TLDR;
setting up kubernetes Allows you to horizontally scale your application by adding multiple small servers instead of bigger more costly ones. It keeps your internal modules, called pods, safe from external interactions unless enabled. It has it's own dns so module connections can be made through service names instead of IP addresses. It makes scaling pods ridiculously simple. It also keeps the specified number of pods running so you have 100% up times, with rolling updates and new instances of pods created when they fail.
In this section, we'll setup a MongoDB database. You need a place to store data for your application! There are many magnificent SQL and NoSQL databases available. They all have their unique set of advantages and disadvantages. MongoDB is a NoSQL Document Oriented Database.
The main reason I'm choosing MongoDB is that it is schemaless. This simply means that you don't have to make changes to the database itself when modifying the format of objects being stored in the database, making it great for prototyping. Don't sell it short though, it has many other great features that we won't get into here. One of the other reasons it is perfect for high scale web applications is sharding which allows the database to horizontally scale growing with your project.
When you build your own application this might not be the right database. You might even need different databases to store different types of data efficiently.
Kubernetes ideas covered in this post:
- Persistent Volume
- Deployment
- Internal Service
We won't cover database credentials in this post. They can be enabled in MongoDB, but they aren't by default. Anything that is run in production should require credentials. That being said, the database will only be exposed to the internal kubernetes environment and shouldn't be accessible outside of it.
Now let's get your database installed...
kubectl
We'll begin using kubectl, installed in the previous post, to deploy things to kubernetes. I'm not going to get into the details of all the commands it can execute, so here are some useful resources:
Start Minikube
minikube start && eval $(minikube docker-env)
Open Minikube Dashboard
minikube dashboard
Persistent Volume
When you deploy a docker container everything is self-contained. That way it's easy to spin up a new one. This is useful if the old one dies or gets corrupted, it is also very convenient for updating. You simply stop and remove the old one and redeploy a new one. The down side is that anything that was saved inside the container is lost. You don't want to lose all the data in your database when you perform an update. To avoid this we create a persistent volume so the database data remains intact during drops, system restarts, and container updates. To accomplish this we'll use a kubernetes Persistent Volume Claim configuration file:
apiVersion: v1
kind: PersistentVolumeClaim
metadata:
  name: mongo-data
spec:
  accessModes:
  - ReadWriteOnce
  resources:
    requests:
      storage: 5Gi
Most of this is boilerplate for a persistent volume but the important parts are
- name: mongo-data - Name to reference this persistent volume
- storage: 5Gi - size of the storage volume
Save that to file "mongo-volume-claim.yml" and then execute the following command:
kubectl apply -f mongo-volume-claim.yml
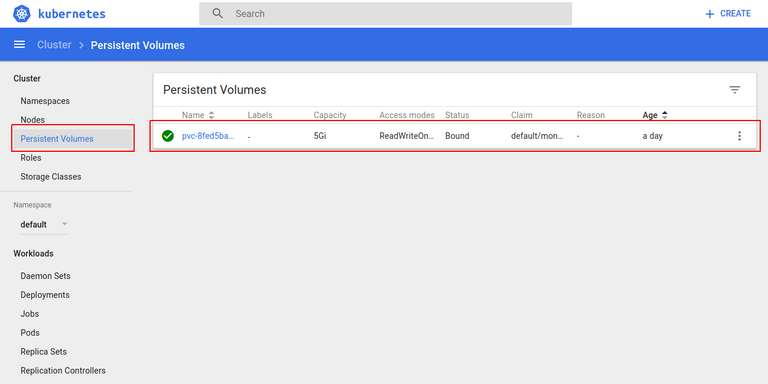
Persistent Volume Claim

Persistent Volume (Bound to Claim)
Deployment
Let's get an actual instance of the database running using a kuberntes Deployment configuration file.
apiVersion: apps/v1beta1
kind: Deployment
metadata:
  name: mongo
spec:
  replicas: 1
  template:
    metadata:
      labels:
         app: mongo
    spec:
      containers:
      - name: mongo
        image: clutteredcode/mongo-alpine:latest
        imagePullPolicy: Always
        ports:
        - containerPort: 27017
        volumeMounts:
        - name: mongodata
          mountPath: /data/db
      volumes:
      - name: mongodata
        persistentVolumeClaim:
          claimName: mongo-data
This one requires a bit more explaining (feel free to post comments if more clarification is required)
- replicas: 1 - allows us to easily scale stateless deployment. This is stateful keep it at 1.
- app: mongo - reference for this deployment
- image: clutteredcode/mongo-alpine:latest The docker image deployed.
- imagePullPolicy: Always - always grab the latest image when (re)deploying.
- containerPort: 27017 - exposes container's port 27017 (port used by MongoDB)
- volumeMounts - links the volume named in 'volumes' to the mountPath inside the docker container to persist database info.
- volumes - links the persistent volume to the specified name for use in the container
Save that to file "mongo-deployment.yml" and then execute the following command:
kubectl apply -f mongo-deployment.yml
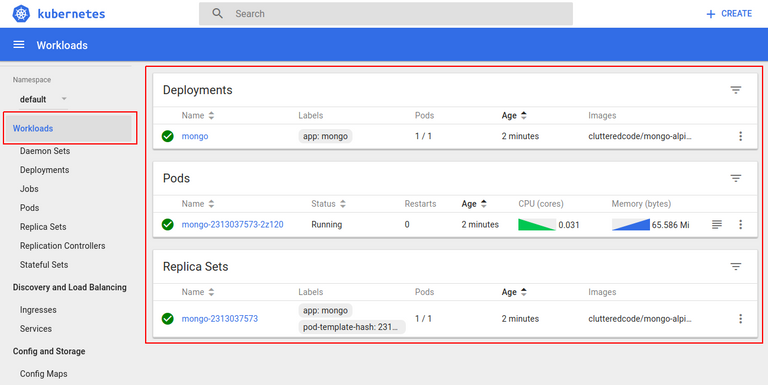
Deployment, Replica Set, and Pod
Test Database deployment
kubectl get pods

NAME                     READY     STATUS    RESTARTS   AGE
mongo-2313037573-2z120   1/1       Running   0          24m
Use pod name listed by the previous command
kubectl exec -it mongo-2313037573-2z120 -- mongo

MongoDB shell version v3.4.4
connecting to: mongodb://127.0.0.1:27017
MongoDB server version: 3.4.4
Welcome to the MongoDB shell.
For interactive help, type "help".
For more comprehensive documentation, see
    http://docs.mongodb.org/
Questions? Try the support group
    http://groups.google.com/group/mongodb-user
...
use admin
db.system.version.find()

{ "_id" : "featureCompatibilityVersion", "version" : "3.4" }
Ctrl+C to exit
Internal Service
We were able to access our database through kubectl and shell commands but that doesn't allow other internal pods to access the database. We don't want anyone to have access to this database externally, keeping it more secure. The last step is to make it accessible internally to other pods in our kubernetes environment but not available outside the environment. kuberntes Service configuration file.
apiVersion: v1
kind: Service
metadata:
  name: mongo
  labels:
    app: mongo
spec:
  selector:
    app: mongo
  ports:
  - port: 27017
    targetPort: 27017
- name:mongo reference name
- selector determines the kubernetes pods this service will route traffic to.
- ports maps the traffic from the port in kubernetes to the targetPort of the pod.
Save that to file "mongo-service.yml" and then execute the following command:
kubectl apply -f mongo-service.yml
Service
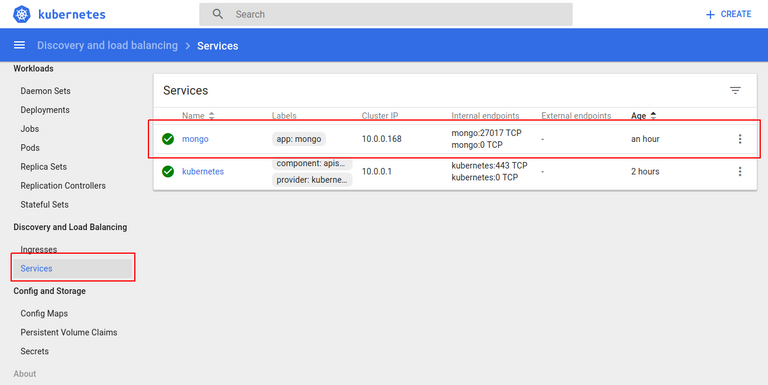
you now have a database up and running that will be reachable from inside the kubernetes environment!
To completely remove the Deployment and service you can issue the following command:
kubectl delete deploy,svc -l app=mongo
The Deployment, Replica Set, Pod, and Service will all be removed.
In this blog, I split the three sections each into their own yaml file. Kubernetes actually allows you to put multiple configurations into a single file for ease of deployment and update. the example of all three of these together can be found in mongo-controller.yml when the controller run, it will setup everything we have discussed.
Save that to file "mongo-controller.yml" and then execute the following command:
kubectl apply -f mongo-controller.yml
Next Post
In the next post, we'll set up a REST interface and start storing and retrieving data to/from the database we just setup. The REST api will be built using Node.js a very good javascript framework for backend implementatios. We'll talk about Replica Sets and horizontal scaling. As well as perform a Rolling update so that our REST api never has an interruption in service to customers, even when updating.
Questions and comments are welcome.
Too much data, IO system overload. Warning warning!!
Thanks for sharing, bookmarked for later reference. :)
I know it is a bit of overload. It can be hard to follow the first time through but really does simplify depolyment when it is in place. This is a dense article, as you said bookmark and reference later as required.
This post has been resteemed by @netuoso courtesy of @sammosk from the Minnow Support Project ( @minnowsupport ). Join us in Discord.
Upvoting this comment will help support @minnowsupport.
This post received a 5% vote by @minnowsupport courtesy of @sammosk from the Minnow Support Project ( @minnowsupport ). Join us in Discord.
Upvoting this comment will help support @minnowsupport.
This post has been resteemed by @nettybot courtesy of @sammosk from the Minnow Support Project ( @minnowsupport ). Join us in Discord.
Upvoting this comment will help support @minnowsupport.
Congratulations @clutteredcode! You have completed some achievement on Steemit and have been rewarded with new badge(s) :
Click on any badge to view your own Board of Honor on SteemitBoard.
For more information about SteemitBoard, click here
If you no longer want to receive notifications, reply to this comment with the word
STOP