![]()
Intro
In an earlier post, I described how to stake QTUM coins using the qtum-qt GUI wallet. That method of staking is appropriate to use on your desktop/laptop, but the main drawback is that you will not be staking your coins as soon you are no longer synchronized with the Qtum blockchain (e.g. due to being disconnected from wifi, etc.)
I had originally intended to follow that post with a tutorial describing how to stake QTUM coins using a cloud hosting provider (e.g. DigitalOcean, etc.) However, after reviewing the associated costs, I came to the conclusion that using a Single-Board Computer (SBC) such as the Raspberry Pi 3 would make better financial sense for most people intending to stake QTUM coins. The total cost for building and running a Raspberry Pi for staking is approximately $56 (US Dollars) + a minimal amount of electricity (and an internet connection). Since you'll likely want to keep your Qtum wallet/node running for a long period of time (e.g. forever), the monthly "rental" costs of a (cloud/VPS) compute instance would easily exceed the cost of a Raspberry Pi.
While this tutorial is intended for use with the Raspberry Pi 3, it should also be helpful for people interested in staking on a regular computer as many of the steps would be similar.
If you ever need help with this tutorial (or related topics), please reach out to the Qtum community on Slack in the qtum-pi channel.
NOTE: This is not an official post from the Qtum (Quantum) team. I'm merely a fan.
Bill of Materials
For this tutorial, you'll need the following hardware:
- A Raspberry Pi 3 Model B with a compatible 2.5A@+5.1V power supply/adapter.
- A MicroSD card with at least 8GB of space. There may be complications with SD cards larger than 32GB. Also, I recommending choosing an SD card which supports wear leveling to help increase the SD card lifespan. Here's a useful guide to help you pick an SD card: http://elinux.org/RPi_SD_cards .
- A MicroSD/SD card reader/writer (many laptops/desktops already have one). You'll likely also need a full-size MicroSD adapter for this.
NOTE: Most of the links above point to https://www.raspberrypi.org, but you can find the equipment at many eCommerce shops. I recommend getting a kit if you don't already have some of the equipment.
The following equipment is optional (and won't be discussed very much in this post):
- A case. I recommend using a clear case.
- An extra MicroSD card (with at least 8GB of space) in case the other one breaks (or gets worn out).
- A heatsink, although I haven't seen the need (the wallet/node is idle most of the time).
- An OLED graphic display + wiring. A cheap $10 (US Dollar) I2C 128x64 OLED display will work just fine.
Lastly, in terms of (free) software, you'll need:
- Raspbian Stretch Lite OS. Version
2017-09-07is the latest at the time of this writing. - Etcher (version v1.1.2 or later) to burn the OS onto the SD card.
Assumptions
I will be making the following assumptions in this tutorial:
- You are comfortable with using the Unix shell (e.g. bash), Unix commands, and tools (e.g. tar). The Raspbian OS is a Debian-based Linux OS.
- You are familiar with ssh and scp, and have an ssh and scp client program on your laptop/desktop (e.g. on Windows you can use Putty for ssh and WinSCP for scp).
- You are comfortable creating and editing files in Unix (e.g. using vim, nano, etc.). The alternative is to edit files on your preferred OS (e.g. Windows, macOS/OSX, etc.) and scp them to the Raspberry Pi.
- You are using a wireless (wifi) network (although a wired network would work too -- just skip the wifi setup instructions).
Step 1 - Burning Raspbian Lite onto your SD Card
If you haven't already, download Raspbian Stretch Lite OS (version 2017-09-07 or later) to your laptop/desktop.
Next, insert your SD card into the SD card writer/burner (you'll likely need to insert the MicroSD card into an SD card adapter first).
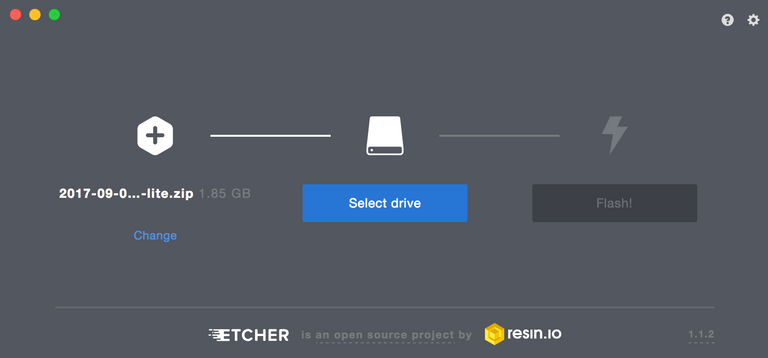
Download, install, and start Etcher on your laptop/desktop. Once Etcher is started, click on 'Select image' and choose/open the Raspbian Stretch Lite OS .zip file that you downloaded earlier. The 'Drive' should already be selected for you (if not, select the drive where you put the SD card). Finally, click on "Flash!".
It will take a few minutes for Etcher to flash and verify.
After burning with Etcher, the SD card is likely unmounted/ejected. If so, remove and re-insert the SD card from/into your laptop/desktop.
IMPORTANT: In the steps below, we'll assume the SD card is mounted at $SDCARD_MOUNT_DIR (e.g. on macOS/OSX this might be /Volumes/boot).
Step 2 - Enabling SSH
We'll be using ssh to access the Raspberry Pi. To enable ssh (and scp) on your Raspberry Pi, you must create a file named ssh on your SD card (in the top-most directory).
You can run the following on macOS/OSX and Linux:
$ touch $SDCARD_MOUNT_DIR/ssh
On Windows (assuming the command-line prompt is >), you can do:
> type nul > %SDCARD_MOUNT_DIR%\ssh
(or, you can use Windows Explorer to create the empty ssh file)
See the section entitled "ENABLE SSH ON A HEADLESS RASPBERRY PI" at https://www.raspberrypi.org/documentation/remote-access/ssh/ for further details.
Step 3 - Configuring Wifi
If you'll be using a wired network connection to your Raspberry Pi, then you can skip this step.
To enable and configure wifi on your Raspberry Pi, you'll need to create a file on your SD card named $SDCARD_MOUNT_DIR/wpa_supplicant.conf with the following content:
country=US
ctrl_interface=DIR=/var/run/wpa_supplicant GROUP=netdev
update_config=1
network={
    ssid="<your_network_ssid>"
    psk="<your_network_passphrase>"
    key_mgmt=WPA-PSK
}
The value given to country above (e.g. US) should be an ISO 3166 alpha-2 country code. For example "CA" for Canada, "CN" for China, "SG" for Singapore, "RU" for the Russian Federation, etc.
Obviously, replace <your_network_ssid> and <your_network_passphrase> with your wireless SSID and the passphrase.
You can find out more abut how to configure this file at: https://wireless.wiki.kernel.org/en/users/documentation/wpa_supplicant .
Step 4 - Starting and Accessing your Raspberry Pi
After creating the ssh and (optionally) the wpa_supplicant.conf file(s) on your SD card, eject the SD card from your laptop/desktop.
Insert the MicroSD into your Raspberry Pi, and plug-in the power supply. Wait about 1 minute for your Raspberry Pi to boot up.
Next, we'll check to see if your SSH and wifi configuration worked properly. Normally, your Raspberry Pi will register itself with your router's DNS as raspberrypi.local. Also, the pi user account will pre-created (NOTE: this user account can also sudo). Let's try to access your Raspberry Pi using ssh (you can use Putty on Windows):
$ ssh pi@raspberrypi.local
You should see something like this:
[email protected]'s password:
Linux raspberrypi 4.9.41-v7+ #1023 SMP Tue Aug 8 16:00:15 BST 2017 armv7l

The programs included with the Debian GNU/Linux system are free software;
the exact distribution terms for each program are described in the
individual files in /usr/share/doc/*/copyright.

Debian GNU/Linux comes with ABSOLUTELY NO WARRANTY, to the extent
permitted by applicable law.

SSH is enabled and the default password for the 'pi' user has not been changed.
This is a security risk - please login as the 'pi' user and type 'passwd' to set a new password.

pi@raspberrypi:~ $
The default password for the pi user is raspberry (we'll change this later).
NOTE: You may get something like this first:
Warning: the ECDSA host key for 'raspberrypi.local' differs from the key for the IP address 'xxx'
Offending key for IP in /Users/cryptominder/.ssh/known_hosts:xxx
Matching host key in /Users/cryptominder/.ssh/known_hosts:xxx
Are you sure you want to continue connecting (yes/no)?
If so, feel free to continue by typing yes.
If you're not able to access your Raspberry Pi using raspberrypi.local, then check your router to see which IP address it may have received. Alternatively, you can use a wired/ethernet connection.
As mentioned earlier, if you run into problems, please ask questions in the comment section below or reach out to the Qtum community on Slack in the qtum-pi channel.
Step 5 - A Little Bit of Admin Work...
You may have noticed the following warning message when you logged-in:
SSH is enabled and the default password for the 'pi' user has not been changed.
This is a security risk - please login as the 'pi' user and type 'passwd' to set a new password.
It's a good idea to change the default password for the pi user, so type:
$ passwd
And follow the prompts to change the password.
We'll also want to make sure we have the latest packages (e.g. security fixes, etc.), so run:
$ sudo apt-get update
$ sudo apt-get upgrade -y
If you are using wifi, you also need disable wifi power management. Type the following command:
$ iwconfig
You should see Power Management:on shown for the wlan0 interface. We need to turn that off.
To disable power management, create a file at /etc/network/interfaces.d/wlan0 with the following content:
auto wlan0
allow-hotplug wlan0
iface wlan0 inet dhcp
wpa-conf /etc/wpa_supplicant/wpa_supplicant.conf
wireless-power off
iface default inet dhcp
Lastly, we'd normally create a separate user to run the qtumd Qtum wallet/node, but we'll leave this as an exercise for the reader...
When the steps above are done, perform a reboot to make sure the system is still accessible after a restart:
$ sudo reboot
Step 6 - Download and install the latest Qtum wallet
Download the Qtum wallet binary named qtum-0.14.2-arm-linux-gnueabihf.tar.gz at https://github.com/qtumproject/qtum/releases/tag/testnet-skynet-v1.2 onto your laptop/desktop. Skynet v1.2 (i.e. qtum-0.14.2) is the latest binary at the time of this writing, but the mainnet/Ignition binary will be released soon. You want to download the Qtum wallet binary suitable for Linux on 32-bit ARM platforms. Once a new binary is made available, make sure to change the filename of the .tar.gz file in the commands below.
After waiting (about 60 seconds) for the Raspberry Pi to come up after rebooting, use scp (or WinSCP on Windows) to copy the .tar.gz file to the Raspberry Pi, e.g.:
$ scp qtum-0.14.2-arm-linux-gnueabihf.tar.gz pi@raspberrypi.local:~
The command above will place qtum-0.14.2-arm-linux-gnueabihf.tar.gz in the pi user's $HOME directory.
NOTE: Remember to use the new password for the pi user (assuming you changed it in the section above).
Next, ssh back to the Raspberry Pi (e.g. $ ssh [email protected]).
We'll now extract the .tar.gz file:
$ mkdir ~/qtum-wallet
$ tar --strip 1 -C ~/qtum-wallet -xf ~/qtum-0.14.2-arm-linux-gnueabihf.tar.gz
You can verify that everything worked by running:
$ ~/qtum-wallet/bin/qtumd -version
The command above should simply display the wallet version (and other related information).
Step 7 - Setting up the Qtum Wallet Service
We'll now set up a systemd service that will automatically restart your Qtum wallet/node if ever your Raspberry Pi restarts.
Open an editor in Unix to create and edit the following file: /etc/systemd/system/qtumd.service. Insert the following content into that file:
[Unit]
Description=Qtum daemon service
After=network.target

[Service]
Type=forking
User=pi
WorkingDirectory=/home/pi/qtum-wallet
ExecStart=/home/pi/qtum-wallet/bin/qtumd -daemon=1 -par=2 -onlynet=ipv4 -noonion -listenonion=0 -maxconnections=24 -rpcbind=127.0.0.1 -rpcallowip=127.0.0.1
PIDFile=/home/pi/.qtum/qtumd.pid
Restart=always
RestartSec=1
KillSignal=SIGQUIT
KillMode=mixed

[Install]
WantedBy=multi-user.target
NOTE: The above assumes that the binaries were extracted in the pi user's home directory in the qtum-wallet directory. If you created a separate user, modify the paths above as well as the value for User.
You can also explore using other qtumd command-line parameters by running:
$ ~/qtum-wallet/bin/qtumd -help
The rpcbind and rpcallowip command-line parameters (as used above in ExecStart) ensure that the RPC service (which is a part of the Qtum wallet/node) can only be accessed from the Raspberry Pi (i.e. you won't be able to access it directly from your laptop/desktop).
To ensure the service is run when the Raspberry Pi restarts, run the following:
$ sudo systemctl daemon-reload
$ sudo systemctl enable qtumd.service
Step 8 - Starting, Stopping, and Updating the Qtum Wallet Service
To start the Qtum Wallet Service, simply run:
$ sudo systemctl start qtumd.service
To stop, run:
$ sudo systemctl stop qtumd.service
If you make modifications to /etc/systemd/system/qtumd.service, always make sure that you run:
$ sudo systemctl daemon-reload
before starting or stopping the service.
You can once again try restarting the Raspberry Pi (e.g. $ sudo reboot) to make sure that the Qtum wallet/node is still running after the restart (again, wait about 60 seconds after rebooting before logging back in):
$ pgrep -a qtumd
This should output something like this:
506 /home/pi/qtum-wallet/bin/qtumd -daemon=1 -par=2 -onlynet=ipv4 -noonion -listenonion=0 -maxconnections=24 -rpcbind=127.0.0.1 -rpcallowip=127.0.0.1
The 506 number is the process id -- you'll very likely have a different one. If there isn't any output, it means that your wallet/node isn't running.
To troubleshoot issues, the debug log file at ~/.qtum/debug.log is the best place to start.
Step 9 - Using the Qtum Command-Line Tool
Another way to check that the Qtum wallet/node is running properly is to use the qtum-cli program.
To check the status of the wallet/node, run:
$ ~/qtum-wallet/bin/qtum-cli getinfo
There are plenty of other commands that you can explore by running:
$ ~/qtum-wallet/bin/qtum-cli help
Useful commands include: getinfo, getwalletinfo, and getstakinginfo. That said, there are many other commands that you may eventually use (and we'll use some of them soon).
NOTE: The qtum-cli tool uses a file named .cookie in the default Qtum wallet/node data directory (i.e. ~/.qtum/) to authenticate itself for access to the RPC interface of the running qtumd wallet/node. There are other (more secure) methods of access to the qtumd RPC interface, but that topic is beyond the scope of this post.
Step 10 - Encrypting and Unlocking Your Wallet
In a previous post, I explained how to use the qtum-qt Qtum GUI wallet/node program to encrypt, back-up, and restore your wallet. I strongly recommend that you read that post to familiarize yourself with the process, as well as the risks. There is also information in that post that you should be aware of relating to encrypting your wallet.
Before encrypting the wallet, we'll run the following command to show what an un-encrypted wallet looks like:
$ ~/qtum-wallet/bin/qtum-cli getwalletinfo
The command above should display something similar to:
{
  "walletversion": 130000,
  "balance": 0.00000000,
  "stake": 0.00000000,
  "unconfirmed_balance": 0.00000000,
  "immature_balance": 0.00000000,
  "txcount": 0,
  "keypoololdest": 1505002808,
  "keypoolsize": 100,
  "paytxfee": 0.00000000,
  "hdmasterkeyid": "5c850a8dff9c0e1a12862af241d19aa4c3f60201"
}
The absence of an unlocked_until field tells us that the wallet is not encrypted.
To encrypt your wallet, first choose a secure passphrase. For the example below, let's say that I choose red dog blue cat as my passphrase.
Now, on your Raspberry Pi, encrypt your wallet by running:
$ ~/qtum-wallet/bin/qtum-cli -stdin encryptwallet
The -stdin parameter is used to (silently) prompt you for input. You should now enter your chosen secure passphrase, and press <Enter/Return>, then press CTRL-D (i.e. press the 'Control'/'Ctrl' button on your keyboard followed by the 'd' button without releasing the 'Control'/'Ctrl' button). Like this:
red dog blue cat
<CTRL-D>
You won't initially see anything displayed when you press CTRL-D as it will take a few moments to complete the encryption process. Once complete, the following message will be displayed:
wallet encrypted; Qtum server stopping, restart to run with encrypted wallet. The keypool has been flushed and a new HD seed was generated (if you are using HD). You need to make a new backup.
At this point, you'll want to backup your wallet. The newly encrypted wallet.dat file will be found at ~/.qtum/wallet.dat. You can use scp to copy the wallet file off of your Raspberry Pi. Run the following command on your laptop/desktop to copy it:
$ scp pi@raspberrypi.local:~/.qtum/wallet.dat ./rpi_wallet-backup1.dat
VERY IMPORTANT: Make sure that you securely back-up your encrypted wallet (e.g. rpi_wallet-backup1.dat above) in at least 2 locations, and that you also remember the passphrase to unlock it.
The Qtum wallet/node would have stopped as part of the encryption process. Restart it by running the following commands:
$ sudo systemctl stop qtumd.service
$ rm -f ~/.qtum/.lock ~/.qtum/qtumd.pid ~/.qtum/.cookie
$ sudo systemctl start qtumd.service
NOTE: We stop it first just to make sure it is really stopped, and then removed 3 temporary files that may not have been cleaned up.
Now that your wallet is encrypted, run the following command:
$ ~/qtum-wallet/bin/qtum-cli getwalletinfo
The command above should now display something similar to:
{
  "walletversion": 130000,
  "balance": 16182.49960000,
  "stake": 0.00000000,
  "unconfirmed_balance": 0.00000000,
  "immature_balance": 0.00000000,
  "txcount": 2,
  "keypoololdest": 1504758151,
  "keypoolsize": 101,
  "unlocked_until": 0,
  "paytxfee": 0.00000000,
  "hdmasterkeyid": "b69f65040dc722e473b9bce1dbd0cb34e424a577"
}
Notice the presence of the unlocked_until field with a value of 0. This tells us that the wallet is encrypted but it is locked. You cannot stake coins with a locked wallet.
To unlock your wallet for staking, run the following command:
$ ~/qtum-wallet/bin/qtum-cli -stdin walletpassphrase
This once again (silently) prompts you for input. Type your secure passphrase, and press <Enter/Return>, then type the number of seconds that you'd like to keep your wallet unlocked, then <Enter/Return>, then 'true' (without the quotes), then <Enter/Return>, and finally CTRL-D. It will look like this:
red dog blue cat
99999999
true
<CTRL-D>
NOTE: You can enter 'false' instead of 'true' above if you want to unlock your wallet for other purposes than staking (e.g. sending your coins).
After unlocking your wallet, run the following command:
$ ~/qtum-wallet/bin/qtum-cli getwalletinfo
This should now display something similar to:
{
  "walletversion": 130000,
  "balance": 16182.49960000,
  "stake": 0.00000000,
  "unconfirmed_balance": 0.00000000,
  "immature_balance": 0.00000000,
  "txcount": 2,
  "keypoololdest": 1504758151,
  "keypoolsize": 101,
  "unlocked_until": 1514916409,
  "paytxfee": 0.00000000,
  "hdmasterkeyid": "b69f65040dc722e473b9bce1dbd0cb34e424a577"
}
The value unlocked_until field now has a non-zero value which represents the time (in Unix Epoch seconds) at which the wallet will once again be locked.
If you want to re-lock your wallet, simply run:
$ ~/qtum-wallet/bin/qtum-cli walletlock
However, remember that you cannot stake coins with a locked wallet. This also means that if your Raspberry Pi restarts, you'll need to unlock your wallet (since this isn't done automatically).
Step 11 - Sending and receiving coins from your wallet
To receive coins into your wallet, you don't need to unlock your wallet. To obtain a Qtum address owned by your wallet (that you can receive coins to), you can do the following:
$ ~/qtum-wallet/bin/qtum-cli getaccountaddress ""
NOTE: Instead of the empty string (""), you can specify an account name (e.g. "coins_from_heaven").
To see which accounts already exist, you can run:
$ ~/qtum-wallet/bin/qtum-cli listaccounts
You'll at least have the "" (default) account listed.
To send coins you must first unlock your wallet (and not 'just for staking'). Follow the steps described in the previous section to unlock your wallet, but type false (instead of true) on the 3rd line of the walletpassphrase command.
Step 12 - Staking
Once you have coins in your wallet that have not moved for at least 500 blocks, they will be eligible for staking.
You can see if your wallet is staking by running:
$ ~/qtum-wallet/bin/qtum-cli getstakinginfo
The command above should display something similar to:
{
  "enabled": true,
  "staking": true,
  "errors": "",
  "currentblocksize": 0,
  "currentblocktx": 0,
  "pooledtx": 0,
  "difficulty": 26753652.34834659,
  "search-interval": 0,
  "weight": 1618249960000,
  "netstakeweight": 7923365887385318,
  "expectedtime": 0
}
If the staking field is false, it means that you are not staking (e.g. your coins have not yet matured, etc).
Advanced / Future Topics
This post is already quite long, but there are many other topics which could be covered. I intend to create a post to describe how to use several very useful qtumd parameters such as -prune and -uacomment.
Also, in the Bill of Materials section, I mentioned that an optional piece of hardware is an OLED display (e.g. I2C 128x64) + wiring. The OLED display is helpful to view information such as the IP address of your Raspberry Pi (in case raspberrypi.local isn't working), whether the wallet is currently running, whether it is locked/unlocked, whether it is staking, displaying system health metrics (e.g. cpu, memory, disk), etc. The OLED allows you to display pretty much anything, such as:
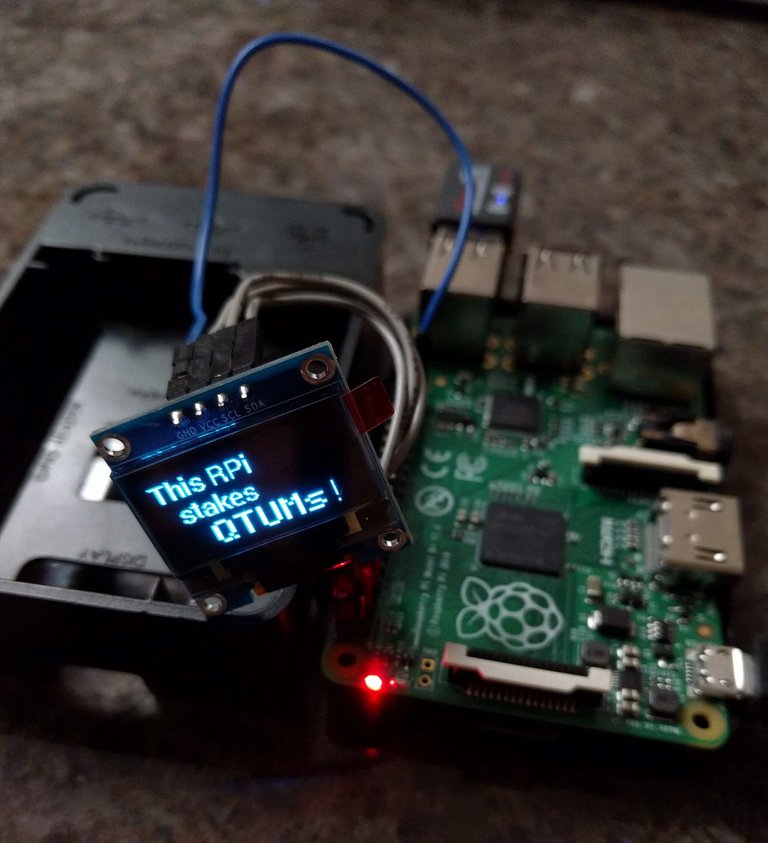
It is relatively simple to set-up the OLED display and I also intend to write how to do this this later. (NOTE: The image above is an older Raspberry Pi).
Lastly, I also want to make all of the steps above as turn-key as possible by automating the steps using Ansible. Stay tuned for more about this!
Where To Go For Help
As previously mentioned, you can obtain help from the Qtum community on Slack in the qtum-pi channel. See you there!
The Qtum mainnet binary (Ignition v1.0.1) has now been released.
I'm running a wallet/node on the RPi 3 using the
qtum-0.14.3-arm-linux-gnueabihf.tar.gzbinary found at https://github.com/qtumproject/qtum/releases/tag/mainnet-ignition-v1.0.1 .The instructions in the post above are exactly the same for the mainnet binary release, except for the 'tar' command (i.e. make sure to specify
qtum-0.14.3-arm-linux-gnueabihf.tar.gzinstead).Also, if you ran a previous version of the Qtum wallet/node (e.g. Skynet), then make sure to delete (or rename) the ~/.qtum directory before starting the mainnet (Ignition) wallet/node.
NOTE: The post didn't specify it, but you need to edit
/etc/systemd/system/qtumd.serviceusing sudo (e.g.$ sudo vi /etc/systemd/system/qtumd.service).Thanks for the guide. I got it working in my raspberry pi 3. All that's left to do now is wait for the swap to happen before we can start staking on the mainnet.
meep
Can I suggest adding an alias to the .bashrc? Instead of typing :
~/qtum-wallet/bin/qtum-cli, we can add to ~/.bashrc:alias qtum-cli='~/qtum-wallet/bin/qtum-cli'That way, we can just execute qtum-cli from the wallet directory by typing:
qtum-cliI cant connect to my wallet using qtum-cli :
$ ~/qtum-wallet/bin/qtum-cli getinfo
error: couldn't connect to server: unknown (code -1)
(make sure server is running and you are connecting to the correct RPC port)
I know nothing about .cookie so I don't know what to do. Any help?
The .cookie file gets created in the datadir (by default under
~/.qtum) whenqtumdstarts up and RPC is enabled. You probably don't haveqtumdrunning -- you can use$ pgrep -a qtumdto check (if that outputs nothing, then it isn't running).Yes, or add
~/qtum-wallet/bininto your$PATH. I should indeed have suggested it.I am struggling with step 5, i do not have the wlan0 sub folder, nor am i able to create it. I created the file on my pi desktop but cannot put this anywhere in the etc folder. I do not have permissions to do this. Is there another way of disabling the power management?
Hey. I had the same problem. Try this: http://www.thelowercasew.com/disabling-wifi-power-management-permanently-for-raspberry-pi-3-with-raspbian-jessie (it worked for me! ) good luck!
do you perhaps need to put 'sudo' in front of the command?
A few quick updates:
Please make sure to use the latest Quantum wallet/node. As of Oct. 11th, 2017 this is https://github.com/qtumproject/qtum/releases/tag/mainnet-ignition-v1.0.2 . You'll want to download the
qtum-0.14.3-arm-linux-gnueabihf.tar.gzfile.Some people have mentioned having difficulties with Etcher on Windows (e.g. https://github.com/resin-io-modules/drivelist/issues/208). Windows users may want to look at using https://www.raspberrypi.org/documentation/installation/installing-images/windows.md instead.
If you're using Windows, the documentation at https://www.raspberrypi.org/documentation/remote-access/ssh/windows.md can be helpful for using PuTTY. If your wifi is set up correctly on your Raspberry Pi, the
Host Name(to enter in PuTTY) should beraspberrypi.local.I followed this guide to the T and it's been 3 days since I've sent qtum to my wallet and it is still showing a 0.00000000 balance. Am I missing something?
I did not know you could stake Qtum I'm just starting to learn and like what I hear
Nice guide! I followed it to setup staking on a Linux AWS instance, free for the first year and then 36$/year, even cheaper than a raspberry! Thanks
hi, i want to try the same thing with a Linus AWS instance. Is the setup identical to this one? thank you
Thanks for the great guide! It seems like if you're dedicating a Raspberry Pi to nothing but QTUM staking it would make sense to not encrypt it. If I understand correctly, encrypting it makes it less likely to remain staking in the event of a reboot (e.g. power outage), and also introduces the need for re-entering an unlock password whenever the unlocked_until expires. Is it possible to encrypt it so and unlock it with a command line option that mentions it should remain unlocked for the next 365 days even in the event of reboots?
I do recommend encrypting your wallet, but I have another guide to cover that.
I'd be careful leaving any trace of your passphrase on the Raspberry Pi. Instead, it's better to have a watchdog process to inform you if the
qtumdprocess goes down or if theqtumdPID changes (so that you can manually bring it up again, then securely unlock it). This topic is a bit more advanced though... but you have the right idea.The adress given by the getaccountaddress is invalid on Cryptopia. how can I get a valide adresse ? Thanks
Hi, the address is invalid because the token swap from ERC-20 to Qtum has not happened yet.
The swap from ERC-20 tokens to Qtum’s functional network tokens will take place on October 4th, 2017.
The participating exchanges will be ChBTC, Bittrex, AllCoin, BTer, and Coinone.
You will need to send you tokens to one of the exchanges above to be converted to Qtum on October 4th then you will be able to send them to your wallet address.
Hi, I followed the tutorial to install it in a Raspberry Pi 1. But when I try to run the binary I get a segmentation fault error. And now I'm stuck. Does it not run in a Raspberry Pi 1? I am sure I downloaded the binary for ARM...
Thanks,
Nuno
I don't recommend using the Raspberry Pi 1 for this. If you do try, make sure that you're running the latest OS (i.e. Stretch) -- and you may need to enable swapping (to give the RPi more memory). Enabling swapping isn't a super-great idea on an SDCard though...
Hi. I have a question. In case of qtum-qt, you recommend backup wallet before encryption. but in this case, you backup wallet file after encryption. Is there any difference??
Ah, only because the wallet was known to be empty/unused in this case.
Does that mean it's actually better to backup the wallet before encryption in this case, too? If so: Why is that?
Hello cryptominder, thank you for the great tutorial!
I'm planning to use my P3 as a Kodi Media Center and QTUM staking device.
What need to be done to run the QTUM wallet on OpenELEC for PI instead of RASPBIAN STRETCH LITE? Is there any difference?
Thank you in advance!
Awesome guide, though would appreciate if you could still put up an option to stake on Digital Ocean or similar (I have a cloud server running for other reasons, so it would be no extra cost to use it for staking, too).
I'm having an issue with transferring Qtum into the Wallet, I followed your steps .
Got everything running - On Step 10 - Encrypting and Unlocking Your Wallet. $ ~/qtum-wallet/bin/qtum-cli -stdin encryptwallet
I can see "unlocked_until": 0, and I set that to 99999999
I created a new account with $ ~/qtum-wallet/bin/qtum-cli getaccountaddress "accountname"
Account info show default account "" and "accountname"
Does "getaccountaddress" create a new account and key? I assume It does because it shows up on listaccounts.
I transferred 1 Qtum from Binance to "accountname" public key. Binance confirm transfer completed.
But when I check with $ ~/qtum-wallet/bin/qtum-cli getwalletinfo
My balance is 0.0000000
What might I have missed or done wrong?
Do I need to select which account to get info on?
If so how I select the account I want to display the info?
Thanks in advance.
I have exactly the same issue now. Did you manage to make it work? :)
In my last installation I had error with the passphrase step. So I format the SD card and re-burn Raspbian and did the above steps again. It worked some how. GL
i'm in the same, the worst is i'm almost sure ( 99.5% ) i saw it once : 0.6 QTUM and then, i tried again to watch it after my dinner, like 1 hour afer and they disapear. I'm exactly in the same case, with another "accountname" plus de default one.
Thanks if you can return about this
Many thanks for this Guide. It was awesome. I had some difficulties in setting it up with some things which I googled them. Really nice and clean guide, at least for me that I have no knowledge of development at all.
Awesome post, to bad i just now find it.
( If you want you can join and post these kind of things in the SteemPi Discord server: https://discord.gg/RMXbqmG
i shared it there now for you, if you make a follow up post on your Pi project, please also share it there with us)
Upvoted and following you.
Excellent post, you have no idea how much time you saved me!!
How do you send coins out of your raspberry Pi?
Great post, I am thinking move some staking wallet from my window laptop to pi3, because I worry my laptop maybe break down after 24/7 no stop working.
Great post, I am thinking move some staking wallet from my window laptop to pi3, because I worry my laptop maybe break down after 24/7 no stop working.
Thanks for this detailed guide!
Hi,
after wrting correctly :
~/qtum-wallet/bin/qtum-cli -stdin MYPASSPHRASEHERE
99999
false
and then CTRL+D
i got the following error :
Error : Method not found
code error : -32116
Thanks in advance
same for me
does "txcount:1" means that there were a transfer ?
Thanks for the guide. I have a problem here. I've sent some qrc20 token to my qtum wallet in pi, and now I can't see it. I can see the token in qtum explorer but not in pi. Am I missing something?
very helpful, thanks
or if your a simpleton like me just deposit your Qtum at Btcpop.co
Great post! Very excited about next posts about OLED display and Ansible automation!!!
Everybody new to staking also check QTUM's official wiki post on how to setup the wallet for staking --> https://github.com/qtumproject/qtum/wiki/Installing-Qtum-on-Raspberry-Pi it's a bit more up to date but not as detailed as this post here.
Thank you for sharing. Great!!
Should port forwarding be activated?
I know it worked without, but any advantages/disadvantages?
Question, I have setup my raspberry pi. My pi is at home, can I use another pc (at work) to log into my qtum core wallet without signing off the wallet that's running on the pi???
why tell me "maxconnections=24?"
i recommend "ExecStart=/home/pi/qtum-wallet/bin/qtumd -daemon"
then in-outbound max 132 node....
How long does reindex take on a Pi 3? I'm going into 24hrs here (chain height ~192k)
Since qtumd 0.18, the PID is qtum.pid, no longer qtumd.pid. Your guide is widely referenced (thank you and congrats), so you might want to update the instructions.