[EN] In this post I would like to share some of my observations on how to improve birds photography basic skills. "Practice makes the master" but maybe some theory I deducted from my practice may let you skip some of yours. ;) So consider those points during your photo sessions:
- Pick proper time of a day. The morning is the best. Most of the birds wonder around that time looking for some food for breakfast. Also sun is lower and lights up objects from the side, not from the top which may be beneficial for us. Best time of the year is early spring when the trees are not full of leaves yet but the flowers and birds are there already. That gives you better opportunities to spot them... but in fact any time of the year is good for some photo sessions and will give you different results.
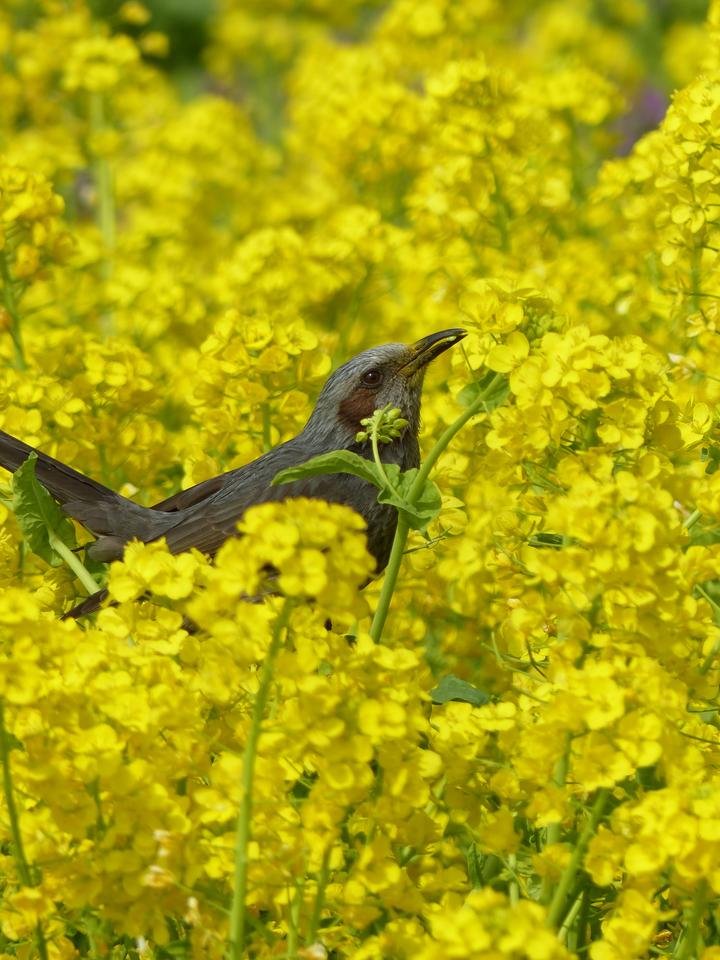
- You don't need super-fancy camera. Just pick something with optical zoom and optical image stabilization. The picture above was taken with old Panasonic Lumix FZ-200 compact (bridge) camera that you can buy second-hand even for 130$.
- During taking pictures stand still and silent. Don't scare the bird. Even when it's not looking at you it hears you well. If you stand next to (or even behind) the tree or a bush you may be able to get much closer to the bird and take better pictures. Standing in open field lowers your chances to remain unnoticed. If the bird is located on the ground you may try to lower yourself a little too.
- The smaller the bird the more hasty it is. Use faster shooter speeds for smaller ones and prepare settings upfront as you won't have much time once you get closer.
- For birds on the ground or among the grass or flowers (like the one above) you may try to change the aperture to obtain blurry background effect and focus on bird only blurring uninteresting parts (like the ground itself). This is obtainable in "A" or "M" camera modes. Try multiple shots with different settings to see how much blur you'll get in your camera in various situations. The picture above had a setting of F/4.
- Change the focusing area to small point. Focus on bird's eye. If the eye is sharp the whole bird will appear to be sharp for a later viewer.
- Pick proper shots and crop pictures later on computer, not right away in your camera. You may miss some detail and delete the wrong picture. For example bird may hold something in it's beak or be sharper than it appeared on the camera LCD.
The most important: have fun experiencing nature. :)
The above picture is also my entry for this week's Qurators Photo Friday competition.
[PL] W tym wpisie chciałbym podzielić się kilkoma swoimi obserwacjami na temat udanej fotografii ptaków. "Praktyka czyni mistrzem", acz może troszkę mojej teorii, wydedukowanej na podstawie mojej praktyki, pomoże Ci pominąć troszeczkę Twojej. ;) Więc zerknij na poniższe punkty odnośnie wycieczek na sesje fotograficzne ukierunkowane na ptaki:
- Wybierz właściwą porę dnia. Poranki są najlepsze. Większość ptaków o tej porze porusza się wszędzie dookoła szukając czegoś na śniadanie. Ponadto słońce jest wtedy niżej nad horyzontem i oświetla obiekty bardziej z boku, niż z góry, co może być dla nas korzystne. Najlepszą porą roku jest wczesna wiosna, kiedy drzewa nie są jeszcze pełne liści, za to kwiaty i ptaki już się pojawiają. Są wtedy lepiej wyeksponowane... choć właściwie każda pora roku daje spore możliwości fotografii ptaków i da odmienne rezultaty.
- Nie potrzebujesz super-czadowego aparatu fotograficznego aby zaczynać. Po prostu wybierz coś ze zbliżeniem optycznym i optyczną stabilizacją obrazu. Powyższe zdjęcie zostało wykonane starym kompaktem (super-zoom-em) Panasonic Lumix FZ-200, który można kupić używany już od 500zł.
- Podczas robienia zdjęć nie ruszaj się i bądź cichy. Nie strasz ptaków. Nawet jeśli nie patrzą na ciebie słyszą cię dobrze. Stojąc blisko (lub nawet za) pniem drzewa lub krzakami zmniejszasz swoją szansę na bycie rozpoznanym jako zagrożenie i będziesz mógł znaleźć się bliżej ptaków i zrobić im lepsze zdjęcia. Sterczenie samotnie w otwartym polu zmniejsza twoje szanse. Dodatkowo jeśli ptaki znajdują się na ziemi możesz spróbować także obniżyć się lekko (np. kucając).
- Im mniejszy ptak tym bardziej ruchliwy. Używaj szybszych migawek (mniejszy ułamek sekundy), szczególnie na małe ptaki. Próbuj ustawiać ustawienia aparatu przed zbliżeniem do małych ptaków, bo potem możesz nie mieć na to czasu (za szybko odlecą).
- Dla ptaków na ziemi lub w trawie/kwiatach (jak ten powyżej), możesz rozważyć manipulację ustawieniem przysłony aby uzyskać efekt rozmazanego tła i rozmazać nieinteresujące partie zdjęcia (jak ziemia, błoto, itp.). Jest to do uzyskania w trybach "A" i "M" aparatu. Sprawdź kilka przysłon (parametr "f") aby zobaczyć jaką ilość rozmazania uzyskasz przy jakich ustawieniach w różnych sytuacjach swoim aparatem. Powyższe zdjęcie zostało wykonane z ustawieniem F/4.
- Zmień ustawienie obszaru focusowania na mały punkt (zamiast dużego obszaru). Reguluj ostrość do oka ptaka. Jeśli oko ptaka na zdjęciu będzie ostre, cały ptak będzie się taki wydawał.
- Wybieraj zdjęcia do zachowania i przycinaj je potem na komputerze, nie od razu na aparacie. Możesz pominąć jakiś detal i skasować niewłaściwe zdjęcie. Np. ptak może trzymać coś w dziobie lub być ostrzejszy, niż się wydaje na małym ekraniku aparatu.
I najważniejsze: ciesz się z obserwacji natury. :)
Powyższe zdjęcie jest jednocześnie moim zgłoszeniem do tego tygodniowego konkursu Qurators Photo Friday.