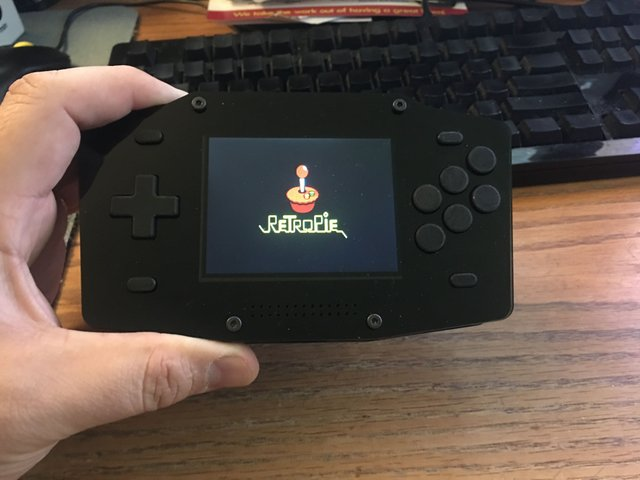
One of the most interesting projects I have done with a Raspberry Pi was to create a portable console for our trip to Florida. This was a couple years ago but came out fantastic.
The build consists of a Raspberry Pi, 32GB SD card, 16 switches, Amplifier, Car Backup Screen, Lithium Battery, and a power charging board to assist in charging the battery.

I have over 8,000 games on this device ranging from Gameboy, Gameboy Color, Atari 2600, Commodore 64, Amiga, Super Nintendo, Nintendo 64, Genesis, and about 45 other consoles.
While I would do this project again, there are much easier designs for a portable gaming console. What I'm going to show you is how to create one for your TV.
I'm not going to get super in depth, just give you an overview so you know what to expect if you want to build one yourself.
If you want to build one, you will need to stock up on some parts. While you could build everything separately, Canakit just released an update to their bundle which includes the only SD card I would recommend for a Raspberry Pi. This makes the kit very practical and better than sourcing the parts yourself.
The bundle I recommend includes the latest Raspberry Pi 3B+ and everything you will need outside of controllers. You can use an existing Raspberry Pi 2/3 but the best performance will come from the 3B+. The 3B will run most everything well and you will have a few problems with a Raspberry 2 but should be able to run most games.
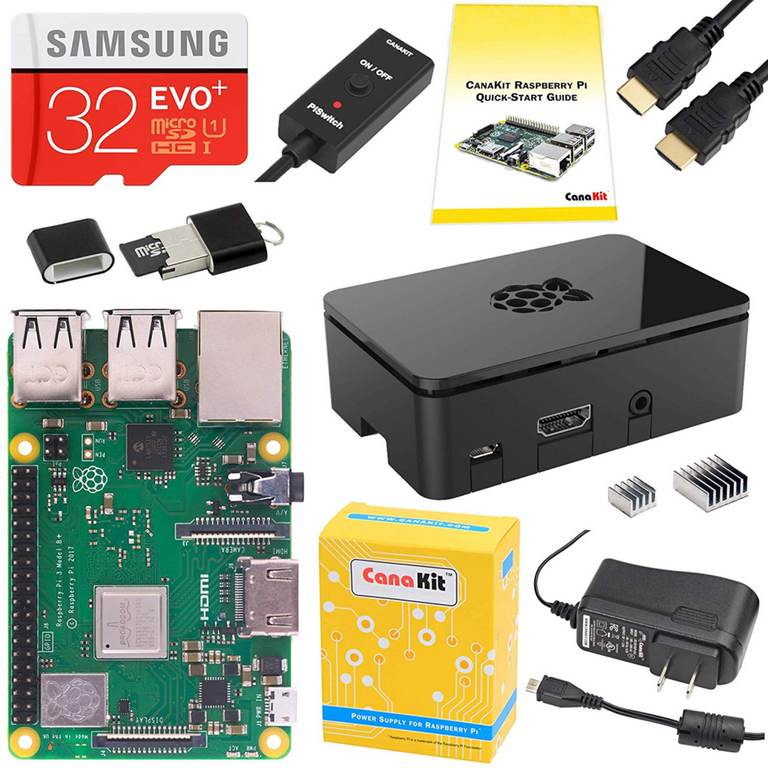
One of the other import components is a quality 2.5A power supply that is included in the kit. Many power supplies are not powerful enough and can cause some problems when attaching devices to the Raspberry Pi.
The kit will run you around $80 USD.
You will need one or more controllers, I currently use two PS3 controllers so my son and I can play.
Download RetroPie
RetroPie is the project that enables you to automatically manage 50+ emulators without any effort on your part and supports almost all consoles prior to 2000.
You can download it here.
Once you download it, you need to save it to an SD card on your computer.
Setup Controllers

Initially, you will set up the controllers wired but you can enable Bluetooth and setup wireless. Some controllers like the Xbox 360 will require a receiver. The best controller right now is the Nintendo Wii U Pro if you can find them on clearance somewhere under $20. You can find them more frequently at around $40. They just work and you can use 4 of them without any dongles or drivers.
Wifi
Once you have gone through the setup for the controllers, you are going to want to configure the wifi. This is pretty easy and the software will walk you through doing it.
Install ROMS!
At this point, you can install roms on to a USB stick (FAT32/NTFS) under a folder called retropie.
You can also use SFTP to upload Roms once you have everything set up and that's the route I would recommend.
Enjoy!
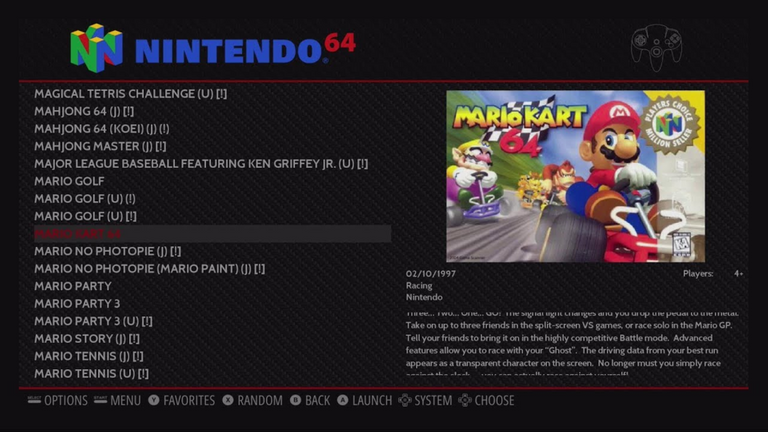
The menu is really nice and how it seamlessly allows you to select any console and just start playing. It will automatically select the correct emulator and optimal settings.
This post has been voted on by the SteemSTEM curation team and voting trail in collaboration with @curie.
If you appreciate the work we are doing then consider voting both projects for witness by selecting stem.witness and curie!
For additional information please join us on the SteemSTEM discord and to get to know the rest of the community!
These builds are killer. I've made a few for family members an they completely lost their shit when they saw how seamless it all worked. Some use PS3 controllers, some used PS4 controllers, some use XBox controllers, some used weird Chinese USB knock off stuff, it all worked great. And some even over bluetooth. What blew my mind was how well the Pi 3 B+ runs PS1 games. I have so many old PS1 RPGs that I don't wanna take out of the cases anymore, so it was a complete god-send.
I didn't get all fancy with the small LCD screen, but yeah, I love this distro.
This post has been upvoted by @opgaming. We like what you're posting, and we want to reward our members who produce quality content. Keep up the good work!If this sounds like the sort of group you want to be a part of, click the image below! We're too OP to be put down!
http://www.lakka.tv/
There is the interesting project contains prebuilt images for different versions of Raspberri Pi, based on LibreELEC and RetroArch.
This looks like a cool project! It must be a great way to work on something together with the kids to get them interested in technology. I am thinking about doing something this for my daughter’s classroom as they have a put together day every year!
Posted using Partiko iOS
I want this 😁
Posted using Partiko Android
Hi @themarkymark!
Your post was upvoted by @steem-ua, new Steem dApp, using UserAuthority for algorithmic post curation!
Your UA account score is currently 8.056 which ranks you at #27 across all Steem accounts.
Your rank has not changed in the last three days.
In our last Algorithmic Curation Round, consisting of 256 contributions, your post is ranked at #10.
Evaluation of your UA score:
Feel free to join our @steem-ua Discord server
How much did the portable design cost you overall? And any chance we might get a guide on how to build it(or even buy it off of you)? 100% something that I would use if I had it. Get Pokemon Fire Red on that and I'll quit my switch in a heartbeat.
If I remember correctly, $125-150.
I would recommend a simpler design, which I would do myself if I did it again.
For example the PiGrrl 2
https://learn.adafruit.com/pigrrl-2/overview
Don't know how to soder or anything, but I might give this a go sometime this year. Maybe divulge into some hardware stuff.
Posted using Partiko Android
There are lots of good tutorials on it.
A good one:
https://www.makerspaces.com/how-to-solder/
I've been thinking of building a raspberry pi MP3 player
I used to use a Raspberry Pi for my home theater running Plex. It works with Movies, TV, and Music. Fantastic system. Runs fantastic on a Raspberry Pi 3.
I only moved off because I wanted 4K.