In my previous article, I presented a free desktop publishing software called Scribus, and it was an introduction. Starting from this article, I’m going to discuss various features of this program in more detail. After reading this article, you should be able to create some basic layouts containing images.
Image frames in Scribus - the powerful tool with the multitude of option
When you launch Scribus for the first time, you’ll see that it is pretty different from word-processing software you know. As I wrote in my previous entry, Scribus aims at creating designs which will be much more complex. Think about magazines and other printed media, like calendars. Their layout differs much from what you usually create with word processors.
In MS Word, or in LibreOffice Writer, you can just start typing, typically in the left upper corner. Scribus doesn’t assume anything, and it provides you a working space which is totally under your control. Of course, you can create more complicated layouts, like magazines and calendars in some word processors, or in presentation software, like PowerPoint or LibreOffice Impress, but it’ll be very difficult, frustrating, and time-consuming. Office suites are just not designed to create very complex designs. On the other hand, Scribus gives you total freedom.
In word-processing software, you typically haven’t got much control over a picture you use in your documents, but in Scribus you can do just about everything you want with images.
Let’s see how inserting images to your document in Scribus works.
To achieve this, you need to create an image frame. You can’t just load a picture from the menu, like in word processors. The image frame can be compared to a window in a building – it’s an area through which the image can be seen.
You can create the image frame using several methods:
First, you can simply press I, and you’ll be able to draw an image frame:
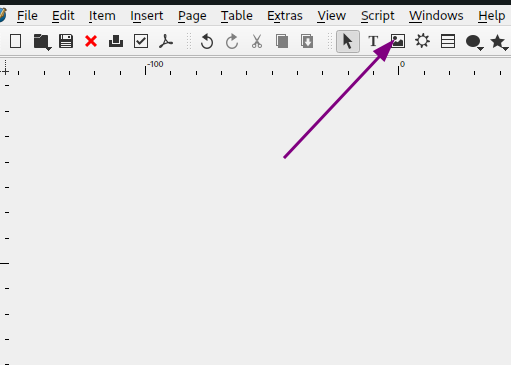
You can also click the Image Frame icon on the toolbar, and you’ll be able to draw the frame.
You can also create the image frame using a menu, by picking Insert > Image Frame.
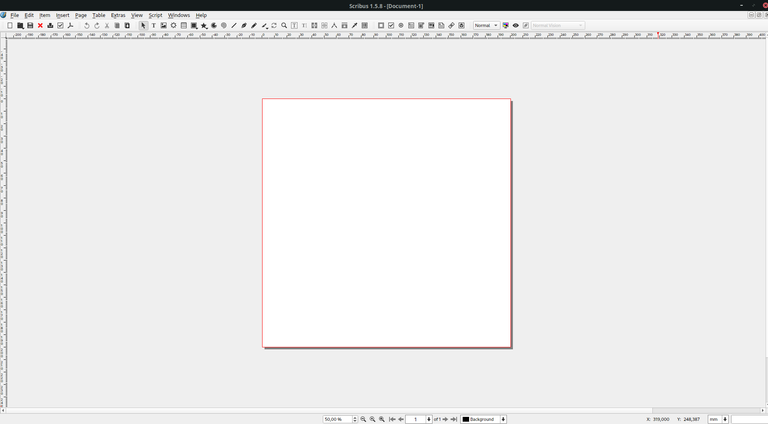
We now have our image frame, which is just an empty window to your image which hasn’t been imported to your document yet.
To place an image in this frame, just double-click on it, or left-click on it and pick Content > Get Image from the context menu.
You did it! Hurray! But your enthusiasm may disappear because now you see something strange – only some part of an image appeared, and it’s pixelated! Does this mean that something is wrong? No, it’s just because we can see only some part of the image, like we were looking at it through the window.
You can see that the image is not static, you can move it:

Scribus just doesn’t assume that you want to see the whole area of an image in the frame. Maybe you want only some part of it to be visible. Perhaps you want to make some kind of collage, or a calendar, or a business card. When you use word-processing software, you typically have to crop images in some external editors, and you get a cropped image that you can’t change. If you want other part of it to be visible, you just need to crop it again. When you design complicated layouts, it’s a waste of time, and in Scribus you don’t attempt to crop an image many times.
If you want the entire image to be visible, you have two basic options.
You can adjust the image size to the frame size, using the context menu. Just choose Image > Adjust Image to Frame:

Great, now the whole image is visible and clear. You can now make the frame smaller using a handle.
The second option is to adjust the Image frame size to the image size by picking Image > Adjust Frame to Image.

As you can see, this is not the best option in this case, because after performing this step the image is much bigger than the area of the page. It’s huge, so it’s pixelated.
But let’s assume that you want only some part of the image to be visible, and you want it to be clear enough to look well in your design. In Scribus, always use images of good quality, or just don't create big image frames when the quality is just average.
Now let's try to adjust the image a little more precisely. To achieve this, press F3, or just use the context menu and pick the Content Properties. You'll see a window which looks like this:

Now, you can use scaling, so it means that you can make the image larger or smaller. If you want to preserve its ratio, just click the button on the right side:
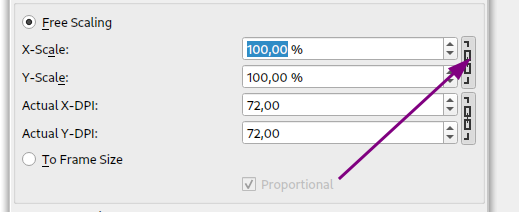
As you can see, I just adjusted an image nicely. I rescaled it to 15%, and I moved it to fill the frame. Notice that only some part of the image is visible - this one I wanted to be so.
You can also change the image position just using fields or buttons on the right. You can also rotate the image
I'll give you a small tip - you can also see the actual value of DPI (dots per inch). For print, it should be at least 300, so don't enlarge your image so much that it drops below this. In this example, the fields show 480 DPI, which is perfectly ok.
Shaped image frames - let's have fun!
Image frames can have various shapes so that you could achieve more fancy effects. I'll discuss shapes and other objects in more detail in my next entries, but now I want to show you possibilities.
For this demonstration, I'll create a custom-sized page - 20 cm x 20 cm, with no margins, so It'll be a rectangle.

On the bottom toolbar there are looking glass icons so that you could zoom in (or zoom out) the page. Now you see something like this:
Let's say that I want my image frames to be circle-shaped. I have to choose Insert > Shapes > Default Shape > Ellipse from the menu at the top of the interface:

To get the circle, I have to hold the CTRL key during drawing the ellipse. Similarly, you hold it when you want to draw a square when you pick the rectangular shape.
Ok. Now we have our circle, but it's not the image frame - it's just a vector graphics of the circle. To make an image frame of it, I have to convert the shape to it. Then I'll double-click on it, import my image, and adjust it by rescaling and moving. The magic begins!
Now I want it to be centered, so it was placed exactly in the central part of the page. I'll tell more about aligning and distribution in my next entries, but for now, I'll quickly guide you.
From the top menu, choose Windows > Align and Distribute. In the Relative field, the right option is picked out - the Page. Then click the two buttons - Center on Vertical Axis and Center in Horizontal Axis:

Now, I'll create 4 square image frames. I'll do it by pressing I and drawing rectangles while holding the Control button. I'll copy this image frame 4 times. I can do it manually or just by pressing CTRL + C and CTRL + V, like in any kind of software.
I'll also change the dimensions of the image frames manually. As you remember, my page is 20 x 20 cm, so I'll change the dimensions of the first frame to 10 x 10 cm before copying it. I'll get 4 square image frames that will fill the page entirely:
I'll also enable snapping to place my square frames precisely. I'll do it by picking Snap to Guides and Snap to Items from the Page menu at the top of the interface. After doing this, I have my 4 squares placed on the page.
Now I'll double-click each of them, and I'll import some random images to each of them separately. I also open the Content Properties of each of these frames to resize my images to 15% and to move them.
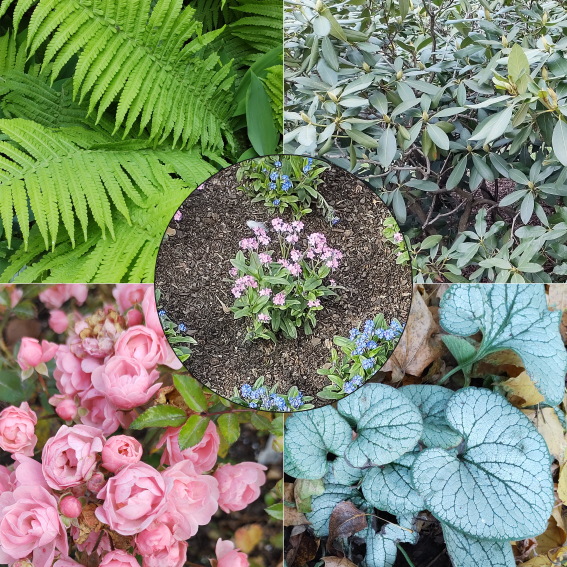
In the end, I have 4 images, but they cover the circular image frame. I select them by pressing CTRL and left-clicking them. After this, I choose Level > Lower from the context menu, and now I get some nice design with 5 images. It's a kind of collage:

Now I just need to export it to some nice format. My choice is PNG so that I could use it as the image illustrating this post in the Ecency app. Let's export it, then by picking File > Export >Save as Image from the top menu bar.

I won't change anything, I'll leave all export options as they are. Now I have a great collage!
Also, I'll save this file as a native Scribus file. Scribus' format is SLA.
I hope that now you know Scribus a little better. Sorry that this tutorial is so long. In fact, Scribus is not so difficult. It's also well-documented. You have a great documentation in this app, and you can discover the ways of achieving many things by just exploring menus, windows etc.
Try to create various kinds of collages. In shapes, you can create stars and other polygons, semicircles etc.
In fact, Scribus is not too good to create more complex shapes. It's good when you combine it with some vector graphic software. You can create shapes faster in Inkscape, which is also free and Open Source. You can also use any other vector graphic software. Just save some shape as SVG file and import it to Scribus. You can also download some ready vector image from vector stock image websites, and convert it to image frame, but this is more tricky, and I'll show you how to do this in my next tutorials.
In case of vector graphics, you import them from the top menu, by picking File > Import > Get Vector File.
Play with Scribus in your spare time, create some collages, explore the options in the Properties and Image Properties windows, and create something visually pleasing.
You can use your own pictures, or get some from Hive Stock community. You can also download them from Pexels and Pixabay. These are websites which allow you to download images for free, and you don't need to credit the original author, no attribution is needed. The license is very much like CC0. We'll discuss various licenses in some other posts.
Try to make some nice collages and use them here, on Ecency, or generally in the Hive blockchain! :)
you have shown how to do the project step by step using motion pictures. congratulations
Yes, I used gifs. I'm going to use them in my next tutorials. I think it's easier to learn something like this when you have gifs 🙈