Signatures (a.k.a. Sigs) are used by every author to add an extra spice to their own blog or forum posts as an attempt to personalize it. These can also be used as an interface to redirect an author's readers to any of his page such as previous posts and blog page.
I created two for my own articles and comments to make those more visually appealing and personal. I'm also using those to provide something to click on and redirect my readers to my own blog page. The one for the articles is this picture below:


However, I'm not just going to present the sig to you guys 'cos I'm also going to give out the steps on how I made it.
As I mentioned, I made two (one for the comments and another for the articles) but I think I'll be able to present only one right now because of time limitations. I have other works to do.
Anyhow, what follows are the steps. Please take not that I'm not a professional at this. I'm just an amateur but I first did this when I was 13 and now I'm 22 so I'm already quite experienced:
STEP 1: Gather the Tool and Digital Material
The Tool
I'm using Photoshop CC. It's the 2015 version of Photoshop, AFAIK. But any older version can suffice.
Canvas:
- For the canvas of the top portion, I used a 672 x 200 px size with a transparent background.
- On the other hand, I used a 672 x 50 px for the bottom portion (the one with the redirect link).
To those who came here to learn about making sigs, the order is width x height. I determined the length by inspecting the element of a sample post here on Steemit. I think all you'll need to know is the size. If you want your sig to fit well to your posts, it would be best to have your length to 672 px, unless Steemit changes it again. I've heard that it was different before For the height, you can choose whatever size you want.
The Material
- The only material I needed was a high quality digital photo of a sleeping puppy. It has a Creative Commons (CC) license which means that it's free-for-use and can be modified. I've taken the photo from Max Pixel via Google Images
To set the digital photo:
- Open the file of the photo.
- Right click anywhere within the photo and choose "Copy"
- Go to Photoshop. Left click on the canvas once.
- Hold Ctrl then press V. You digital photo will appear on the canvas.
STEP 2: Resize and Adjust
I discovered the my photo is too big for my canvas and so I resized and adjusted it.
One of the ways to resize the photo is to use the Maquee tool which looks like a shape that is outlined with dashed lines.

After choosing the Marquee tool, I right clicked on my canvas and chose "Free Transform". From there, it was already like resizing and adjusting a photo in Microsoft Word.
When making a sig, it's arbitrary to save space for text where you can put any information about your blog. I saved some which you'll see on the next step.
STEP 3: Text and Stroking
Text is a vital part in a sig. That will give readers information about anything you want them to know as well as inviting them over to a certain link.
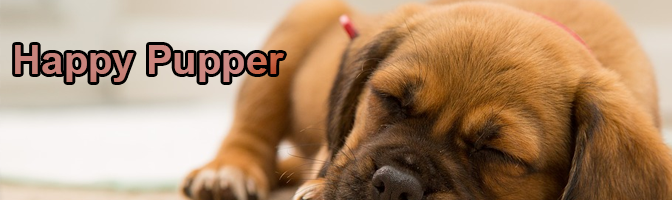
After resizing and adjusting the photo to my liking, this is now how it looks like:

The leftmost part is where I wanted to put some text. I want my readers to know about my blog which includes my title and username so I put some using the Text tool which I think you're all familiar with now. It looks that of letter "T".
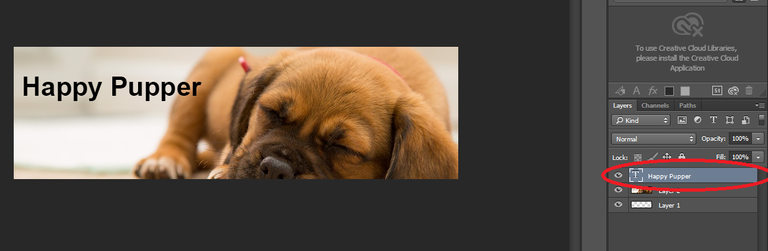
The more important aspect that I want to share with you is stroking the text just like that in the words "Happy Pupper".
After creating the text, Photoshop always makes a layer for it, as shown below. To apply stroke, I right clicked on that layer and chose "Blending Options".
Under Blending Options, I clicked on Stroke and the blending options dialogue box will change to that of the Stroke Settings as shown below: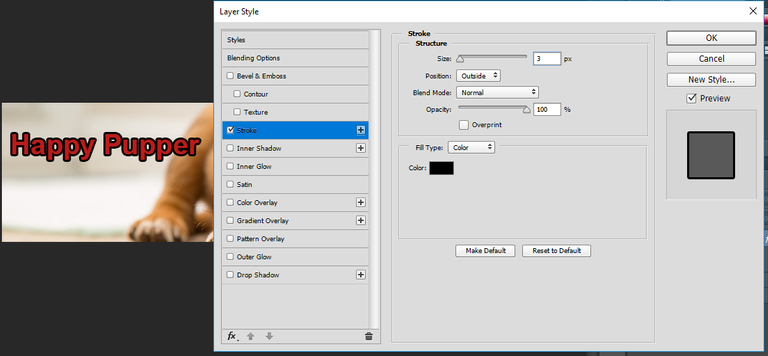
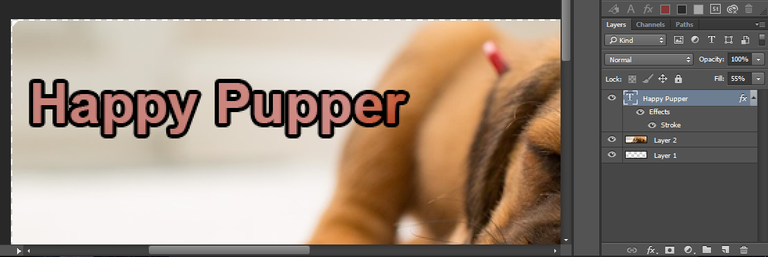
After setting the Stroke, I decided to add more visual effects to make it not just any normal text with stroke. So under the Layers tab, I slid the Opacity for the fill properties lower. This will only lower the Fill color but not the stroke. Now it looks like this:
For the rest of the text, I just added them as I normally would.
STEP 4: Trim
The final step has to do with trimming the edges. There's a rule in design that says that when the edges of your graphics is pointed, it would usually mean less serene. So what I did was shape it smoothly by trimming.
To do this, I used the Rounded Rectangle Tool which is a derivative of Rectangle Tool. The rectangle tool is rectangular in shape. To use the Rounded Rectangle Tool, I right clicked on the Rectangle tool and selected the former.
The next thing to do is to Left Click the upper left edge of my canvas and drag the mouse to the exact opposite corner (lower right corner). This filled the canvas with a rounded rectangle.

But I wasn't done yet with the RR tool because I needed it to make a selection using it. To achieve the selection, I just right clicked inside the canvas and chose "Make Selection". I clicked OK and then there's the selection.
Now, I needed to select the Inverse so that the edges that needed to be trimmed will be chosen. To do that, I used the Marquee Tool again and right clicked on the Canvas. From there, I chose "Select Inverse". Then, I erased on the edges using the Erase tool.
To finally see the the finished sig, I just removed the Rounded Rectangle Layer. Now it looks like there's no harm intended.
Step 5: Exporting to PNG
To export the image as a file, I just clicked the File button, clicked export and then chose "Quick Export as PNG".
And that's how I made my own article sig. Every time I'll need it, I could just copy-paste the image's proper text after uploading it via Steemit.
Thanks for taking time to explain the process step by step. It's a catchy signature and will attract readers to your blog. So you blog about dogs?
Do check out the artwork done by autistic son.
https://steemit.com/art/@positivesteem/my-autistic-son-the-emerging-artist
It feels warm to know that my explanations are being appreciated sir. Thank you!
I'm supposed to blog about dogs e but I'm still on the planning phase right now. Eventually, you'll see me blogging about dogs. :) However, I often do put some dog pics on my blogs and comments.
I'll definitely check your article. It sounds interesting and I'm excited to know about your son.
It was fun. :) @happy-doge
Hi @bontonstory!
I'm glad you had fun reading my post ^_^
Congratulations @happy-doge! You have completed some achievement on Steemit and have been rewarded with new badge(s) :
Click on any badge to view your own Board of Honnor on SteemitBoard.
For more information about SteemitBoard, click here
If you no longer want to receive notifications, reply to this comment with the word
STOPIf you want to support the SteemitBoard project, your upvote for this notification is welcome!