En mi país Venezuela después de ser el tercer país con las reserva más grande de petróleo y no teníamos que preocuparnos por ningún tipo de combustible. Pasamos a ser el país más pobre del mundo nuestra gasolina tiene que venir del exterior y no contamos con GAS doméstico pero los venezolanos contamos con algo y es que en tiempos difíciles nos las ingeniamos por eso le muestro a continuación un pequeño tutorial de cómo hacer una cocina a combustión de gasoil espero les agrade le invito a que construya una.
In my country Venezuela after being the third country with the largest oil reserves and we did not have to worry about any type of fuel. We become the poorest country in the world our gasoline has to come from abroad and we do not have domestic GAS but we Venezuelans have something and that is that in difficult times we manage so I will show you below a small tutorial on how to make a diesel combustion stove I hope you like it I invite you to build one.
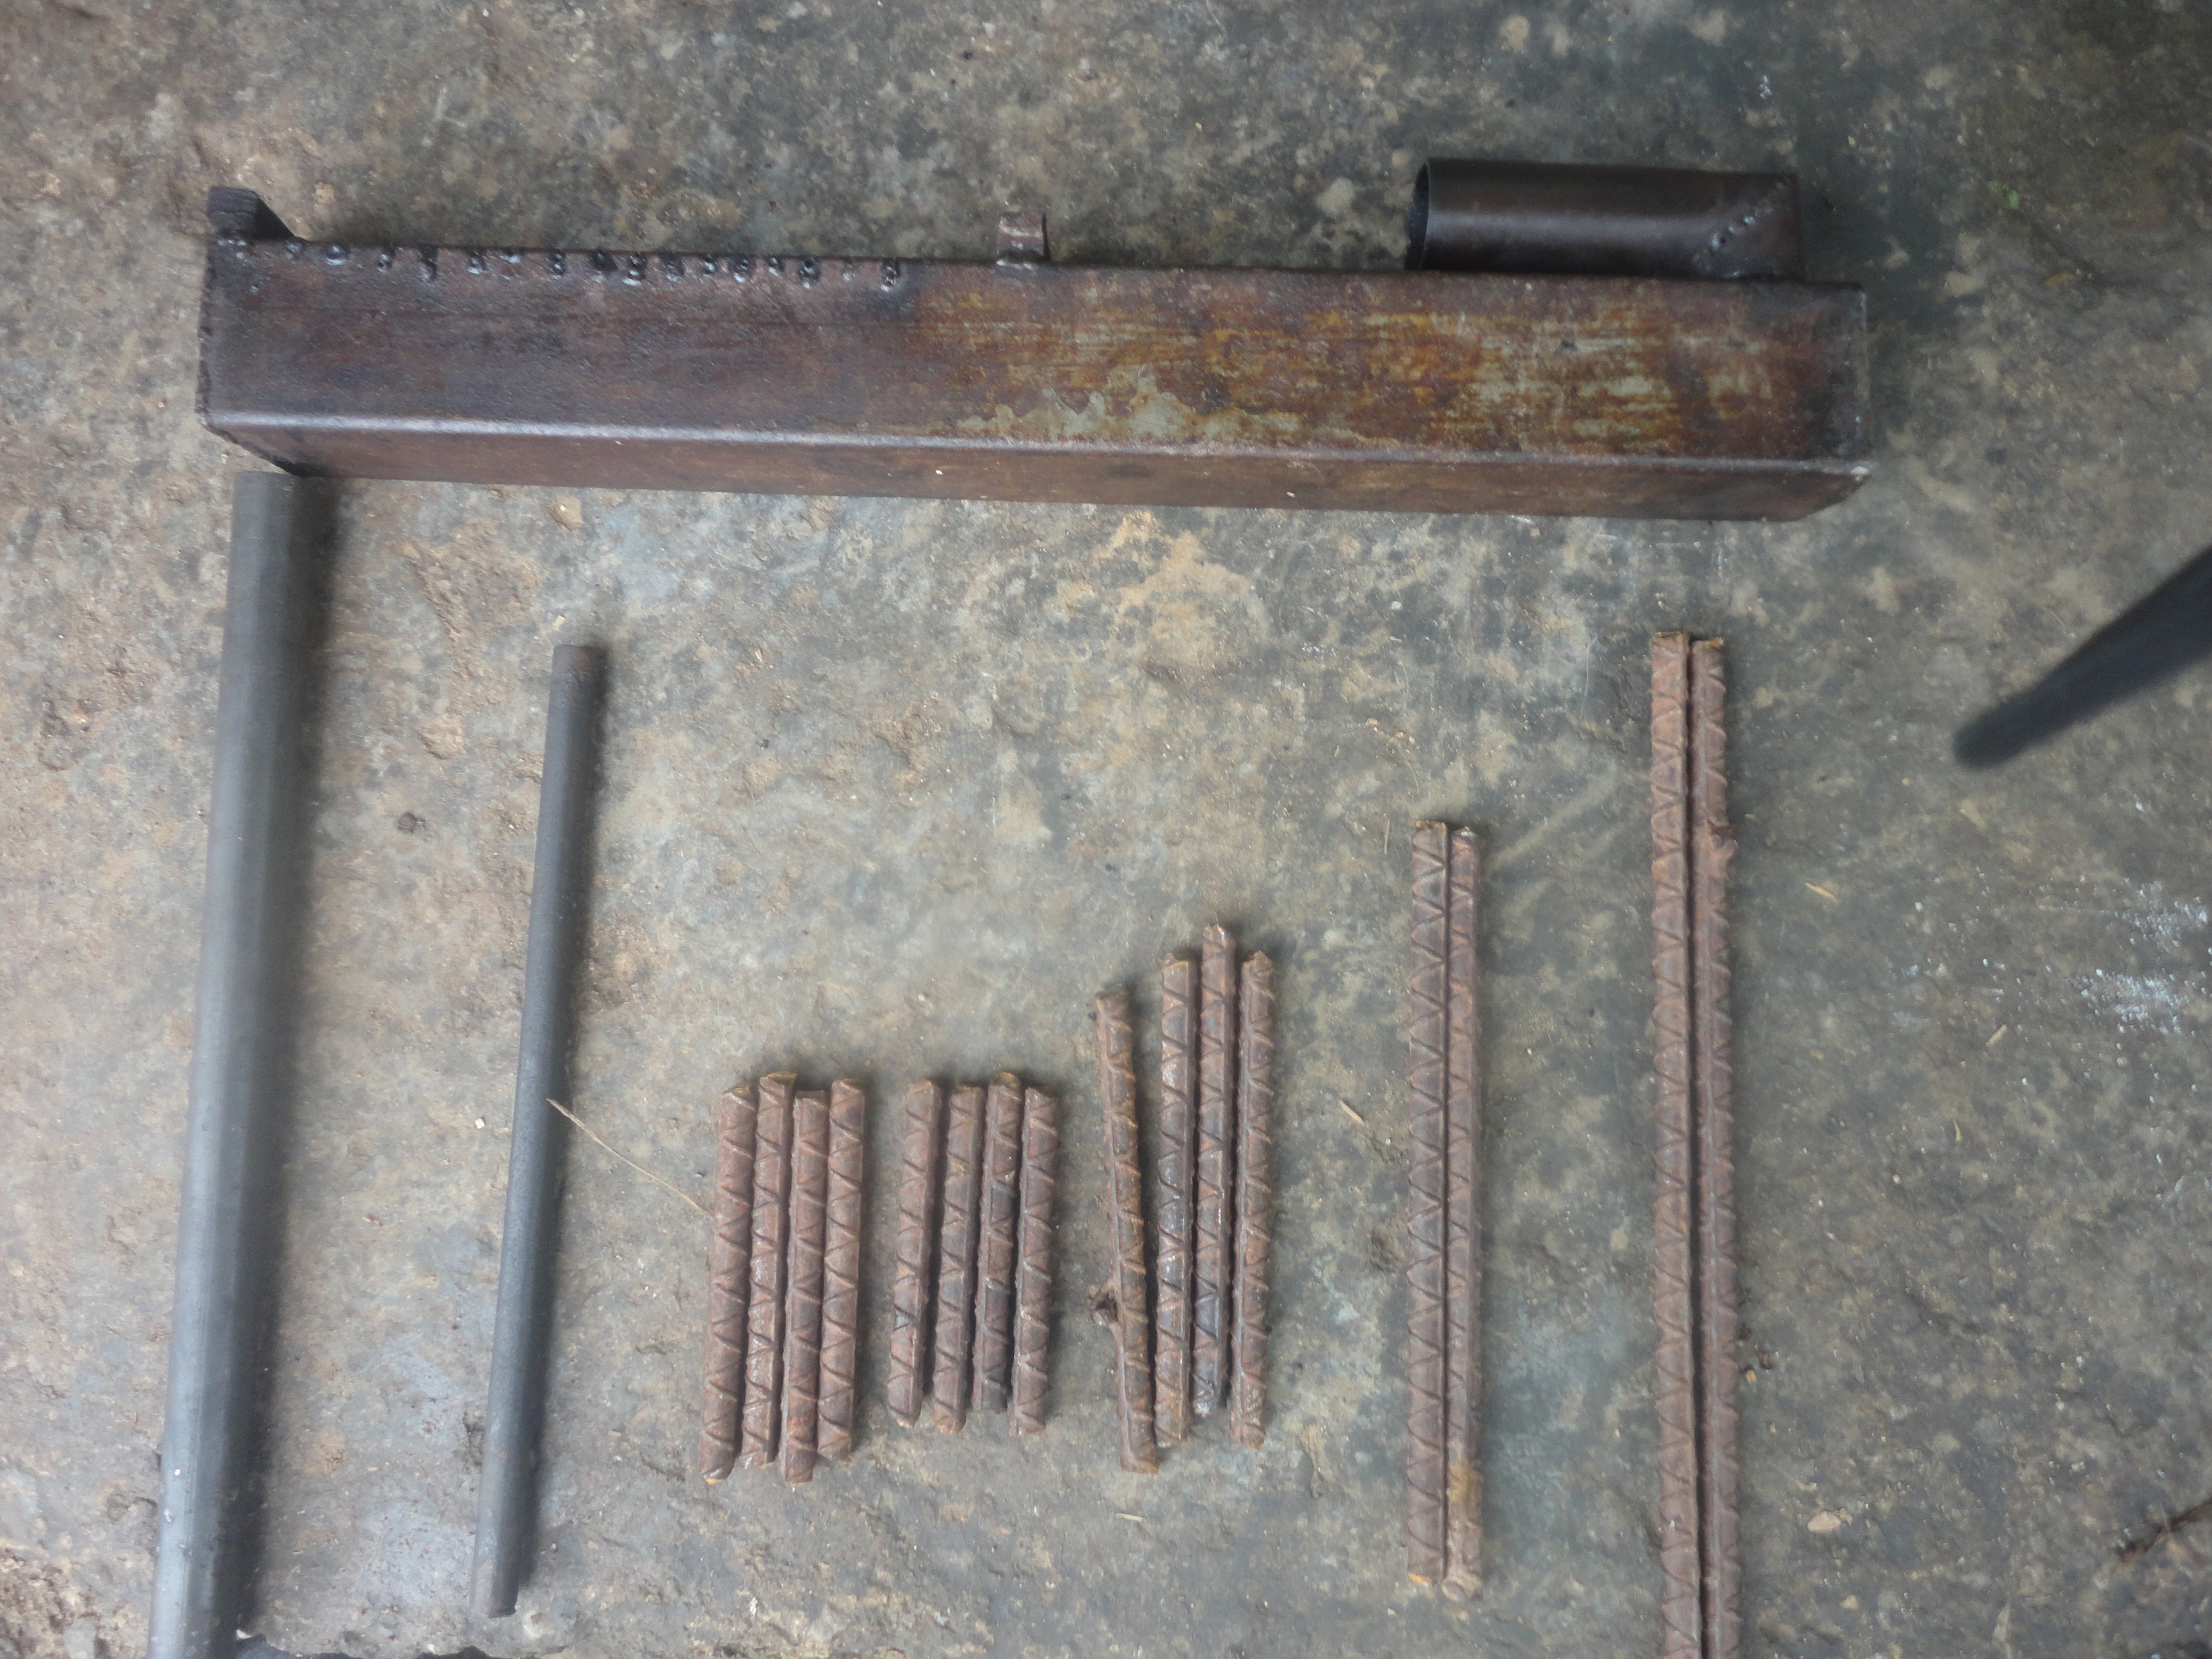
Materiales:
• Una Cabilla de 2 Metros 30 cm de 3/8 de espesor
• 33cm de tubo de hierro de ½ pulgada
• 28cm de cabilla de ½ lisa
• 16cm de tubo de 1 pulgada
• Un tubo de 2x2 de 43cm de largo
• Un pequeño tubo de 5mm de espesor con 22cm de largo
• 10 electrodos
Materials:
• A 2 meter 30 cm 3/8 thick caliper
• 33cm ½ inch iron pipe
• 28cm ½ smooth calf
• 16cm 1-inch tube
• A 2x2 tube 43cm long
• A small 5mm thick tube 22cm long
• 10 electrodes

Primero se hace el armazón donde va reposada la cacerola o la olla donde se cocinan los alimentos.
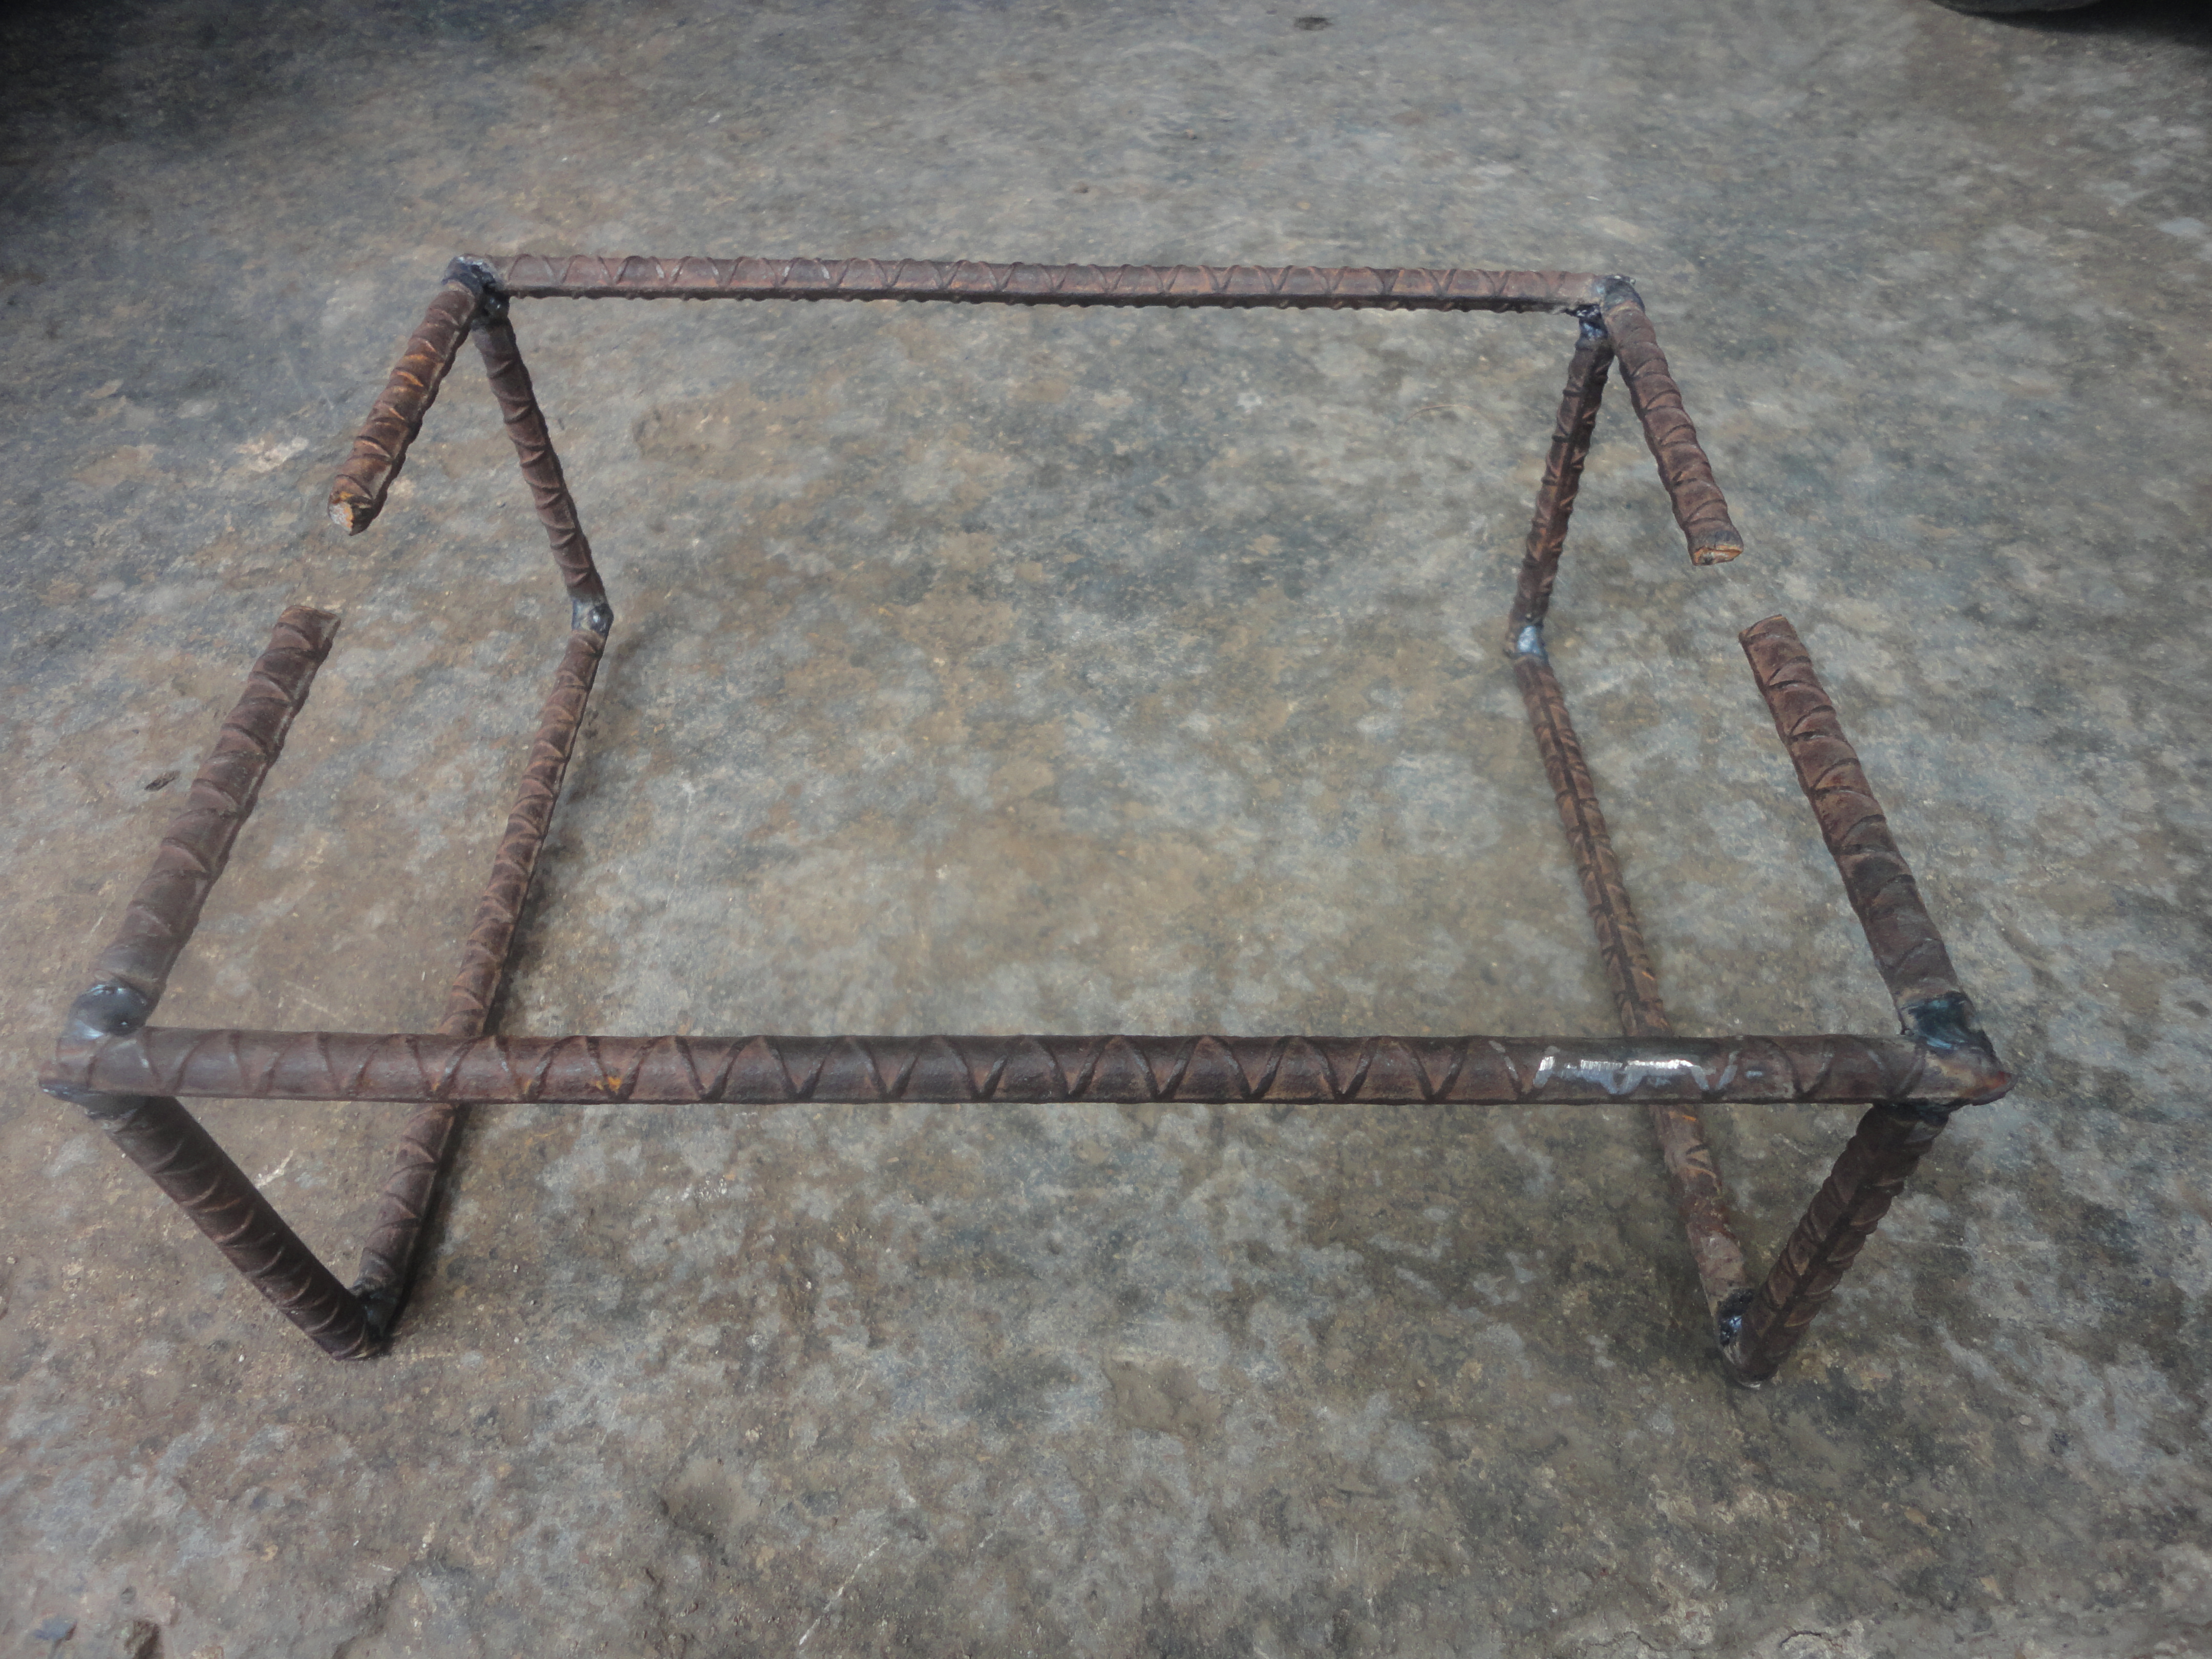
First the frame is made where the saucepan or the pot where the food is cooked rests.
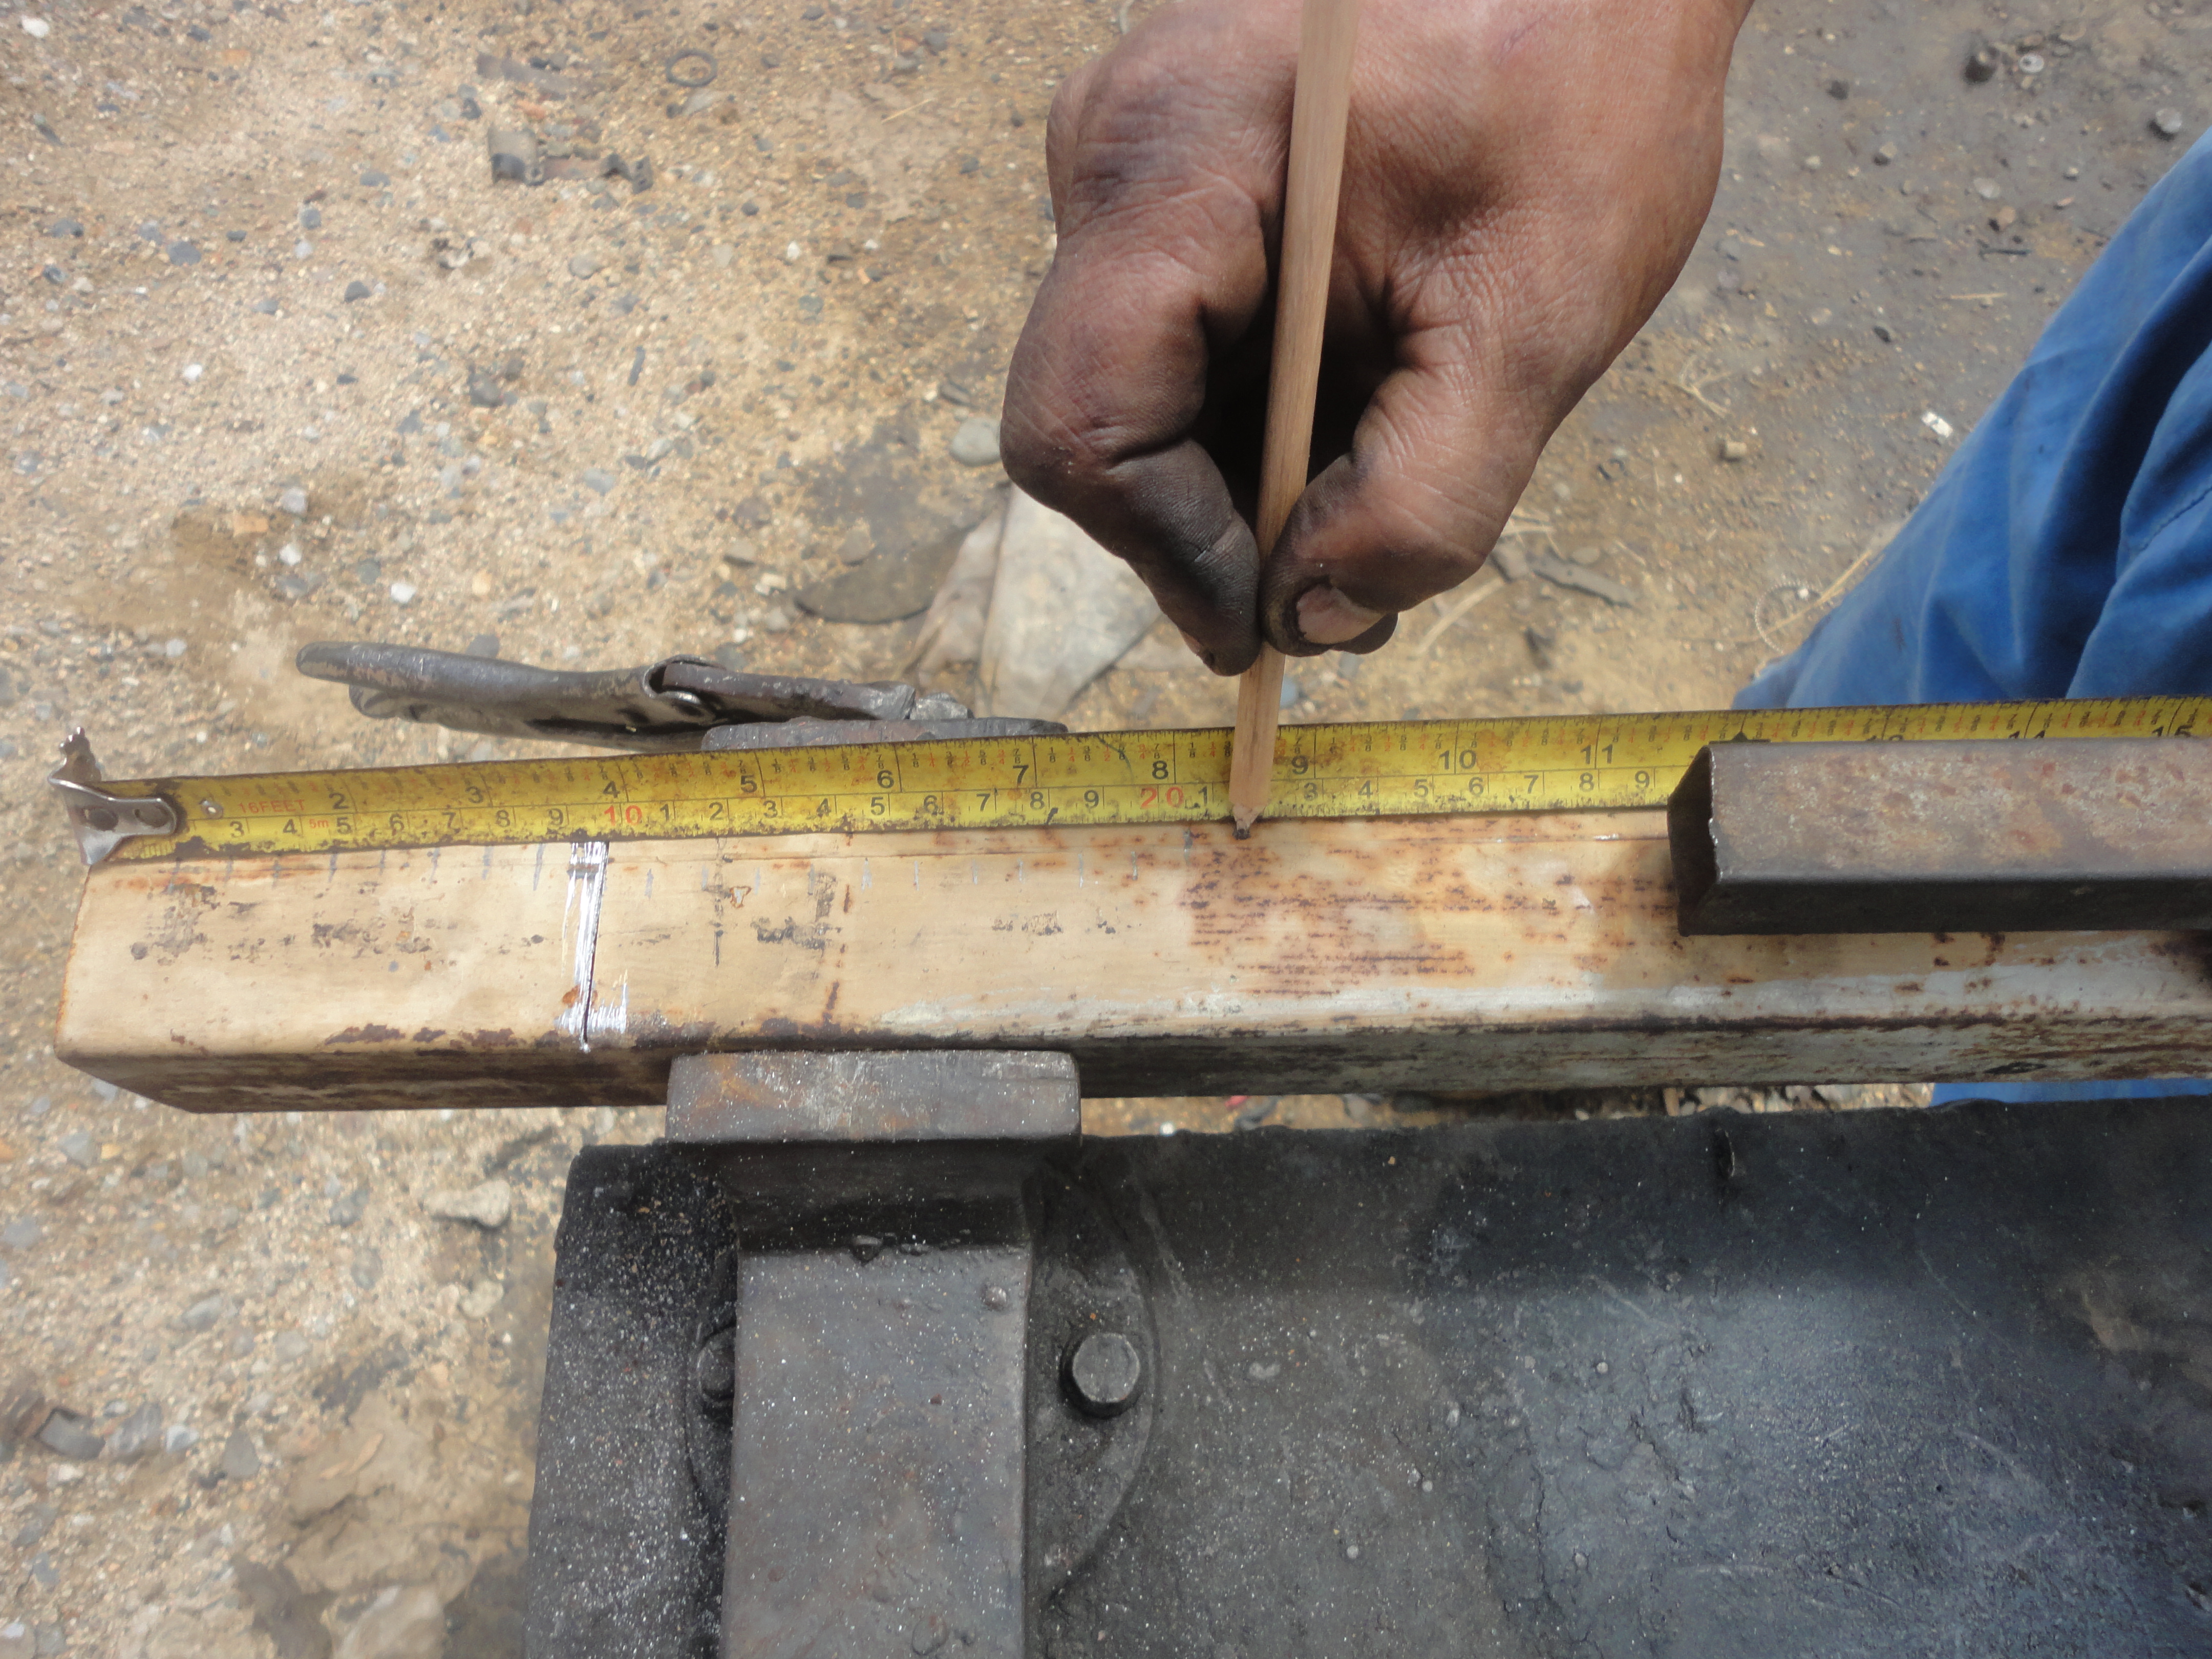
Agarramos el tubo de 2x2 y en una punta le soldamos el pedazo de tubo de 16cm de una pulgada lo soldamos tipo codo en una de las equinas
We grab the 2x2 tube and at one end we weld the piece of 16cm tube of an inch we weld it elbow type in one of the equines
En el siguiente paso espero que presten mucha atención ya que de esto depende que funcione la cocina, las rendijas que ven en la foto. Tienen que ser de lo ancho de una hoja de segueta, de 2cm de ancho entre cada una, total 21 rendijas ni más ni menos guíense lo más que puedan en estas fotos.
In English below

In English below
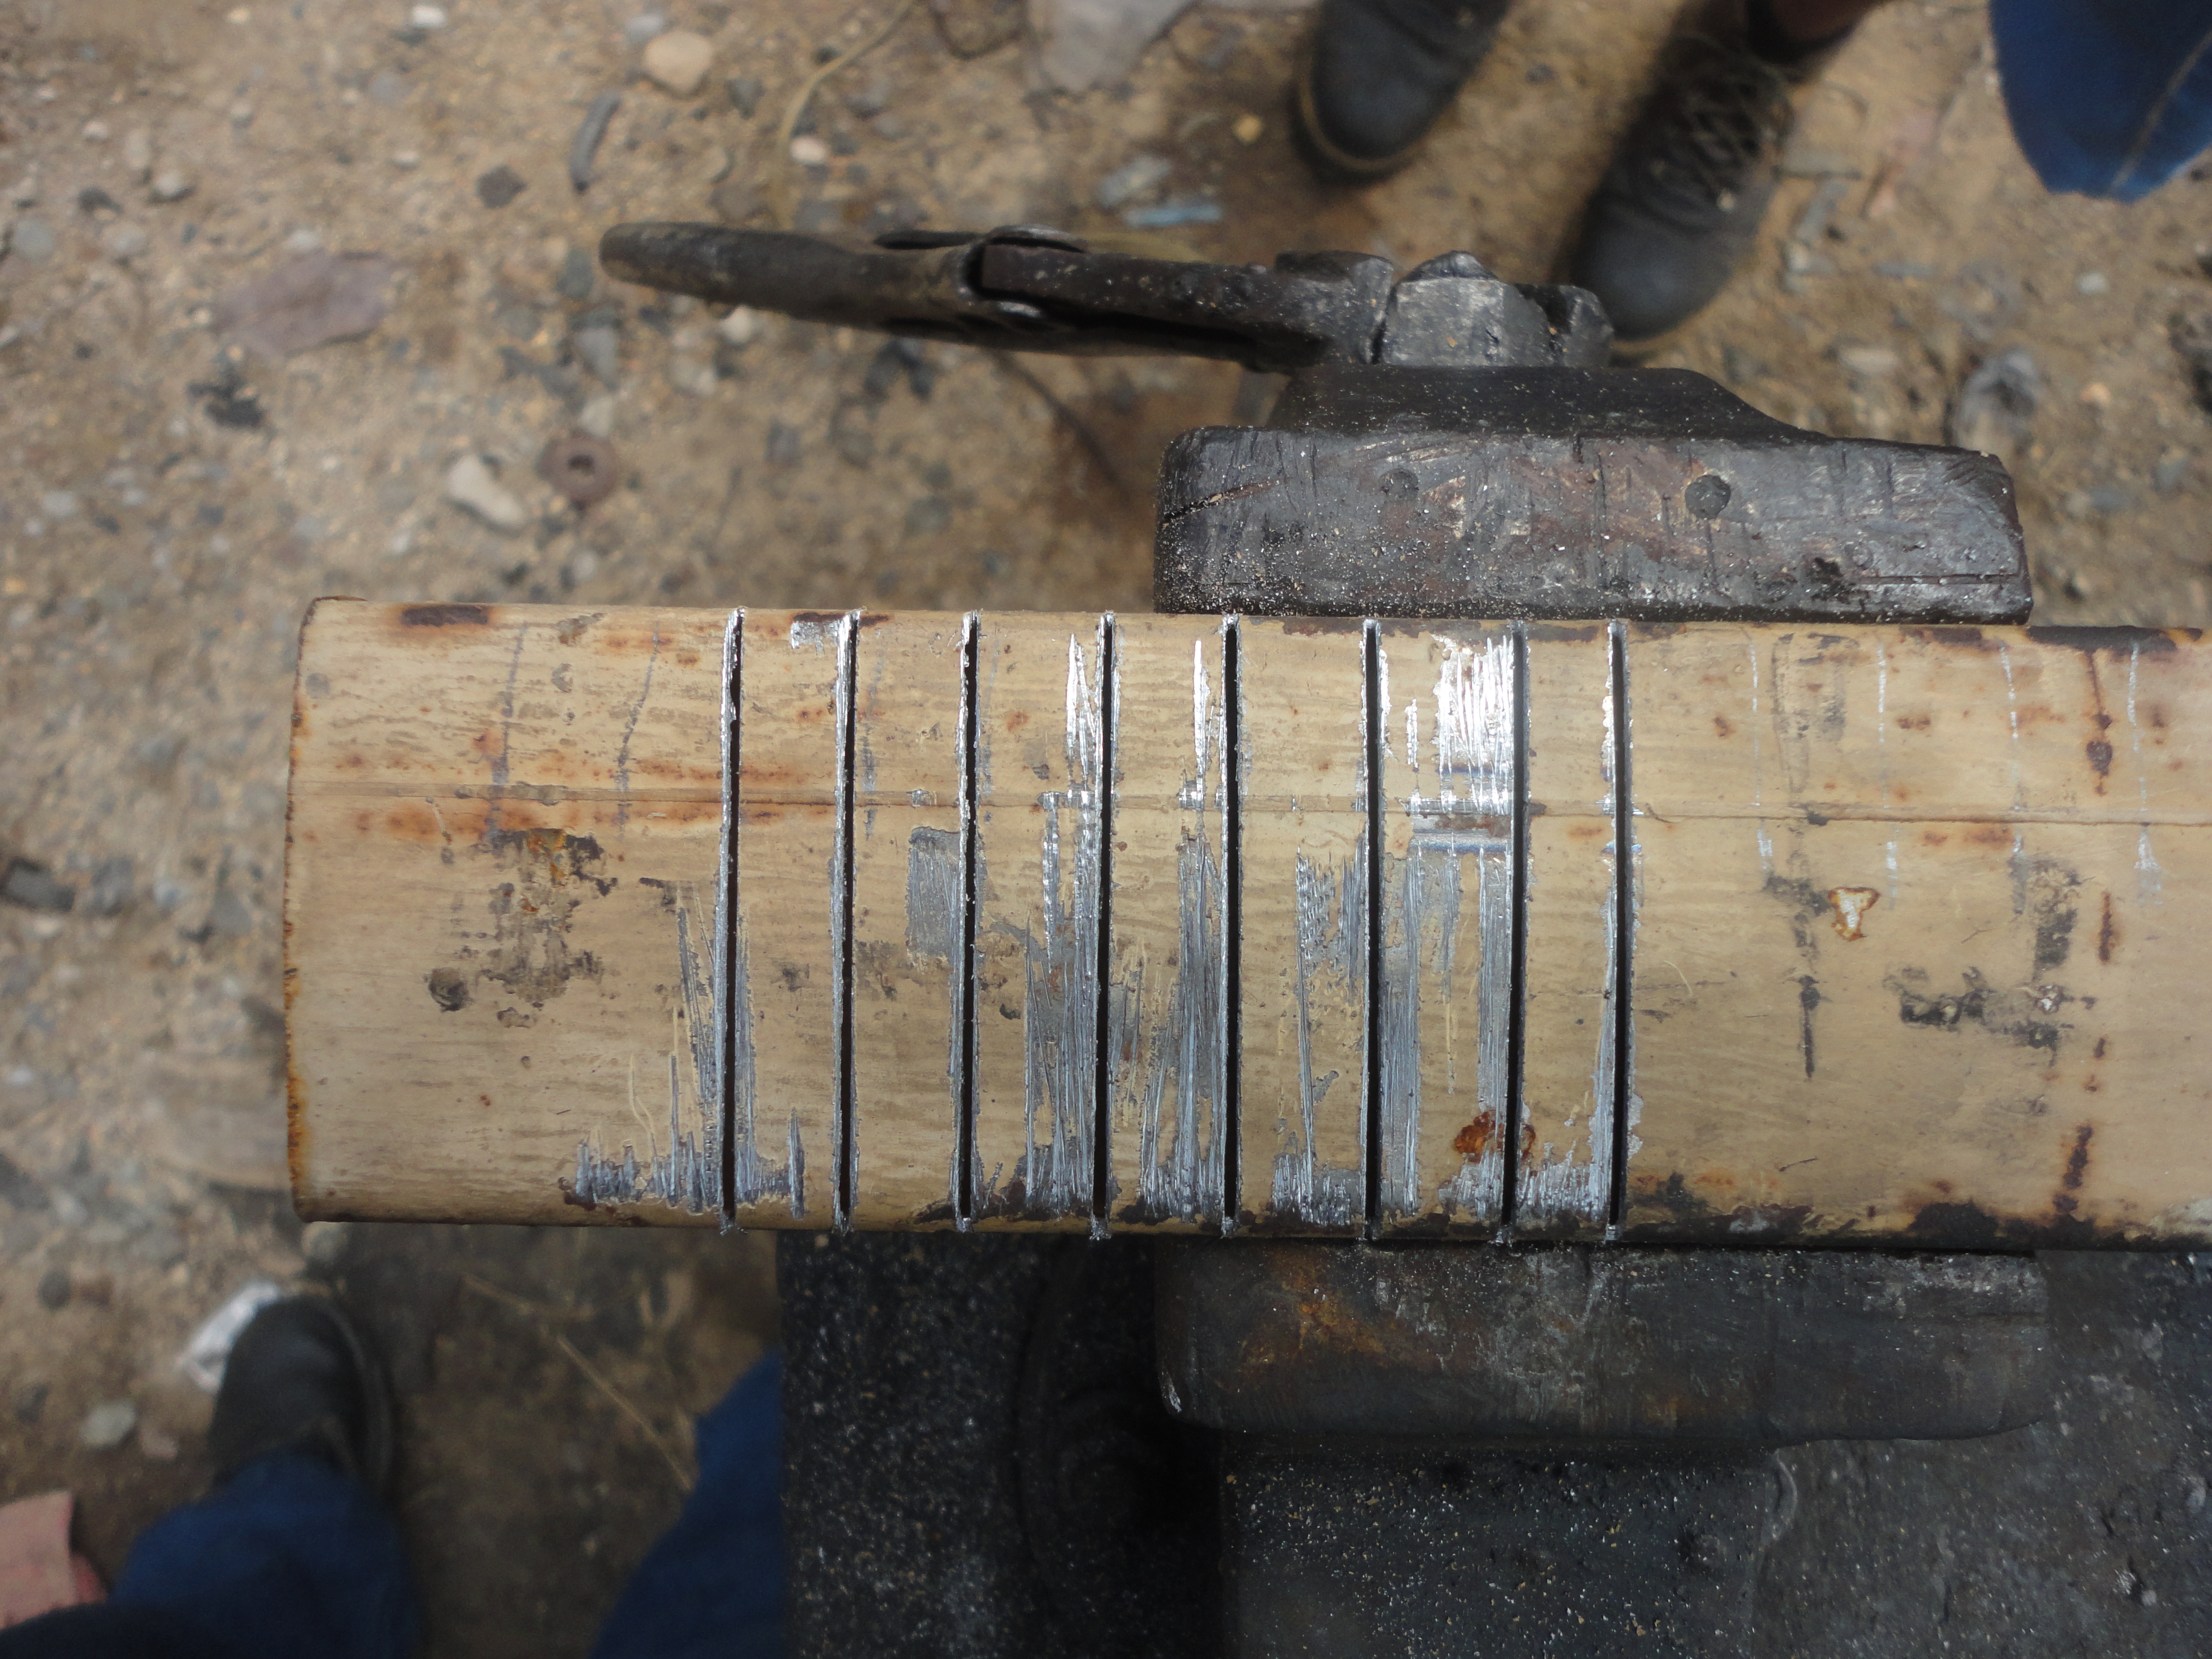
In the next step I hope you pay close attention as the kitchen depends on this, the slits you see in the photo. They must be the width of a saw blade, 2cm wide between each one, total 21 slits, no more and no less, guide yourselves as much as you can in these photos.
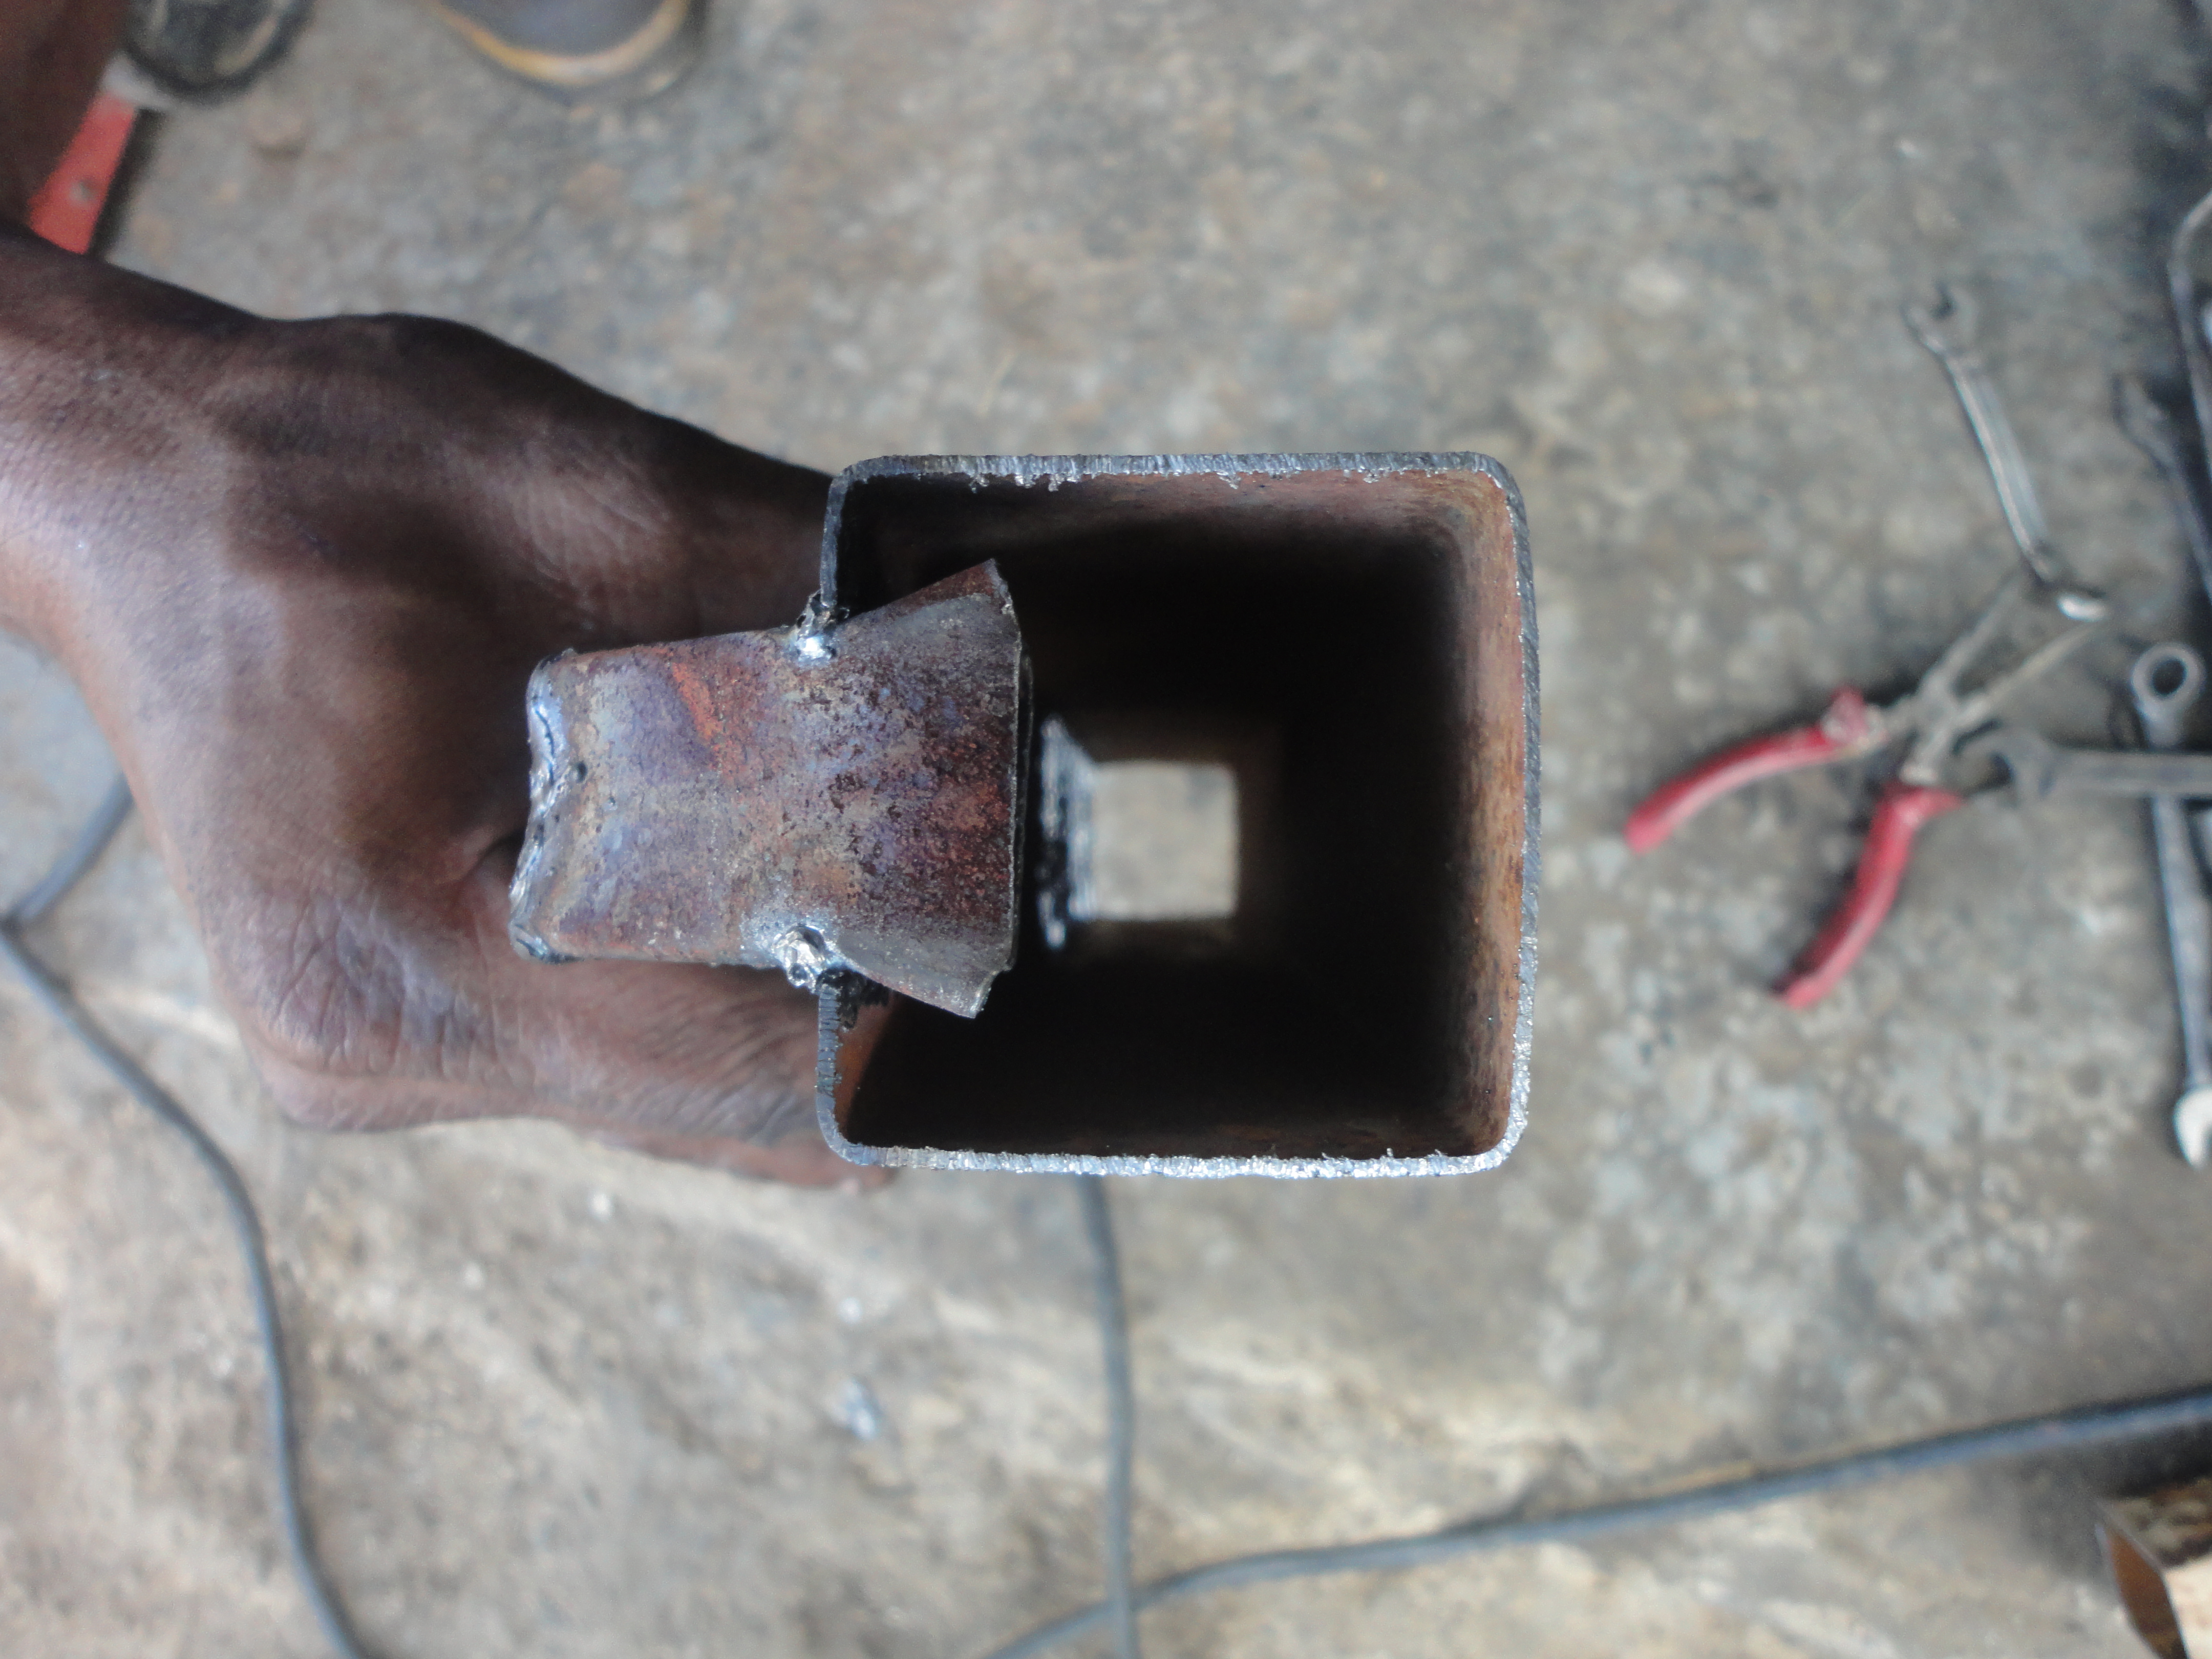
El siguiente paso recorta dos pedazos de lámina delgada para tapar los dos extremos del tubo 2x2 que quede bien sellado con soldadura para que no escape el gas del gasoil quemado observen los pasos bien detallados en las fotos

In English below
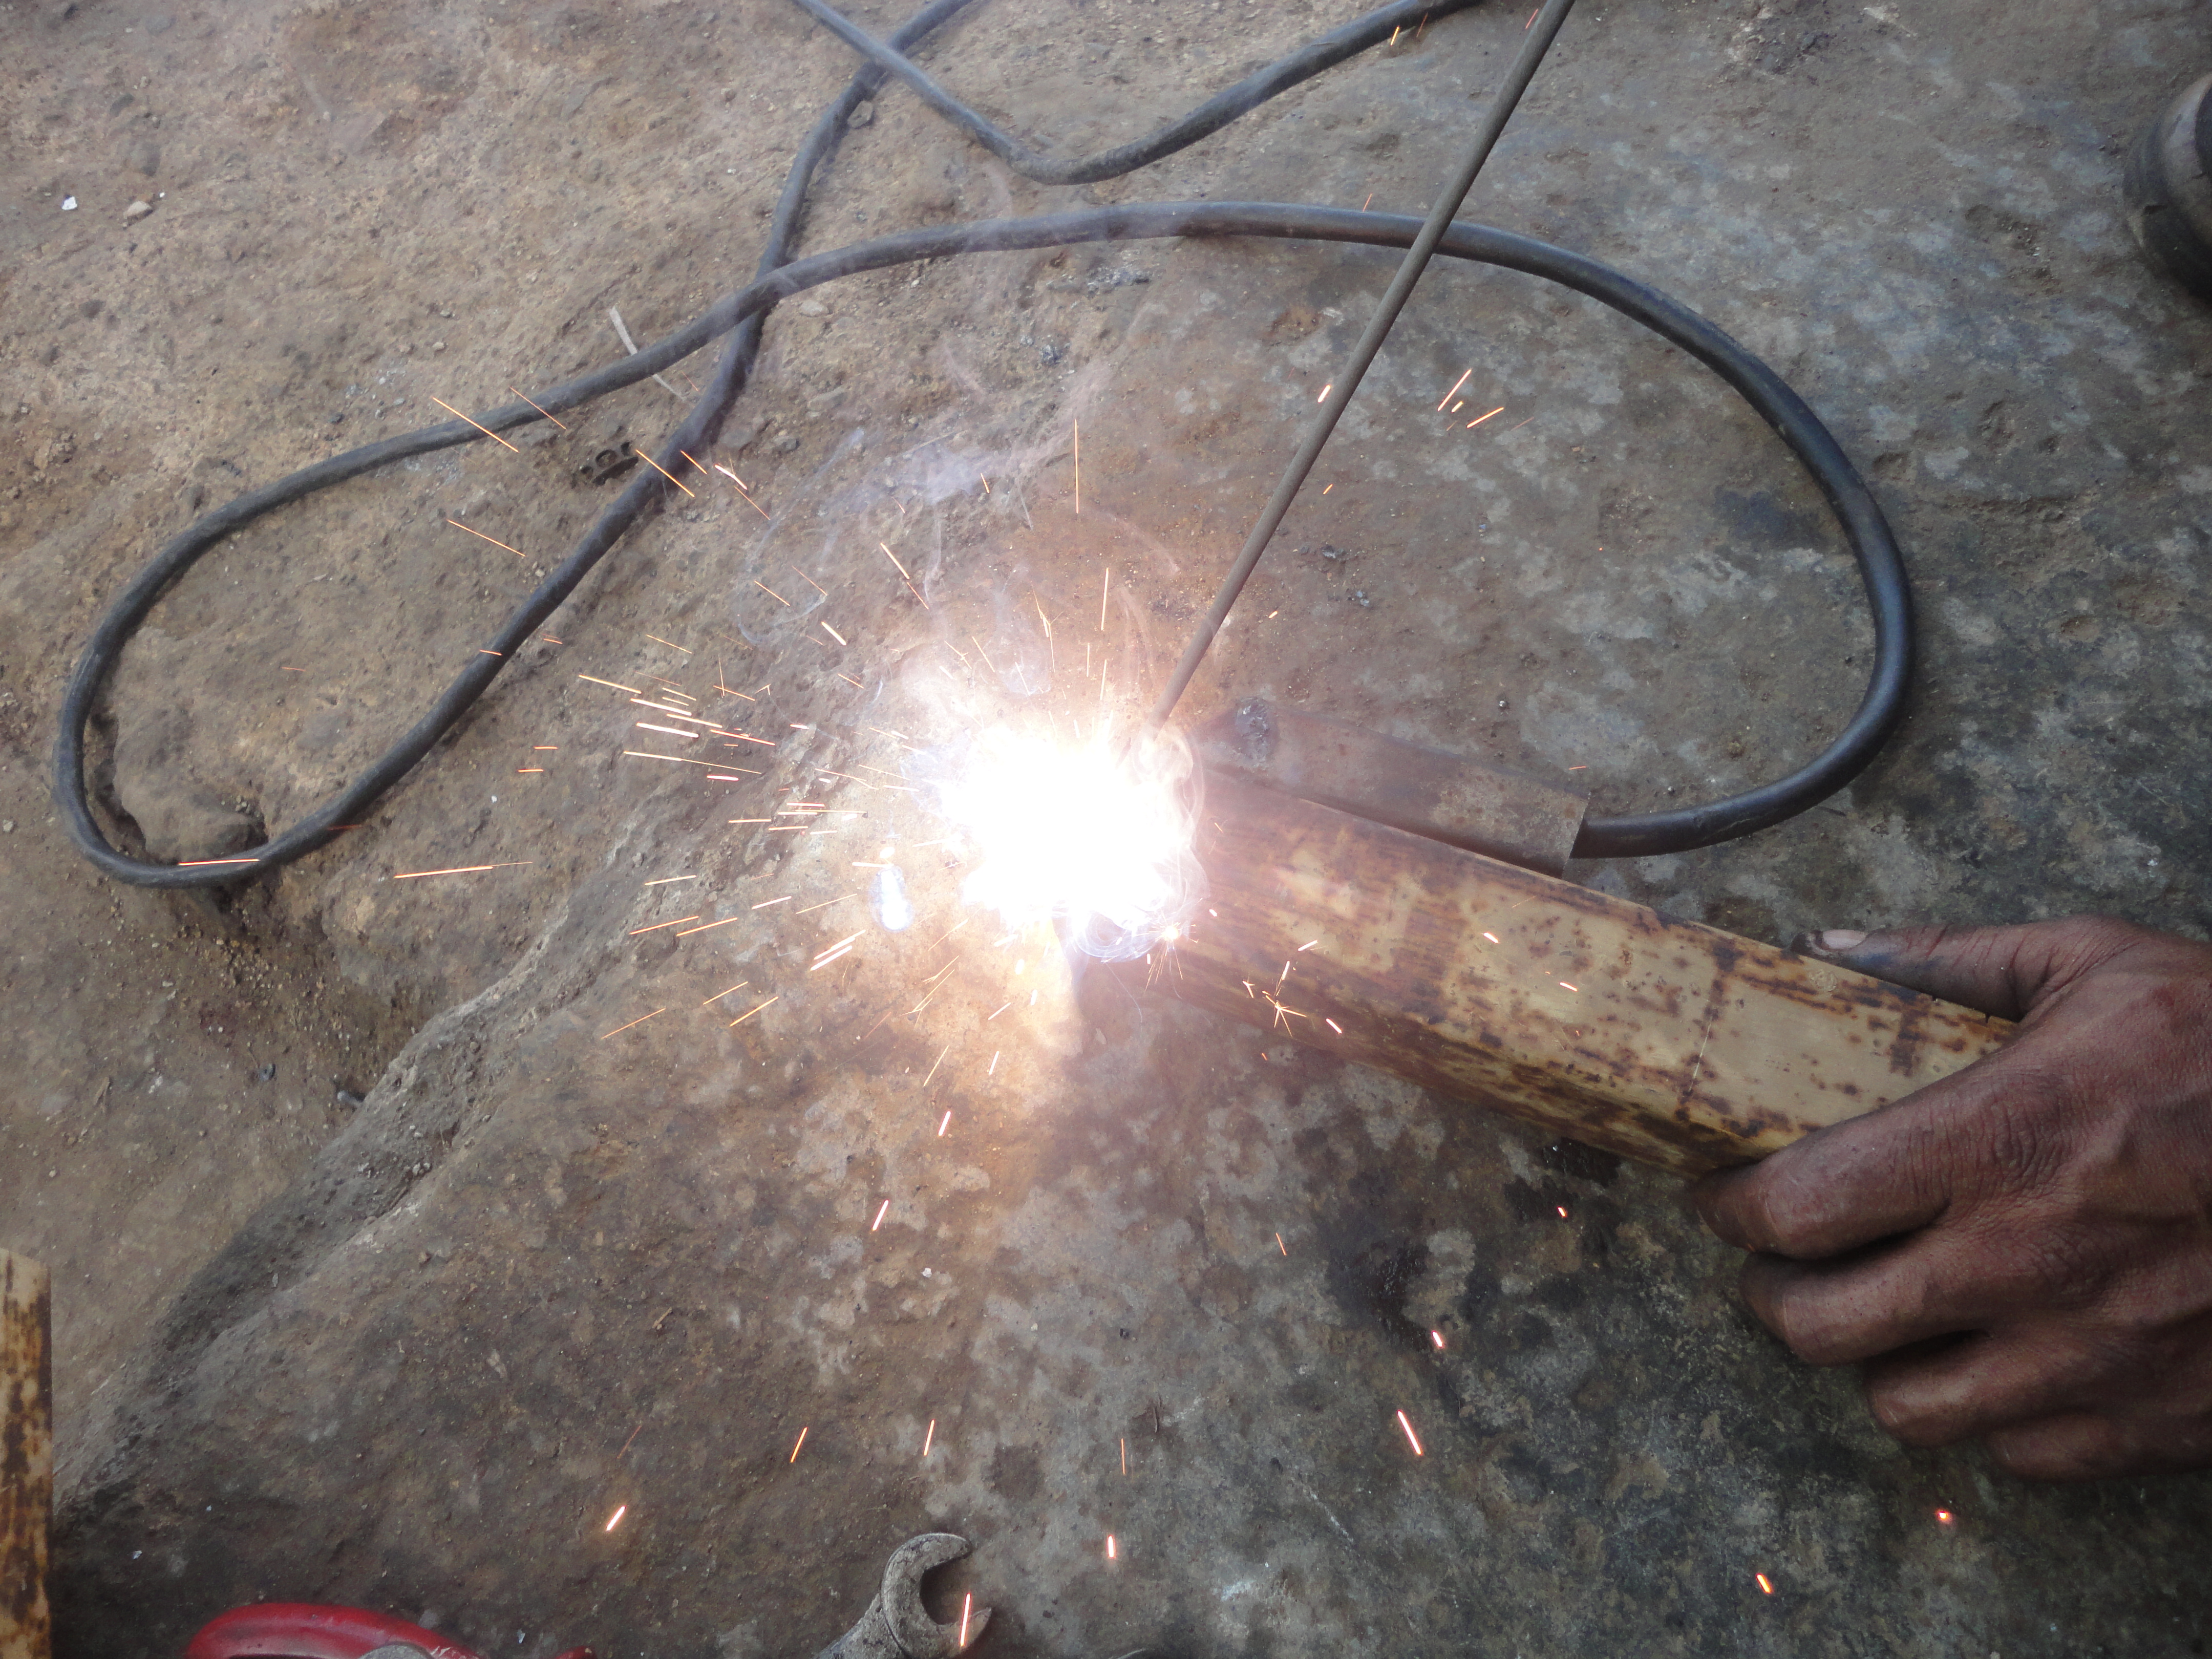
The next step cuts two pieces of thin sheet to cover the two ends of the 2x2 tube that is well sealed with solder so that the gas from the burned diesel does not escape, observe the steps well detailed in the photos
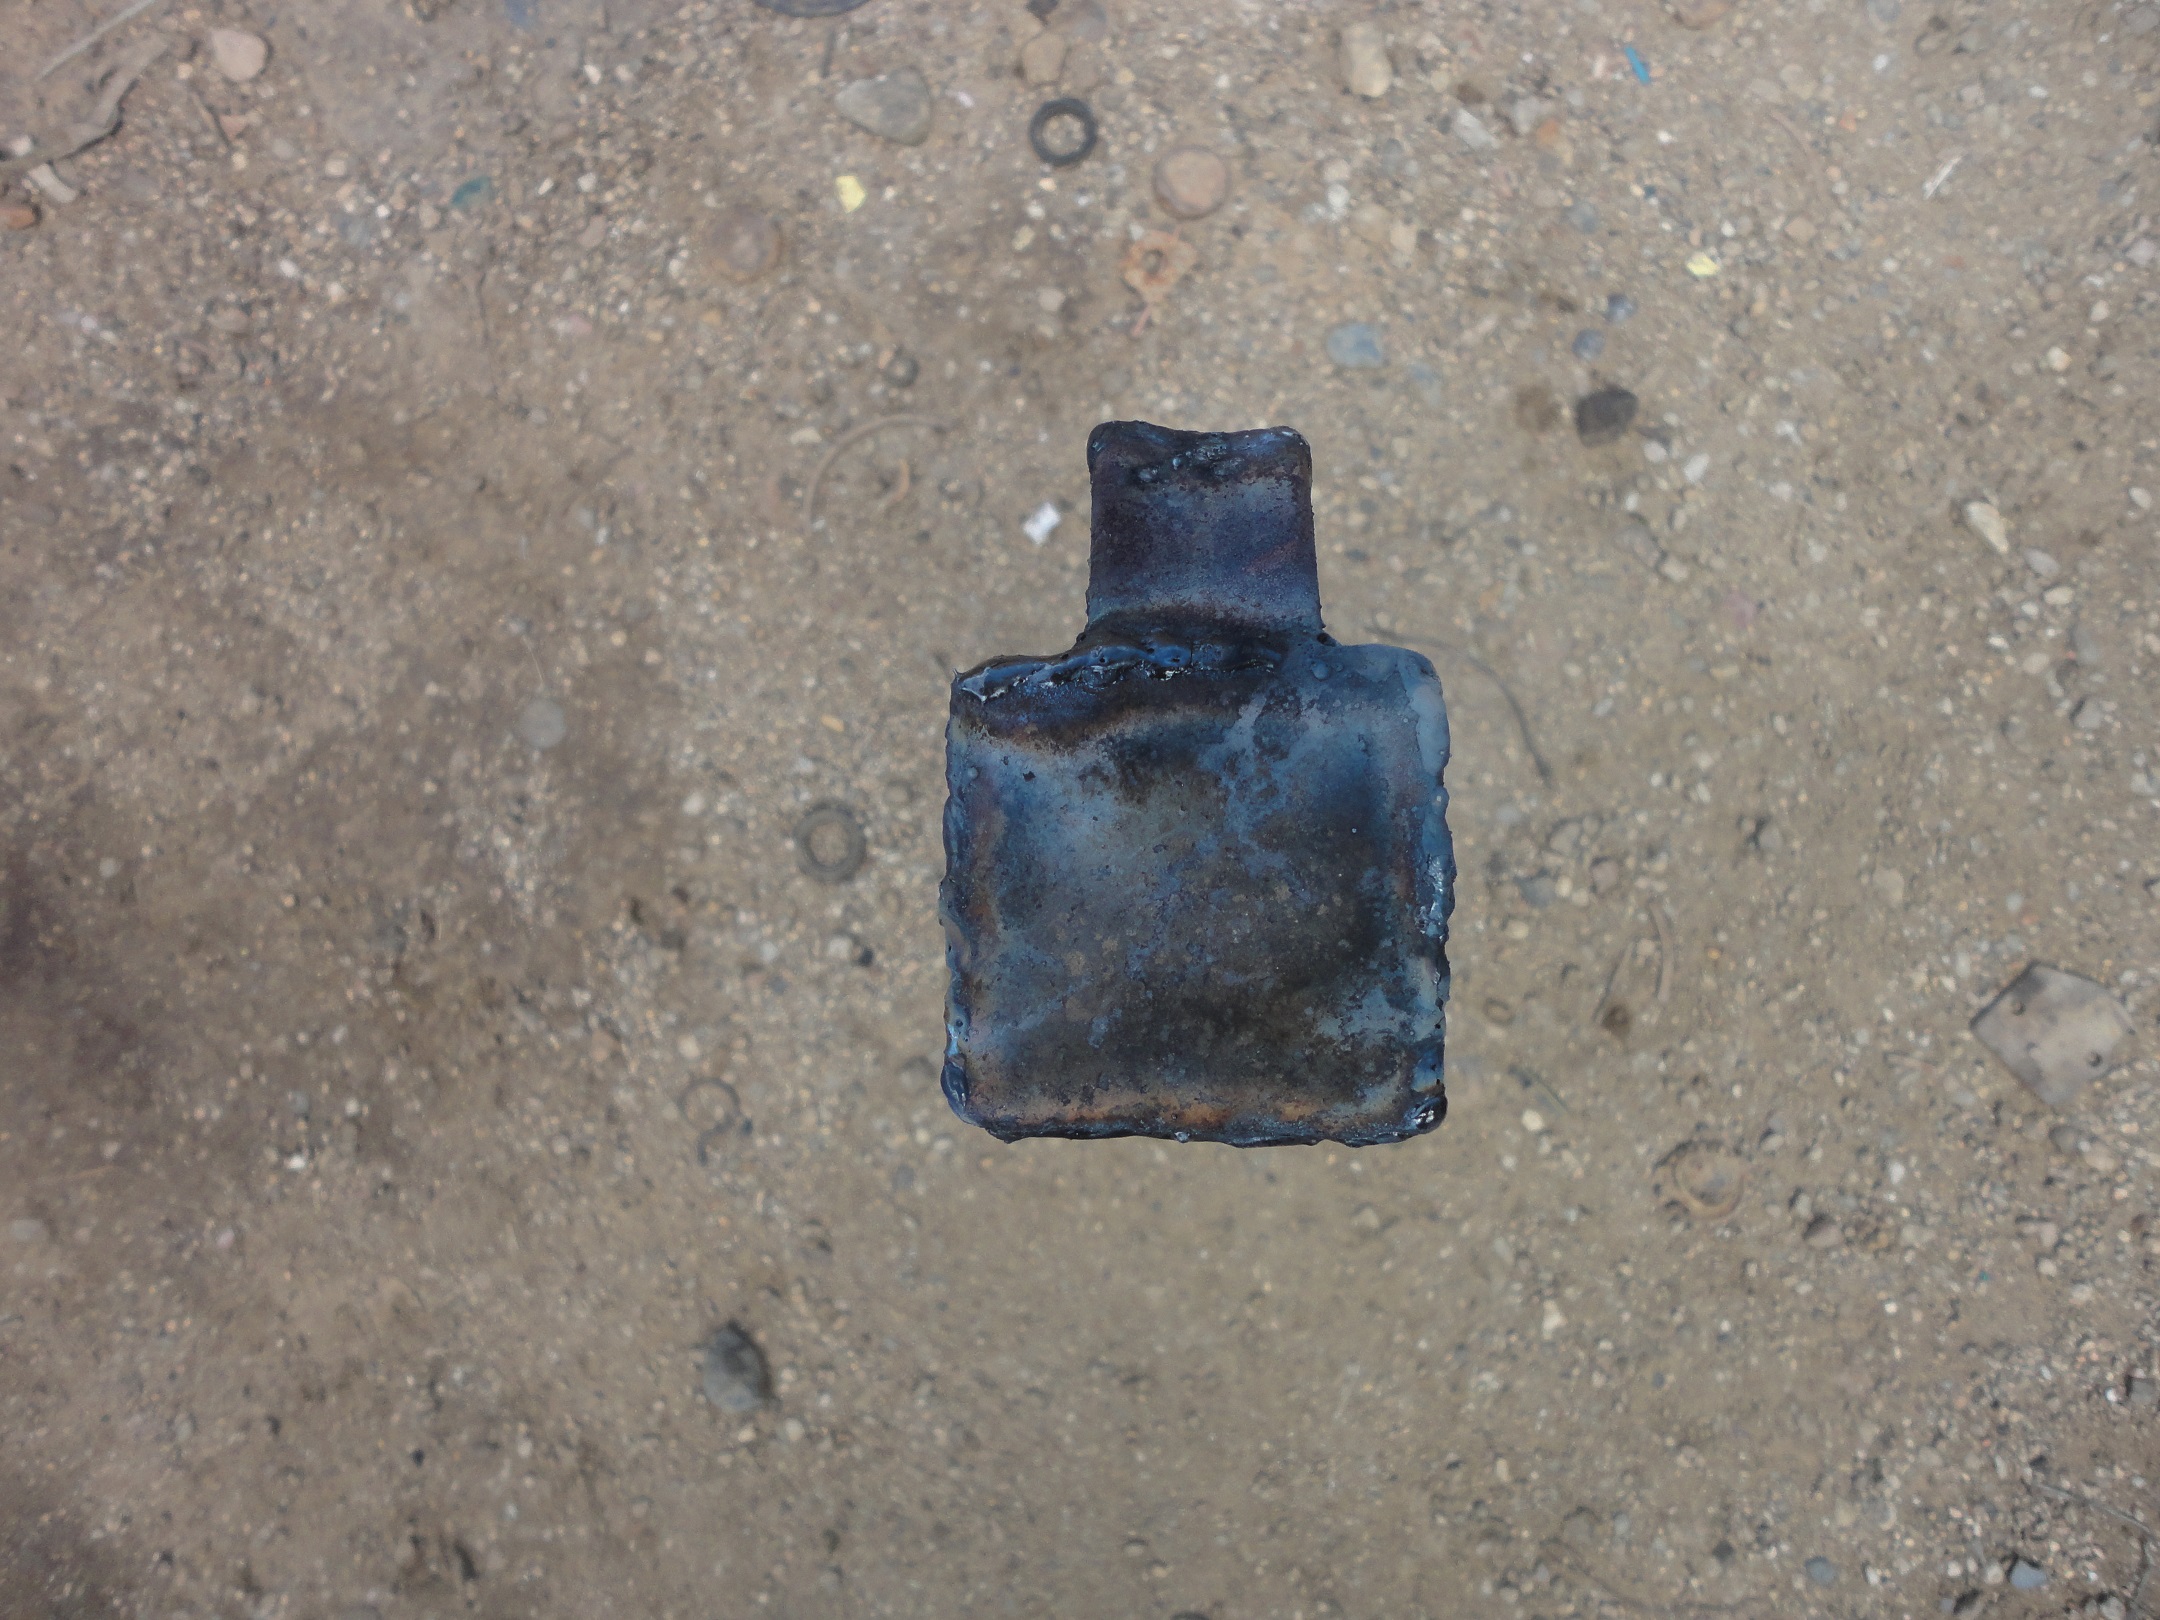
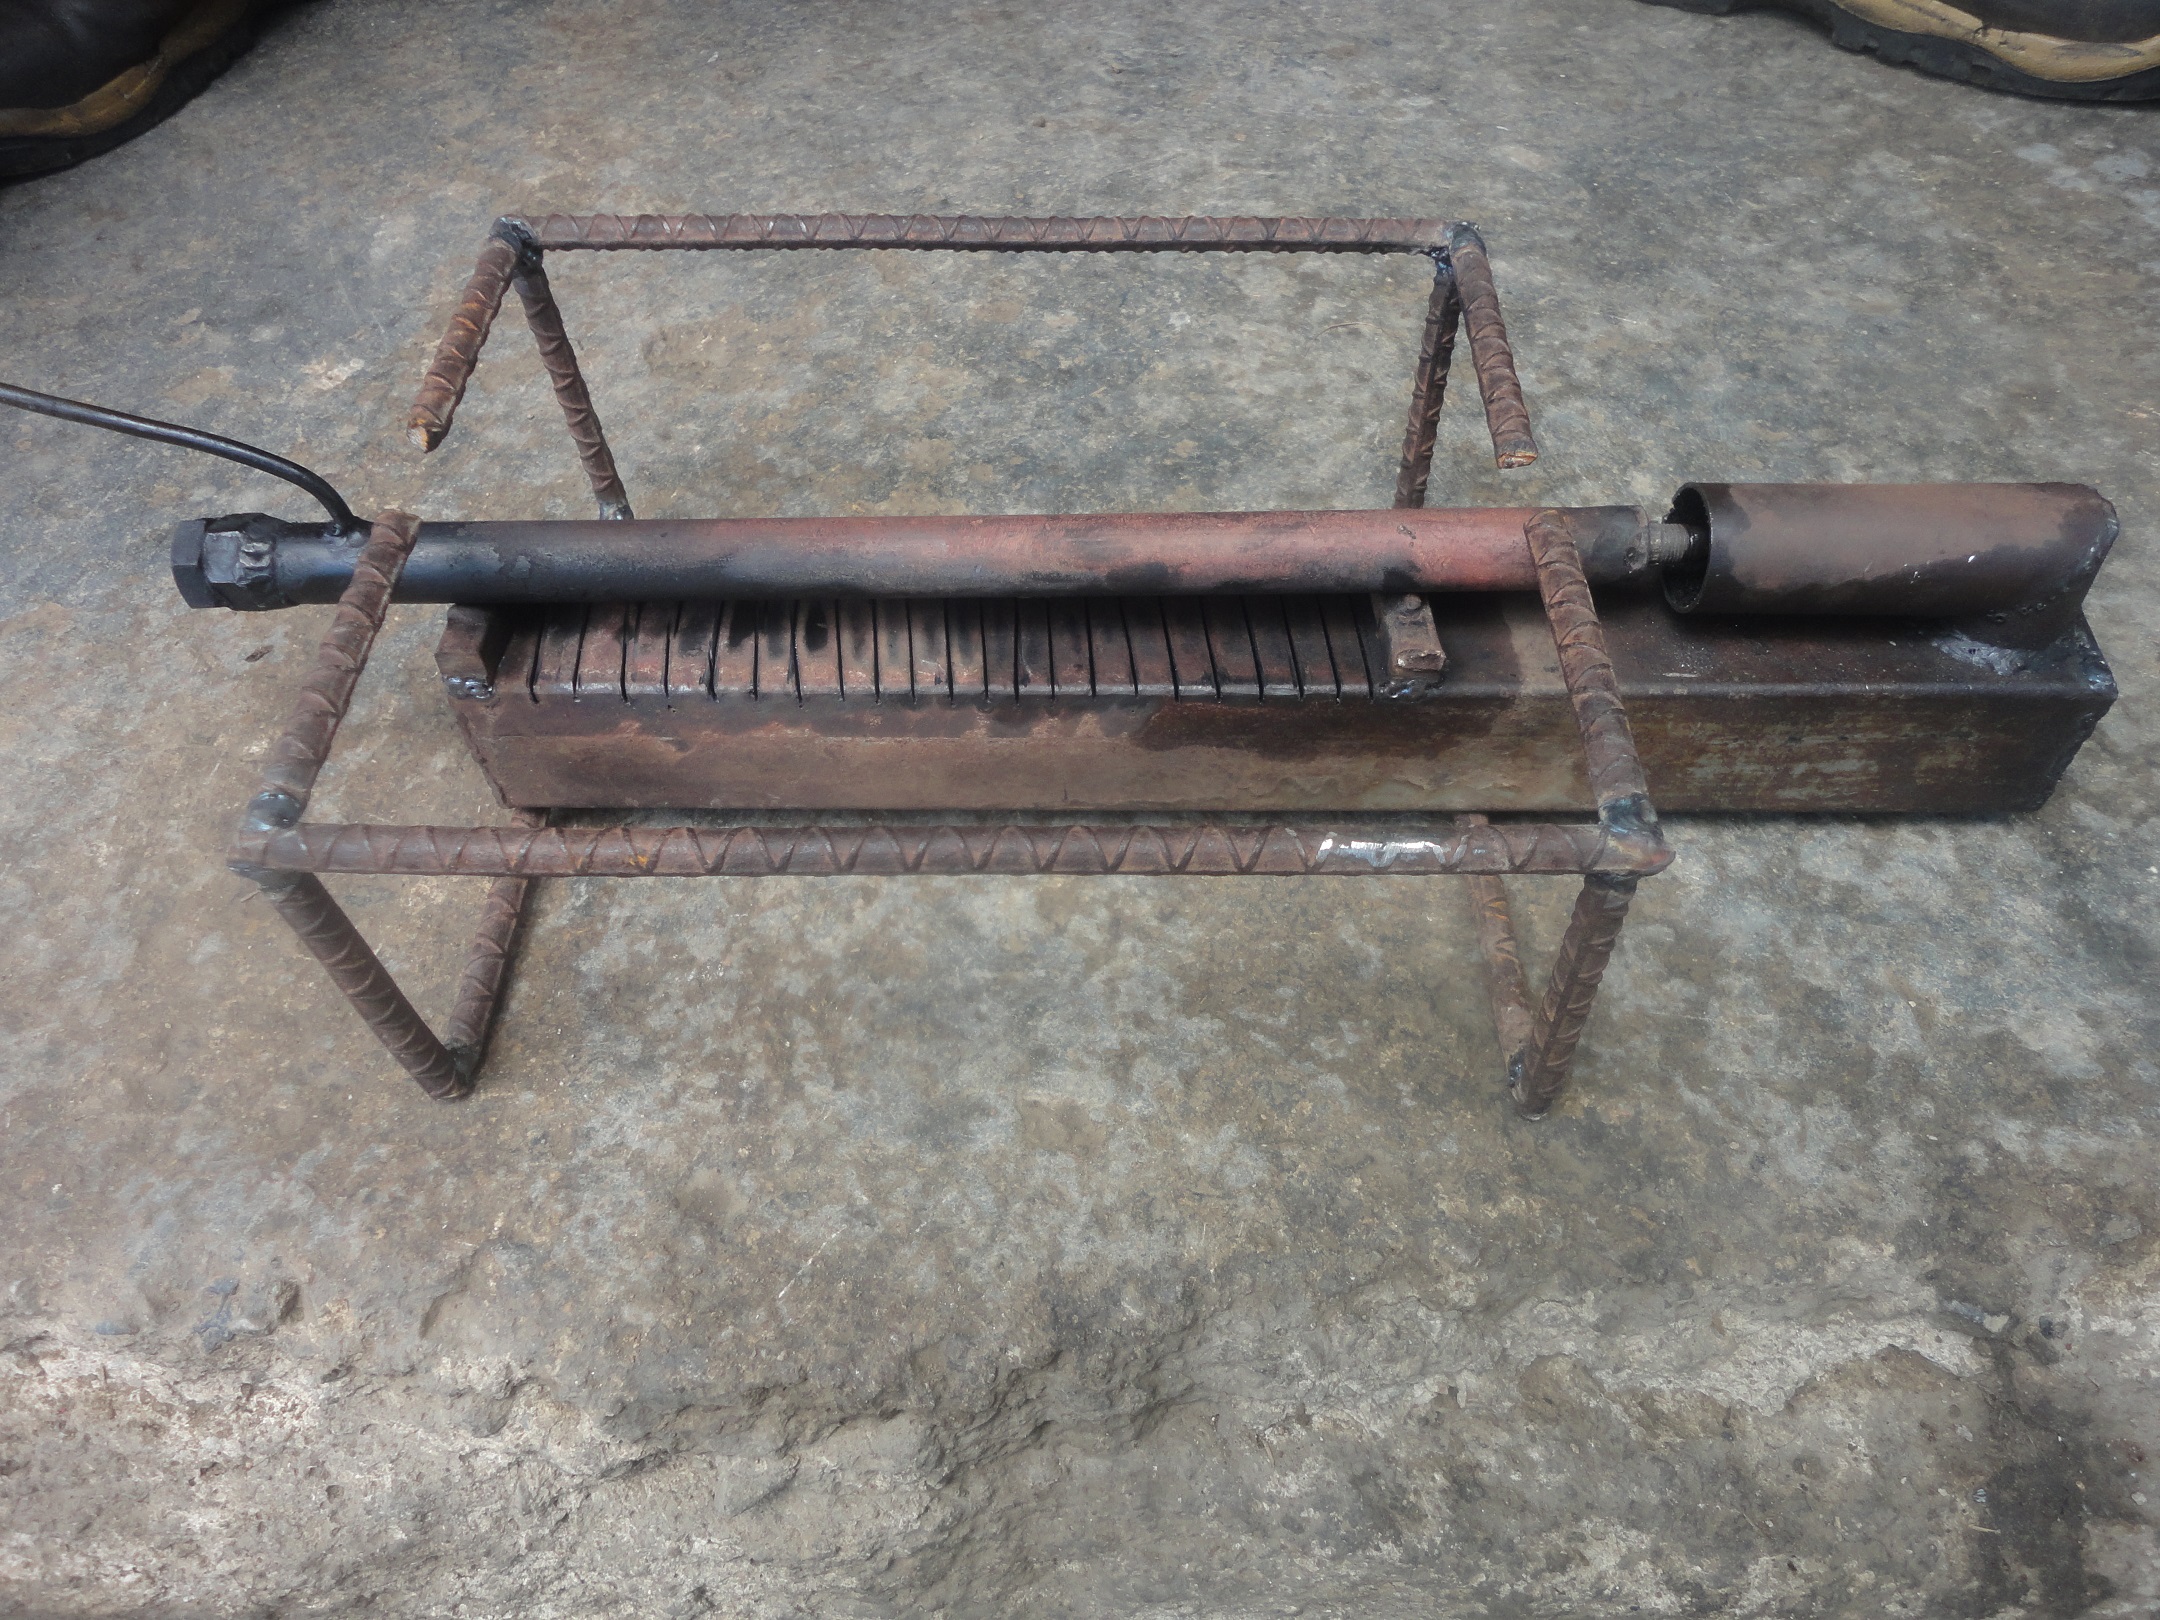
OK… vean detalladamente esta foto parte de la hornalla u hornilla de nuestra cocina de combustión a gasoil esta lista paso por paso espero logren verla está terminada.
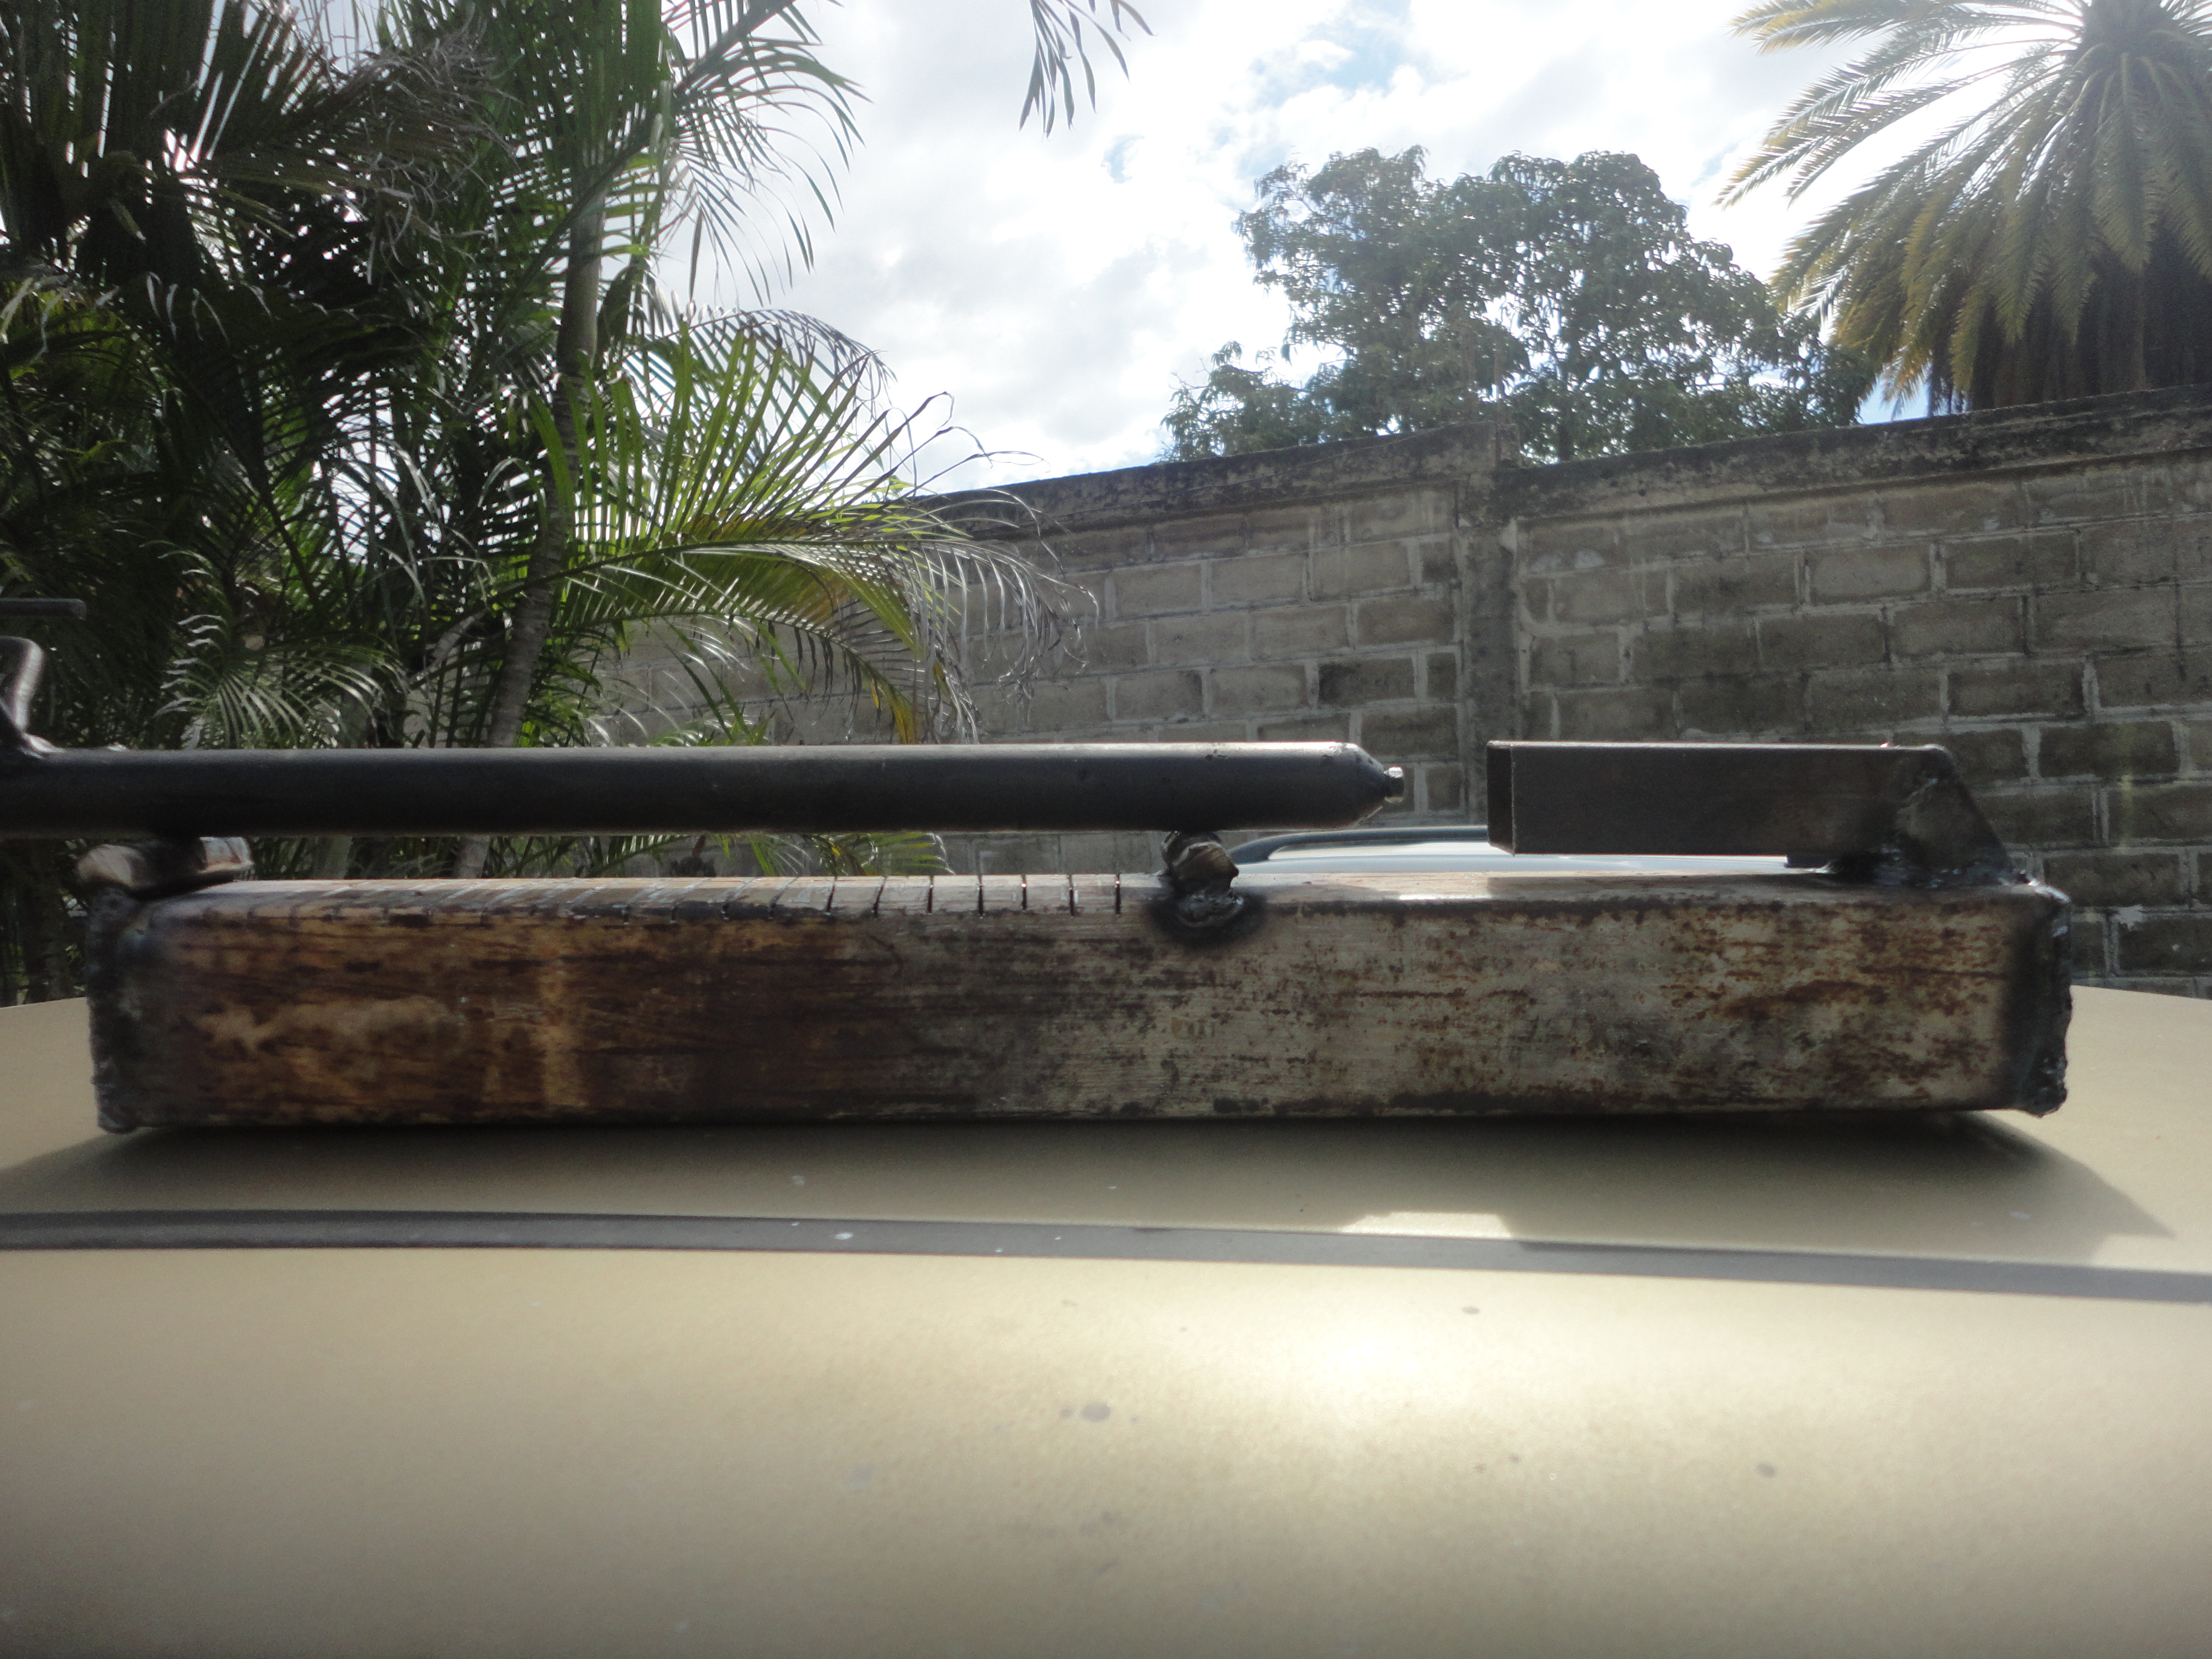
OK ... see this photo in detail part of the burner or burner of our diesel combustion stove this list step by step I hope you can see it is finished.
Todos preguntaran y como inyecto el gasoil? Como logro que encienda esta cocina? Pues les explico en el principio cuando di los materiales dije un tubo de 33 cm de ½ pulgada y una cabilla lisa de ½ pulgada esta cabilla lisa va por dentro del tubo del tubo de 33cm para el flujo de gasoil sea el mínimo en una de las puntas colocamos una salida de aire con un hueco lo más mínimo posible y en el otro extremo un tornillo con tuerca soldado esto para que se pueda limpiar el tubo de ½ por dentro.
Este le llaman cañón y otros lo la llaman difusor vean en las fotos que tenemos el difusor con su pequeño tubo de 5mm soldado por arriba es por donde por medio de una manguera que se utiliza para poner intravenosas MACRO GOTERO con esto podemos regular la salida de combustible.
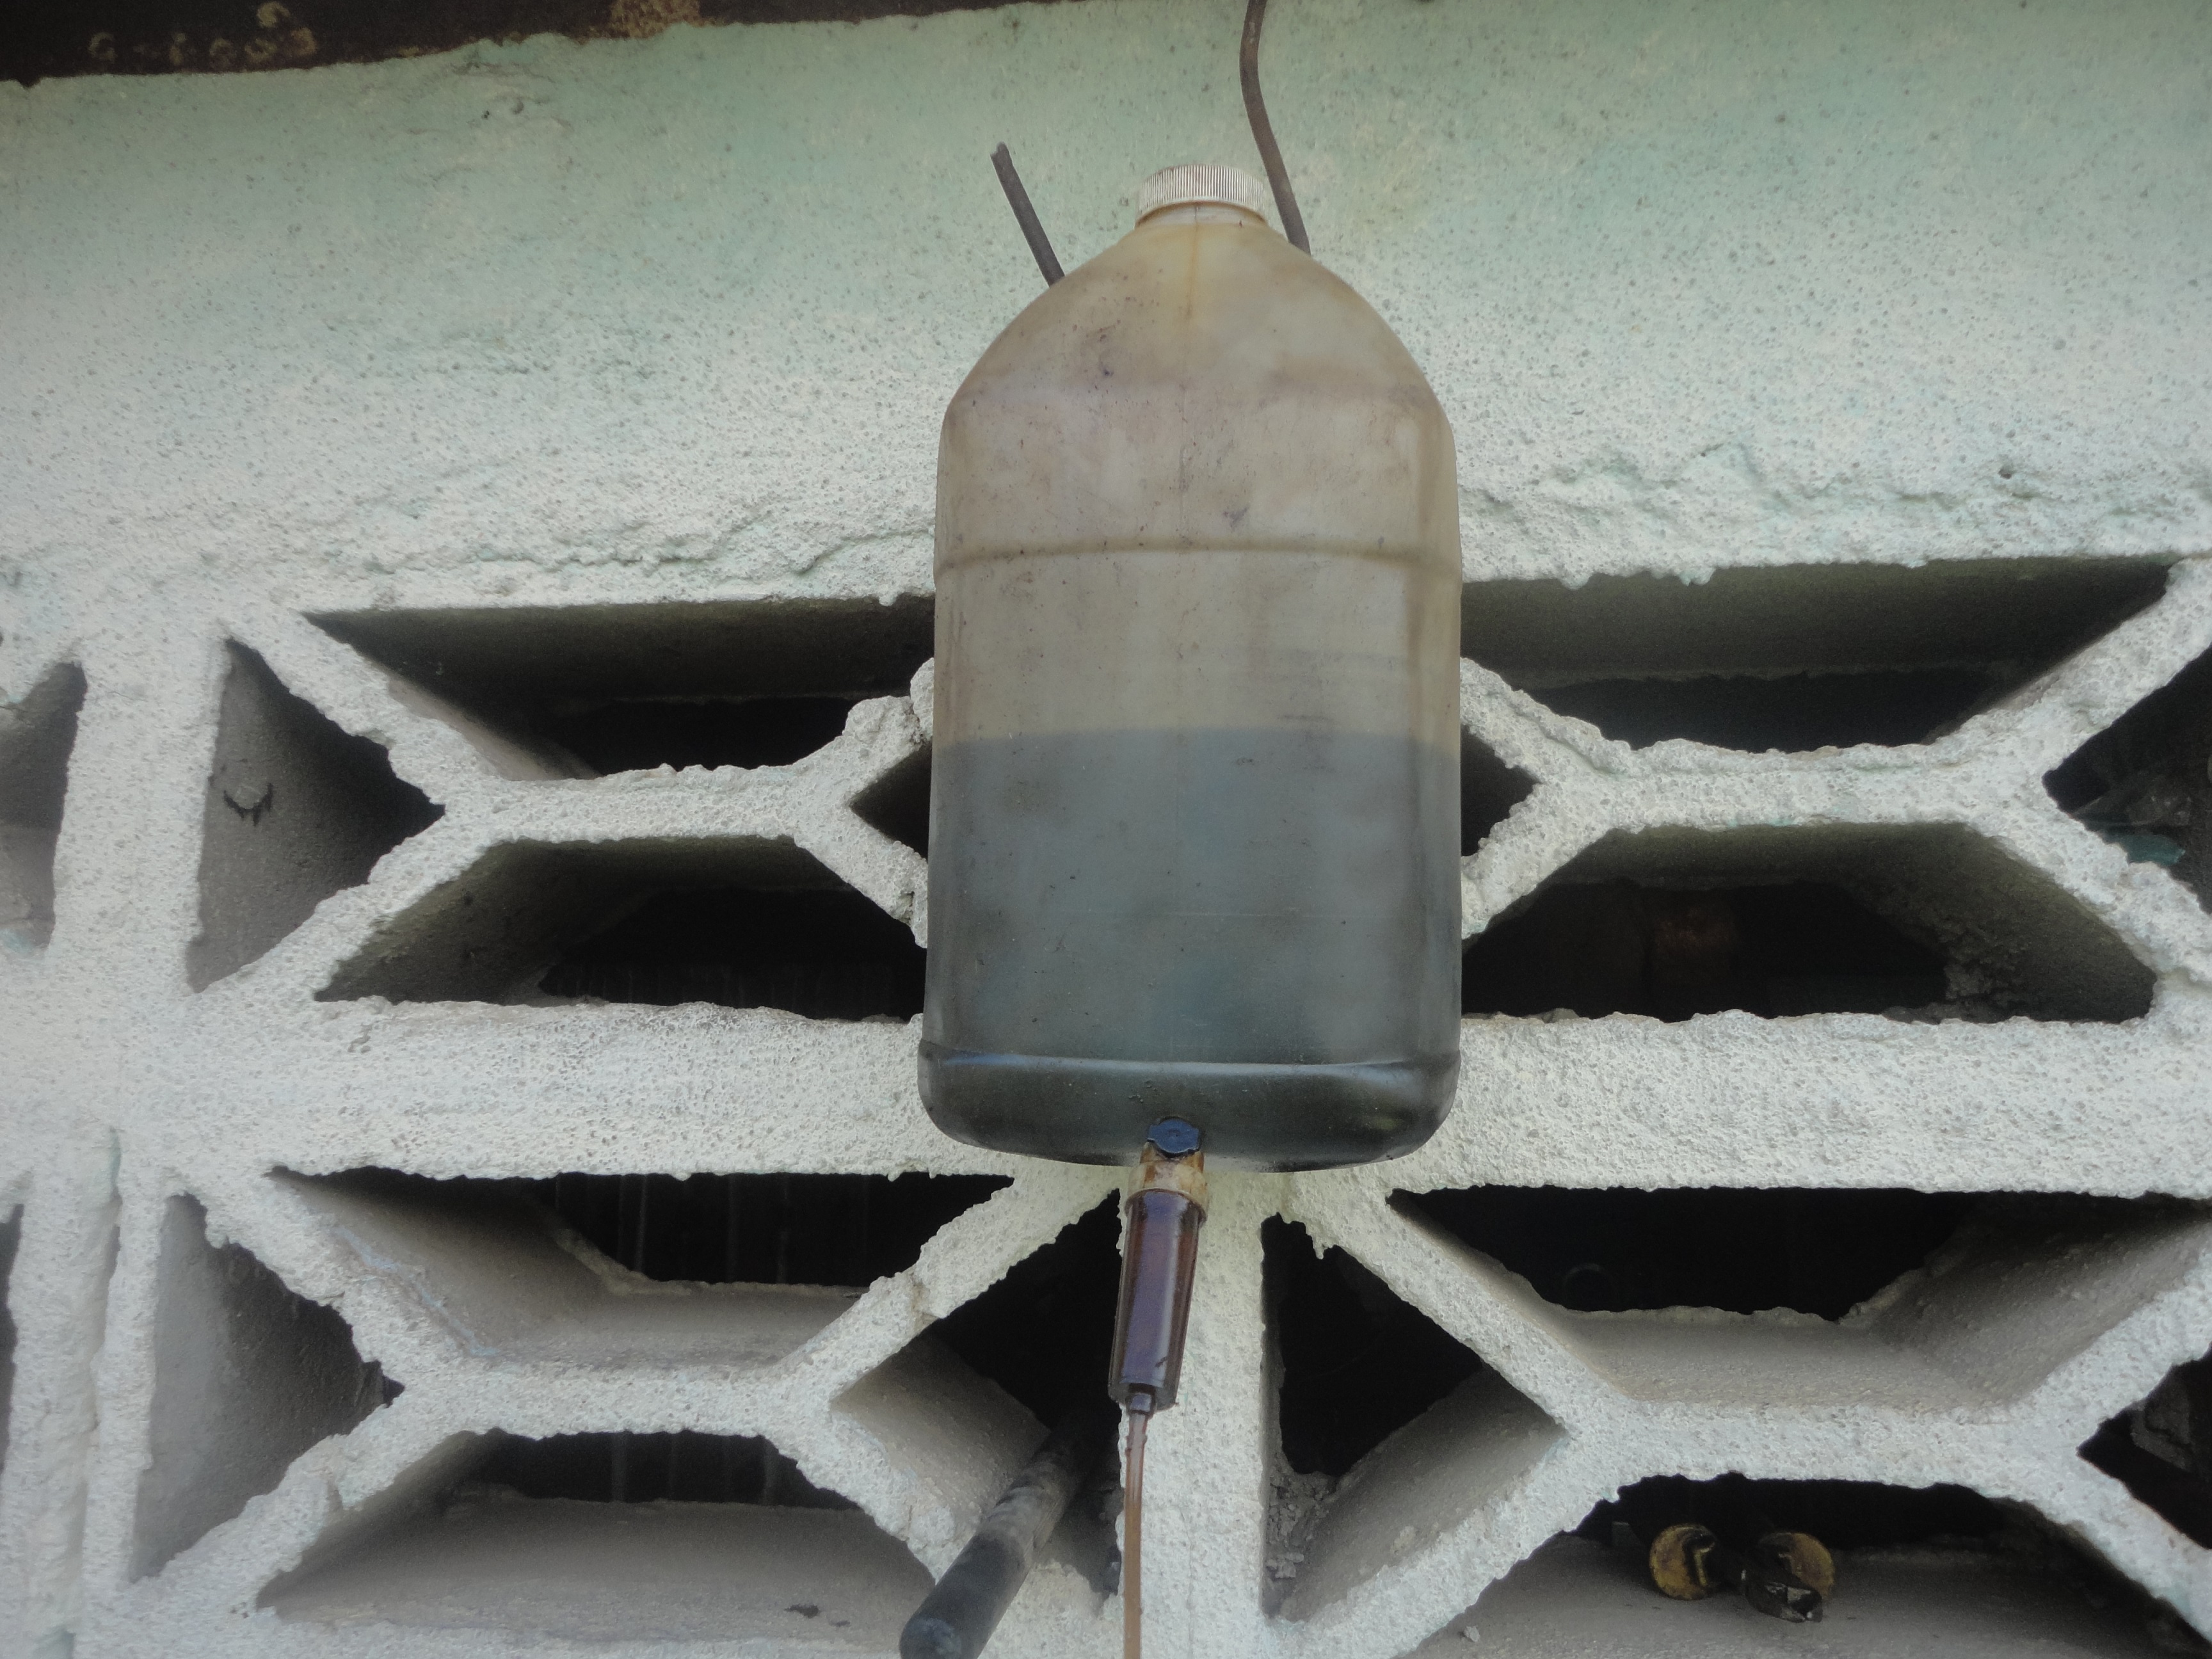
Everyone will ask and how do I inject the diesel? How do I get this kitchen to light? Well, I explained to you at the beginning when I gave the materials I said a 33 cm ½ inch tube and a smooth ½ inch tube this smooth tube goes inside the tube of the 33cm tube for the flow of diesel is the minimum in one of the tips we place an air outlet with a gap as little as possible and at the other end a screw with a welded nut, so that the ½ tube can be cleaned inside.
This is called a cannon and others call it a diffuser, see in the photos that we have the diffuser with its small 5mm tube welded on top, which is where by means of a hose that is used to put intravenous MACRO GOTERO with this we can regulate the outlet of fuel.
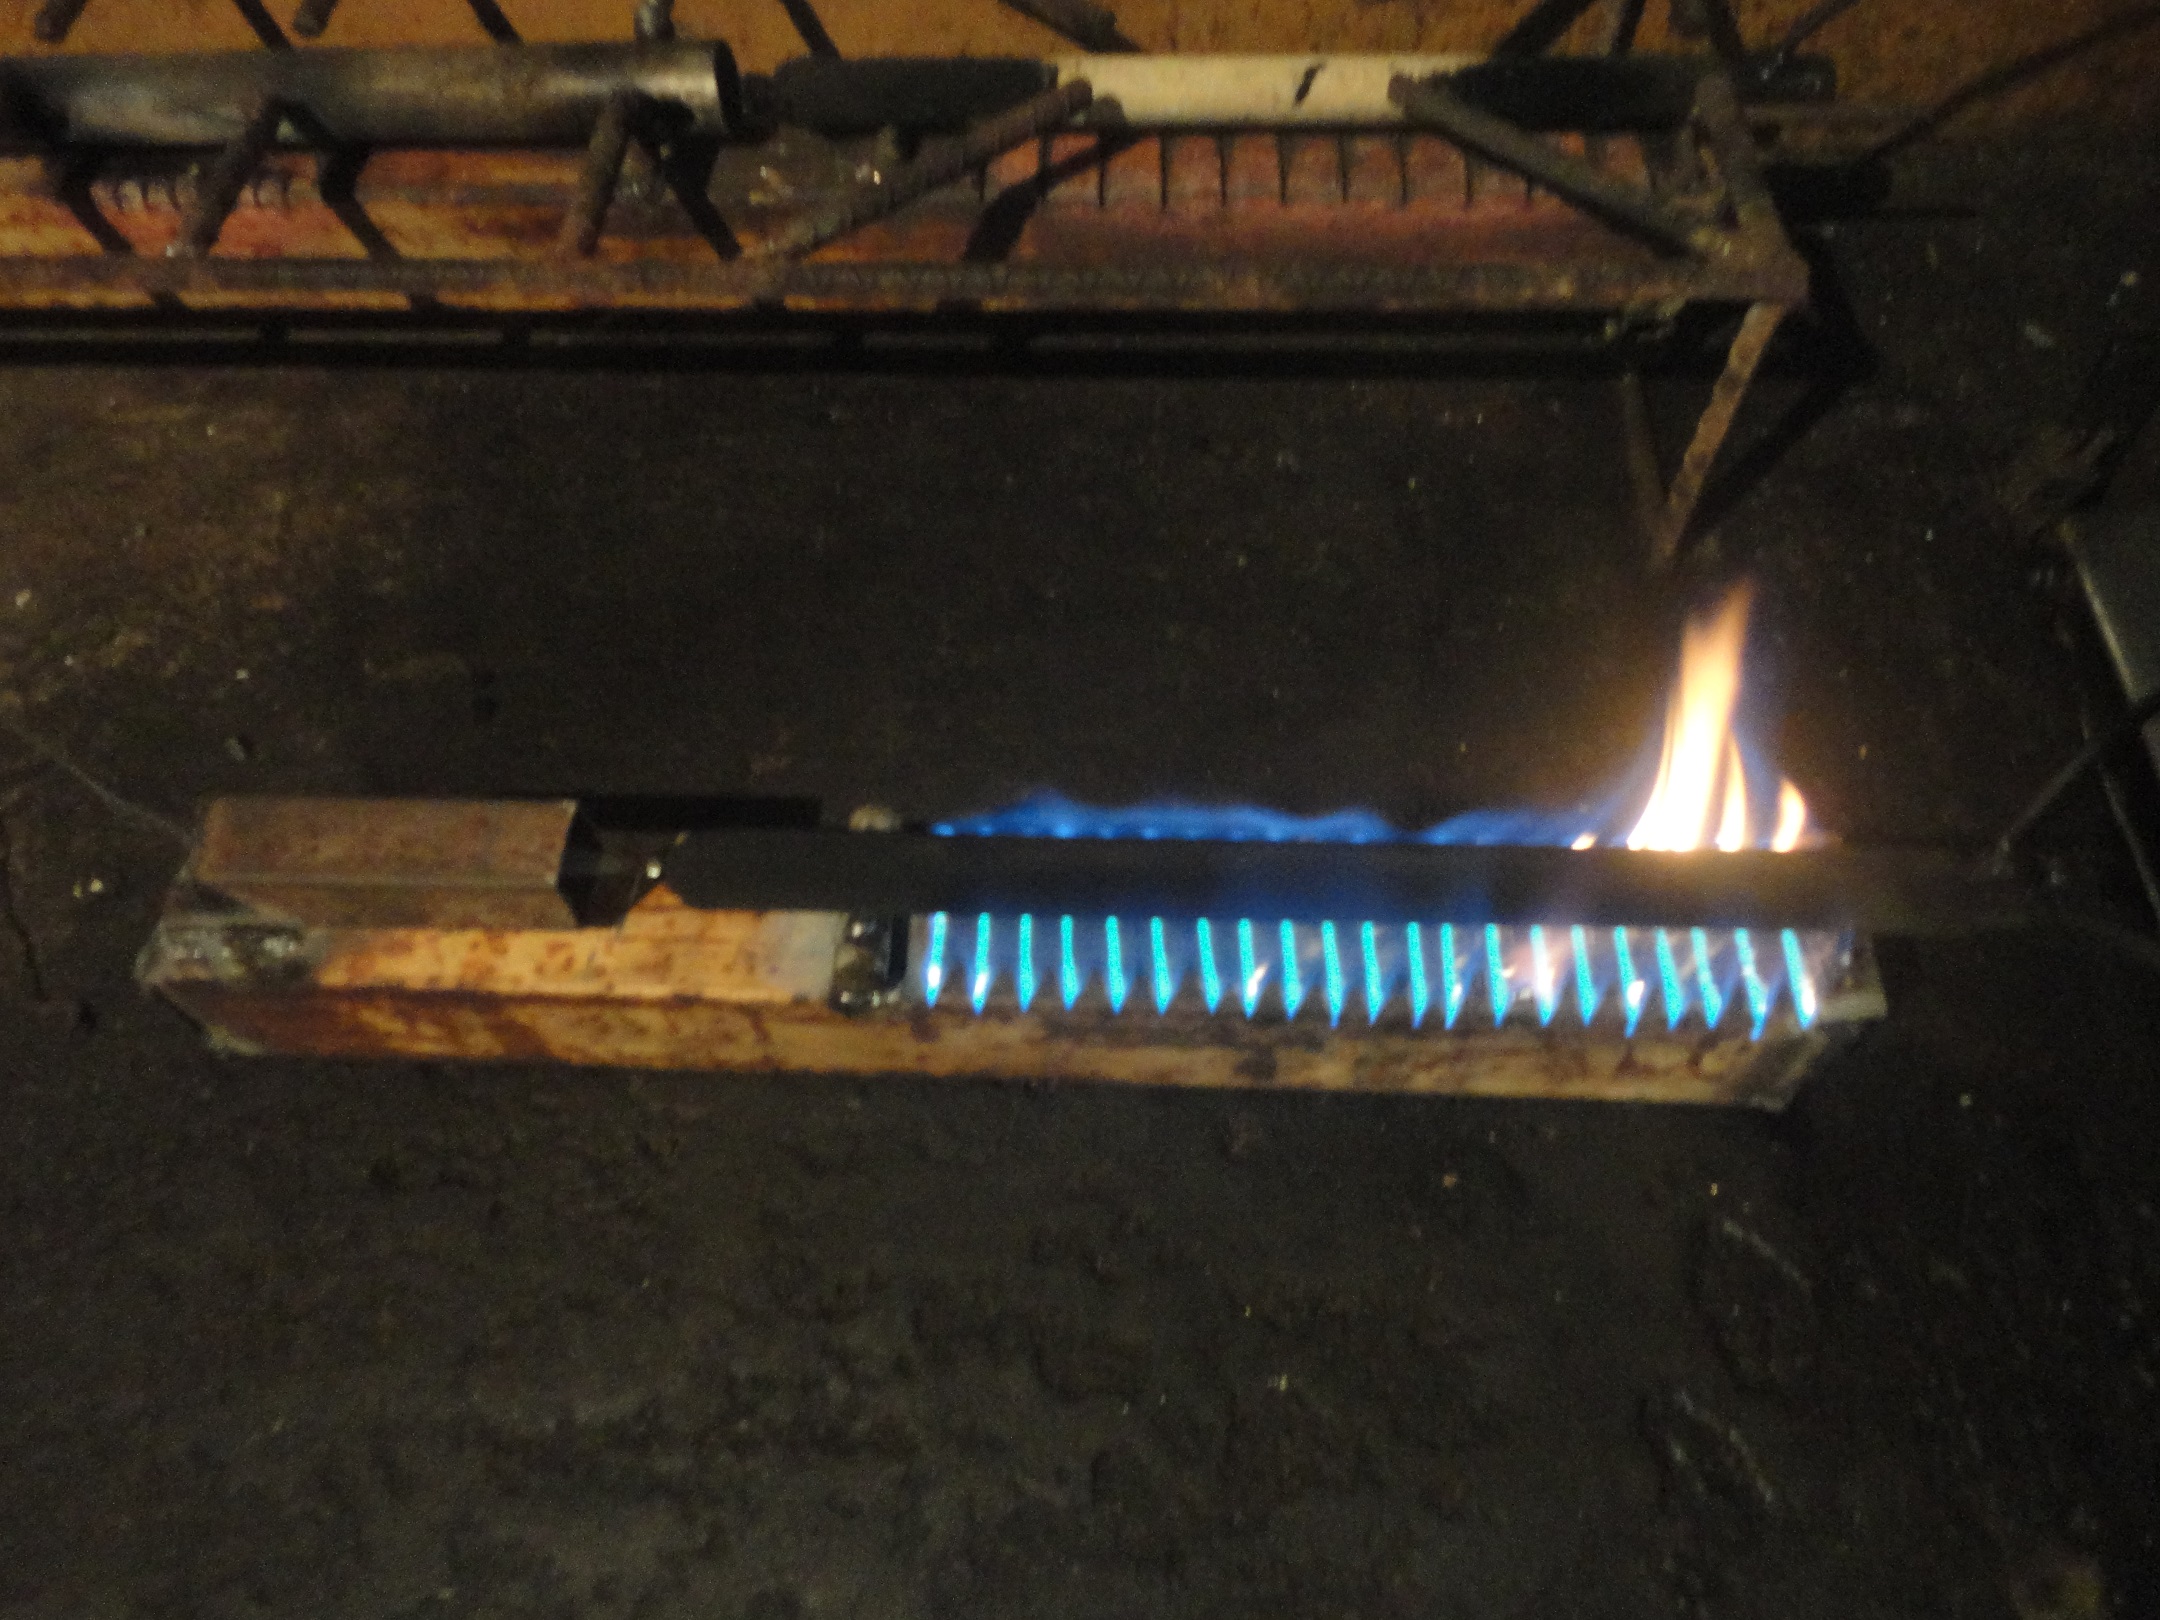
Para finalizar esta épica explicación ponemos a calentar por 10 minutos el difusor una vez bien caliente lo colocamos conectado al Macro gotero abrimos la llave y el combustible comienza a quemarse dentro del tubo vean en la foto como sale humo blanco de la hornalla o hornilla ponemos un fósforo en este humo blanco y listo la cocina está encendida.

In English below

To finish this epic explanation we put the diffuser to heat for 10 minutes once it is very hot we place it connected to the Macro dropper we open the key and the fuel begins to burn inside the tube see in the photo what white homo comes out of the burner or burner we put a match in this white smoke and ready the kitchen is on.
Importante: esta cocina a gasoil no deja los alimentos con sabor a combustible. Y económica dos litros de combustible da para 7 horas encendida sin interrupciones.
Important: this gas stove does not leave food flavored with fuel. And economical two liters of fuel gives for 7 hours on without interruption.
Nota: Las imágenes son propias del autor, fueron capturadas con una Camara Sony Cyber Shot , no están editadas ni se hizo uso de filtros para su presentación en este post.
Note: The images are the author's own, they were captured with a Sony Cyber Shot Camera, they are not edited or filters were not used for their presentation in this post.
Familia Hive, hasta aquí mi pequeño tutorial de cómo hacer una cocina. Espero les sirva a la hora de hacer unas de estas maravillas para sus alimentos. Anímese a construir una hasta el próximo post...
Hive family, so far my little tutorial on how to make a kitchen. I hope it helps you when it comes to making some of these wonders for your food. Dare to build one until the next post ...
Buen trabajo, saludos!
Congratulations @oldboss! You have completed the following achievement on the Hive blockchain and have been rewarded with new badge(s) :
You can view your badges on your board And compare to others on the Ranking
If you no longer want to receive notifications, reply to this comment with the word
STOPDo not miss the last post from @hivebuzz:
Gracias por compartir tu contenido con la comunidad de El Arca (@elarca), el mismo ha sido votado por nuestra iniciativa de curación artística @stellae. Si deseas puedes delegar HP al proyecto: Delegate 25 HP Delegate 50 HP Delegate 100 HP Delegate 250HP Delegate 500HP
https://discord.gg/XZGPGpz