Welcoming ALL the Steemit community! this time we will be appreciating the process of drawing a kitchen in AutoCad, commissioned by a client last week in order to improve the brightness of his apartment.
First of all it is necessary to know that AutoCad is a drawing tool used to stylize the Graphic Representation of any type of Architecture or Engineering project, however it could be used in other disciplines, as in Medicine in the specialty of Traumatology.
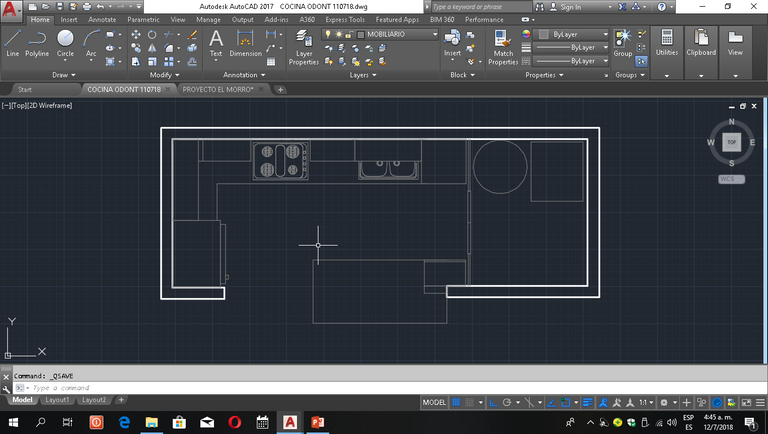
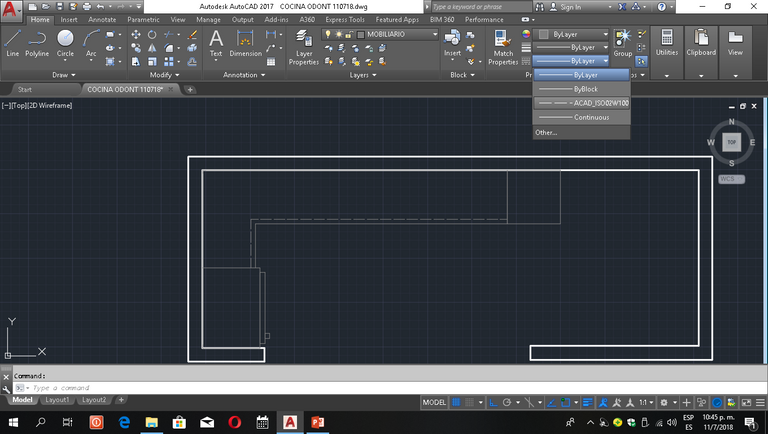
A continuación observamos el producto final dentro de la Interfaz de Autocad, para proceder a explicar el proceso de Dibujo:
Next we observe the final product within the Autocad Interface, to proceed to explain the Drawing process:
- 01 Plano de Planta
- 04 Planos de Fachada
- 01 Frontal
- 01 Lateral
- 01 Frontal de la isla
- 01 Posterior de la isla
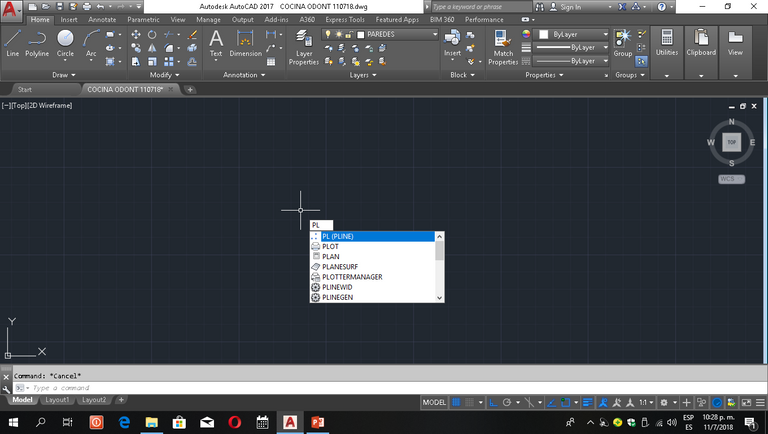
En Primera instancia se elaboró el Plano de Planta, para lo cual se generaron las lineas correspondientes a las Paredes utilizando el comando "Polyline" (PL) una vez activado el comando se introducen las dimensiones de cada una de las paredes determinando con el cursor la dirección de las mismas.
This Project is comprised not only by the Floor Plan shown in the previous image, but also involves:
- 01 Floor Plan
- 04 Facades
- 01 Frontal
- 01 Side
- 01 Front of the island
- 01 Rear of the island
In first instance the Floor plan was elaborated, for which the lines corresponding to the Walls that were generated using the "Polyline" (PL) command, once the command has been activated, the dimensions of each of the walls are entered, determining their direction by the cursor way.

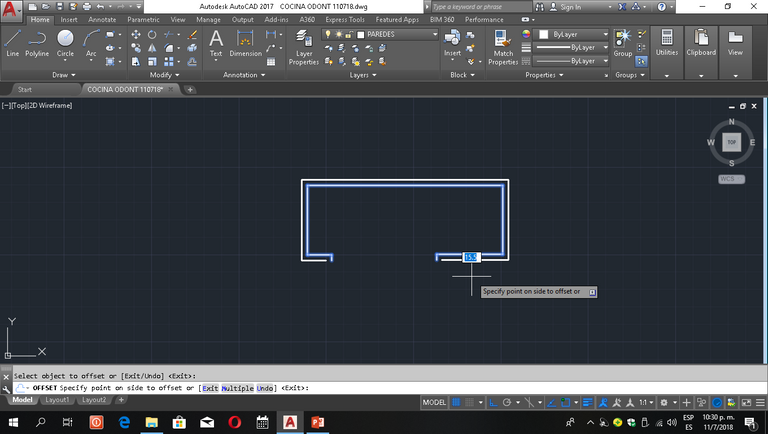
Seguidamente activamos el comando "Offset" (O), que nos permite duplicar lineas de forma paralela y según la distancia que nosotros establezcamos, en este caso particular 15.5 son las unidades introducidas en la Barra de Comando. Es así como se comienza a apreciar la forma de los muros en la que será dibujada la cocina.
Now we activate the command "Offset" (O), that allows us to duplicate lines in a parallel way and according to a distance we establish, in this particular case 15.5 are the units introduced in the Command Bar. This is how you begin to appreciate the shape of the walls on which the kitchen will be drawn.

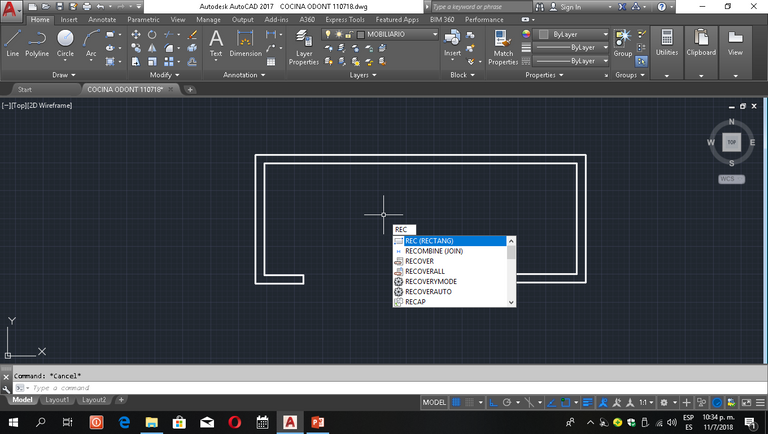
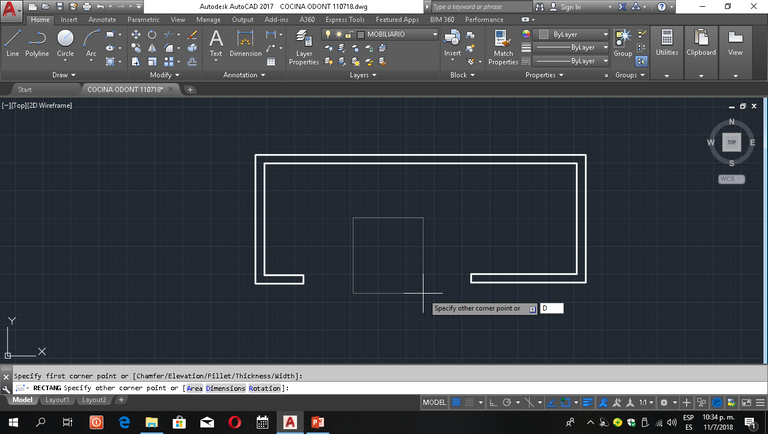
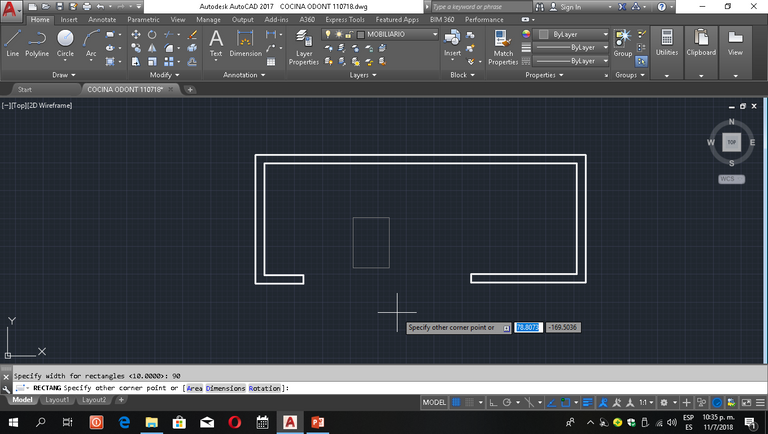
Una vez establecidos los muros, o paredes, iniciamos el proceso de dibujo del mobiliario. El comando que utilizaremos será Rectangle (REC), este comando ofrece varias opciones una vez que hacemos "click" sobre el área de trabajo, especificamos la opción Dimensions (D) y en consecuencia introducimos las dimensiones de la figura, primero su dimensión de el eje "X" y luego la dimensión en el eje "Y". Una vez establecidos estos parámetros hacemos "click" en el área de trabajo para finalizar la acción.
Once the walls are established, we begin the process of drawing the furniture. The command that we will use are Rectangle (REC), this command offers several options once we click on the work area. We specify the option Dimensions (D) and consequently we introduce the figure dimensions, first its dimension on "X" axis and then the dimension on the "Y" axis. Once these parameters are established, we click on the work area to complete the action.
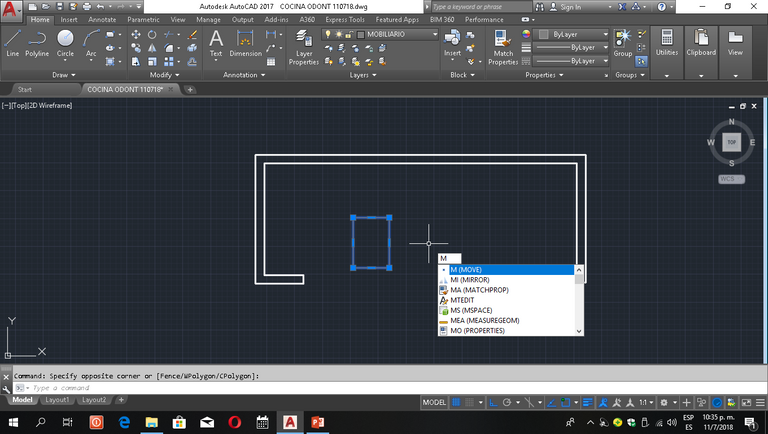
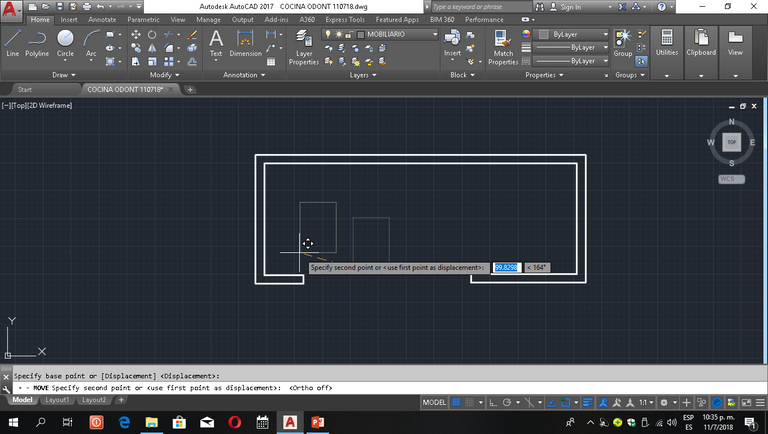
A continuación activamos el comando "Move" (M) con el que obtendremos la posibilidad de cambiar la ubicación el objeto que hemos dibujado, así pues, tomamos como referencia el vértice inferior izquierdo de la figura, hacemos "click" en él, y lo arrastramos hasta el vértice inferior izquierdo de los muros de la cocina. Una vez ubicado el Poligono en su posición, procedemos a dibujar con el comando "Line" (L) el tope de la cocina y otros detalles mostrados en las siguientes figuras.
Then we activate the command "Move" (M) with which we will get the possibility to change the object location we have drawn, so, we take as reference the lower left corner of the figure, we make " click "on it, and drag it to the lower left corner kitchen walls. Once the Polygon is located in its position, we proceed to draw the top of the kitchen and other details shown in the following figures with the command "Line" (L).
Utilizando los procedimientos para los comandos explicados anteriormente, proseguimos con la incorporación de elementos adicionales para poder mostrar una visión más "Real" de aquellos componentes de una cocina. Aquí les muestro el resultado del producto del Plano de Planta.
Using the procedures for the commands explained above, we continue with the incorporation of additional elements to show a more "Real" view of those components who are in the kitchen. Here I show you the result of the product of the Floor Plan.
Dale UPVOTE y REESTEEM para apoyarme en la elaboración de próximas publicaciones relacionadas con esta actividad, que podría beneficiarte como una alternativa de oficio y de Cultura Laboral!
NOS VEMOS EN EL PRÓXIMO POST
And this concludes this first Post of How to draw a Kitchen in Autocad?, very happy that you have read this publication and very anxious to present the coming deliveries, in which I will explain how I did the work of the facades, as well as the elaboration of the TRIDIMENSIONAL model and the work of Photorealism to convince the Client!
Give me an UPVOTE and REESTEEM to support me in the preparation of future publications related to this activity, which could benefit you as an alternative of trade and Labor Culture!
SEE YOU AT MY NEXT POST

AutoCad es sin duda una de las herramientas más utiles para el desarrollo de este tipo de proyectos, puede resultar un poco complejo el utilizarlo, por ello se agradece este tipo de publicaciones, muy buen uso del mismo. Saludos!
Congratulations! This post has been upvoted from the communal account, @minnowsupport, by cpereira from the Minnow Support Project. It's a witness project run by aggroed, ausbitbank, teamsteem, theprophet0, someguy123, neoxian, followbtcnews, and netuoso. The goal is to help Steemit grow by supporting Minnows. Please find us at the Peace, Abundance, and Liberty Network (PALnet) Discord Channel. It's a completely public and open space to all members of the Steemit community who voluntarily choose to be there.
If you would like to delegate to the Minnow Support Project you can do so by clicking on the following links: 50SP, 100SP, 250SP, 500SP, 1000SP, 5000SP.
Be sure to leave at least 50SP undelegated on your account.
Pero que impresionante. :O
Dios, esto me hace recordar muchos trabajos de mi instituto xD
buen trabajo, te ha estado quedando bien ^^
autocad tiene su encanto y su rapides cuando sabes los comandos xD
mientras... tiende a ser un tanto confuso con tantas herramientas
Definitivamente jaja! Gracias! claramente esta es una muestra muy básica, si no, habría que pasar horas leyendo el Post jajaja xD muchas gracias de nuevo!
Hello @cpereira, thank you for sharing this creative work! We just stopped by to say that you've been upvoted by the @creativecrypto magazine. The Creative Crypto is all about art on the blockchain and learning from creatives like you. Looking forward to crossing paths again soon. Steem on!
Thanks for your support!!