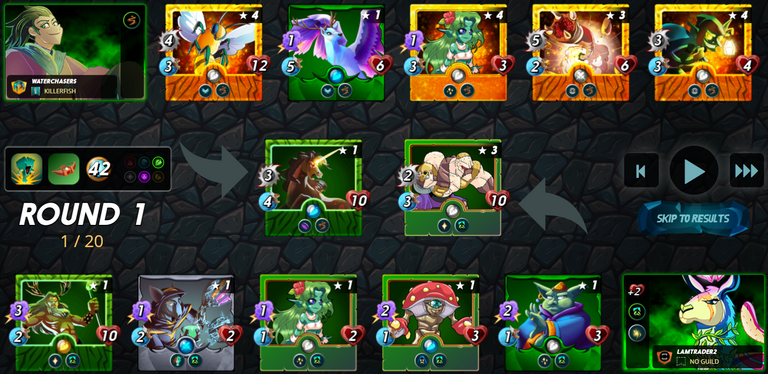
In this blog and the next I want to touch on how I used Sneak Monsters when I expected my opponent to have Llama based on his previous battles (which can be seen when enemy is found before on selects the team to battle).
From his previous battles I noticed that he used Llama and placed Kron monster in last position so he would have the 'Last Man' ability and increased stats when Kron is the last monster left.
Splinterlands Sneak Ability Battle Ideas
In this instance, I used 2 Splinterlands Sneak Monsters for battle.
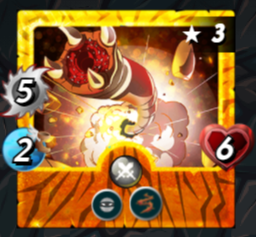
Although the enemy monsters were at a lower level than me, Llama with Flesh Golem and Kron are always tough battles nonetheless.
For this particular battle, my sole focus was to kill off the most troublesome monster on the enemy's side, Kron. For this battle, the only Splinter options were 'Death Splinter' and 'Earth Splinter'. Here is the summoner and the monsters I used in this 42 mana battle 'Trample' (trample can occur multiple times per attack if trampled monster is killed) and 'Close Range' (range attack monsters can attack in first position):
Mylor Crowling
Mylor Crowling of the Earth Splinter is a Splinterlands Summoner that gives the 'Thorn' ability to all monsters that does wonders for all melee monsters that are selected. This ability means that every time a monster is attacked my a melee attack monster, it does damage back to that monster. However, in this battle the 'Thorn' ability did have much use except on the enemy's front positioned monster, Flesh Golem. The opponent used magic monsters for the other 5 cards he chose for this battle, probably because he has also studied my past battles and knew there was a high probability that I would use Mylor Crowling.
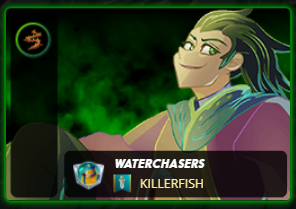
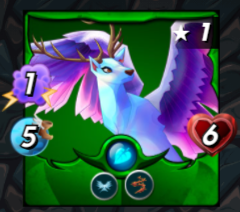
Unicorn Mustang
Unicorn Mustang is the first placed monster in my battle. I chose to place it in the first place as I expected magic attacks to be used by the opponent, especially since I had already expected Kron to be used by the opponent. Even at 1st level, Unicorn Mustang has the Void ability, which means reduced damage from magic attacks and it is always a good idea to have a healer so Unicorn Mustang can last longer in the first position.
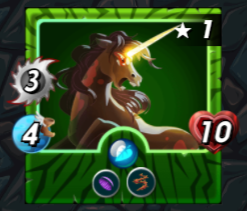
Nectar Queen
Nectar Queen is the 2nd position monster for this battle, as I wanted to save her 4 melee attack ability after enemy has been weaken and Unicorn Mustang has fallen in battle and especially after Kron, which has 3 magic attack has been killed. She has high health and also has the flying ability. Enemy melees and range tend to miss her occasionally too as you will see in his battle where enemy's Flesh Golem misses an attack. At level 4 she has 4 attack, 12 health and 3 speed which makes her a great monster to use in battles. Furthermore, if the opponent used melee monsters, the 'Thorn' ability that the summoner Mylor Crowling gives gives her that added advantage. The 'Thorn' ability causes any melee monster attacks on her to give damage back.
Regal Peryton
The 3rd positioned card I used in this battle was Regal Peryton. The main reason I used this card is because I wanted some magic attacks for this battle and in case Nectar Queen is killed, melee and range enemy monsters may have had trouble killing it because of its 5 speed and flying ability which increases the chances of enemy missing its attack on it. However, in this battle it would not have mattered cause enemy used 5 magic attack monsters. Regal Peryton does give some advantage my always being amongst the first to attack due to its fast speed. Another reason I has for placing this monster in the 3rd position is to take the enemy's snipe attack damage as I wanted to protect my 4th placed monster, Wood Nymph, a healer and very important monster for this battle to be kept alive as long as possible so the enemy would have a hard time killing Unicorn Mustang and Nectar Queen.
Wood Nymph
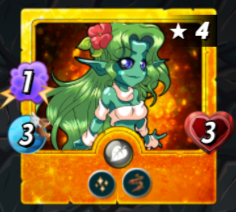
Wood Nymph was my 4th placed monster. She is a very important card for this battle as she will keep the front monsters alive much longer with her healing ability. This is a must have monster for battles. As such, it was important to keep her alive for as long as possible. Which is why I chose to place Regal Peryton in 3rd place to protect against snipe attacks which are usually archers. However, I was also lucky that enemy did not use an opportunity monster as this enemy monster would have attacked the lowest life monster on my line-up, which would have been Wood Nymph. She would have given the 'Thorn' damage back but would probably have died pretty early in the battle.
Sand Worm
(The Star)
Sand Worm is a great monster to use due to its high attack power of 5 at level 3. I placed it in 5th position as it is a card that needs some protection and so it can stay alive longer to do more damage to the enemy so I rarely place it in the last position. It is always important to keep your important and vulnerable (low health) cards in 3rd and 4th position. Protected from sneaks with your 5th and 6th placed monsters. However, in this battle, I placed Wood Nymph in 4th position and to give it protection from snipe attacks I placed Regal Peryton in 3rd position. The 6th placed monster was the only protection that Sand Worm had in this battle. Sand Worm was chosen as I wanted to do as much damage with sneak attacks on the enemy rear monsters, where I believed the most troublesome monster would be placed by the opponent, Kron.
Goblin Thief
(Co-Star)
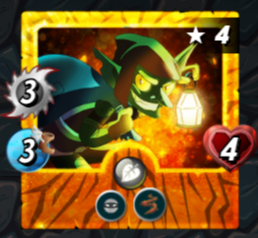
Goblin Thief in this battle was chosen as my 6th and last placed monster due its 3 sneak attack. It is always better to use at least 2 cards who do similar attacks such as sneak, opportunity and snipe. Sand Worm and Goblin Thief in this battle give a total of 8 sneak attack damage on the enemy rear monster and as such they will work great together. Which is why I call Sand Worm 'The Star' and Goblin Thief the 'Co-Star'. The only weakness and gamble on my part was that enemy did not have heavy sneak monsters as that would have derailed my plans on killing off Kron and would have lost me this battle.
You may also be interested to view my previous blogs on using:
Splinterlands Earthquake Ruleset Battle - Protect The Queen!
Splinterlands Earthquake Ruleset Battle - Protect The Queen! Part 2
Malric Inferno in an Up Close & Personal ruleset battle
Mylor Crowling in an Up Close & Personal ruleset battle
I am sorry that its a long blog on one battle but I like explaining things in little more detail and I hope that this also gives you an idea to form your own strategies in your battles. Every monster chosen for your battle has to be carefully thought out and in my case I always keep in mind to protect my important cards against the 1st snipe, opportunity and sneak attacks in the game, unless its a ruleset where no snipe and sneak can be used or when all abilities are lost.
Hope this blog has been helpful especially for newbies to the Splinterlands game. This is a fun game with huge investment potential for NFT collectors. If you have been thinking of joining this game, you can use my Splinterlands referral link.
It takes only $10 to play the game with unlocked starter cards. This will unlock rewards that you can earn on a daily basis with daily quests and also at season end which is every 15 days.
Splinterlands is great for NFT investors as history has shown that the cards give great returns on investment and it is an awesome card game too.
For a start my advice is not to rush into buying cards immediately. Battle with other players first to see what cards bring value and are most effective in battles. You can also buy packs which contain the latest new cards with great price growth potential. Feel free to drop me a comment should you need any assistance or advice.
Thanks for sharing! - @alokkumar121

Congratulations @waterchasers! You have completed the following achievement on the Hive blockchain and have been rewarded with new badge(s):
Your next payout target is 50 HP.
The unit is Hive Power equivalent because your rewards can be split into HP and HBD
You can view your badges on your board and compare yourself to others in the Ranking
If you no longer want to receive notifications, reply to this comment with the word
STOPTo support your work, I also upvoted your post!
Support the HiveBuzz project. Vote for our proposal!
@waterchasers! The Hive.Pizza team manually curated this post.
PIZZA Holders sent $PIZZA tips in this post's comments:
@steem82868(9/14) tipped @waterchasers (x1)
Learn more at https://hive.pizza.
Have a !PIZZA