
Hola queridos amigos de Steemit, hoy comparto una guía básica de como cambiar nuestras ganancias de esta plataforma en cualquier otra criptomoneda que deseamos y también como podemos hacer para venderlas. Este tutorial se orientará en como cambiar principalmente los SBD (Steem Blockchain Dollars) en la criptomoneda "Ethereum", pero con esta simple guía podrás cambiar tus ganancias a la criptomoneda que desees. Sin mas que decir empecemos.
How to change our earnings in another cryptocurrency and how to sell it Hello dear friends of Steemit, today I share a basic guide of how to change our profits from this platform in any other cryptocurrency we want and also how we can do to sell them. This tutorial will focus on how to change mainly the SBD (Steem Blockchain Dollars) in the cryptocurrency "Ethereum", but with this simple guide you can change your earnings to the cryptocurrency you want. Without more to say let's start.
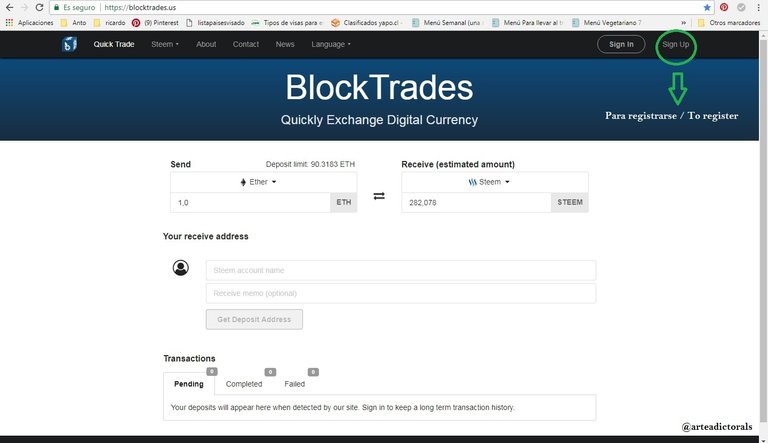
comenzaremos ingresando en la pagina www.blocktrades.us , donde podremos cambiar de forma rápida y sencilla nuestros Steem y Steem Dollars a cualquier otra Criptomoneda. Una vez estemos en la pagina, procederemos a darle clic en donde dice "Registrarse" como se muestra en la imagen.
We will start by entering the page www.blocktrades.us, where we can quickly and easily change our Steem and Steem Dollars to any other Cryptocurrency. Once we are in the page, we will proceed to click on where it says "Register" as shown in the image.
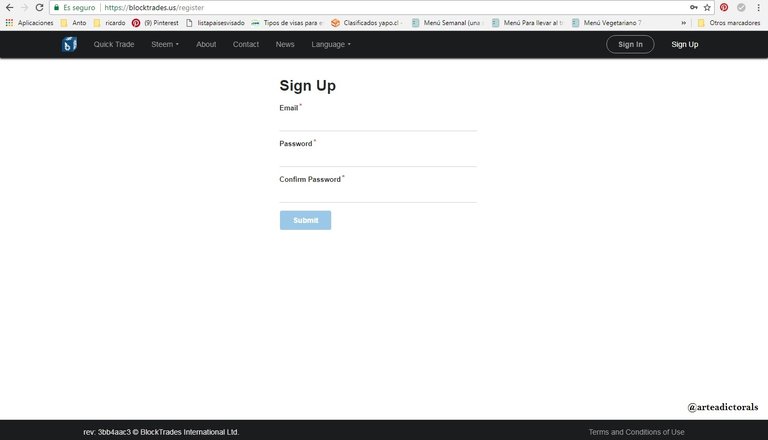
Nos saldrá la siguiente ventana, en donde tenemos que colocar nuestro correo y nuestra contraseña, luego le damos clic en "Submit" (Enviar) y nos pedirá que confirmemos esta cuenta dándole clic al link que nos llego en el correo colocado previamente.
We will get the next window, where we have to put our mail and our password, then we click on "Submit" and ask us to confirm this account by clicking on the link that arrived in the mail previously placed.
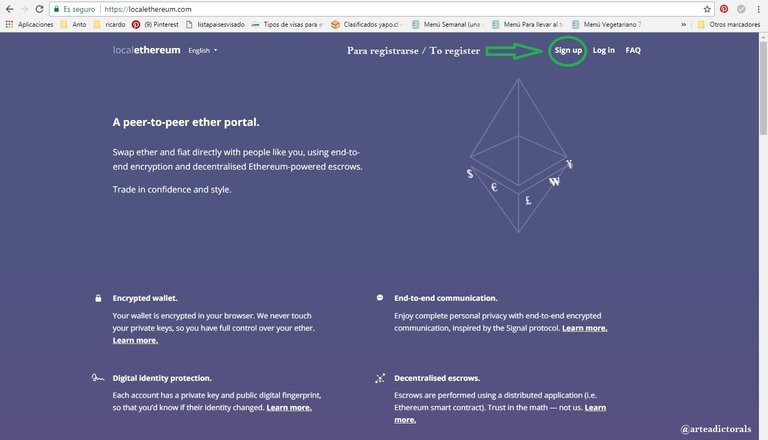
Una vez confirmada la cuenta, procedemos a ir a la pagina en donde venderemos la criptomoneda que convertiremos, en este caso lo cambiaremos a "Ether", por ende ingresaremos a localethereum.com y procedemos a registrarnos.
Once the account is confirmed, we proceed to go to the page where we will sell the cryptocurrency that we will convert, in this case we will change it to "Ether", therefore we will enter to localethereum.com and we proceed to register.
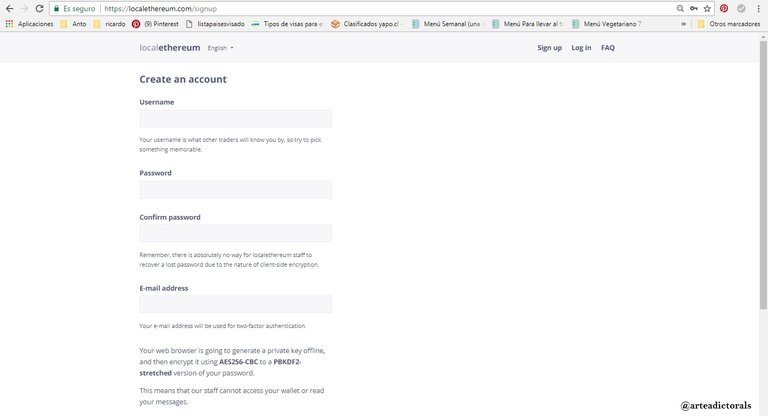
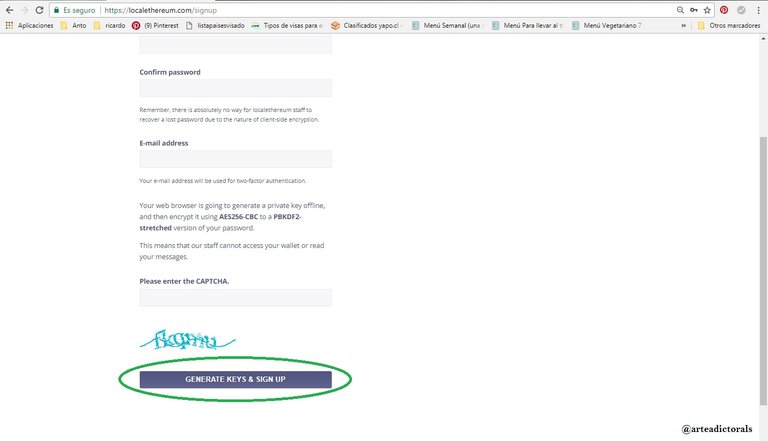
Nos pedirá que coloquemos un nombre de usuario para ingresar a la pagina, es importante mencionar que este nombre de usuario sera visto por los demás usuarios de "localethereum", así que piensa bien que colocaras. Como toda cuenta nos pide una contraseña y un correo en el cual nos llegaran las notificaciones y el link para confirmar dicha cuenta. Por ultimo colocamos el "Captcha", para confirmar que no somos un robot. Recuerda que debes de confirmar la cuenta para poder luego vender tus criptomonedas.
It will ask us to place a username to enter the page, it is important to mention that this username will be seen by the other users of "localethereum", so think carefully what you will place. As every account asks for a password and an email in which we receive notifications and the link to confirm this account. Finally we put the "Captcha", to confirm that we are not a robot. Remember that you must confirm the account in order to later sell your cryptocurrencies.
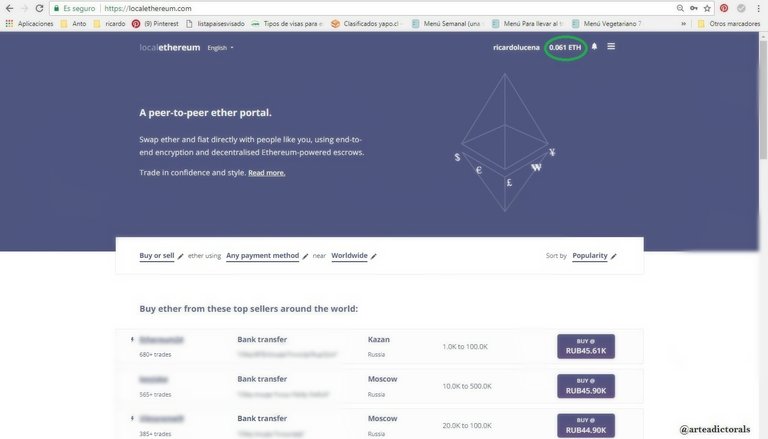
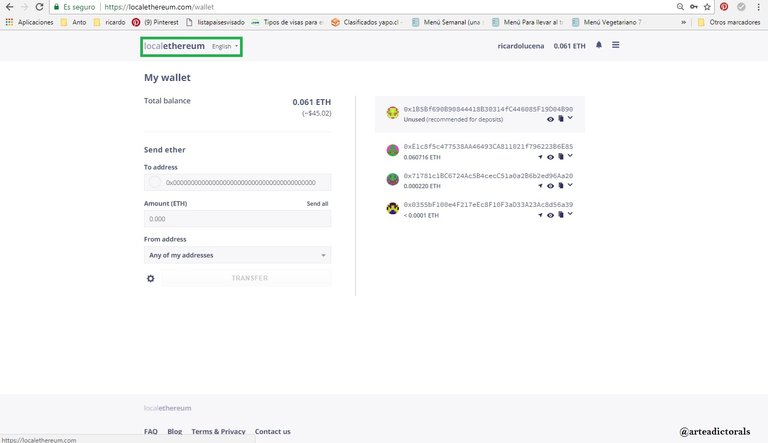
Después de haber confirmado ambas cuentas, procedemos a ir a la pagina principal de "Localethereum" e irnos a nuestro monedero como se muestra en la siguiente imagen.
After confirming both accounts, we proceed to go to the main page of "Localethereum", then go to our wallet as shown in the following image.
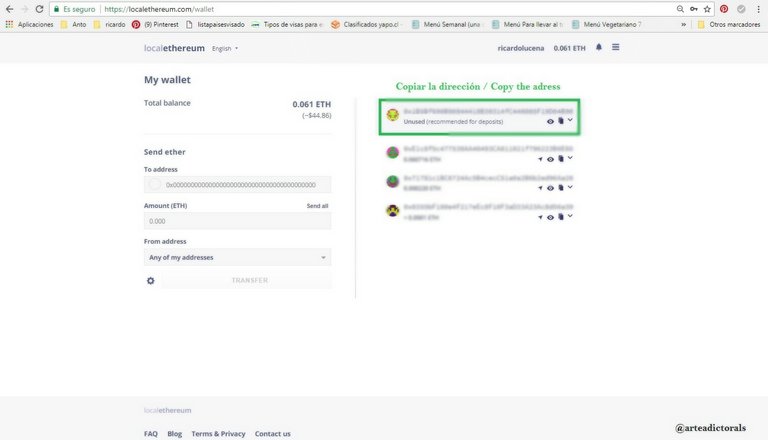
Nos saldrá la siguiente ventana, donde copiaremos la dirección de nuestra cartera recomendada para el deposito. La dirección es la que se muestra en la siguiente imagen.
We will get the next window, where we will copy the address of our recommended portfolio for the deposit. The address is the one shown in the following image.
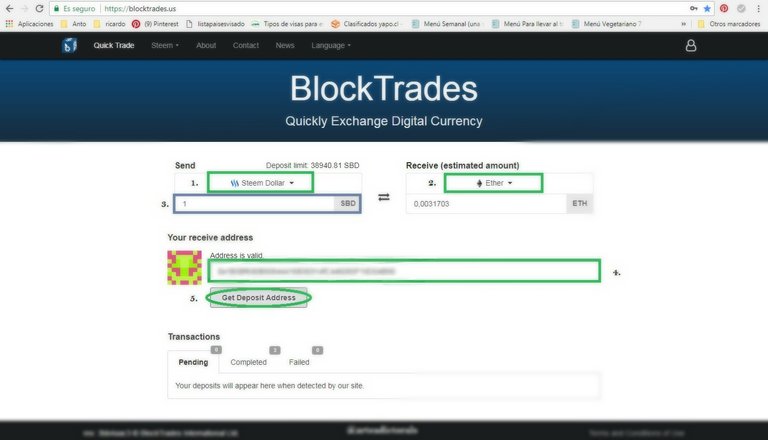
Ya teniendo ubicada la dirección de nuestra cartera en "localethereum", procedemos a ir al inicio de "blocktrades" y hacer los siguientes pasos:
1. Seleccionar la criptomoneda "Steem Dollar", la cual enviaremos a Blocktrades desde Steemit.
2. Seleccionar La criptomoneda a convertir, en este caso, seleccionar "Ether".
3. Colocar la cantidad de SBD que desees cambiar.
4. Insertar la dirección recomendada para depósitos de tu cartera de "Localethereum". En el caso de que no estés cambiando los SBD a "Ether", tienes que colocar la dirección de la cartera en donde vendaras dicha Criptomoneda.
5. Esperar que la dirección sea valida y darle clic en "Get deposit Address" (Obtener dirección de deposito).
- Select the "Steem Dollar" cryptocurrency, which we will send to Blocktrades from Steemit.
- Select The cryptocurrency to convert, in this case, select "Ether".
- Enter the amount of SBD you want to change.
- Insert the recommended address for deposits from your "Localethereum" portfolio. In the case that you are not changing the SBD to "Ether", you have to place the address of the portfolio where you will sell said Cryptocurrency.
- Wait for the address to be valid and click on "Get deposit address"
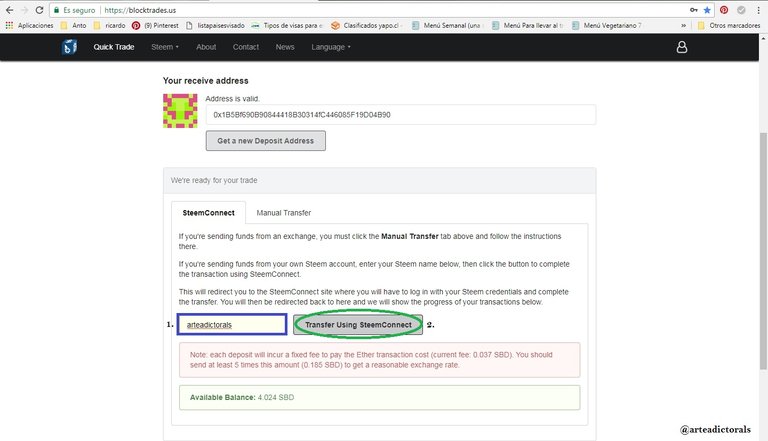
Luego colocamos nuestro usuario de Steemit, en el recuadro marcado y le damos clic en "Transfer using Steem Connect" (Transferir usando la conexión de Steemit).
Then we place our Steemit user, in the checked box and we click on "Transfer using Steem Connect".
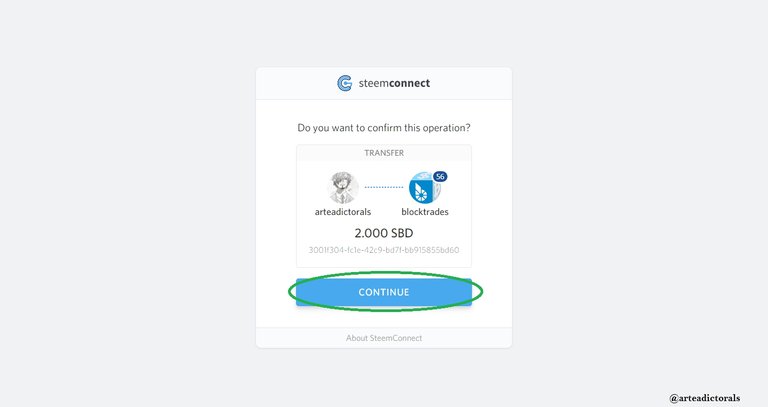
Procedemos a confirmar la operación de cambio, dándole clic en el recuadro como se visualiza en la siguiente imagen.
We proceed to confirm the change operation, by clicking on the box as shown in the following image.
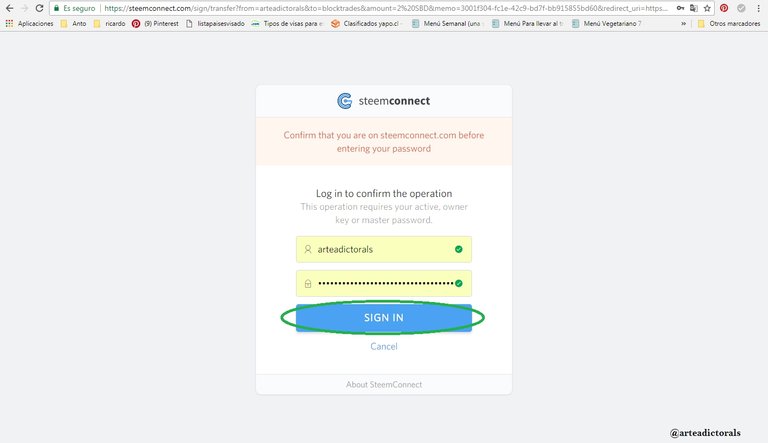
Confirmamos nuevamente, colocando nuestro usuario y contraseña de Steemit.
We confirm again, placing our username and password of Steemit.
Después de esto, se emitirá un aviso que indica que la transacción ha sido satisfactoria. Una vez que estamos en la página de inicio, vamos en donde dice "transactions" (transacciones), aquí podemos visualizar qué transacciones están pendientes, cuáles ya se han completado y qué transacciones han sido infructuosas.
After this, a notice will be issued stating that the transaction has been successful. Once we are on the home page, we go to where it says "transactions" (transactions), here we can see which transactions are pending, which have already been completed and which transactions have been unsuccessful.
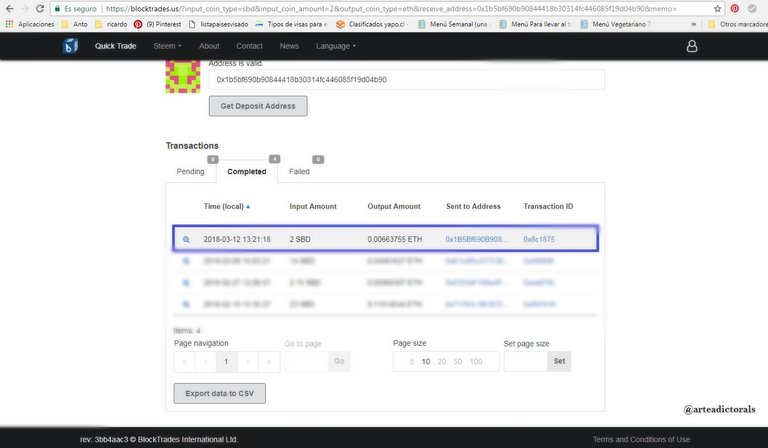
Cuando veamos que la orden de cambio fue completada, nos vamos a nuestra cartera en "Localethereum" para visualizar si los fondos ya se cargaron, esto puede tomar entre 2 y 5 minutos. Apenas se hayan cargado en nuestra cartera nos iremos a la pagina de inicio para iniciar nuestra venta.
When we see that the change order was completed, we go to our portfolio in "Localethereum" to see if the funds have already been charged, this can take between 2 and 5 minutes. As soon as they have loaded into our portfolio we will go to the home page to start our sale.
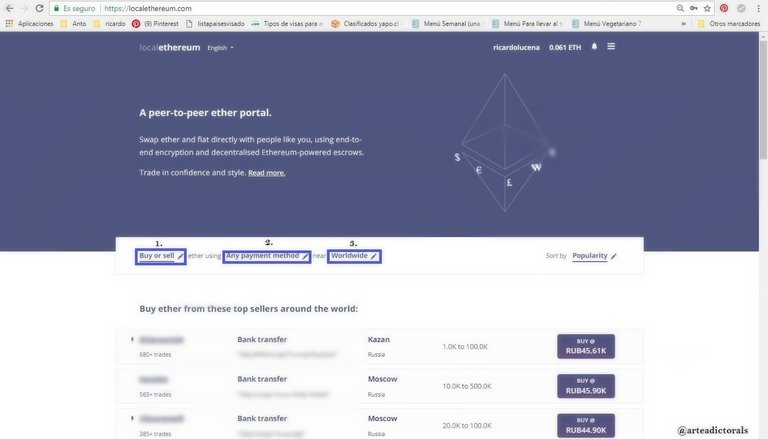
Cuando Estemos en la pagina de inicio de "Localethereum", haremos los siguientes pasos:
1. Seleccionaremos si vamos a vender o a comprar "Ether", en este caso colocaremos "Vender".
2. Seleccionamos el método en el cual queremos que nos paguen, escogeremos "Bank Transfer".
3. Y por ultimo escogemos el país en el que tenemos cuenta bancaria, en mi caso coloque "Venezuela".
When we are on the homepage of "Localethereum", we will do the following steps:
- We will select if we are going to sell or buy "Ether", in this case we will place "Sell".
- We select the method in which we want to be paid, we will choose "Bank Transfer".
- And finally we choose the country where we have a bank account, in my case, I put "Venezuela".
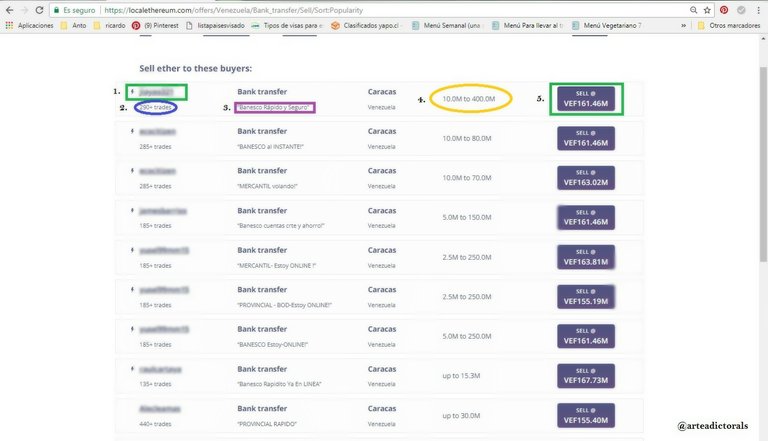
Nos saldrá un listado de las ofertas que varios usuarios nos dan, para escoger el mejor tienes que entender lo siguiente:
1. Es el Usuario que creo la oferta.
2. Cantidad de ventas o compras que ha realizado satisfactoriamente.
3. Tipo de cuenta bancaria que el usuario dispone, es recomendable escoger al usuario que trabaje con el mismo tipo de banco que tu.
4. Limite que tiene el usuario para pagar en tu moneda local.
5. Precio que del usuario para la compra de tus "Ethers".
We will leave a list of the offers that several users give us, to choose the best you like, you have to understand the following:
- It is the User that created the offer.
- Amount of sales or purchases you have made successfully.
- Type of bank account that the user has, it is advisable to choose the user who works with the same type of bank as you.
- Limit the user has to pay in your local currency.
- Price of the user for the purchase of your "Ethers".
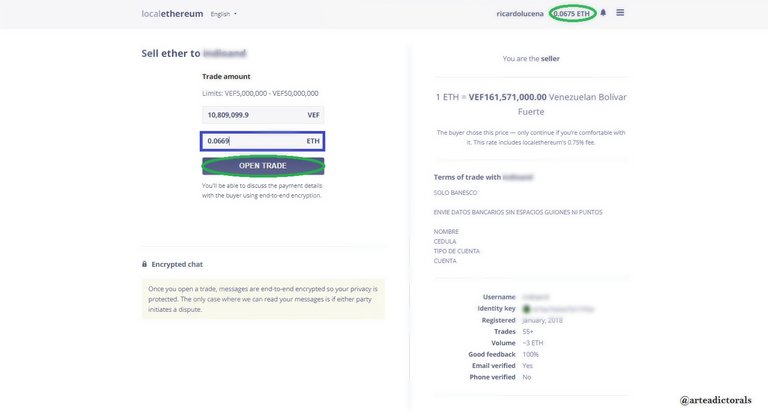
Una vez hayamos escogido a quien le venderemos nuestros "Ethers", le damos clic en el recuadro donde sale el precio que coloco el comprador. Nos saldrá un cuadrado donde nos pide colocar la cantidad de "Ethers" que venderemos, es importante no colocar la cantidad exacta de "Ether" que tenemos disponible, puesto que la pagina nos cobrara un pequeña comisión por la venta. Después de colocar la cantidad le damos clic en "Open Trade".
Once we have chosen who we will sell our "Ethers", we click on the box where the price that the buyer placed. We will get a square where it asks us to place the amount of "Ethers" that we will sell, it is important not to place the exact amount of "Ether" that we have available, since the page will charge us a small commission for the sale. After placing the amount we click on "Open Trade".
Por consiguiente, iniciamos la venta saludando al comprador y esperando a que este responda para poder proseguir con el intercambio. El comprador tiene 2 horas para respondernos y también para pagarnos, al pasar estas horas la venta queda cancelada.
Therefore, we initiate the sale by greeting the buyer and waiting for him to respond in order to proceed with the exchange. The buyer has 2 hours to respond and also to pay us, after these hours the sale is canceled.
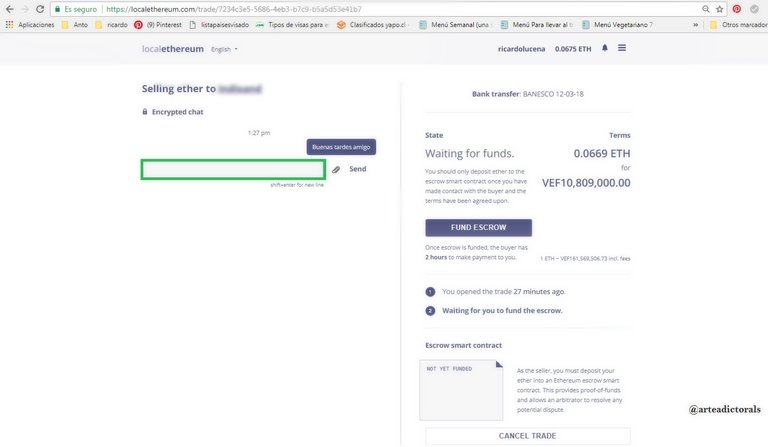
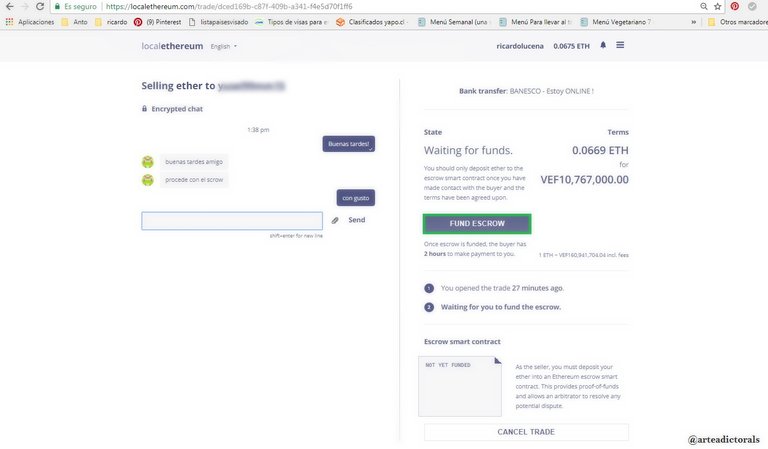
Una vez contactado al comprador, este nos pedirá que coloquemos los fondos en garantía "Scrow", esto lo hacemos dándole clic en el recuadro como se muestra en la siguiente imagen.
Once contacted the buyer, this will ask us to place the funds in guarantee "Scrow", this we do by clicking on the box as shown in the following image.
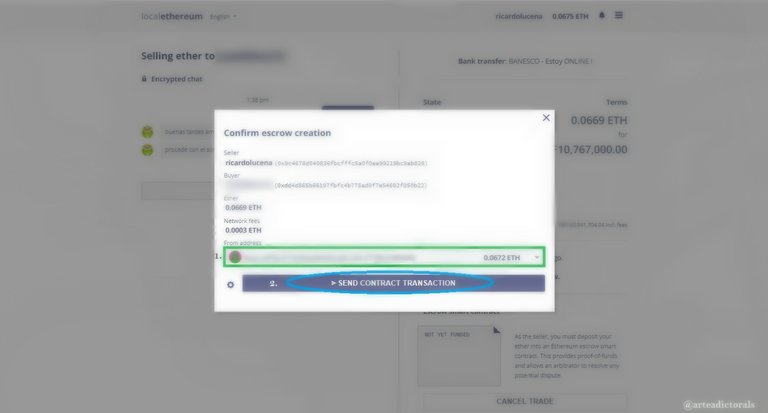
Seleccionamos la dirección de la cartera en donde esta el dinero, es decir, los "Ether". Vale mencionar que es la misma dirección que usamos para transferir los "ethers" hasta "localethereum".
We select the address of the portfolio where the money is, that is, the "Ethers". It is worth mentioning that it is the same address that we use to transfer the "ethers" to "localethereum".
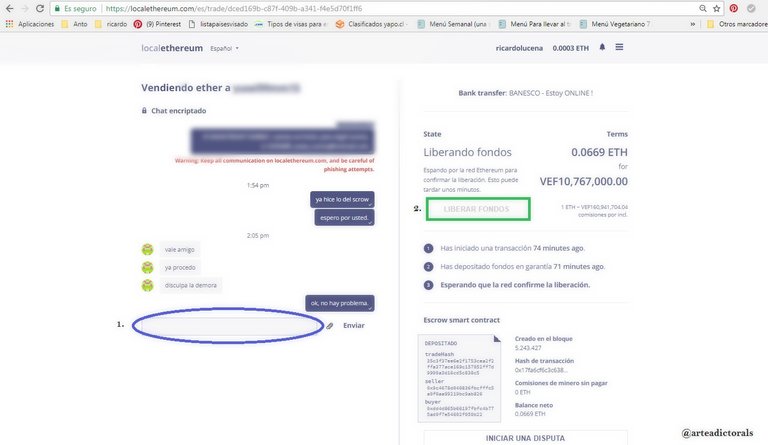
Luego de haber colocado los fondos en garantía, le pasamos al comprador nuestros datos bancarios, para que nos pueda transferir el monto exacto. Cuando verifiques que dicha transferencia si fue realizada puedes darle clic en el recuadro mostrado en la siguiente imagen, para liberale los fondos al comprador. De no recibir el pago bancario al pasar las 2 Horas de la venta, se cancelara la venta automáticamente y tus "Ethers" serán regresados a tu cartera.
¡Con esto esto la venta quedara finalizada y podemos proceder a gastarnos el dinero!
After having placed the funds in guarantee, we pass to the buyer our bank details, so that he can transfer us the exact amount. When you verify that this transfer was made, you can click on the box shown in the following image to release the funds to the buyer. If you do not receive the bank payment after 2 hours of the sale, the sale will be automatically canceled and your "Ethers" will be returned to your wallet.
With this, the sale will be finished and we can proceed to spend the money!
Espero que este tutorial te haya servido de ayuda, que lo mencionado haya sido bien explicado y sin tantas complicaciones, de no ser así, puedes comentarme cual es tu duda que con gusto te la responderé.
I hope this tutorial has helped you, that the aforementioned has been well explained and without so many complications, if not, you can tell me what is your doubt that I will gladly answer.

Gracias por la información
De nada!
Muy buen tutorial!!!Gracias.
¡Muchas gracias! :)