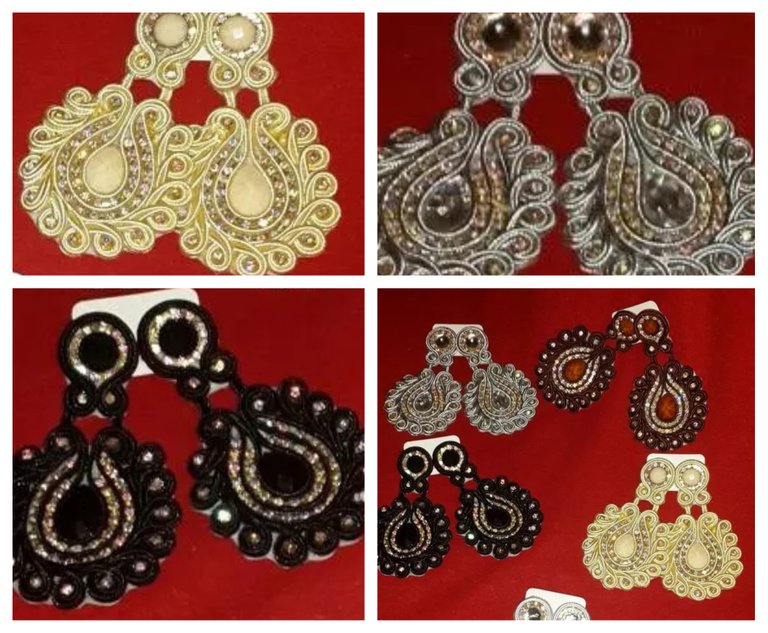
Hello hello, it is a great pleasure to greet you I hope today you dare to learn with me this wonderful technique that is the soutache and every day we learn more and more, this day I have brought you a pretty practical tutorial to make some beautiful tendrils are great they measure approximately 9 cm long by 7.5 cm wide this technique is simple everything is in practice, the love you dedicate and your desire to do everything is in you. It's always wonderful to learn something new, I'm always innovating and creating new designs. This is more than my work. It's my passion. I'm not the best at this and as I learn more every day, I do it with love and with that same love and enthusiasm. I teach you how little I am with my personal touch and my desire to help. English is difficult but I hope if you understand me.
The soutache is a cord or braid that is originally used to embroider dresses and gala costumes nowadays also to give precious shapes to the threads with different jewels and cooking with each other until you get the desired shape. Sincerely, it is a technique that was used a long time ago, Although I gave it my personal touch and I do not use thread and needle I use silicon liquid and I stick the threads until I give them the shapes that I want this is something that more than my work I love and I dedicate love and time, I really hope you like it, try to do it in the most simple and explanatory way possible so that if you follow the steps little by little you will achieve it and surely you will improve it with your personal touch as well as I do it myself, now let's start ...

Materials:
Soutache thread or rayon braid (The name varies according to your country).
Apply drop type plane of 1.2 cm.
Apply 0.5 cm round plane.
Strass of 3 mm
Piece of thick cloth or Leather for the base
Flat tendril base
Liquid silicone.
Fine tip eyebrow tweezers.
Scissors.
Rule.
lighter
Encourage to use base when working it.
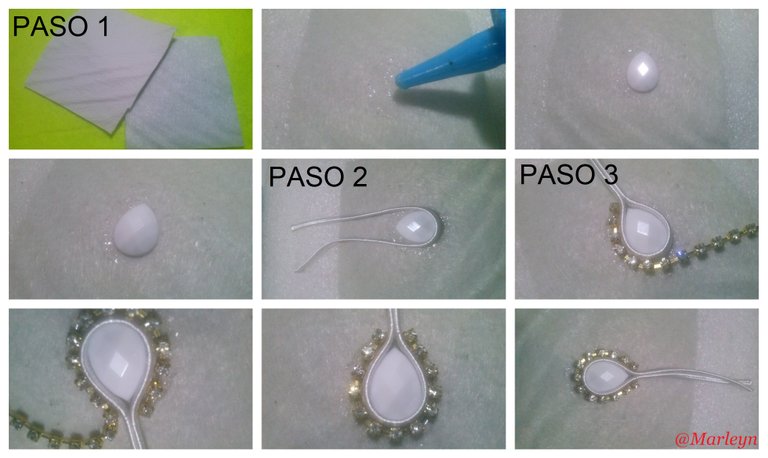
STEP 1: Cut a piece of thick cloth or leather of 8 cm by 7cm, look for the middle of it and place a little liquid silicon, stick the 1.2 cm drop on it and replace it with liquid silicon around it.
STEP 2: Cut a strip of thread of 17 cm and paste it in the liquid silicone that we just spread in the previous step around the drop applique, you can help the eyebrow tweezers so you do not touch the silicon with your fingers and you can get dirty the piece.
STEP 3: Cut 6.5 cm of strass or 13 stones, we must stick it around the thread that was placed in the previous step, It should be seen as well as the last image.
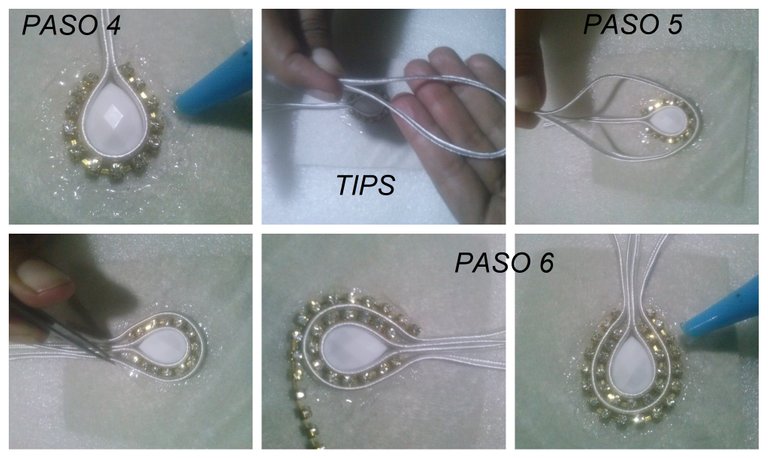
STEP 4: Place liquid silicon around the strass that you just pasted.
TIPS: Before gluing the thread, grasp it in this way pointed tip and stick it from the middle so it will be the same size on both sides.
STEP 5: Cut a strip of about 18 cm and stick it around the strass, you can help with the clamp to do it more delicately.
Párrafo AquíSTEP 6: Cut 6.5 cm of strass or 13 stones, we should stick it around the thread that was placed in the previous step, It should be seen as well as the last image.
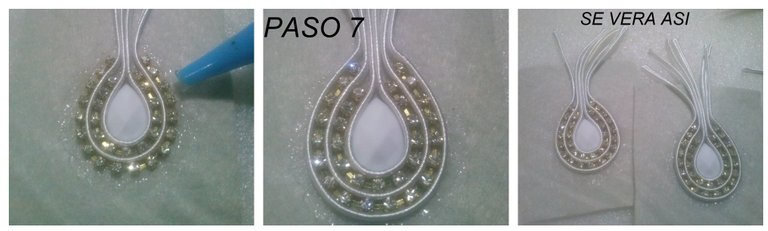
STEP 7: Add more liquid silicon around the strass, cut a thread of about 18 cm and stick it, it should look like the last image
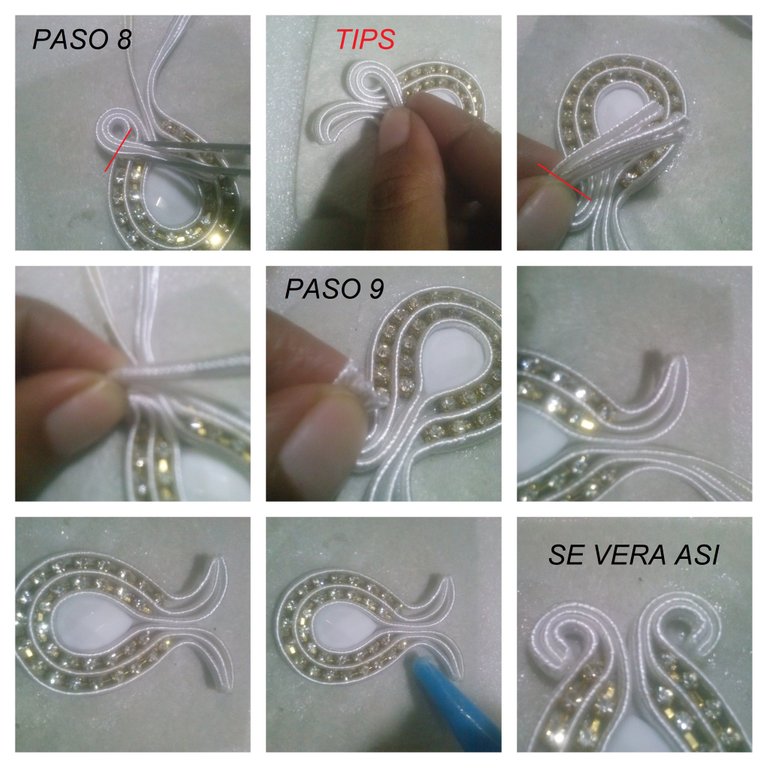
STEP 8: After having the threads well glued, folding them as I show you in the image should be cut right where you put the red line.
TIPS: The best way to do it is after folding it, grabbing it with your fingers from inside and then grabbing it with the other hand just where it is going to be cut. When burning, only use tinder a candle will smoke and damage your piece.
STEP 9: cut it flush and burn the tips with the help of a tinderbox. Make these steps on both sides, proceed to place liquid silicone on the leather below the threads bend them in and stick them. You can help with the eyebrow tweezers. It will be like the last image.

STEP 10: Just after having stuck it so that even this wet, cut the leftover leather from the top in the middle of each circle as I marked in the image. It will look like in the third image ... Take care not to cut the thread because it is easy to tear but if it happens to burn with the tinder quickly and closely with the low flame that will close the thread and you will not damage the piece.
STEP 11: Then cut the leftover leather gently lift off the circles just done a little, apply a little liquid silicone and proceed to burn the tips in two pieces of thread you can use the leftovers of approximately 1.5 cm, and with the help of the clamp insert it between the leather and the thread that we have just lifted, then re-glue them and exert a little pressure so that it sticks completely. it will look like the last image.
TIPS: The remaining threads do not discard them since you can reuse them.
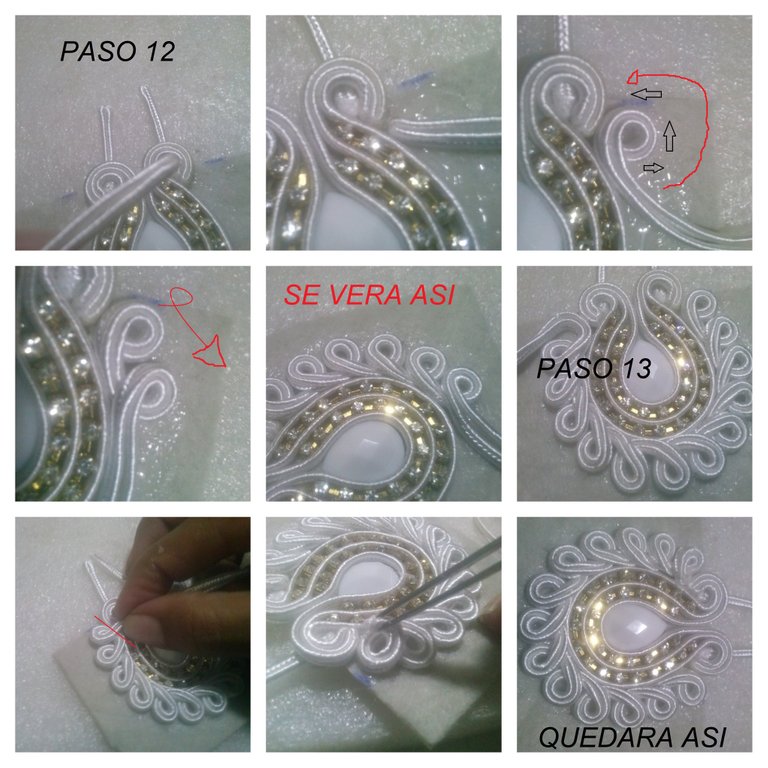
STEP 12: Cut 2 threads of 45 cm each, stick the ends and burn them together. Spread liquid silicon on the leather around the piece that we have already made and just below the circle, always starting in the circle on the right, stick the ends of the threads and begin to roll to give them that shape, start from the inside out and return to enter and so on to verify that the size of the circle so that you are forming a piece of strass. It will look like I leave the image, what matters in this step is that you do it with patience little by little taking care of the detail the good thing is that the liquid silicon does not dry so fast and if you make a mistake you can fix it instantly.
STEP 13: When we arrive at the last circle the same procedure is done as in step 8, then it will go under the thread that follows you as you will see in the image, that is to say it is introduced below the circle on the left side you can help with the clip to not fill with silicon and dirty your piece ... It will be as I show you in the last image.
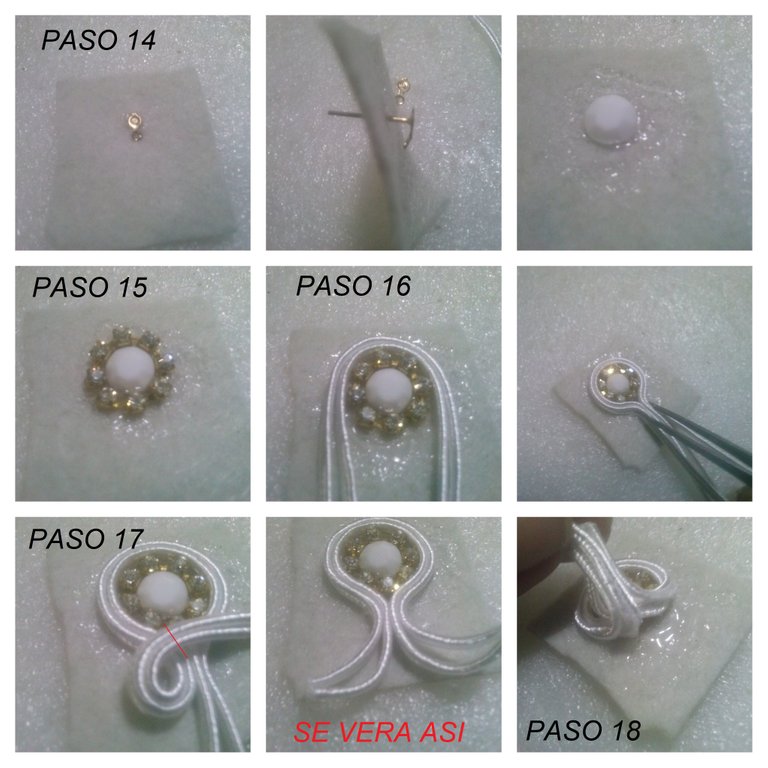
STEP 14: Cut another piece of leather about 3 cm x 4 cm. Put a little bit of liquid silicon on it and then insert the base of the flat tendril as shown in the picture, once again smear liquid silicon on the base this time and stick the round sconce.
STEP 15: Spread liquid silicone around the round wall and proceed to stick the strass that would be 8 stones or approximately 4 cm.
STEP 16: Cut 2 threads of about 10 or 12 cm each and stick them around the strass, you can help the clip for a cleaner job.
STEP 17: Fold the thread two on each side and repeat the procedure of step 8 to cut it, it will remain as the next image.
STEP 18: Lift the threads just cut a little and place liquid silicon on the leather below them
.
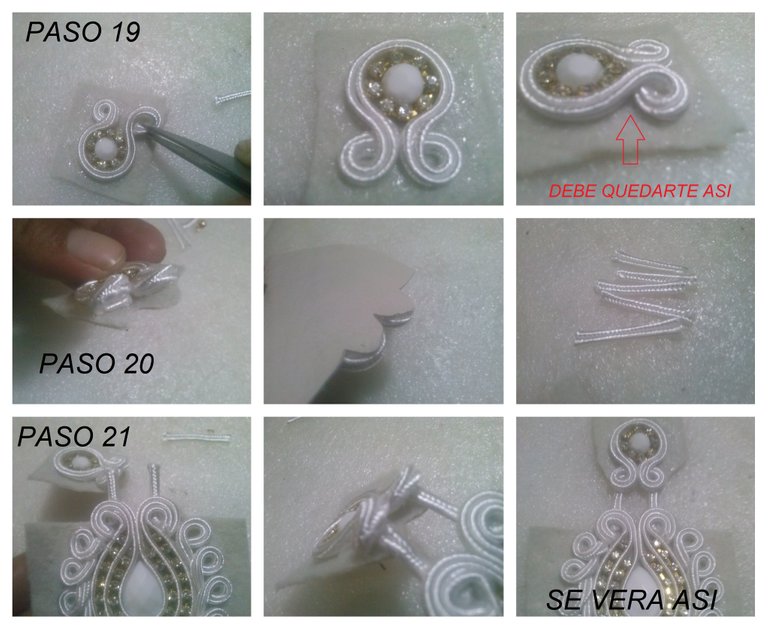
STEP 19: Fold the threads in a circle inwards and stick them under the same thread, you can help with the clip for ease and cleanliness.
STEP 20: Perform the same procedure as in step 10, which is to cut the leftover leather and lift the circles carefully that we just pasted and put back liquid silicon.
STEP 21: Check the piece that we already made that the upper threads are the same size, burn the tips and insert them in the part that we just lifted and paste again, exerting a little pressure, it will look like the last image.
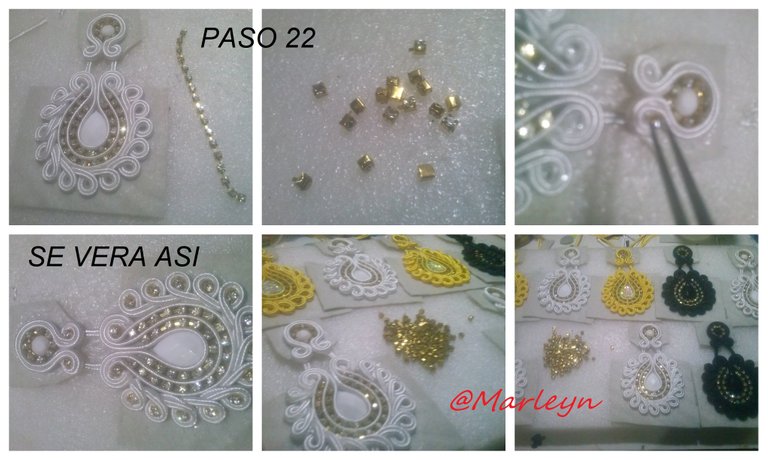
STEP 22: Place a little liquid silicone in each of the spaces that we leave and Cut 17 Strass stones, so with the help of the eyebrow tweezers, introduce each of the strass stones, which will preferably dry from one day to the next and when it is completely dry, cut the remaining leather and burn it with the tinderbox in a low flame very quickly so that you seal it and it will be ready with some beautiful tendrils or earrings.

Join our Discord Channel to connect with us and nominate your own or somebody else's posts in our review channel.
Help us to reward you for making it ! Join our voting trail or delegate steem power to the community account.
Your post is also presented on the community website www.steemmakers.com where you can find other selected content.
If you like our work, please consider upvoting this comment to support the growth of our community. Thank you.
Thank you, this support is important to me !!!
Beautiful work and informative essay on your process.
I found your link in self-promotions on the @curie Discord chat.
Thank you, I'm glad you like it
You must taken a lot of effort to make this and I loved the way you had explained everything in detail...
Keep it up
Thanks, it's easy when you love what you do :)
Congratulations! This post has been upvoted from the communal account, @minnowsupport, by Marleyn from the Minnow Support Project. It's a witness project run by aggroed, ausbitbank, teamsteem, theprophet0, someguy123, neoxian, followbtcnews, and netuoso. The goal is to help Steemit grow by supporting Minnows. Please find us at the Peace, Abundance, and Liberty Network (PALnet) Discord Channel. It's a completely public and open space to all members of the Steemit community who voluntarily choose to be there.
If you would like to delegate to the Minnow Support Project you can do so by clicking on the following links: 50SP, 100SP, 250SP, 500SP, 1000SP, 5000SP.
Be sure to leave at least 50SP undelegated on your account.
beautiful work! I make jewelry too, but in a very different style. Great tutorial, and very informative. Keep up the great work, and good luck!
Thank you, is important to me !!!