Sometimes I'm bored and I'm getting involved in discussions with various kinds of pseudoscientists. Such discussions are often a waste of time, but it's possible occasionally to get something out of them - after all, if you want to explain to someone why there are wrong, you need to have a good understanding of the topic yourself. If your knowledge is not enough to counter the opponent's arguments, you need to expand it, and so you are learning. It was the case for me this time.
It all began with two flat-earthers appearing on a certain forum. The exchange started with standard arguments like timezones, seasons, eclipses, the rotation of the sky... what have you. As usual in such cases, those arguments were met with silence or really far-fetched alternative explanations. I'll omit the details, interested people can find standard flat-earth arguments on the web.
Well, you can't sway a person that is completely confident in their beliefs with arguments, so the discussion has become somewhat futile. Both sides stuck to their positions and mulling over the same issues time and time again has started. That is, until one of the flat-earthers started presenting photos which, according to them, proved that the Earth "can't be a ball with a 6371-6378 km radius", with descriptions that can be expressed shortly as "explain THAT!". Alright.

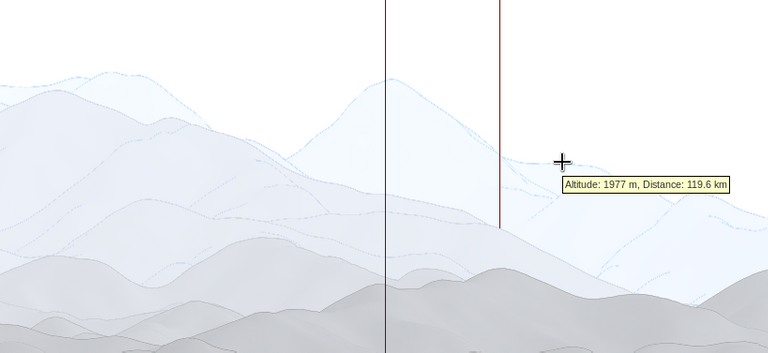
The most interesting part was when they touched upon the issue of this observation of the Schneeberg mountain from the Praděd peak:
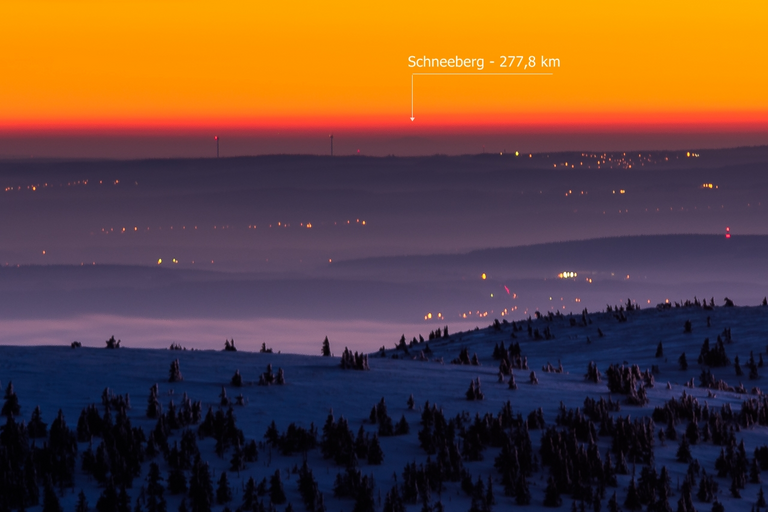
Schneeberg as seen from Praděd
What is the problem? Well, let's look at some of the facts:
- Praděd has an elevation of 1491 m ASL, but it is reasonable to assume that the observation has been made from a viewing platform that is found at the peak, which has an elevation of 1565 m ASL.
- The Schneeberg mountain is as tall as 2070 m ASL.
- The distance from Praděd to Schneeberg is 277 km.
- There is a hill between Praděd and Schneeberg, approx. 73 km from the former, that has an elevation of 680 m ASL. (in the picture, it is the hill that has two wind turbines on top of it; the turbines are the two poles with red lights to the left of Schneeberg, in reality they are a little distance to the east of a Czech town of Protivanov).
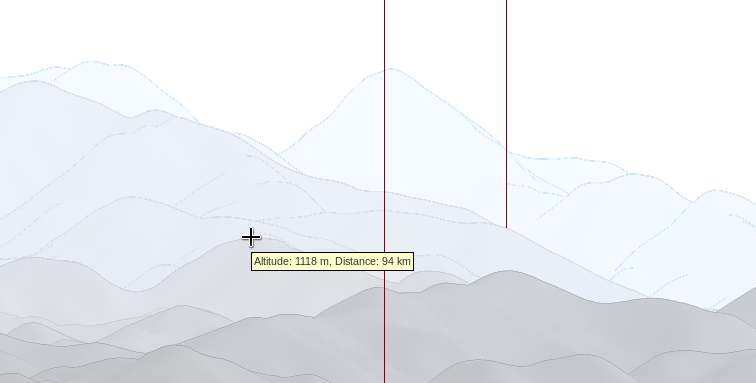
And everything would be perfectly clear if it wasn't for the fourth fact. To show why, let us calculate how tall would Schneeberg have to be, so that the hill near Protivanov couldn't obscure it.
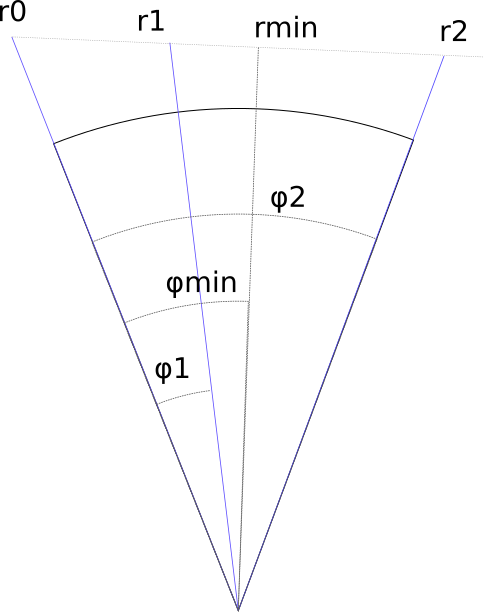
A diagram for the calculation
We will use the polar coordinates, assuming the Earth's radius of R = 6378 km.
We have:
r0 = R + 1565 m
φ0 = 0
r1 = R + 680 m
φ1 = 73 km / R
φ2 = 277 km / R
The equation of a line in polar coordinates is:
r(φ) = rmin / cos(φ - φmin)
Substituting the coordinates of the first two points, we get rmin and φmin, then we calculate r2... And what do we get?
As it turns out, a line starting at Praděd and tangent to the hill near Protivanov arrives at Schneeberg at the elevation of... about 2600 m ASL!
The hill near Protivanov should be obscuring Schneeberg. Schneeberg makes nothing of it and keeps being visible in the picture.
What is happening here?
Refraction to the rescue
Our flat-earther obviously concluded that this proves the flatness of the Earth. Objects wouldn't hide under the horizon on a flat Earth, so it would be no problem for Schneeberg to stick out from behind the hill near Protivanov.
Of course, there is another explanation, too, and it is the atmospheric refraction.
To give you some introduction - refraction is a topic that needs to be treated very carefully in the presence of flat-earthers. To them, it is a keyword that explains everything: timezones, seasons, the horizon... generally everything that is a good argument for the Earth's roundness. Something looks differently than it should on a flat Earth? Refraction! Of course it's no explanation at all - but if we don't accept refraction-based arguments from the other side, we need to be thorough when we need to use it ourselves. We don't want to leave any holes, even only apparent ones, after al.
So, in order not to leave any hole in the explanation, I set off to prepare a thorough, quantitative analysis.
Before I present the approach I took, let me explain one more thing - flat-earthers have the tendency to question everything they can't check themselves. So, even though atmospheric refraction is well-explored and measured, I decided to start from some more basic principles. It is hard to question the laws of optics, being confronted with them every day, and it is hard to deny that the air gets less dense with altitude. Thus, I assumed a simplified model:
- The air density decreases exponentially with altitude.
- The deviation of the air's refractive index from 1 is proportional to its density.
- And, of course - the Earth is a ball with a radius of 6378 km.
The first point basically means assuming this equation: ρ(r) = ρ0 exp(-α(r-R)).
The α coefficient can be derived from the equation dp/dh = -ρg by tying the density of air to its pressure with the ideal gas equation. This leads to α being equal to µg/RT, where µ - the molar mass of the air, g - the Earth's gravitational acceleration, R - universal gas constant, T - the temperature of the air. The constants can be found on Wikipedia, and we assume the temperature to be 273 K, which gives us α ≈ 1.25e-4 m-1.
Again on Wikipedia we can find the refractive index of the air at the pressure of 1 atmosphere and the temperature of 273 K, equal to 1.000293.
So, the assumption no. 2 is basically this: n(r) - 1 = 0.000293 exp(-α(r-R)).
We now have a model of the atmosphere, but what's left is to see how the light propagates in such an atmosphere. We will use Fermat's principle for that.
The Fermat's principle states that the light takes the route between points A and B that minimises the optical length of the path (the integral of the refractive index). In other words, it can be expressed as follows:
∫ n ds = min
This can be written in polar coordinates as:
∫ n(r) √(dr² + r²dφ²) = min
If we assume that the path of our light ray can be expressed with a function r(φ) (it is true as long as we don't consider vertical rays), this can be expressed with an integral over φ:
∫ n(r(φ)) √(r'² + r²) dφ = min
r' = dr/dφ in this equation.
Problems of this kind can be solved with the Euler-Lagrange equation. If we assume L(φ, r, r') = n(r)√(r'² + r²), the Euler-Lagrange equation will look like the following:
∂L/∂r = d/dφ (∂L/∂r')
Omitting the intermediate steps (those who know calculus can perform those steps themselves; those who don't wouldn't get much out of it, anyway ;)), the final result is this:
r'' = n'/n (r'² + r²) + 2r'²/r + r
where n' = dn/dr.
We can do a quick sanity check now by checking the result for a constant n. In such a case, n' = 0 and we get r'' = 2r'²/r + r - an equation that is satisfied by a straight line r(φ) = r0 / cos(φ - φ0). This is correct, at least.
This equation doesn't look like it could be easily transformed further, to put it lightly. But we are lucky in that we have the 21st century now, and we have computers, so why don't we do some numerical analysis? I decided to create a small application that calculates paths of the light rays based on this equation (links to the source code and the compiled binaries are at the end of this post).
The first test: we do the calculation for a ray that starts tangentially to the surface. Angles of deflection of such rays are important to astronomers and well-measured, the deflection in typical conditions is 34 arc-minutes. I tell the program to calculate the path up to the altitude of 200 km (high enough that the atmosphere shouldn't deflect it further) and get the result... 35 arc-minutes. Excellent for such a crude approximation!
Excited by this test, I decided to input the data from the Schneeberg case. The ray starts at 1565 m ASL, and we get the starting angle from the condition that it has to hit 680 m ASL at the distance of 73 km. What will be the altitude at 277 km? The result:
$ atm-refraction --start-h 1565 --tgt-h 680 --tgt-dist 73 --output-dist 277 -v
Ray parameters chosen:
Starting altitude: 1565 m ASL
Hits 680 m ASL at a distance of 73 km

Altitude at distance 277 km: 1688.2650324094586
The ray will be at a bit less than 1700 m ASL at Schneeberg's distance! This is almost 400 m below the peak, completely sufficient for the mountain to be visible! Success :D
Deconstruction of another example
We could stop at that, but our flat-earther decided to give me another challenge. "This video proves conclusively that the Earth is flat!", they wrote, supplying the following link: https://www.youtube.com/watch?v=oNdRhW1yQZ4.
For those that don't want to watch the video: the author shows the view of New Zealand's southern island from a bay near Wellington. Some peaks are visible. The author finds them on a map, gets distances and elevations, then compares the view with predictions from a flat-Earth and round-Earth models. He gets agreement with the flat model, and disagreement with the round one. But is that so...?
The peaks are color-coded, and their data is shown on the following frame from the video:
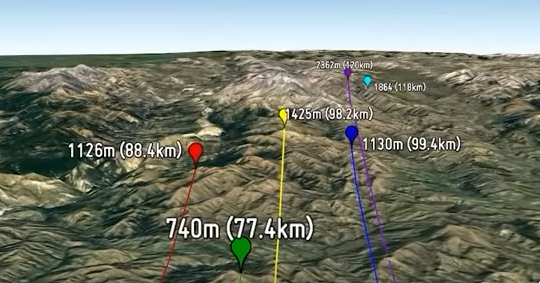
The peaks from the video
The video itself shows a concerning thing: the purple peak is marked as reaching 2362 m ASL, but later in the film the author shows a table with data, in which 2410 m is entered. Why? No idea.
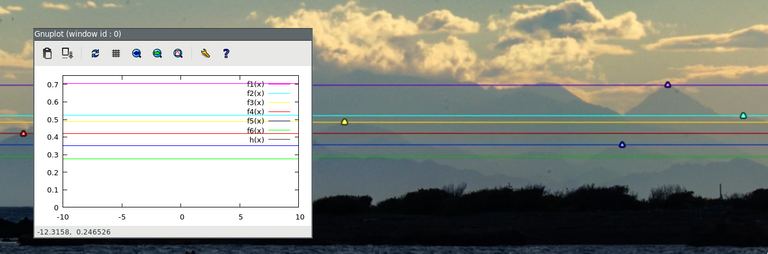
Anyway, I decided to input this data into my program and get the viewing angles of the various peaks. Assuming the horizon is at 0 (which the author didn't do, by the way), we get the following results:
Fit to the author's data
The purple, yellow, red and green peaks fit surprisingly well! We have some trouble with the cyan (which got merged with yellow) and the blue peaks. Encouraged by the good fit for the other peaks, I started suspecting that the author misidentified the cyan and blue peaks. I resolved to try and find them myself.
Unfortunately, finding them on the map of New Zealand is a Sisyphean task. There are a lot of small and large peaks in the area. I decided to get some help from a panorama generator at http://www.udeuschle.selfhost.pro/panoramas/makepanoramas_en.htm . This generator lets you select the place and direction of viewing, and then draws the simulated view.
It was pretty easy to find the cyan and blue peaks on the generated panorama:
The cyan peak
The blue peak
As you can see, their distances and elevations differ slightly from the ones given by the video's author. Let us try those values in the simulator, now...
Fit to the corrected data
Fits perfectly :)
One more test
I later came up with an idea of yet another test that could be conducted with the photo of Schneeberg.
It bases on the fact that the wind turbines from the photo (reminder: they are the two poles to the left of Schneeberg) can be found on Google Maps. They are exactly here:
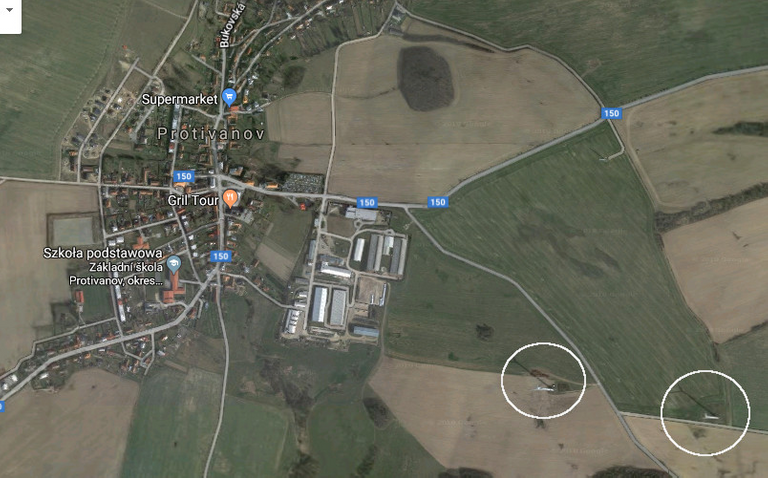
Wind turbines near Protivanov
Google Maps tells us that the distance between them is about 450 m. From the distance of 73 km, this gives an angle of about 0.3 - 0.35 degrees (0.35 would be for a line perpendicular to the line of sight, but it is slightly oblique in reality). Based on that, we can estimate the angular size of Schneeberg in the picture to be about 0.05 - 0.1 degrees.
The latest version of the refraction simulator has two interesting features: one, it can print the initial angle between the simulated ray and horizontal plane, and two, it can simulate a flat Earth. The light rays start at the observer, so this gives us an ability to calculate the viewing angle of Schneeberg and the hill near Protivanov both on a round and a flat Earth, and both with refraction and without. The results are presented below:
a) Round Earth, with refraction
Hill:
$ ./atm-refraction --start-h 1565 --tgt-h 680 --tgt-dist 73 --output-ang
-0.9565201819329879
Schneeberg:
$ ./atm-refraction --start-h 1565 --tgt-h 2070 --tgt-dist 277 --output-ang
-0.8812788180363719

Difference: 0.075 degrees
b) Round Earth, no refraction
Hill:
$ ./atm-refraction --start-h 1565 --tgt-h 680 --tgt-dist 73 --output-ang --straight
-1.0223415221033665
Schneeberg:
$ ./atm-refraction --start-h 1565 --tgt-h 2070 --tgt-dist 277 --output-ang --straight
-1.1397834768466832

Difference: -0.117 degrees (invisible)
c) Flat Earth, no refraction
Hill:
$ ./atm-refraction --start-h 1565 --tgt-h 680 --tgt-dist 73 --output-ang --straight --flat
-0.6945791903312372
Schneeberg:
$ ./atm-refraction --start-h 1565 --tgt-h 2070 --tgt-dist 277 --output-ang --straight --flat
0.10445608879994964

Difference: 0.799 degrees
d) Flat Earth, with refraction
Hill:
$ ./atm-refraction --start-h 1565 --tgt-h 680 --tgt-dist 73 --output-ang --flat
-0.6293267999337602
Schneeberg:
$ ./atm-refraction --start-h 1565 --tgt-h 2070 --tgt-dist 277 --output-ang --flat
0.3332380994146694

Difference: 0.963 degrees
And an illustration for what we are actually calculating:
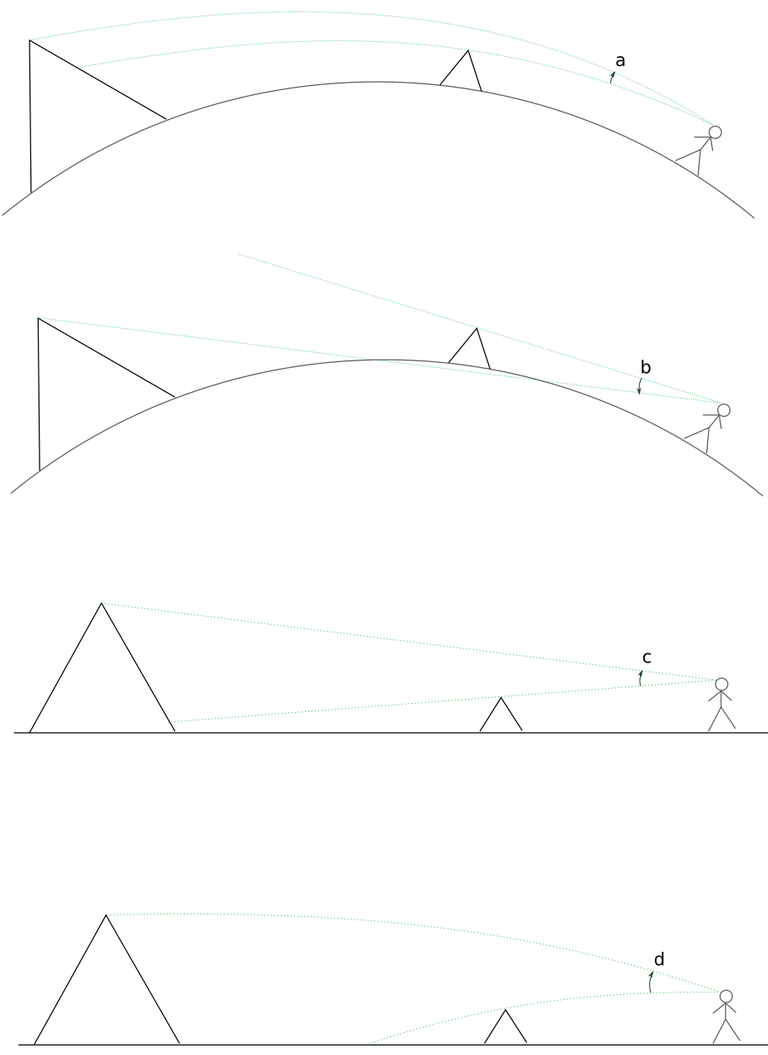
The four tested models
As you can see, the predicted angular sizes of the visible part of Schneeberg vary wildly between models. One of the models fits perfectly, though... the round one, with refraction.
Even such a simple observation turns out to be a pretty solid proof for the roundness of the Earth!
Summary
What is the conclusion of this story? Well, I have drawn two main ones:
- Don't assume that an effect is negligible, unless you've checked it (by a calculation or an experiment).
- The landscapes would look differently if there was no atmospheric refraction.
And, of course, nothing compares to the satisfaction from proving someone wrong with calculations :D
Finally, the promised links to the program:
The code: https://gitea.ebvalaim.pl/ebvalaim/atm-refraction
(atm-refraction --help prints the options list)
Linux binary: https://ebvalaim.pl/download/936/
Windows binary: https://ebvalaim.pl/download/939/
Hi! I am a robot. I just upvoted you! I found similar content that readers might be interested in:
https://ebvalaim.pl/en/2018/10/14/landscapes-and-atmospheric-refraction/
Right, I also published this on my blog. I was actually thinking of linking to that from the post, but forgot. Well, the bot found it, anyway :D
This post has been voted on by the SteemSTEM curation team and voting trail in collaboration with @curie.
If you appreciate the work we are doing then consider voting both projects for witness by selecting stem.witness and curie!
For additional information please join us on the SteemSTEM discord and to get to know the rest of the community!
Congratulations @ebvalaim! You have completed the following achievement on the Steem blockchain and have been rewarded with new badge(s) :
Click on the badge to view your Board of Honor.
If you no longer want to receive notifications, reply to this comment with the word
STOPDo not miss the last post from @steemitboard:
Congratulations @ebvalaim! You received a personal award!
You can view your badges on your Steem Board and compare to others on the Steem Ranking
Vote for @Steemitboard as a witness to get one more award and increased upvotes!