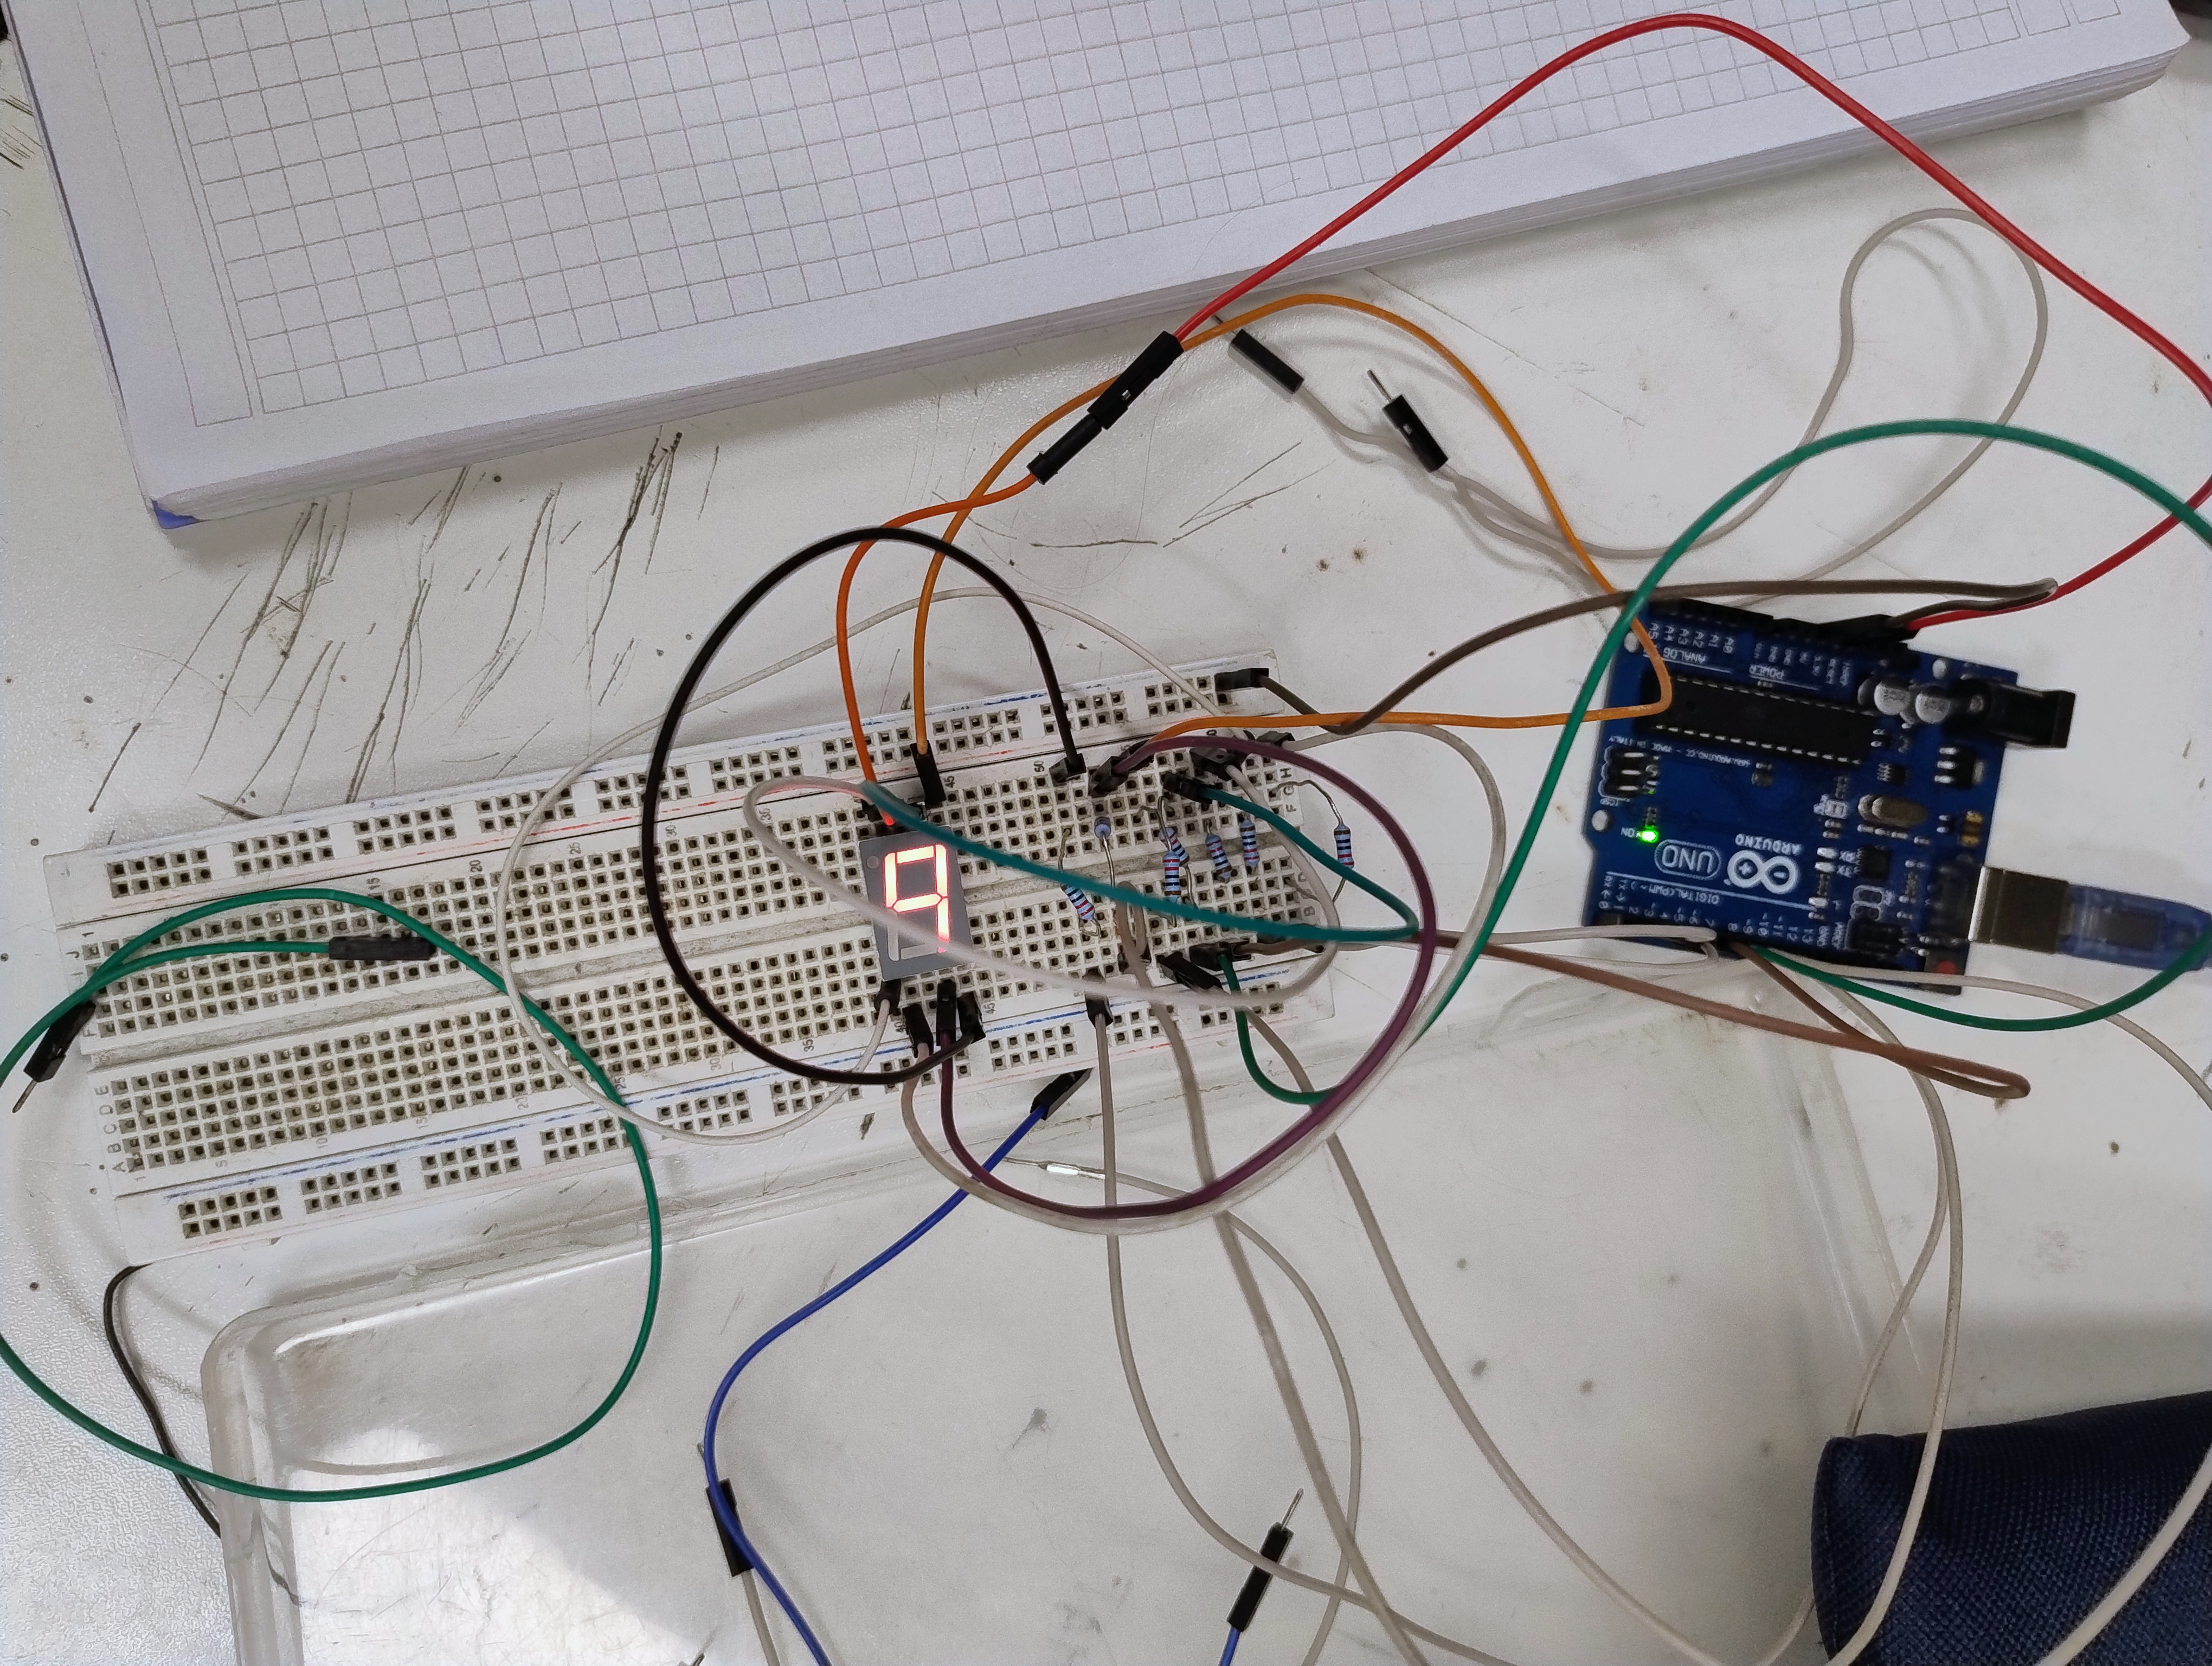
Hola compañeros de hive hoy les voy a contar lo que pasó el miércoles antes del finde largo con mis alumnos en el taller. Ahí estábamos, en plena clase de tecnología y control, con los pibes emocionados y yo preparado para ver que íbamos a programar con el Arduino y el 7 segmentos.

Viste cómo es, arrancamos con toda la buena onda. Los chicos, con esa curiosidad que tienen siempre, se mandaron a programar el circuito para que contara de 0 a 9, primero para arriba y después para abajo. ¡Una locura! Estaban re entusiasmados, haciéndose los técnicos, probando cables y codeando como unos campeones.
Programacion:
// Definición de pines del display de 7 segmentos
const int segmentA = 2;
const int segmentB = 3;
const int segmentC = 4;
const int segmentD = 5;
const int segmentE = 6;
const int segmentF = 7;
const int segmentG = 8;
// Tiempo de visualización de cada número en milisegundos
const int tiempoVisualizacion = 1000;
// Arreglo de patrones para los dígitos del 0 al 9
byte patronesDigitos[] = {
B11111100, // 0
B01100000, // 1
B11011010, // 2
B11110010, // 3
B01100110, // 4
B10110110, // 5
B10111110, // 6
B11100000, // 7
B11111110, // 8
B11100110 // 9
};
int contador = 0; // Variable para el contador
void setup() {
// Configurar pines del display como salidas
pinMode(segmentA, OUTPUT);
pinMode(segmentB, OUTPUT);
pinMode(segmentC, OUTPUT);
pinMode(segmentD, OUTPUT);
pinMode(segmentE, OUTPUT);
pinMode(segmentF, OUTPUT);
pinMode(segmentG, OUTPUT);
// Establecer el primer número en el display
mostrarNumero(contador);
}
void loop() {
// Incrementar el contador en 1
contador++;
// Si el contador alcanza el valor máximo, reiniciarlo a 0
if (contador > 9) {
contador = 0;
}
// Mostrar el número actual en el display
mostrarNumero(contador);
delay(tiempoVisualizacion);
}
void mostrarNumero(int numero) {
// Apagar todos los segmentos del display
apagarSegmentos();
// Activar los segmentos correspondientes para mostrar el número
byte patron = patronesDigitos[numero];
digitalWrite(segmentA, bitRead(patron, 0));
digitalWrite(segmentB, bitRead(patron, 1));
digitalWrite(segmentC, bitRead(patron, 2));
digitalWrite(segmentD, bitRead(patron, 3));
digitalWrite(segmentE, bitRead(patron, 4));
digitalWrite(segmentF, bitRead(patron, 5));
digitalWrite(segmentG, bitRead(patron, 6));
}
void apagarSegmentos() {
digitalWrite(segmentA, LOW);
digitalWrite(segmentB, LOW);
digitalWrite(segmentC, LOW);
digitalWrite(segmentD, LOW);
digitalWrite(segmentE, LOW);
digitalWrite(segmentF, LOW);
digitalWrite(segmentG, LOW);
}

Después de la explicacion que les di, veía a los pibes, todos concentrados pero alegres, riéndose cuando algo salía mal y festejando cuando todo funcionaba como tenían en mente.
Y qué te digo, en ese aula se sentía esa buena onda que solo se vive entre profes y alumnos que están re copados con lo que hacen. ¡Y eso que el finde largo estaba a la vuelta de la esquina! Pero ni eso los distraía, estaban re enganchados con el proyecto, con ganas de hacerlo lo mejor posible para mostrar después lo que eran capaces de hacer.
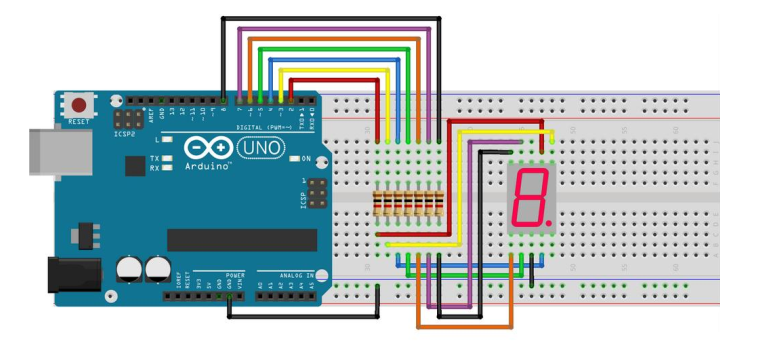
Para este proyecto usamos:
7 resistencias de 1KΩ (marrón-negro-rojo)
También pueden ser 7 resistencias de 220Ω (rojo-rojo-marrón)
1 display 7 segmentos.
Así que ahí estaban haciendo magia con la tecnología, aprendiendo y disfrutando juntos. Te juro que esos momentos son los que más valoro como profe, ver cómo crecen y se motivan con estas cosas. Y bueno, así fue el miércoles antes del finde largo, con nuestros Arduinos y nuestros 7 segmentos, entre risas y cables.
Como desafío culminante, los desafié a aplicar sus conocimientos previos y a incorporar un segundo display de 7 segmentos junto con sus correspondientes resistencias, con el objetivo de construir un contador capaz de mostrar cifras del 0 al 99.
Espero que hayan disfrutado de esta publicación. Si tienen alguna pregunta o comentario sobre el circuito o la programación, no duden en consultarme en la sección de comentarios.
..........................................................................
Hello hive colleagues, today I am going to tell you what happened the Wednesday before the long weekend with my students in the workshop. There we were, in the middle of a technology and control class, with the kids excited and I was ready to see what we were going to program with the Arduino and the 7 segments.

You see how it is, we start with all the good vibes. The boys, with that curiosity they always have, set out to program the circuit so that it counted from 0 to 9, first up and then down. Crazy! They were really excited, acting like technicians, testing cables and rubbing shoulders like champions.
Programacion:
// Definición de pines del display de 7 segmentos
const int segmentA = 2;
const int segmentB = 3;
const int segmentC = 4;
const int segmentD = 5;
const int segmentE = 6;
const int segmentF = 7;
const int segmentG = 8;
// Tiempo de visualización de cada número en milisegundos
const int tiempoVisualizacion = 1000;
// Arreglo de patrones para los dígitos del 0 al 9
byte patronesDigitos[] = {
B11111100, // 0
B01100000, // 1
B11011010, // 2
B11110010, // 3
B01100110, // 4
B10110110, // 5
B10111110, // 6
B11100000, // 7
B11111110, // 8
B11100110 // 9
};
int contador = 0; // Variable para el contador
void setup() {
// Configurar pines del display como salidas
pinMode(segmentA, OUTPUT);
pinMode(segmentB, OUTPUT);
pinMode(segmentC, OUTPUT);
pinMode(segmentD, OUTPUT);
pinMode(segmentE, OUTPUT);
pinMode(segmentF, OUTPUT);
pinMode(segmentG, OUTPUT);
// Establecer el primer número en el display
mostrarNumero(contador);
}
void loop() {
// Incrementar el contador en 1
contador++;
// Si el contador alcanza el valor máximo, reiniciarlo a 0
if (contador > 9) {
contador = 0;
}
// Mostrar el número actual en el display
mostrarNumero(contador);
delay(tiempoVisualizacion);
}
void mostrarNumero(int numero) {
// Apagar todos los segmentos del display
apagarSegmentos();
// Activar los segmentos correspondientes para mostrar el número
byte patron = patronesDigitos[numero];
digitalWrite(segmentA, bitRead(patron, 0));
digitalWrite(segmentB, bitRead(patron, 1));
digitalWrite(segmentC, bitRead(patron, 2));
digitalWrite(segmentD, bitRead(patron, 3));
digitalWrite(segmentE, bitRead(patron, 4));
digitalWrite(segmentF, bitRead(patron, 5));
digitalWrite(segmentG, bitRead(patron, 6));
}
void apagarSegmentos() {
digitalWrite(segmentA, LOW);
digitalWrite(segmentB, LOW);
digitalWrite(segmentC, LOW);
digitalWrite(segmentD, LOW);
digitalWrite(segmentE, LOW);
digitalWrite(segmentF, LOW);
digitalWrite(segmentG, LOW);
}

After the explanation I gave them, I saw the kids, all focused but happy, laughing when something went wrong and celebrating when everything worked as they had in mind.
And what can I tell you, in that classroom you felt that good vibe that only exists between teachers and students who are passionate about what they do. And the long weekend was just around the corner! But not even that distracted them, they were re-engaged with the project, wanting to do the best they could to show later what they were capable of doing.
For this project we use:
7 resistors of 1KΩ (brown-black-red)
There can also be 7 220Ω resistors (red-red-brown)
1 7 segment display.
So there they were making magic with technology, learning and enjoying together. I swear to you that those moments are the ones I value most as a teacher, seeing how they grow and are motivated by these things. And well, that's how it was on Wednesday before the long weekend, with our Arduinos and our 7 segments, between laughter and cables.
As a culminating challenge, I challenged them to apply their previous knowledge and incorporate a second 7-segment display along with its corresponding resistors, with the aim of building a counter capable of displaying figures from 0 to 99.
I hope you enjoyed this post. If you have any questions or comments about the circuit or programming, don't hesitate to ask me in the comments section.
Thanks for your contribution to the STEMsocial community. Feel free to join us on discord to get to know the rest of us!
Please consider delegating to the @stemsocial account (85% of the curation rewards are returned).
You may also include @stemsocial as a beneficiary of the rewards of this post to get a stronger support.
Gracias por apoyar mis posts , un saludo desde buenos aires!