# [UIKit](https://developer.apple.com/documentation/uikit?changes=_2)
<div class="side-by-side">
<div class="toleft">
<img class="image" src="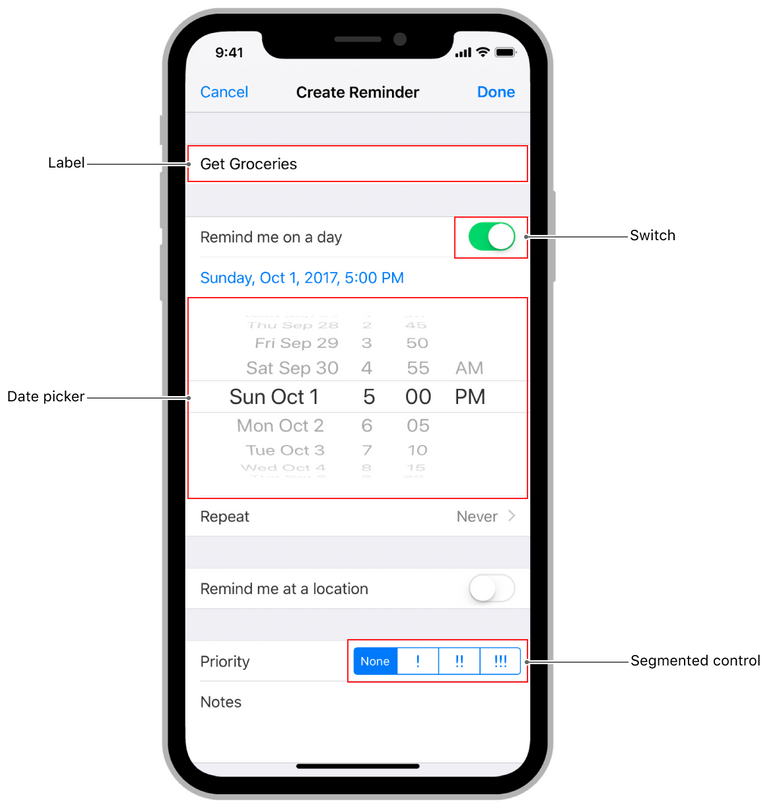 " alt="Alt Text">
</div>
<div class="toright">
<p><br />
UIKit 프레임 워크는 iOS 또는 tvOS 앱에 필요한 인프라를 제공한다. 또, 인터페이스 구현을 위한 window, view 아키텍처, 애플리케이션에 멀티 터치 및 기타 유형의 입력을 제공하는 이벤트 처리 인프라, 사용자, 시스템 및 앱 간의 상호 작용을 관리하는 데 필요한 기본 실행 루프를 제공한다.
<br />
그 외에도 프레임 워크가 제공하는 다른 기능으로는 애니메이션 지원, 문서 지원, 그리기 및 인쇄 지원, 현재 장치에 대한 정보, 텍스트 관리 및 디스플레이, 검색 지원, 접근성 지원, 앱 확장 지원 및 리소스 관리가 있다.</p>
</div>
</div>
## [UILabel](https://developer.apple.com/documentation/uikit/uilabel?changes=_2)
레이블은 우리가 일상생활에서 말하는 라벨과 같은 말이다. **사용자에게 원하는 데이터를 표시하고 싶을때** 사용한다.
> 단, 사용자는 볼 수만 있고, 수정할 수 없다.
### 핵심 속성
#### var text: String?
Label의 text**값**
```swift
myLabel.text = "It is Label" //Label의 text를 "Hi Lable"로 변경
print(myLabel.text!) //현재 Label을 가져와 출력(옵셔널이기 때문에 언래핑 함)
```
<br />
#### var textColor: UIColor!
Label의 text의 **색**, UIColor로 색을 지정할 수 있다.
```swift
myLabel.textColor = UIColor.brown //Label의 text 색을 브라운으로 변경함
```
<br />
#### var textAlignment: NSTextAlignment
Label의 text를 **Center(중앙), Left(왼쪽), Right(오른쪽)** 로 **정렬**할 수 있다.
지정할때는 **NSTextAlignment**를 이용해 지정한다.
```swift
myLabel.textAlignment = NSTextAlignment.center //text 중앙 정렬
```
<br />
#### var font: UIFont!
text의 글꼴 및 크기를 설정한다.
설정하려는 글꼴을 UIFont를 이용해 설정하는데, 일반적으로는 `UIFont.systemFont(OfSize: 원하는 폰트 사이즈)`를 이용해 시스템의 기본 폰트에 사이즈만 변경해서 사용하지만 만약 폰트를 수정하고 싶다면 `myLabel.font = UIFont(name: 폰트이름, size: CGFloat값)`을 사용하면 된다.
```swift
myLabel.font = UIFont.systemFont(ofSize: 18) //폰트: 시스템, 사이즈: 18
myLabel.font = UIFont(name: "Didot", size: 18) //폰트: Didot, 사이즈: 18
```
<br />
#### var numberOfLines: Int
레이블에 표시할 **최대 행의 수**
Default는 1이며, 0을 설정할 경우 제한 없이 행을 늘릴 수 있다.
```swift
myLabel.numberOfLines = 3 //최대 행의 수를 3줄로 제한
```
---
## [UIButton](https://developer.apple.com/documentation/uikit/uibutton?changes=_2)
버튼은 사용자가 누르면 무엇인가를 실행할 때 사용한다. 사용자가 버튼을 누르면 버튼에 연결된 메소드가 실행된다.
### 버튼 상태(UIControlState)
<center><img src=" "></center>
- **UIControlState.normal** : 기본 상태
- **UIControlState.highligted** : 버튼이 터치 되고있는 상태
- **UIControlState.selected** : 선택되었을 때
- **UIControlState.disabled** : 사용하지 않을 때
### 핵심 속성
#### func setTitle(String?, for: UIControlState)
버튼 타이틀을 설정하려면 setTitle메소드로 문자열과 버튼상태를 설정한다. 버튼상태는 UIControlState로 지정한다.
```swift
myButton.setTitle("normal", for: .normal)
myButton.setTitle("highlighted", for: .highlighted)
myButton.setTitle("selected", for: .selected)
myButton.setTitle("disabled", for: .disabled)
```
<br />
#### func setTitleColor(UIColor?, for: UIControlState)
버튼 타이틀의 색을 변경
타이틀 색 역시 타이틀의 내용처럼 상태에따라 다른 값으로 설정할 수 있다.
```swift
myButton.setTitleColor(UIColor.red, for: .normal)
```
<br />
#### var isEnabled: Bool
버튼의 활성화 상태 (활성화/비활성화)
```swift
if self.count == 2 {
self.myButton.isEnabled = false
} else {
self.myButton.isEnabled = true
}
```
<br />
#### var isSelected: Bool
버튼이 선택되었는지, default값은 false이다.
```swift
//버튼의 활성화 상태를 반대로 바꾸기
self.myButton.isSelected = !self.myButton.isSelected
```
---
## [UISwitch](https://developer.apple.com/documentation/uikit/uiswitch?changes=_2)
<center><img src=" "></center>
On / Off와 같은 이진 선택을 제공하는 컨트롤
Default는 On이다.
### 핵심 속성
#### var isOn: Bool
switch의 On / Off 상태
```swift
if(self.mySwitch.isOn) {
print("Switch is On") //스위치가 On으로 바뀔때
} else {
print("Switch is Off") //스위치가 Off으로 바뀔때
}
```
<br />
#### func setOn(Bool, animated: Bool)
위의 isOn과 같이 상태를 변경시켜줄 수 있다.
**isOn과의 차이**
- 상태를 return해줄 수 없다.
- 직접 터치해서 상태를 바꾼 것 처럼 애니메이션을 줄 수 있다.
```swift
mySwitch.setOn(false, animated: true) //값을 false로 바꾸고 애니메이션을 실행한다.
```
<br />
#### 스위치 색 바꾸기
<center><img src=" "></center>
```swift
mySwitch.tintColor = UIColor.red //상태가 off일때의 색
mySwitch.onTintColor = UIColor.brown //상태가 on일때의 색
mySwitch.thumbTintColor = UIColor.black //손잡이의 색
```
### 핵심 액션 이벤트
**Value Changed**: 스위치의 상태가 변경될 때 실행
---
## [UISlider](https://developer.apple.com/documentation/uikit/uislider?changes=_2)
<center><img src="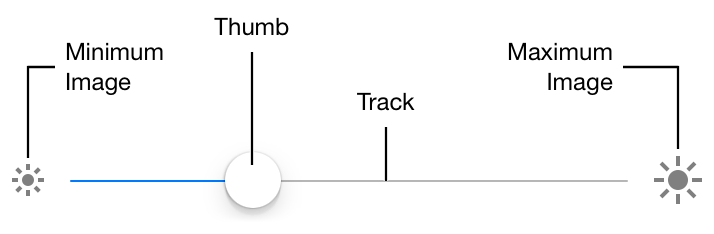 "></center>
슬라이더는 **밀어서 값을 선택**할 때 사용한다. 노브를 슬라이드시키는 것으로 값이 변경된다.
### 핵심 속성
#### 최소, 최대값 설정
UISlider는 최소 최대값을 어떻게 설정하느냐에 따라 Thumb의 움직임에 따른 값의 변화가 달라진다.
최소값을 설정할때는 `minimumValue`, 최대값을 설정할때는 `maximumValue`를 사용한다.
```swift
mySlider.minimumValue = 0
mySlider.maximumValue = 10
```
<br />
#### var value: Float
slider의 현재 값을 설정 및 return할 수 있다.
```swift
mySlider.value = 0 //이렇게 초기화를 할 수도 있다.
```
<br />
#### var isContinuous: Bool
slider의 값의 타입은 Float이기 때문에 손잡이를 조금만 움직여도 값이 변경된다. 그렇기 때문에 손잡이를 이동할때 값을 리턴할지 설정해야한다.
```swift
mySlider.isContinuous = false //변경중에는 값을 리턴하지 않는다.
```
<br />
#### 슬라이더 스타일 바꾸기
<center><img src=" "></center>
```swift
mySlider.minimumTrackTintColor = UIColor.red //thumb보다 왼쪽 색 설정
mySlider.maximumTrackTintColor = UIColor.yellow //thumb보다 오른쪽 색 설정
mySlider.thumbTintColor = UIColor.black //thumb 색 설정
```
<center><img src=" "></center>
이 외에도 `setMinimumTrackImage(_:for:)`, `setMaximumTrackImage(_:for:)`를 이용해 최대 최소 위치에 원하는 이미지를 삽입할 수 있다.
<center><img src="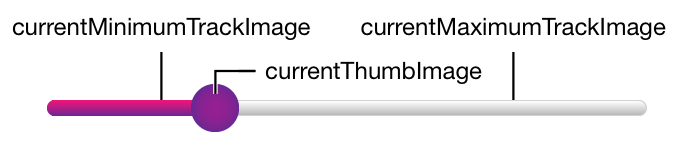 "></center>
또, `currentMinimumTrackImage`, `currentMaximumTrackImage`, `currentThumbImage`를 이용해 색을 바꾸는게 아니라 이미지를 넣어 스타일을 바꿀수 도 있다.
### 핵심 액션 이벤트
**Value Changed**: 값이 변경될 때 실행
---
## [UITextField](https://developer.apple.com/documentation/uikit/uitextfield?changes=_2)
<center><img src="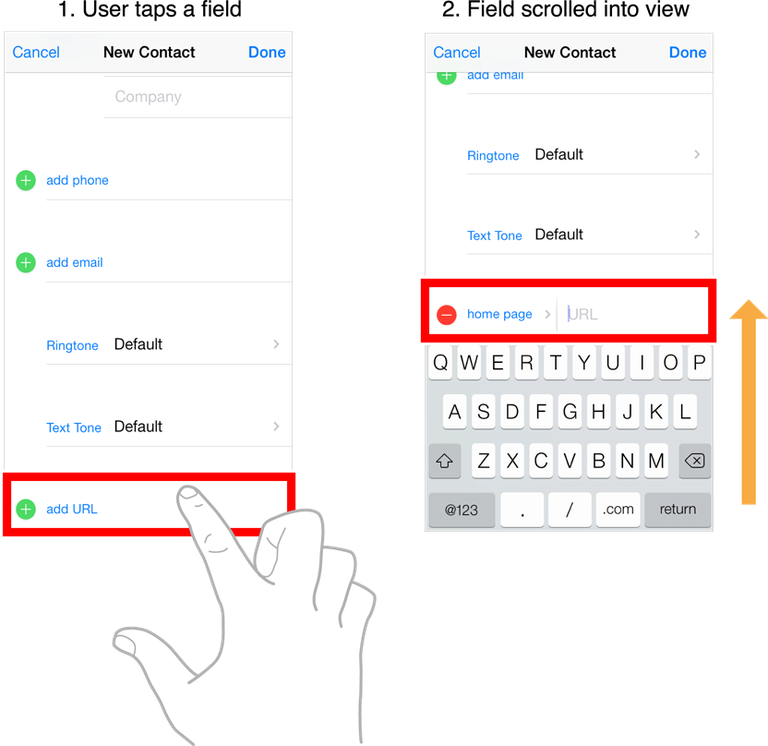 "></center>
텍스트필드는 키보드에서 한줄의 텍스트를 입력시 사용한다. 문자를 입력하기 위한 요소로 누르면 키보드가 자동으로 표시되어 사용자가 키보드를 사용하여 텍스트를 입력할 수 있다.
### 핵심 속성
#### var text: String?
텍스트 필드안의 값을 설정하거나 리턴할 수 있다.
```swift
myTextField.text = "It is Text Field"
```
<br />
#### var placeholder: String?
텍스트 필드안에 사용자에게 입력을 유도하는 텍스트를 입력
> 위의 text와 다르게 사용자가 필드 안을 터치하고 키보드를 이용해 값을 입력하면 placeholder값은 사라진다.
```swift
myTextField.placeholder = "Search"
```
<br />
#### 텍스트 필드의 텍스트 스타일 변경법은 UILabel과 완전 동일하다.
```swift
myTextField.textColor = UIColor.white
myTextField.backgroundColor = UIColor.black
myTextField.textAlignment = NSTextAlignment.center
```
<br />
#### 텍스트 필드 입력시 사용되는 키보드 종류 설정
`keyboardType`를 이용해 키보드 종률를 변경할 수 있으며, 키보드 종류는 `UIKeyboardType`으로 지정한다.
```swift
myTextField.keyboardType = UIKeyboardType.emailAddress
```
<center><img src="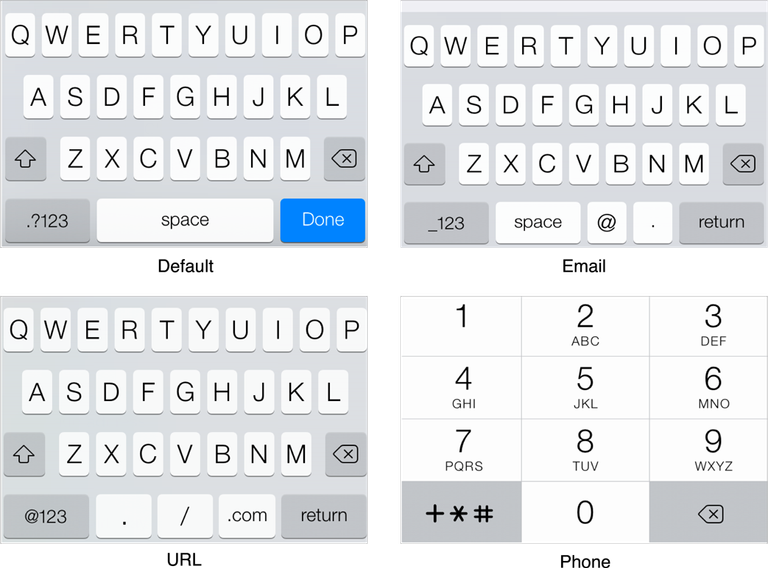 "></center>
<br />
**키보드 종류**
- **Default** : 기본
- **ASCIICapable**: 문자입력
- **URL**: URL입력
- **EmailAddress**: 이메일 입력
- **NumberPad**: 숫자입력용
- **PhonePad**: 전화번호 입력용
- 기타 등등
<br />
#### 리턴키 설정
키보드의 return키를 입력하는 종류에 따라 지정할 수 있다. 리턴키 종류는 UIReturnKeyType으로 지정한다.
```swift
myTextField.returnKeyType = UIReturnKeyType.send
```
**리턴키 종류**
- Default
- Go
- Join
- Next
- Search
- Send
- Done
### 핵심 액션 이벤트
**Value Changed**: 값을 변경과 동시에 실행하고 싶을때 사용
**Did End On Exit**: Return키를 눌렀을때 실행된다.
### 핵심 액션 이벤트
핵심 액션 이벤트는 UITextField와 같다.
**Value Changed**: 값을 변경과 동시에 실행하고 싶을때 사용
**Did End On Exit**: Return키를 눌렀을때 실행된다.
---
## [UITextView](https://developer.apple.com/documentation/uikit/uitextview?changes=_2)
텍스트뷰는 긴 텍스트를 표시하거나 입력할 때 사용한다. 긴 텍스트를 표시하기 위한 요소로 긴 텍스트를 넣으면 자동으로 스크롤바가 생겨 스크롤할 수 있다.
### 핵심 액션 이벤트
#### var text: String!
텍스트 뷰안의 값을 설정하거나 리턴할 수 있다.
```swift
myTextView.text = "It is TextView"
```
<br />
#### var isEditable: Bool
editable속성에서 편집할 수 있는지를 설정하며 Bool로 설정하고 true이면 편집 가능하고 false이면 편집할 수 없다. 편집 가능한 상태이면 텍스트뷰를 선택하면 자동으로 키보드가 나와 입력할 수 있게 된다.
```swift
myTextView.isEditable = false
```
<br />
#### 키보드 타입, 리턴 키 수정은 UITectField와 완전 동일하게 사용한다.
```swift
myTextView.keyboardType = UIKeyboardType.alphabet
myTextView.returnKeyType = UIReturnKeyType.done
```
<br />
#### 텍스트 뷰의 텍스트 스타일 변경법은 UILabel과 완전 동일하다.
```swift
myTextView.textColor = UIColor.white
myTextView.backgroundColor = UIColor.black
myTextView.textAlignment = NSTextAlignment.left
```
---
## [UIImageView](https://developer.apple.com/documentation/uikit/uiimageview?changes=_2)
이미지뷰는 이미지를 표시할 때 사용한다. 미리 프로젝트에 포함시킨 이미지나 웹사이트에 있는 이미지를 URL로 지정하여 표시가 가능하다.
### 핵심 속성
#### var image: UIImage?
UIImageView에 이미지를 넣을 수 있다.
> Png, jpg등의 이미지파일을 볼 수 있지만, 이미지 파일 그대로를 설정하기 어렵다. [UIImage]는 프로그램에서 사용할 이미지데이터로 변환후 설정해야 한다.
```swift
myImageView.image = UIImage.init(named: "swift")
```
#### 이미지 뷰의 비욜
`var contentMode: UIViewContentMode`를 이용해 이미지 뷰의 비율 조절 타입을 설정하고, 타입은 `UIViewCOntentMode`로 지정한다.
```swift
myImageView.contentMode = UIViewContentMode.scaleAspectFill
```
**비율 조절 타입(UIViewContentMode)**
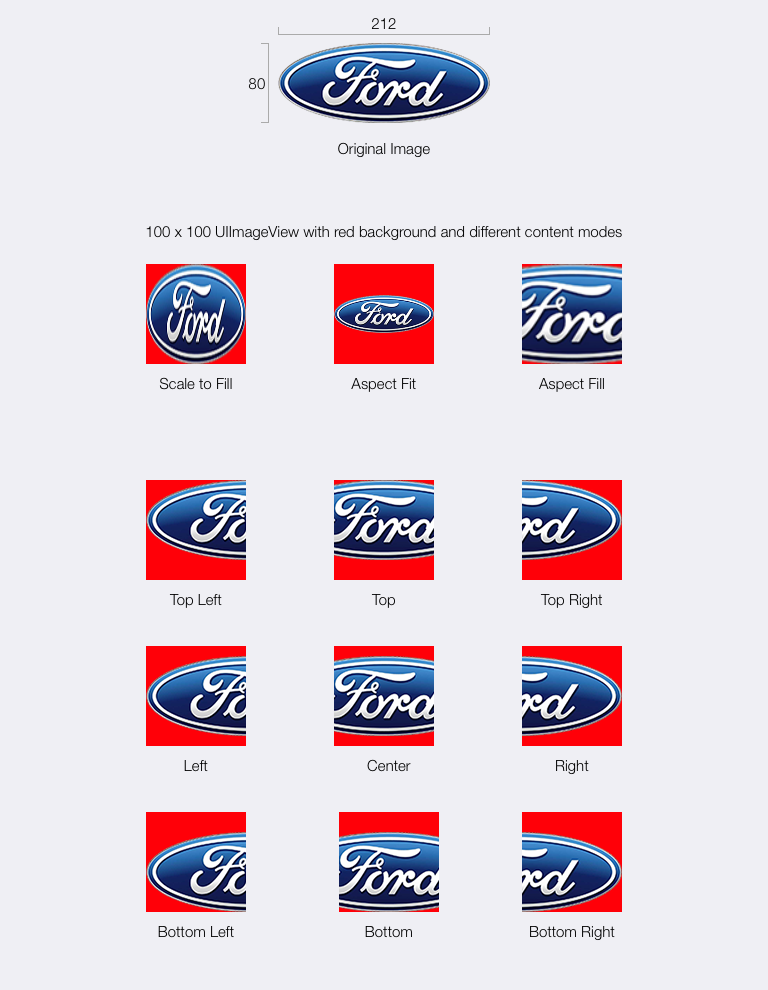
- ScaleToFill: 이미지를 이미지뷰에 맞게 크기로 확대축소한다.
- ScaleAspectFit: 이미지의 가로세로비율을 변경하지 않고 이미지 그대로 확대축소된다.
- ScaleAspectFill: 이미지의 가로세로비율을 변경하지 않고 이미지뷰에 틈새가 없도록 확대축소된다.
<div class="side-by-side">
<div class="toleft">
<img class="image" src="" alt="Alt Text">
</div>
<div class="toright">
<p>
ScaleToFill <br />
이미지 원본의 비율을 희생하여 전체 이미지가 ImageView안에 어떻게든 들어가도록 한다. 전체 이미지가 나오기는 합니다만 이미지 비율 왜곡이 발생할 수 있다. </p>
<p>
ScaleAspectFit <br />
이미지 비율을 유지하면서 이미지를 모두 표시한다. 비율도 유지되고 전체 이미지도 나오지만 이에 따라 이미지가 매우 작게 표시될 수도 있다. </p>
<p>
ScaleAspectFill <br />
이미지 비율을 유지하면서 ImageView에 가득 차게 이미지를 표시한다. 비율은 유지되지만 전체 이미지가 나오지 않고 부분적으로 짤릴 수 있다.
</p>
</div>
</div>
Aspect Fill을 사용할 때 이미지가 ImageView 밖으로 삐져나갈 수도 있는데 이럴 때는 아래 코드를 입력한다.
```swift
myImageView.layer.masksToBounds = true
```
> 하지만 이미지가 ImageView의 범위를 벗어나 의도와 다른 형태가 될 수 있다.
### 핵심 액션 이벤트
이미지뷰는 사용할 수 있는 액션 이벤트가 없다.
---
### 그 외
[여기](https://developer.apple.com/ios/human-interface-guidelines/bars/navigation-bars/)에서 더 자세히 볼 수 있다.
 )
)
### [UISegmentedControl](https://developer.apple.com/documentation/uikit/uisegmentedcontrol?changes=_2)
### [UIProgressView](https://developer.apple.com/documentation/uikit/uiprogressview?changes=_2)
### [UIStepper](https://developer.apple.com/documentation/uikit/uistepper?changes=_2)
 )
)
### [UIPickerView](https://developer.apple.com/documentation/uikit/uipickerview?changes=_2)
 )
)
### [UIDatePicker](https://developer.apple.com/documentation/uikit/uidatepicker?changes=_2)
 )
)
### [UINavigationBar](https://developer.apple.com/documentation/uikit/uinavigationbar?changes=_2)
## 기타 자료
 )
)
강사님처럼 시뮬레이터를 전체화면으로 보고싶다면 [여기에서](http://zeddios.tistory.com/504) Allow Full Screen Mode 보기
Congratulations @devjiwon! You received a personal award!
You can view your badges on your Steem Board and compare to others on the Steem Ranking
Vote for @Steemitboard as a witness to get one more award and increased upvotes!
Congratulations @devjiwon! You have completed the following achievement on the Hive blockchain and have been rewarded with new badge(s) :
Your next target is to reach 50 replies.
You can view your badges on your board and compare yourself to others in the Ranking
If you no longer want to receive notifications, reply to this comment with the word
STOPSupport the HiveBuzz project. Vote for our proposal!