AWS RDS Service
AWS RDS: Overview
Hello and welcome to the next module – AWS RDS Service, Learning & Best Practices.
In this module, we will get introduced to Amazon RDS and create a MySQL DB instance in RDS.
AWS RDS Service: Overview
Expected Learning
So what can you expect to learn from this module?
To begin with, we will get familiar with Amazon RDS. Then we will look at some key terminologies related to it. We will also discuss the advantages of having Amazon RDS.
Then we will look at the things to know while getting started with RDS. We will also see how we can create a MySQL DB instance in Amazon RDS using default network. And finally as we come to the conclusion of the module, we will verify the connection to MYSQL DB instance.
So let’s begin with a brief introduction to Amazon RDS.
Brief Introduction to RDS (1/2)
Before proceeding to the main topic, we should know what a Database is.
In general computer language, a database is a collection of data items organized in such a way that they are easily accessible in the future. But what you’re probably wondering is how does a relational database differ from a database. In a Relational database, data items are stored as a set of tables containing rows and columns.
Brief Introduction to RDS (2/2)
The table shown here is an example of relational Database. In this table, ID, Name, Age, and Salary mentioned in the top most section are called fields; you can also see rows and columns. Rows are nothing but a single record in a table, like 1, Adam, 34, and 13k is a single Row. Whereas columns are a set of values of a specific type, like for the field ID, a set of values 1, 2, 3, and 4 are values of the same type making up the first column.
Amazon RDS Engines
Okay so moving on, let’s talk about the engines provide by Amazon, what exactly are they?
As of now, Amazon provides the following RDS engines - Aurora, PostgreSQL, MySQL, MariaDB, Oracle and SQL Server. You can use any of them as per your requirement keeping in mind your workload.
In this module, we will be using MySQL RDS.
Amazon MySQL RDS
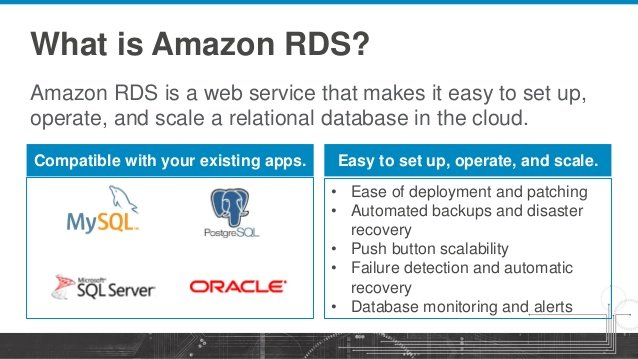
For everyone who is somewhat new to this, MySQL RDS is a relational database service in the cloud which makes things like Setup and Operations - easy, scalable, and highly available.
MySQL RDS Advantages
Let us now look at some advantages of MySQL RDS over a simple database hosted on the premises.
Easy to administer: With an RDS you don’t have to log in to the terminal, and type in any additional administrator commands. In fact you can get all the information and processing done on the Amazon Console and go through the Dashboard there, which shows the RAM usage, network usage, etc. (basically everything you have configured). You don’t need a system admin team to take care of your database instance.
It is highly scalable and you can scale up to petabytes if you’re going ahead with MySQL RDS; whereas when you have hosted your database on premises and in future if you need more space, you need to attach some more space to your physical servers which is a hectic job. But once you have deployed your DB instance in RDS you don’t need to worry about space - it will be automatically assigned.
Available & Durable: Its available in a sense that you can deploy your Database instance in a Multi-AZ form. So in Multi-AZ Deployment, your Database will be in several AZ’s, if for e.g., one AZ stops working then any of the other AZ’s can act as a Master DB.
Secure: If you’re going to create DB instance under VPC, you can permit the communication via security groups and network access control list. So if you want to allow certain IP to communicate with your DB instance, then you can specify that in your security group and need not worry about configuring IP tables, firewall, etc.
Setting up RDS Instance
Let us now move on to the setting up of RDS instance.
As discussed earlier, we will create a MySQL DB instance in this course. But there are a few things to know before creating a MySQL DB instance.
Region Selection: As of now, Amazon provides 12 regions and you can select any one of them based on your requirements. e.g., if your Application is running in USA, Virginia, the recommended setting would be for you to deploy your DB Instance in Virginia to overcome Network and Latency Issues.
The Second thing to look out for is the right kind of Engine type for your database, if it is PostgreSQL, MySQL, Oracle, etc. So you need to know your engine in advance. And lastly, since you’re creating your Database you need to know for what environment are you creating it, if it is for a QA environment, Staging or Production.
After creating a Database, we will verify it by connecting it to a DB instance and finally we will also learn how to delete a DB instance.
Demo
Let us now move to the Amazon console and try out these steps.
Creating MySQL DB Instance in a Default Network
We are in the Amazon console.
You need to be signed in to the Amazon console to create your Relational Database or DB instance. So once you’re signed in, you can directly go to Services and search for RDS in the Search Services field. Select RDS from the search results and you will be taken to the RDS dashboard. So if you don’t have an existing database cluster you see this page with Get Started Now option. Once you click on that option, you will be asked to select the engine. Since we’re considering MySQL for this demo let us choose MySQL and click on Select. Now you will be asked to select the type of environment. For this demo, let us select Dev/Test. Click on Next Step to proceed further. Here you can specify the DB details. The Instance Specifications section shows mysql as the DB Engine as we had chosen earlier. As you already know, mysql has a general public license. So you have to include the license here. Next you can specify the engine version that you want. AWS RDS provides the latest version of MySQL. So I am going to select the latest one here.
Then set the DB instance Class which is the hardware requirement for your DB Instance. You may select any one of these based on your requirements. For this demo, I will select 1 vCPU 1GB RAM.
Next, it will ask you if you want a Multi-AZ Deployment or not. If you’re expecting a higher workload in future you can go for multi-AZ deployment. In case of unforeseen circumstances, like if your master is down, then any of the slaves in other AZ will act as Master and the application will not go down.
This time, I will set it as NO and later in another session, we will go with a Multi-AZ Deployment.
Now let us select the Storage Type. There are three options in the drop down menu - General Purpose SSD, Provisional IOPS SSD, and Magnetic SSD. If you’re creating a DB Instance for Dev/Testing purpose, it is better to go with General Purpose SSD. For production, it is recommended to choose Provisional IOPS since it gives you more IOPS or more Input/Output Per Second on your hard drive. So for our demo, let us select General Purpose SSD.
Now moving on, specify the Allocated Storage. For this demo 5GB will be fine. This setting is based on the data you’re expecting to work within your DB.
Let us now move on to the Settings Section. The DB instance Identifier is the parameter to help you identify your DB instance. Let me give tetra-virginia as the DB instance identifier.
The Master Username and Master Password will be used to log in to the DB you’re creating. So let us type in a username and password. Confirm the entered password and then click on Next Step. Make sure that you memorize or note this password – we will use it again later.
We will configure some advanced settings here. We are in the Network & Security section. Here you will set the network for your DB Instance. For this demo, we’re going with the default settings.
So I will leave the VPC to Default VPC and Subnet Group to Default. Here you can select whether your DB instance is publicly accessible or not. In this demo, I am going to connect with my local machine. So set Publicly Accessible to YES. Availability Zone can be set to No Preference as we don’t have any preferences for this demo. and Next, select the Security Groups you want to attach to the Database. Keeping in mind that we’re going for the default settings in the demo, we will set it as Default VPC.
Finally coming to the Database Options, type in Database Name. I am giving the name tetranoodles. You probably already know this -the Default MySQL port is 3306. Leave the DB parameter Group and Options Group as they are. Make sure that copy Tags to Snapshots is unchecked and Enable Encryption is set to Yes if you want to secure your database. However, for this demo, I will keep them as they are.
In the Backup section, you can set the duration for which you want to backup your data. I will go with 7 which is the default setting.
Another option is to set a Backup Window. It is the time when the backup should be performed in the case of automated backups. The recommended setting is midnight, since it’s a time when there aren’t too many connections to the Database. I will not set a backup window for now.
Enable Enhance Monitoring should be set to Yes, if you want to have a closer look at your database. But for the demo I will go with the default setting.
And finally, the very last step in the configuration is to set the maintenance window. This lets you select a maintenance window in case a newer version is launched. For the demo, we will leave it with the default settings.
Once all these settings are configured, click on Launch DB Instance. It will take some time so just relax while it’s launching. Click on View your DB Instance to see the status. Here you can see the status as creating.
Once the status changes to Available, you can go ahead and connect to this database. But to do that we will need MySQL client. and for that, we will need to download MySQL workbench. Visit the MySQL Downloads section and scroll to the bottom of the page. You will see different versions available. You can download any of them as per your requirements. So now I will download this, and once the it is complete, just double click on it to configure it.
After configuring MySQL workbench, launch the application. Click on the Plus sign, to create a new connection.
Let’s name it as tetra-rds., Then you need a hostname. To find out the hostname, go to the RDS Dashboard, click on Instance Actions and go to See Details. Find the Writer Endpoint Information, copy it, go back to your workbench and paste it under Hostname.
Next, to check the username, go back to the details section and copy the username and paste it to the workbench. Now for the password, enter the password you had given earlier. You are now ready to test your connection. Click on Test Connection and a popup will open informing that you successfully made a MySQL connection. Click on OK.
This is the MySQL instance that we created. I will now try to open it by clicking on it. It will take some time.
Grab a glass of water or scroll through your phone for the messages you might have missed while it loads.
As you can see, the connection is now open and here we can see the tetranoodles database which we created earlier. Double click on tetranoodles and it will expand to show Tables, Views etc. But as of now we don’t have any tables, if you want to create tables, use the Query section.
We have come to the end of this demo. So this is how you create your Database under Default VPC and connect to it via MySQL workbench. I hope you found this useful.
Summary
Let us quickly summarize what we learnt in this module. We got introduced to Amazon RDS and also learnt about its advantages. Then we saw a demonstration of creating MySQL DB instance in AWS RDS. Finally, we also saw how to verify the connection to MySQL DB Instance.
In the next module, we will understand what a VPC is and look at the process of creating a VPC in AWS RDS and connecting to a DB instance via EC2 instance. I am sure you will find it very useful and interesting.