Now that the insulation was finished the time had come to put up the vapor barrier. The vapor barrier, although tedious, is very important to get right because it prevents water vapor from inside the house getting into the walls and causing condensation.
We also have an unconventional roof on our tiny house which is designed more like a wall than a traditional roof. In a conventional house the attic space is kept cold and has high airflow to wick away any moisture that finds it's way up there. Our "attic" is basically a wall with no air flow. In my line of work I deal with condensation related roofing issues all the time which is why I knew that this would work if I had absolutely no air flow. Having some airflow is where you can run into big trouble because when there is enough flow to bring moisture into the area but not enough to dry it out condensation occurs. So, if this type of roof system was to work doing the vapor barrier properly was critical.
 As with the insulation, the poly was a tedious process for such a small area because of the relatively large numbers of windows, doors and electrical boxes.
How I Installed the Vapor Barrier
The installation of the poly is a fairly challenging process to describe so hopefully having pictures to follow along with will make the steps easier to understand.
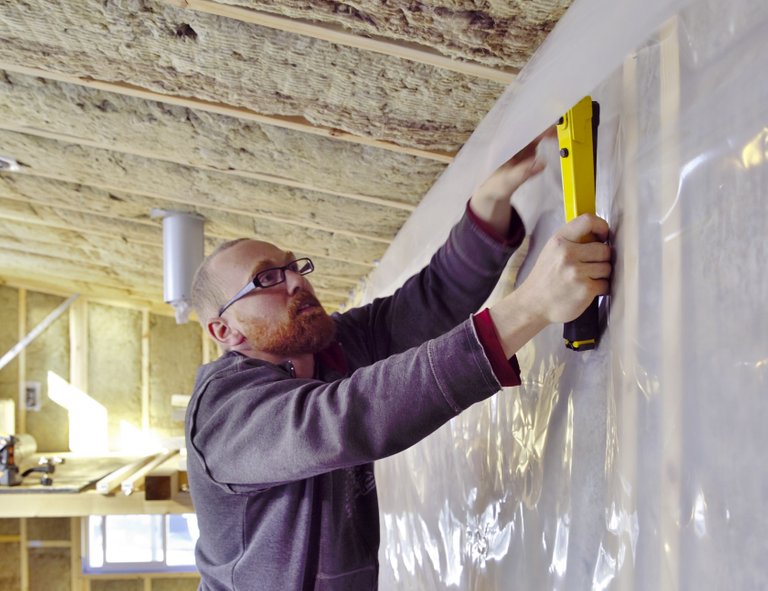
 The majority of the poly was fairly easy to install. I kept it as flat and wrinkle free as possible and stapled it every 16" on the studs. Where one wall met another, or the ceiling, I overlapped the poly about 6 inches and used a bead of acoustical sealant to help separate one wall section from another. Separating the wall sections was an extra precaution. Should one section develop condensation the moisture would be contained to a single area.
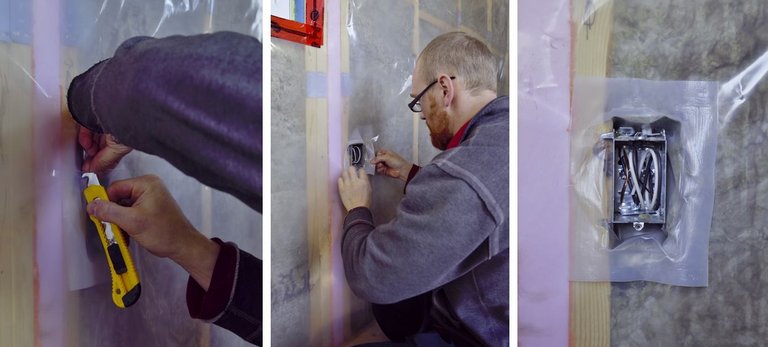 The poly hats that we installed at the same time as the electrical boxes are actually part of the vapor barrier. I made a cut in the poly about 1/2" wider than the electrical box on all sides and then pulled the poly hat through the hole.
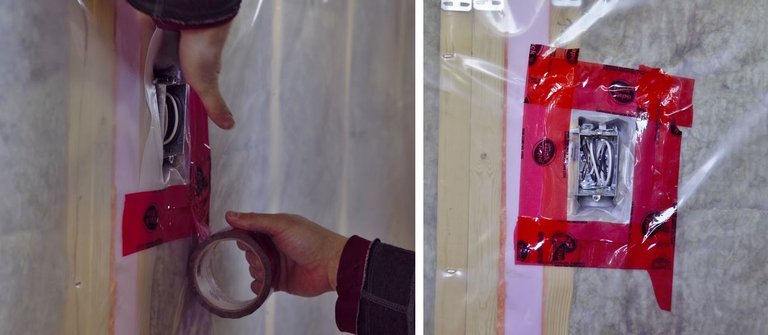 Once the flange of the hat is through I sealed it with Tuck Tape starting with the bottom, then the sides and finally the top.
 For the windows I cut the poly 1/2" to 3/4" from the edge of the frame. As you can tell I was not in the mood the day these pictures were taken. Aimee made me do it anyway!
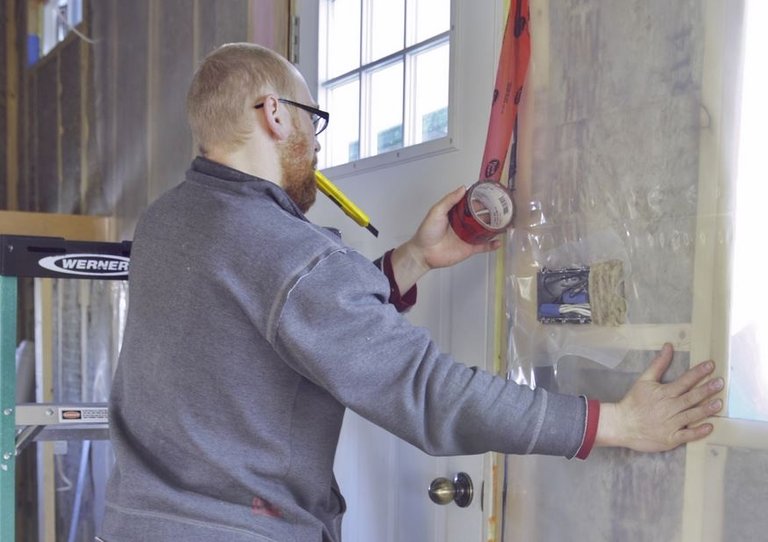
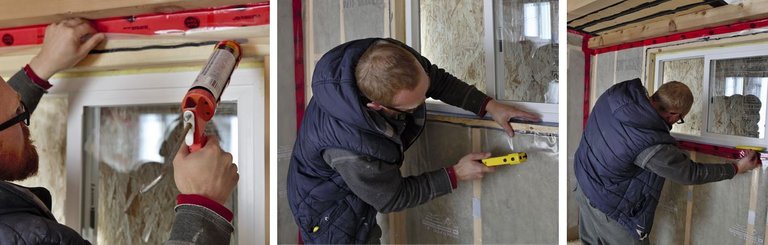 Next, I applied the acoustical sealant to the window frame. I made sure to be precise with this stuff as it has a tendency to stick to anything it touches and it can really make a mess. Once it's on I stapled the poly and apply the tuck tape to the window frame.
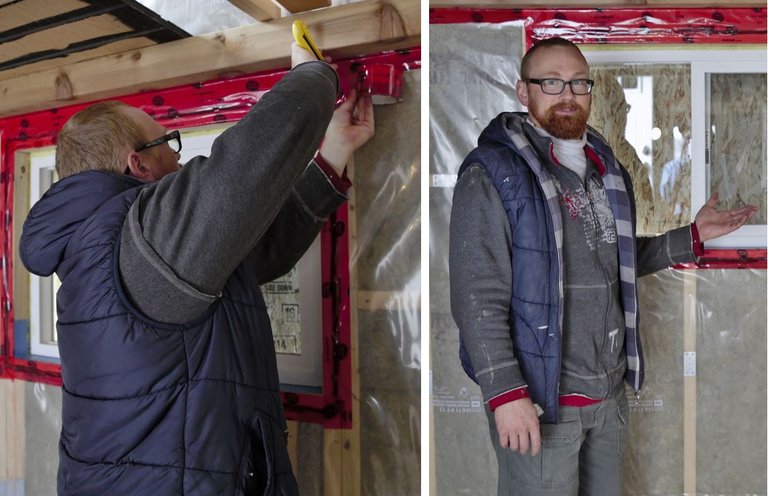 As with the poly hat I applied the tape to the bottom, then the sides and finally the top. Look! I even managed a half assed smile!
I don't have any photos of the vapor barrier along the walls where it meets the floor, however, I used the same cutting, acoustical sealant and taping method I used around the windows to seal this area as well.
 Just because it's getting dark doesn't mean the fun stops!
This is very detailed and will done
Thank you @canadianrenegade as this well help me one Day i am sure
You're welcome.
First off as an insulator of 10 years I must say you did a wonderful job. I know how anyoing it is to work with roxul, it's awful. Your batts are very nice clean cut, friction fitted to your studs.
What mil poly did you use ? 6ml ?
Your Polly job is nice as well, I like how you taped the windows and doors to on top of the acustical .
A thing you can keep in mind for next time is to do the caulk behind the Polly boots of your outlets, so to seal it because the tape drys and is known to separate after a period of time; It's code to do that In All houses in kamloops now.
Also you said your ceiling was like a wall did you make sure to put vents (baffles)in the ceiling all the way through on every run?
Thanks, glad to hear I at least did a decent job. I didn't know about the acoustical around the poly boots but it makes sense.
There are no vents of any kind in the roof/ceiling. It receives no air flow by design. There is no soffit or overhangs on the tiny house due to width considerations.
With not having vents it can cause condensation and if you live in Canada like myself you can get a problem with snow melting off the roof and causing ice. It's the air space that helps prevent that, as in normal sized houses your attic space is roughly the same temp as outside give or take.
That's not to take away from the amazing job you have done, and that shouldn't cause to much problems, as you don't have a foundation to divert water away from. It would be the condensation in the ceiling I would keep an eye out for in winter time .
We have actually been through one winter already. When I was building the house I didn't have time to blog about it too so I just took pictures and video with the intention of blogging when I had the time. So far no issues with condensation on or in the ceiling. The key is that I sealed it to the point of having no airflow both on the inside and the outside. No airflow means that no moist air is entering the ceiling to condensate.
I am a roofing service tech and deal with condensation related issues in attics a lot during winter so that is how I came up with the idea. Another way to look at it is that it is acting more like a flat roof then a conventional roof system. I think the biggest draw back to this system would be that the shingles probably get hotter without the airflow from below and will probably not last as long.
An excellent presentation, will need this later so I upvoted and resteemed.
Thank you!
You are welcome, I must thank you!
Great Idea ;)
Good luck i hope it works well.
Good luck i.verry..nice.to.job... hope it works well.
Is the insulation material glass fiber? It looks like it, I remember doing this job a few years back and that material is just nasty to work with. Great properties tho.
It is actually made from Basalt rock and Recycled Slag. In a lot of ways it is similar to fiberglass insulation but it isn't nearly as itchy to work with.
I see, great!
Thanks for the great photos and exclamation - I wish you all the best with the renovations - Just followed you and appreciate if you follow me too.
Thanks I'm glad you enjoyed the post.
Innovative Idea.
Thanks!
Wonderful idea. It will be work and help you
I don't think it's too bad of an idea myself. 🙂
best idea! excellent work
Thanks!
Your publications are very interesting. I would very much like you to visit me. You like me and follow me too. taty kisses
I'm not really sure how to take this..... 🙂
Lol
Resteemed by @steemvote - send only 0.5 SBD to get your post resteemed to 2K follower and receive Bonus-Upvotes
Your post is very very great. and very beautifull.
I like it.
Thanks
Resteemed to over 5900 followers and 100% upvoted. Thank you for using my service!
Send 0.100 Steem or 0.100 Steem Dollar and the URL in the memo to use the bot.
Read here how the bot from Berlin works.
@resteem.bot
nice photo
img credz: pixabay.com
Nice, you got a 59.0% @peaceandlove upgoat, thanks to @canadianrenegade
It consists of $13.16 vote and $4.39 curation
Want a boost? Minnowbooster's got your back!
The @OriginalWorks bot has determined this post by @canadianrenegade to be original material and upvoted(1.5%) it!
To call @OriginalWorks, simply reply to any post with @originalworks or !originalworks in your message!