If, as the old saying goes, a picture is worth 1000 words, then an online image should be worth 1000 likes or followers. And if just 1% of those likes or followers convert to a paying customer, that image can be worth some serious dollars!
But there are many things that can take away the impact an image can have. Most of these things can be easily avoided and we’ll take a look at exactly how to make the most of your images in this series.
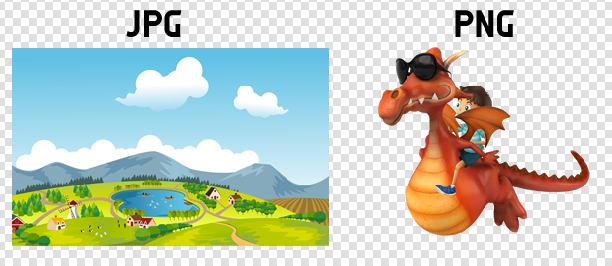
There are several file types for images and each one is different from the others and has a “best use” for its file type. The two main types of image files we use for most of our work, including blog postings are JPEGs, which have a .jpg file extension and PING’s which have a .png file extension.
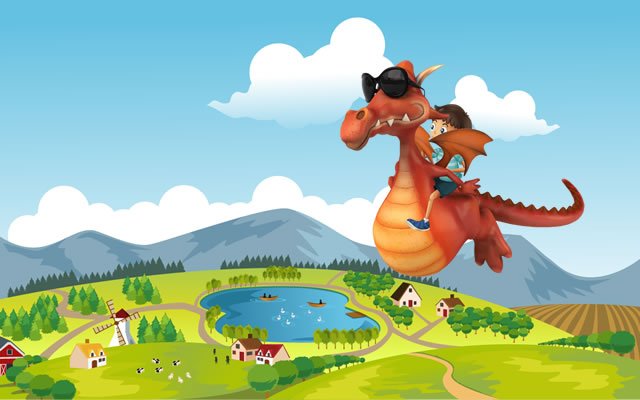
Jpegs are great for handling complex color combinations, like photographs. They can also handle more simple color combos like what you might find in an Infographic equally well. Pings can turn a range of color, like a background for example, transparent. So you can take a transparent background ping object and put it on the nontransparent jpg and the background will show through the invisible bits of the ping, making it appear as a part of the total image.
But all images no matter what file type they may be, are made up of little dots of color called pixels. Each image type handles these little dots a little bit differently than other image types. This is where we get into such massive differences between image file sizes.
Most of the websites like Unsplash and Pixabay where we get our images use jpg or png. Sometimes you will run into a third type of file - SVG or EPS which is a vector image and handles those pesky pixels a bit differently, and we’ll get into that after we go deeper into jpgs and pngs.
Let’s visit the biggest problem we have with images before talking more about jpegs and pngs. Size. Yes, size matters - it matters a lot. And to add to the confusion, we deal with two different types of sizes
Image Dimensions - the height and width of the image
Image File Size - the actual size of the image file stored in the cloud or on disk
Image dimensions are shown as width and height of the image at a specific resolution.
So you will see that expressed as something like 640 x 480 x 72 PPI
What that means is the image is 640 pixels wide, by 480 pixels high with 72 Pixels Per Inch.
Understanding the length and width is easy, but the Pixels Per Inch is where things start to get a bit confusing. The three most common resolutions - or PPI we'll often see are
- 72 PPI - great for most screens and for most of what we do
- 144 PPI - often used for high resolution screens
- 300 PPI - physical print like books or magazines
So if you have a blurry photo, all you have to do is pop it into an image editing program and change the resolution - right?
WRONG
If you take a 640 x 480 image at 72 PPI and change the resolution to something higher than the original 72, that image will change dimensions! It will become smaller, which is counter-intuitive - right? I mean you have more pixels per inch shouldn’t it be bigger in height and width? But that’s not how it works. The original image has 72 little squares of color and you can NOT add more pixels to it. BUT if you change the dimensions, those little squares of color get pushed closer together, and then you have 144 or 300 or whatever you chose as the resolution. So your image might be cleaner and more clear, BUT it will also be smaller in size.
The next problem we run into is when we save the image file. Most image programs will compress a jpeg when you save it. Some allow you to tell it how much compression your want as a range between 1 and 10, with 10 being the least compression and 1 being the most or as a percentage.
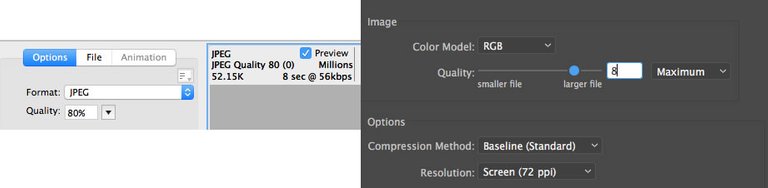
When this happens, some of the pixels are stripped out, others are made closer in color to the colors around them so there are fewer well defined colored pixels, and if compressed too far, the edges between one color and another become fuzzy.
But that’s not the worst of it. When you save that file that has been compressed, then reopen it and save it again, it compresses even further. So open and save a few times and you’ll have a muddy mess. This is often the problem you see with images that have square blocky bits around text for example or have bad blurriness in some parts of the image. You see this most often with JPGs, but the compression/recompression quality problem can also occur with PNGs.
This brings us to the two cardinal rules of image work.
Rule # 1 for any image type - always work with the largest original image available
(with a few exceptions that I’ll go into later)
Rule # 2 - always work with the original uncompressed jpeg file.
You can always make a large file smaller and it will look good, but you can’t make a small jpg bigger without making it look pretty awful most times. Remember - you can’t add pixels to an image, you can only squish them together or spread them apart. When you change the size on a large jpg to one with smaller dimensions, you are squishing those pixels closer together but they still retain their color attributes. To make it larger, you’re pushing those pixels further apart and there’s nothing to fill in those gaps. Some programs will make a “best guess” and most of the time that guess is wrong and the colors come out blurry.
The resolution - 72 PPI, 300 PPI, etc. also has a bearing on the file size sometimes called the file weight. When you have a large image - 1920 x 1286 pixels or 4728 x 3168 pixels, the file size will grow to be ginormous. Take a look at this screenshot of available sizes from Pixabay.
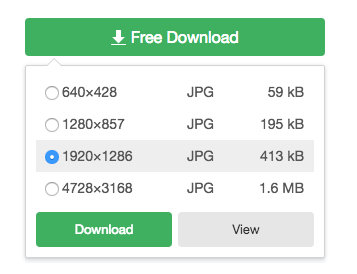
1.6 MB? OUCH that is way too big. Compare that large file size in both dimensions and file weight to the smaller 640 size that is usually perfect for our blog posts. That one comes in at 59 KB - a whopping difference! The bigger the dimensions, the heavier the image file is, and the longer it takes to load for a visitor to see it. Large image files slow the load time for the website, clogs up the servers running that site, and makes it really bad for someone on a slow connection or a limited data plan. For blog posting there is NEVER a reason to go over 1280 x 800 ish and a 640 image will often do just fine. This is the size exception I was talking about before. We don’t often need to go with the 1920 or bigger sizes when we’re just dropping an image into a blog post. We can usually use one of the smaller sizes.
One last thing about image sizes - when you’re using images for your blog that you’ve taken with your phone, check the setup and settings to be sure that the image size and finished file size are not ginormous. Cell phones often have a default setting that is very large in both dimensions and the number of pixels per inch. If you don’t want to use editing software on these images, pushing that setting down to a smaller dimension and a 72 PPI or even a 144 PPI will make a big difference in the file weight of that image.
Next up in this series will be how to resize those images using image editing software. You might be surprised to find how easy this is to do and most of the programs we’ll look at are free!