Adding images to our blog posts is a good thing. It makes the post more interesting and helps it stand out for a potential reader. However, sometimes finding images that we are allowed to use and getting those images into our blog posts so that they are loading quickly and look clean and crisp can be difficult.
Courtesy of Pixabay
There are two ways we get those images - take them ourselves, or use one of the many image sites found online. These sites are divided by use license type. Some image licenses allow you to use the image on your blog for free, others require payment. Some allow you to make changes to the image, other license types don't. What we're looking for are the sites that offer images that come with what is called a CC0 license which allows you to use the image for free and unless stated otherwise also allow you to change that image, adding other bits to it, changing its size, adding text, etc.
Here is a short list of CC0 image sites
and a great, up to date article that lists even more image sites for blog and product images.
There are two types of CC0 image sites - those that give you a choice of image size to download, like Pixabay and those who don’t, like Unsplash. Unsplash has one file size - ginormous. So we have to chop that image down to size, no pun intended.
Any decent image program will do this. Here are the other things you need an image program to do:
- Resize images
- Crop the images (cut parts off)
- Add text to the images
- Add other objects to the images
- Save in multiple formats
Here are some free ones that are pretty good
- Gimp
- https://www.gimp.org/
- Paint
- https://www.getpaint.net/
- Photoscape
- http://www.photoscape.org/ps/main/index.php
And a couple of online ones
- Pixlr
- https://pixlr.com/editor/
- Fotor
- https://www.fotor.com/
- Photopea
- https://www.photopea.com/
I also want to mention Canva. Canva is absolutely great for making memes, logos, book covers, - you name it, it seems that Canva can do it. It’s an image editing program, a layout program, a jack of all trades. So be sure to explore this online program as well.
Canva
Play with these image programs and see which one has the features and workflow that best fits your work style and needs.
Changing The Image Dimensions
All decent image programs will give you at least one way to resize the image - either during the image editing itself (most common) or sometimes the image dimensions can be done during the save file process.
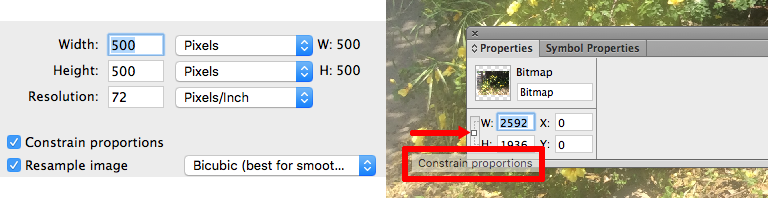
You can usually either use the handles that will pop up on the image when you are in the edit function, or some programs will allow you to set either the height or the width and then the program will automatically set the other dimension to match it. Be SURE you have the "Constrain Image Dimensions" or "Constrain Proportions" turned on when you set the height OR width pixel number so the program can set the other dimension correctly. If you don't your image will look squished or stretched and won't be what you want at all!
When you go to save your jpeg image files, you'll usually be given the option of "save quality". This is expressed as a number 1-10, or a percentage 10% -100%, or a text selection "Good, Better, Best". The higher the number, the higher the image quality, BUT the higher the file size will be as well! For our purposes, a 7 or 70% or Better selection will do perfectly fine. The image will still be crisp and clear, but also have a manageable file weight.
So far we have learned how to cut the file size down to size by making sure we have the right dimensions on our images and by saving jpegs at a better compression level, but what about pngs? They are generally “heavier” than a jpeg. Even with a transparent background that you can’t see, those pixels still exist, they are just changed from their original color to a transparent color. And you can’t compress a ping from most image programs and get a good, consistent result. But there is a free tool that I swear by - Image Alpha.
Let’s see how this works. Here’s an uncompressed png at 1999 x 1125 px
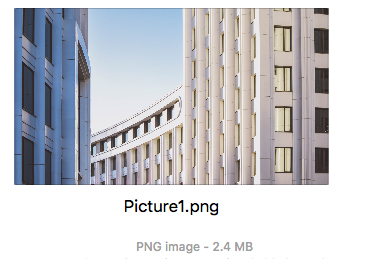
Notice the size - 2.4 MB - that’s huge!
Now I drop that image into Image Alpha and look at what that image will be! 908 K
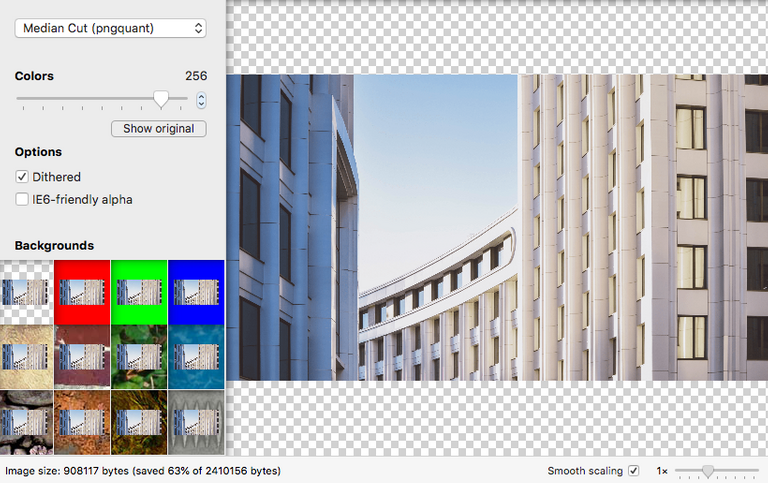
It saved 63% of that file size! With no discernable loss of clarity or sharpness or color depth.
The easiest way to explain this is Image Alpha strips out unused pixels. Frankly, I don’t care how it works, I only care that it works so very well.
Here’s the link to download it - it’s available for Mac and PC here
https://pngmini.com/
Image Alpha can often make a ping file even smaller than a compressed jpeg file.
And remember - size matters! If a mobile user is trying to load your article or website or whatever, and you have used gigantic image files, it won’t take but a few seconds before they close you out and head to a more friendly place that loads quicker.
Vectors
Let’s look at the third type of image file you may run into - the SVG, EPS or AI file. These are vectors. And Vectors are magic! Vectors are the only way to make a small image larger without turning it into a total mess. Vectors don’t use pixels the way jpegs and pngs do, they use points and lines and curves that are mathematically positioned instead of a designated number of pixels. With vectors you will never have jagged lines or square chunks of color (pixelation) no matter how big you make the image. You can resize a vector graphic from a 60 x 60 px image to a 1280 x 800 image and it will resize beautifully - no blur, no jaggies, no problem!

Vectors are great for more simple images with 256 colors or less, but they will work on more complex images like photos, just sometimes not quite as well as you would like. Vectors are often not accepted by some platforms so it is best to take a jpeg or png, turn it into a vector, change the size and then save that vector image as a jpeg or png. Here’s a free online site that will turn images into vectors for you.
Vectorization.org
https://www.vectorization.org/
So to summarize image types
Jpg - good for photos and images with unlimited colors
Relatively small file size
Does not resize well from small to large
Can be compressed too much resulting in blurry, muddy images
Png - good for images that need a transparent area
Works with any number of colors
Does not resize well from small to large
Can be compressed to small file size (weight) using software programs like ImageAlpha
Vectors - good for images that need to be sized larger than the original
Works best with smaller number of colors but can work on more detailed, color laden images
Should be saved as a jpg or png as many online platforms don’t handle this file type
Next up we'll go over how to make InfoGraphics. InfoGraphics help make complex ideas and processes easy to understand and help show your audience that you're an expert in your field. I'll show you some shortcuts and give you some resources that will help you turn out some really slick InfoGraphics in no time.
Very thorough!
Posted using Partiko iOS
Thank you Ashtv!