![]()
Okay, time for part II. I said we would do some some coding, so we'll definitely try to do that (no promises though, lots of theory and explanation to get through). So let us jump in and start working on our Serialization Manager.
Related Posts:
Part I: https://steemit.com/unity/@therajmahal/developing-games-with-unity-serialization-part-i
Part III: https://steemit.com/unity/@therajmahal/developing-games-with-unity-serialization-part-iii
Part IV: https://steemit.com/unity/@therajmahal/developing-games-with-unity-serialization-part-iv
First, I am assuming that you have downloaded the Unity game engine. If you haven't you can click on the following link to download the latest version:
https://www.unity3d.com/download
I would suggest downloading and running the installer. You can elect what options you wish to install. I always install everything, but that is over 20GB and thus takes time to download. The Unity installer also gives you the option of installing Microsoft Visual Studio Community 2015. That is my Integrated Development Environment (IDE) of choice although you may wish to use MonoDevelop. If you are on a Mac I am assuming there is a way to use Xcode but as I do not own any Macs I am only speculating on that. On first run you will be asked to create a new account or login to an existing one.
After Unity is Installed and Account Information is Validated
Double click on the Unity icon to start Unity and click on New:

After that, enter your project name and where you would like the project to reside:
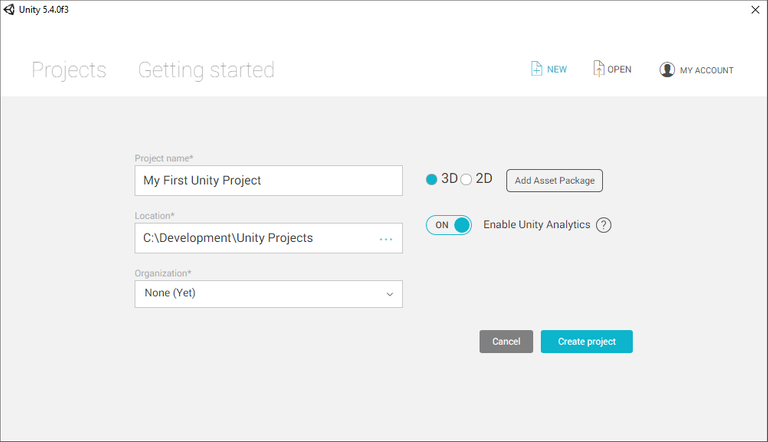
After that, click the Create project button. Your new project will be ready in a few seconds, if that:

We will briefly go over all the stuff in this screenshot, starting from left to right:
The Hierarchy tab (upper left) shows you the assets you are using in your current scene (aka current game world). As you can see, there is a camera and a light. You can also see them in the world as depicted by the icons in the Scene tab (big area in the middle).
The Project tab (lower left and spans almost the entire lower area) contains all the assets (textures, models, animations, C# files (Unity calls them scripts), etc... that are at your disposal to use in your scenes. To add any asset from your Project to your current scene simply drag and drop the asset from your Project tab to your scene or into the Hierarchy tab.
Notice the Assets folder in the Project tab. Its an actual folder that exists on your disk under the folder where you created the project. In fact, the Project tab is basically Explorer (for Windows Users) with one exception; it doesn't show you the meta files associated with each asset. Understanding meta files is not important at this point, but we may cover it in a future post. Its basically meta data about every asset in your project. You can add favorite locations in your Project tab for quick access, just like Windows Explorer as well.
The Inspector tab is like the Properties window in Visual Studio; when you click on something, if it has any exposed properties they will be displayed here for you to modify.
When you play your game through the editor, Unity will switch you to the Game tab (middle, not displayed because the Scene tab is selected in this screenshot and they share the same space).
Okay, that's a general overview of the editor. Oh, and you probably are wondering about the dark skin I have. That's because I have a Unity Pro perpetual license. I believe if you have a Plus or above subscription license you can switch to the dark skin but for free users you are stuck with the light skin.
Organization
People will differ on how they like to organize the files in their project. Ultimately, when it comes to Unity, as long as they are all under the Assets folder Unity will recognize the files so any organization beyond that point is strictly up to you or your team. There are a few exceptions, like if you wanted to write code for a custom editor, custom inspector, property drawer or for assets that need to be loaded at runtime, but that is beyond the scope of this post and tutorial.
I have seen a lot of people create a Scripts folder under the Assets folder to contain all their scripts. This certainly works and I have done that in the past. Today I organize things by way of association, like game systems. It is kinda like Bob Ross painting, do what you want, a little crimson red here, some yellow ochre there...
In the case of this example, I'll create a Systems\Serialization folder.
Right click in the content area of the Assets folder to bring up a context menu and select Create -> Folder:

This will create a new folder under the Assets folder. Rename the folder to "Systems":

Now go into that folder and do the same thing, this time naming the folder "Serialization":

Go into the Serialization folder and right click again to bring up the popup menu. This time, select Create -> C# Script:

Rename the script to "SerializationManager":

Alrighty, so now we have a Unity project that has one C# file (I hate calling it a script, it’s a C# file, it gets compiled into a DLL when a change occurs in it, but Unity and a lot of people who use Unity call it a script - good people disagree on what makes a script a script as opposed to a source file).
Double-click on the C# file to open Visual Studio (or MonoDevelop). You should see something like this (in the case of Visual Studio it may have a light theme by default but you can change this by going to Tools -> Options and selecting the Dark Theme):

Thanks for the Pre-Written code Unity, but No Thanks
As you can see, Unity did some things automatically for us. First, it assumed that we wanted the Serialization Manager to derive from MonoBehaviour. Second, it assumed we were going to use the Start and Update functions associated with the MonoBehaviour class. This is where we run into one of my "Laws of Unity":
Do not derive from MonoBehaviour unless you really need to.
What Does That Mean?
Some explanation should go here, so I'll give it a try.
Basically, Unity works upon the concept of what is called an entity-component model. That is, entities are a generic container that is undefined and vague, but as you add components to an entity it becomes what you want it to be.
For example, let us say you create an entity called a car. That's fine, but there is nothing that makes that entity a car yet. You need to add a chassis component, an engine component, a gas tank component, a transmission component, four wheel components... ahh, now this entity we call a car is beginning to take shape, and, well, it looks like that entity that we called a car is becoming a car.
In Unity, entities are called game objects and components are called MonoBehaviours. You add classes that derive from MonoBehaviour to game objects to make game objects into something.
Does Everything In Unity have to be a Game Object with Components on it?
The Serialization Manager, unlike the car in the above example, doesn't actually need to exist in the game world (Unity calls them scenes) , so it doesn't need to be a component (MonoBehaviour) on some entity (game object) in the world. As long as we can access the functions to serialize and deserialize our objects/data from code we should be fine.
Which brings us back to the law I mentioned above – do not derive from MonoBehaviour unless you really need to, and the Serialization Manager doesn't.
The code "template" can be modified such that Unity will not write this code automatically when creating a new C# script/file, but that is out of the scope for this post and tutorial. I'll look into making one if there is enough interest, but its fairly simple - find the template file and change the template schema.
Why are you Emphasizing not Using MonoBehaviours Unless You Really Have To?
The Unity game engine is written in C/C++. The code you write in C# gets compiled into a DLL that is linked to the C/C++ executable. Calls to the Unity API in your code have to go through what is called an interop to communicate back and forth with that executable. Without getting too technical, this is costly. So the fewer MonoBehaviours with the fewer Start(), Update() and other API functions the better – especially those in loops or the Update() function which happens every frame (iteration through the main game loop).
In the work that I do along with my colleagues frame update calls for game systems are called from one single MonoBehaviour's Update function (and the game systems themselves are not MonoBehaviours thus not registered with the engine to be called through the interop every frame).
I should note that Unity is addressing this (the C# dll / C++ executable), they are building a technology where they convert the IL (Intermediate Language) code compiled from Mono into native C/C++, and then recompile the project as a native program entirely (its called IL2CPP). It is on some of the build targets already but not all of them.
I should also note (the .NET developers out there are probably already wondering about this) that it is very easy to hack the DLL as it has all the IL code in it for the CLR, easily disassembled by a program like ILSpy. If someone is using a code scrambler, de4dot can usually clean the IL code up. There are some good products out there that will make de4dot fail though and are worth a look if disassembling the game code is a concern.
How do we ensure that the Serialization Functions are Accessible from Anywhere in Code?
Well, there are two options that stand out, although there could be a few others. First, Make the functions in the Serialization Manager class static. Setting functions static means that you do not need an instance of the class. This way the functions would be always accessible from anywhere and its nice to not have to have an instance of the class just to execute these functions.
The other popular option is to use a design pattern called the Singleton design pattern. A design pattern is more or less a general reusable solution to a commonly occurring problem within a given context in software design (Wikipedia). The singleton design pattern limits instantiation of a class to one instance (usually) and makes it accessible from anywhere in code (in other words, you do not have to have a reference to the instance stored in another class to be able to access it).
A reference to learn more about singletons and what other design patterns they are commonly used in can be found here: https://en.wikipedia.org/wiki/Singleton_pattern.
To get ourselves a little wet with design patterns we will implement our Serialization Manager using the singleton design pattern.
Phew, okay, I promised code in my previous post and I'm going to break my promise. Sorry about that. I'm at the end of page 8 already, sheesh. However, I'm fairly confident that in the next post we will start writing our Serialization Manager.
If you have any questions, comments or suggestions let me know the comments. I may not have gotten everything right so let me know if you catch something I missed or got wrong. Thanks!
Nice series! It's good how much detail you go into. One suggestion: make the screenshots links to the full image. They render too small on the page so I couldn't really read any of the text.
Thanks @ryanbaer, I actually tried that and it didn't seem to change the screen size. Maybe I did something wrong. I'll give it another go on the images. Basically I hit that good ol' print screen button, paste from the clipboard, saved and uploaded to TinyPic.
Like so:
[](https://img1.steemit.com/0x0/http://i67.tinypic.com/11gng2s.png)It won't change the size but it makes it clickable so you can see it in a larger resolution :)
On it. Thanks for the tip @ryanbaer!
Updated. They are clickable to see a larger version although these screen shots are still blurry. Arrgh.
Fantastic tutorial @therajmahal