
I was checking out my wallet on Steemit and realised I keep leaving my rewards unclaimed since I am forgetful. To solve this I thought about creating a program using steem-python that can do the following:
- Claim rewards automatically
- Convert SBD to STEEM
- Sell STEEM on exchange / convert to SP
- Claim rewards from other accounts and send to main account
In this tutorial I will cover how to write a program using steem-python to perform step 1: claim rewards automatically!
What Will I Learn?
- How to set up environment variables
- How to check and claim your rewards using
steem-python - How to schedule this program using the software utility
cron
Requirements
- Ubuntu (sort of)
- Python3.6
steem-python- A Steemit account
Difficulty
- Intermediate
Tutorial
Setting and accessing environment variables
Before you can perform actions with your Steemit account when using steem-python you need to log in. To do this you need your access your username and password in your steem-python program. A good way to do this is to set environment variables with your username and password and then load these in your Python file. In Ubuntu simply open open ~/.bashrc with your preferred editor and add the following to the end of the file
export STEEMIT_USERNAME="your_username"
export STEEMIT_PASSWORD="your_password"
then source it using the source ~/.bashrc and add the following to your Python file
import os
USERNAME = os.environ["STEEMIT_USERNAME"]
PASSWORD = os.environ["STEEMIT_PASSWORD"]
Checking unclaimed rewards
Next step is checking if you have any unclaimed rewards in the first place. To do this we can use the function get_account(), which returns a whole lot of information about an account, including their reward balance
steem = Steem()
reward_SBD = steem.get_account(USERNAME)["reward_sbd_balance"]
reward_SP  = steem.get_account(USERNAME)["reward_vesting_steem"]
print("Your current rewards: {} and {} POWER".format(reward_SBD, reward_SP))
which outputs the following
Your current rewards: 0.170 SBD and 0.031 STEEM POWER
Checking my account on Steemit shows that this is indeed the case!

Claiming rewards
If we don't have any rewards to claim we want to print this and return immediately, otherwise we want to claim the rewards. This is made very easy by steem-python's claim_reward_balance() function! Before we use this function we also need to unlock the account's wallet, which gives us the following code
from steem.amount import Amount
steem.wallet.unlock(pwd=PASSWORD)
if Amount(reward_SBD).amount + Amount(reward_SP).amount == 0:
    print("Claim rewards: {} and {} POWER".format(reward_SBD, reward_SP))
    return
else:
    steem.claim_reward_balance(account=USERNAME)
    print("Claim rewards: {} and {} POWER".format(reward_SBD, reward_SP))
After running this it should output something similar to this to your terminal
Your current rewards: 0.170 SBD and 0.031 STEEM POWER
Claim rewards: 0.170 SBD and 0.031 STEEM POWER
And indeed, going to my profile on Steemit shows that it worked!

Scheduling your script
To schedule a script you can use something called a crontab file. You can edit this file by simply typing crontab -e in your terminal. Once this is open you can use crontab-generator to generate a crontab line that will execute your script whenever you want. It's good practice to use absolute paths for the version of Python you are using to execute the script and the script itself, otherwise it probably won't work. So instead of the command python claim_rewards.py you should use
- Python
$ which python
/home/amos/anaconda3/bin/python
claim_rewards.py
$ pwd claim_rewards.py
/home/amos/Documents/utopian-tutorials/wallet-manager
(remember to add the Python file to the end) which generates the following crontab line
0 * * * * /home/amos/anaconda3/bin/python /home/amos/Documents/utopian-tutorials/wallet-manager/claim_rewards.py >/dev/null 2>&1
Note: programs executed by a crontab are executed in a different environment than the one you use, so you must set the environment variables (if needed) in the crontab file where you save the crontab line, which should look something like this
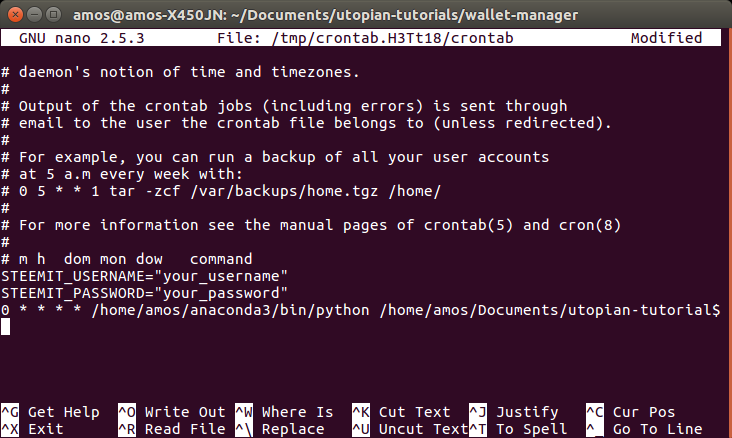
If it doesn't work for you for some reason, then you can use env -i /bin/bash --noprofile --norc to enter the same environment crontab uses and type python claim_rewards.py to see what is going wrong.
Congratulations! If you followed along you don't have to worry about manually claiming your rewards anymore! In the next tutorial we will look at how you can sell your SBD for STEEM automatically!
Code this tutorial can be found on my GitHub!
Posted on Utopian.io - Rewarding Open Source Contributors
Thank you for the contribution. It has been approved.
You can contact us on Discord.
[utopian-moderator]
Hey @howo, I just gave you a tip for your hard work on moderation. Upvote this comment to support the utopian moderators and increase your future rewards!
Hey @amosbastian I am @utopian-io. I have just upvoted you!
Achievements
Suggestions
Get Noticed!
Community-Driven Witness!
I am the first and only Steem Community-Driven Witness. Participate on Discord. Lets GROW TOGETHER!
Up-vote this comment to grow my power and help Open Source contributions like this one. Want to chat? Join me on Discord https://discord.gg/Pc8HG9x
Is there any way you would know how to set it for a Windows user?
Never mind, I did something and it started working, so for now it's working.
If it ain't broke don't fix it, I guess.