What Will I Learn?
- Integrate DCPathButton library to an iOS project
- Creating floating action button using DCPathButton library
- Configure DCPathButton subviews and its delegate
Requirements
- Xcode
- Understanding of Objective-C language
- Understanding of CocoaPods
- Basic understanding of protocol and delegate in iOS development
Difficulty
- Basic
Tutorial Contents
What is DCPathButton?
DCPathButton is a custom menu button for iOS. The original design for this control first appeared in the well-known iOS app, Path. This library let you easily manage animation, designs, etc. DCPathButton is just like Floating Action Button in Android development but already customized. Many Apps use this kind of button because it is provide quick way for the user to take an action. Okay, let's get started.
Integrate to iOS project using CocoaPods
CocoaPods manages library dependencies for your Xcode projects. Make sure you have installed the CocoaPods to continue. You can follow the instruction on its official page https://cocoapods.org/. The dependencies for your projects are specified in a single text file called a Podfile. Open up your Podfile and add this line in your target App
pod 'DCPathButton'
Then, open terminal, change to your project directory and run this command pod install to install the dependency of the DCPathButton. This is the full part of the Podfile.
# Uncomment the next line to define a global platform for your project
# platform :ios, '9.0'

target 'DCPathDemoApp' do
  # Uncomment the next line if you're using Swift or would like to use dynamic frameworks
  # use_frameworks!

  # Pods for DCPathDemoApp
  pod 'DCPathButton'
  target 'DCPathDemoAppTests' do
    inherit! :search_paths
    # Pods for testing
  end

  target 'DCPathDemoAppUITests' do
    inherit! :search_paths
    # Pods for testing
  end

end
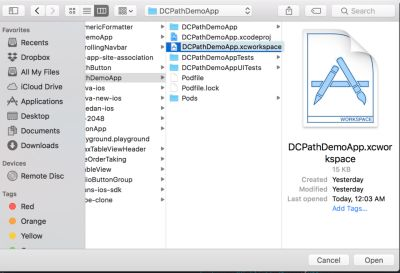
Once finished, open up the .xcworkspace file to continue.
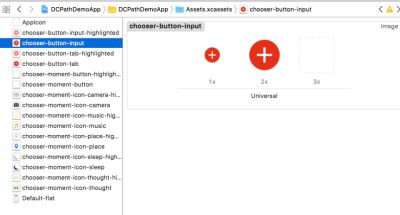
Adding images to assets
Images in this context is very helpful to differentiate action button to users. Put your own images to the assets files with some resolutions like 1x, 2x and 3x for the image scale proportionally according to each device. You can use your own images to be used later.
Implementing the DCPathButton
Before we go further, we must first import the DCPathButton.h in our ViewController header file.
#import "DCPathButton.h". This is how we import the DCPathButton.h library. We also conform to the DCPathButtonDelegate protocol.
This is the entire ViewController.h code
//
//  ViewController.h
//  DCPathDemoApp
//
//  Created by Andri on 1/22/18.
//  Copyright © 2018 Andri. All rights reserved.
//

#import <UIKit/UIKit.h>
#import "DCPathButton.h"

@interface ViewController : UIViewController<DCPathButtonDelegate>


@end
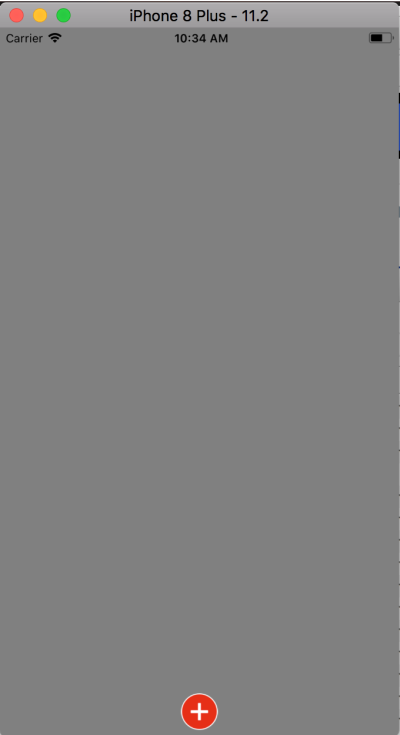
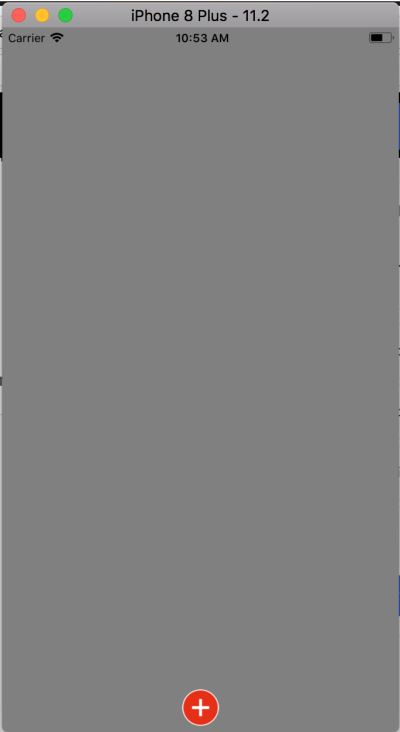
Let's continue on our ViewController.m file. We first setup the background color to gray because our button images are white when the DCPathbutton is pressed so it will be contrast and we can see it clearly.
self.view.backgroundColor = [UIColor grayColor];
The next thing we must do is to initialize and set the image for the center of our DCPathButton. Remember to set the highlightedImage to view a specific image when the button is tapped.
DCPathButton *dcPathButton = [[DCPathButton alloc]initWithCenterImage:[UIImage imageNamed:@"chooser-button-tab"]
                                                         highlightedImage:[UIImage imageNamed:@"chooser-button-tab-highlighted"]];
After done, add the dcPathButton to self.view
[self.view addSubview:dcPathButton];
Then, we will add another buttons that will show up when our DCPathButton and it is called DCPathItemButton. We need to initialize it using init with the parameters:
initWithImageset the image when the DCPathItemButton is initializedhighlightedImageset the image when the DCPathItemButton is highlightedbackgroundImageset the image of DCPathItemButton backgroundbackgroundHighlightedImageset the image of DCPathButton background when the button is highlighted
Write the following code and don't forget to assign UIImage with images you want to use when a particular event.
DCPathItemButton *firstItemButton = [[DCPathItemButton alloc]initWithImage:[UIImage imageNamed:@"chooser-moment-icon-music"]
                                                           highlightedImage:[UIImage imageNamed:@"chooser-moment-icon-music-highlighted"]
                                                            backgroundImage:[UIImage imageNamed:@"chooser-moment-button"]
                                                 backgroundHighlightedImage:[UIImage imageNamed:@"chooser-moment-button-highlighted"]];
Add the buttons count up to you. In this context, we add 5 DCPathItemButton including the above we initialized before.
DCPathItemButton *firstItemButton = [[DCPathItemButton alloc]initWithImage:[UIImage imageNamed:@"chooser-moment-icon-music"]
                                                           highlightedImage:[UIImage imageNamed:@"chooser-moment-icon-music-highlighted"]
                                                            backgroundImage:[UIImage imageNamed:@"chooser-moment-button"]
                                                 backgroundHighlightedImage:[UIImage imageNamed:@"chooser-moment-button-highlighted"]];

    DCPathItemButton *secondButton = [[DCPathItemButton alloc]initWithImage:[UIImage imageNamed:@"chooser-moment-icon-place"]
                                                           highlightedImage:[UIImage imageNamed:@"chooser-moment-icon-place-highlighted"]
                                                            backgroundImage:[UIImage imageNamed:@"chooser-moment-button"]
                                                 backgroundHighlightedImage:[UIImage imageNamed:@"chooser-moment-button-highlighted"]];

    DCPathItemButton *thirdButton = [[DCPathItemButton alloc]initWithImage:[UIImage imageNamed:@"chooser-moment-icon-camera"]
                                                           highlightedImage:[UIImage imageNamed:@"chooser-moment-icon-camera-highlighted"]
                                                            backgroundImage:[UIImage imageNamed:@"chooser-moment-button"]
                                                 backgroundHighlightedImage:[UIImage imageNamed:@"chooser-moment-button-highlighted"]];

    DCPathItemButton *fourthButton = [[DCPathItemButton alloc]initWithImage:[UIImage imageNamed:@"chooser-moment-icon-thought"]
                                                           highlightedImage:[UIImage imageNamed:@"chooser-moment-icon-thought-highlighted"]
                                                            backgroundImage:[UIImage imageNamed:@"chooser-moment-button"]
                                                 backgroundHighlightedImage:[UIImage imageNamed:@"chooser-moment-button-highlighted"]];

    DCPathItemButton *fifthButton = [[DCPathItemButton alloc]initWithImage:[UIImage imageNamed:@"chooser-moment-icon-sleep"]
                                                           highlightedImage:[UIImage imageNamed:@"chooser-moment-icon-sleep-highlighted"]
                                                            backgroundImage:[UIImage imageNamed:@"chooser-moment-button"]
                                                 backgroundHighlightedImage:[UIImage imageNamed:@"chooser-moment-button-highlighted"]];
You may change the bottomViewColor when the DCPathButton is clicked, but this is optional.
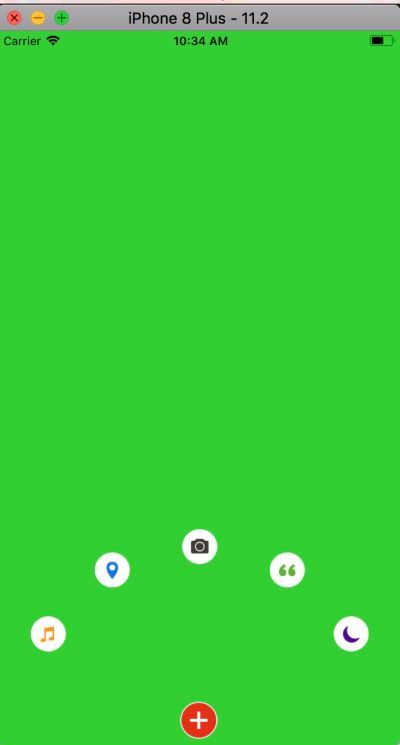
dcPathButton.bottomViewColor = [UIColor greenColor];
Background color before the DCPathButton is clicked.
Background color after the DCPathButton is clicked using dcPathButton.bottomViewColor = [UIColor greenColor];.
After done with the steps, we need to add each DCPathItemButton to our DCPathButton for show up when the DCPathButton is clicked. We'll make it by writing this code below.
[dcPathButton addPathItems:@[firstItemButton,
                                 secondButton,
                                 thirdButton,
                                 fourthButton,
                                 fifthButton
                                 ]];
Then, set the bloomRadius of the dcPathButton. The bloomRadius property is the radius of dcPathButton when it is clicked and then it blooms up using specific radius. Default bloomRadius is 105.0f.
dcPathButton.bloomRadius = 150.0f;
Next, we configure the center of our DCPathButton using dcButtonCenter property. We set it using CGPointMake to point its x-coordinate to the center using self.view.bounds.size.width / 2 and y-coordinate using self.view.bounds.size.height - 25.5f. This is the code.
dcPathButton.dcButtonCenter = CGPointMake(self.view.bounds.size.width / 2, self.view.bounds.size.height - 25.5f);
You can also set the sound when the DCPathButton is clicked and allow center button rotation. This step is optional but you can configure and try it .
dcPathButton.allowSounds = YES;
dcPathButton.allowCenterButtonRotation = YES;
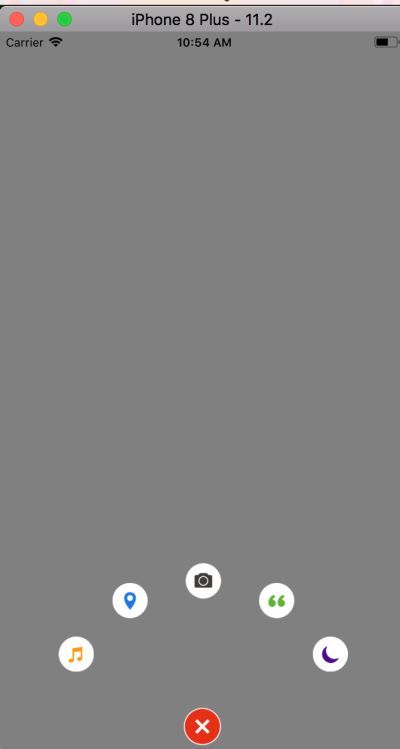
Before click the button using allowCenterButtonRotation
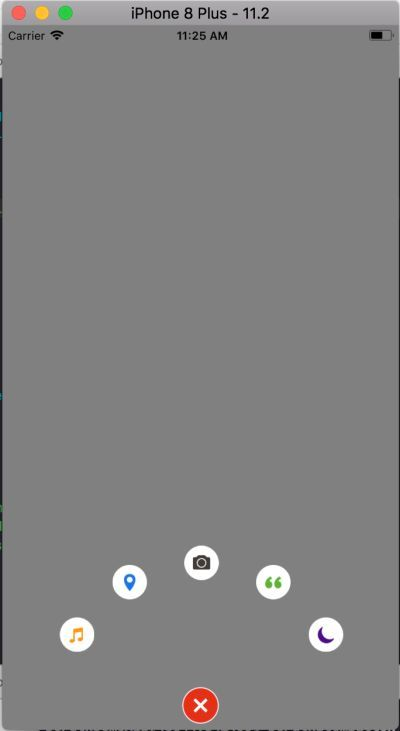
After click the button using allowCenterButtonRotation. Notice the icon that from '+' become 'x' if we set dcPathButton.allowCenterButtonRotation = YES;
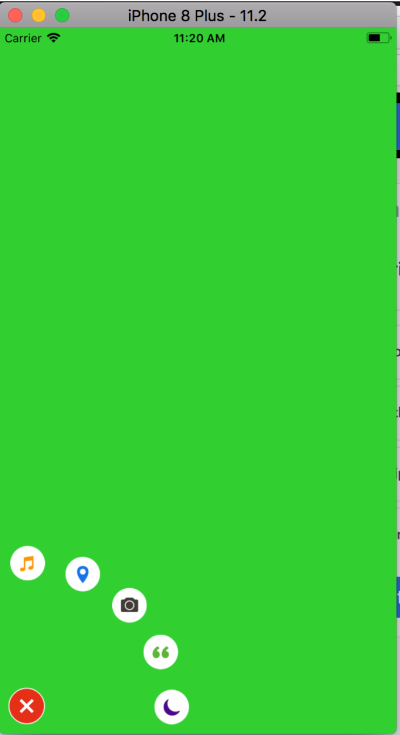
We can also change the direction of the bloom. Use below code to try it.
dcPathButton.bloomDirection = kDCPathButtonBloomDirectionTopRight;
dcPathButton.dcButtonCenter = CGPointMake(10 + dcPathButton.frame.size.width/2, self.view.frame.size.height - dcPathButton.frame.size.height/2 - 10);
In the above code, we configure again the dcButtonCenter to make the position of bloom well-aligned

The next thing we can do is to implement the delegate method when a particular event is triggered of the DCPathButton and DCPathItemButton. Write these 2 delegate methods that triggered when the DCPathItemButton will present to the screen and when the DCPathItemButton did present to the screen.
- (void)willPresentDCPathButtonItems:(DCPathButton *)dcPathButton {

    NSLog(@"DCPathItemButton will present");

}

- (void)didPresentDCPathButtonItems:(DCPathButton *)dcPathButton {

    NSLog(@"DCPathItemButton did present");

}
You can do another things when those two events are triggered. Now, let's continue when the DCPathItemButton will dismiss from the screen and did dismiss from the screen using this snippet.
- (void)willDismissDCPathButtonItems:(DCPathButton *)dcPathButton {

    NSLog(@"DCPathItemButton will dismiss");
}

- (void)didDismissDCPathButtonItems:(DCPathButton *)dcPathButton {

    NSLog(@"DCPathItemButton did dismiss");

}
And then, we need to know which particular item button we are clicking. We do that by using this method. We get the index of our clicked DCPathItemButton.
- (void)pathButton:(DCPathButton *)dcPathButton clickItemButtonAtIndex:(NSUInteger)itemButtonIndex {
    NSLog(@"You tap %@ at index : %lu", dcPathButton, (unsigned long)itemButtonIndex);
}
Okay, we're done with this tutorial. You can configure the settings of each button you wanted to. This is the entire ViewController.m file. Remember we changed the bloomDirection to top right near the end of setupUI method and dcButtonCenter to the bottom left to the screen. This is the full ViewController.m class.
//
//  ViewController.m
//  DCPathDemoApp
//
//  Created by Andri on 1/22/18.
//  Copyright © 2018 Andri. All rights reserved.
//

#import "ViewController.h"

@interface ViewController ()

@end

@implementation ViewController

- (void)viewDidLoad {
    [super viewDidLoad];
    [self setupUI];
}

- (void) setupUI {
    self.view.backgroundColor = [UIColor grayColor];
    DCPathButton *dcPathButton = [[DCPathButton alloc]initWithCenterImage:[UIImage imageNamed:@"chooser-button-tab"]
                                                         highlightedImage:[UIImage imageNamed:@"chooser-button-tab-highlighted"]];
    [self.view addSubview:dcPathButton];

    DCPathItemButton *firstItemButton = [[DCPathItemButton alloc]initWithImage:[UIImage imageNamed:@"chooser-moment-icon-music"]
                                                           highlightedImage:[UIImage imageNamed:@"chooser-moment-icon-music-highlighted"]
                                                            backgroundImage:[UIImage imageNamed:@"chooser-moment-button"]
                                                 backgroundHighlightedImage:[UIImage imageNamed:@"chooser-moment-button-highlighted"]];

    DCPathItemButton *secondButton = [[DCPathItemButton alloc]initWithImage:[UIImage imageNamed:@"chooser-moment-icon-place"]
                                                           highlightedImage:[UIImage imageNamed:@"chooser-moment-icon-place-highlighted"]
                                                            backgroundImage:[UIImage imageNamed:@"chooser-moment-button"]
                                                 backgroundHighlightedImage:[UIImage imageNamed:@"chooser-moment-button-highlighted"]];

    DCPathItemButton *thirdButton = [[DCPathItemButton alloc]initWithImage:[UIImage imageNamed:@"chooser-moment-icon-camera"]
                                                           highlightedImage:[UIImage imageNamed:@"chooser-moment-icon-camera-highlighted"]
                                                            backgroundImage:[UIImage imageNamed:@"chooser-moment-button"]
                                                 backgroundHighlightedImage:[UIImage imageNamed:@"chooser-moment-button-highlighted"]];

    DCPathItemButton *fourthButton = [[DCPathItemButton alloc]initWithImage:[UIImage imageNamed:@"chooser-moment-icon-thought"]
                                                           highlightedImage:[UIImage imageNamed:@"chooser-moment-icon-thought-highlighted"]
                                                            backgroundImage:[UIImage imageNamed:@"chooser-moment-button"]
                                                 backgroundHighlightedImage:[UIImage imageNamed:@"chooser-moment-button-highlighted"]];

    DCPathItemButton *fifthButton = [[DCPathItemButton alloc]initWithImage:[UIImage imageNamed:@"chooser-moment-icon-sleep"]
                                                           highlightedImage:[UIImage imageNamed:@"chooser-moment-icon-sleep-highlighted"]
                                                            backgroundImage:[UIImage imageNamed:@"chooser-moment-button"]
                                                 backgroundHighlightedImage:[UIImage imageNamed:@"chooser-moment-button-highlighted"]];

    // Add the item button into the center button
    //
    dcPathButton.bottomViewColor = [UIColor greenColor];
    [dcPathButton addPathItems:@[firstItemButton,
                                 secondButton,
                                 thirdButton,
                                 fourthButton,
                                 fifthButton
                                 ]];

    dcPathButton.bloomRadius = 150.0f;

    dcPathButton.dcButtonCenter = CGPointMake(self.view.bounds.size.width / 2, self.view.bounds.size.height - 25.5f);

    dcPathButton.allowSounds = YES;
    dcPathButton.allowCenterButtonRotation = YES;

    dcPathButton.bloomDirection = kDCPathButtonBloomDirectionTopRight;
    dcPathButton.dcButtonCenter = CGPointMake(10 + dcPathButton.frame.size.width/2, self.view.frame.size.height - dcPathButton.frame.size.height/2 - 10);
    dcPathButton.delegate = self;

}

#pragma mark - DCPathButton Delegate

- (void)willPresentDCPathButtonItems:(DCPathButton *)dcPathButton {

    NSLog(@"DCPathItemButton will present");

}

- (void)didPresentDCPathButtonItems:(DCPathButton *)dcPathButton {

    NSLog(@"DCPathItemButton did present");

}

- (void)willDismissDCPathButtonItems:(DCPathButton *)dcPathButton {

    NSLog(@"DCPathItemButton will dismiss");
}

- (void)didDismissDCPathButtonItems:(DCPathButton *)dcPathButton {

    NSLog(@"DCPathItemButton did dismiss");

}

- (void)pathButton:(DCPathButton *)dcPathButton clickItemButtonAtIndex:(NSUInteger)itemButtonIndex {
    NSLog(@"You tap %@ at index : %lu", dcPathButton, (unsigned long)itemButtonIndex);
}

- (void)didReceiveMemoryWarning {
    [super didReceiveMemoryWarning];
    // Dispose of any resources that can be recreated.
}


@end
The result is like this image.
That's all about this tutorial. Thanks for reading this guide.
Posted on Utopian.io - Rewarding Open Source Contributors
Thank you for the contribution. It has been approved.
You can contact us on Discord.
[utopian-moderator]
Smoga approve:)
Hey @andrixyz I am @utopian-io. I have just upvoted you!
Achievements
Suggestions
Get Noticed!
Community-Driven Witness!
I am the first and only Steem Community-Driven Witness. Participate on Discord. Lets GROW TOGETHER!
Up-vote this comment to grow my power and help Open Source contributions like this one. Want to chat? Join me on Discord https://discord.gg/Pc8HG9x