UITableView is a component in iOS development that used to display lists whether it is simple or custom list. This component is very important for every developers to understand because mostly iOS development always provide information in a list. Besides, this really help the developers because its built in method and components. We'll also learn how to swipe using MGSwipeTableViewCell
What Will I Learn?
- Create UITableView programmatically
- Implement UITableView delegate methods
- Using MGSwipeTableCell library to implement swipe to action on a UITableViewCell.
Requirements
- Macbook or other computers that can run Mac OS
- Xcode 9 (recommended)
- Protocol and delegate in iOS development
- Understanding of UITableView components
Difficulty
- Intermediate
Tutorial Contents
Import library and assigning delegates to .h file
A protocol declares a programmatic interface that any class may choose to implement. Protocols make it possible for two classes distantly related by inheritance to communicate with each other to accomplish a certain goal. A delegate is an object that acts on behalf of, or in coordination with, another object when that object encounters an event in a program
First of all, we need to add the MGSwipeTableCell library to our project. Just add this line to the Podfile
pod 'MGSwipeTableCell'
Then, clean and build the project. After that, we are going to create a view controller. In the .h file, import the MGSwipeTableCell library.
#import <MGSwipeTableCell/MGSwipeTableCell.h>
Add the delegate to the interface and add a UITableView variable to use later
@interface SwipeViewController : UIViewController<UITableViewDelegate,UITableViewDataSource,MGSwipeTableCellDelegate>
This is the full code of SwipeViewController.h file
//
//  SwipeViewController.h
//  SwipeDemoApp
//
//  Created by Andri on 1/15/18.
//  Copyright © 2018 Andri. All rights reserved.
//

#import <UIKit/UIKit.h>
#import "DemoTableViewCell.h"
#import <Masonry/Masonry.h>
#import <MGSwipeTableCell/MGSwipeTableCell.h>

@interface SwipeViewController : UIViewController<UITableViewDelegate,UITableViewDataSource,MGSwipeTableCellDelegate>{
    UITableView *tableView;
}

@end
Create the UITableView programmatically
We're going to our SwipeViewController.m file. Notice and follow these steps to create the UITableView programmatically.
- Create the tableview using
tableView = [UITableView new]; - Change the background color of the tableView by writing
tableView.backgroundColor = [UIColor whiteColor]; - Set the delegate of tableview to this view controller and the tableview data source that must adopt the UITableViewDataSource protocol
tableView.delegate = self;
tableView.dataSource = self;
- Set estimated row height of the tableviewcell because when you create a self-sizing table view cell, you need to set this property and use constraints to define the cell’s size.
tableView.estimatedRowHeight = 100;
- Set rowHeight to UITableViewAutomaticDimension to request that UITableView use the default value for a given dimension.
tableView.rowHeight = UITableViewAutomaticDimension;
- Set inset to the left and right
tableView.separatorInset = UIEdgeInsetsMake(0, 24, 0, 24);
- Add to the self.view and set the tableview constraint to place the tableview.
[tableView mas_makeConstraints:^(MASConstraintMaker *make) {
        make.left.top.bottom.right.equalTo(self.view).insets(UIEdgeInsetsMake(64, 0, 0, 0));
    }];
Assign count of elements in the UITableView
We must specify how many elements in our UITableView to be able to see the data. In this case, we return 10 elements. You can replace using array size or how much count you want Remember, this must be done at tableView delegate method with the numberOfRowsInSection. Write the following code.
-(NSInteger)tableView:(UITableView *)tableView numberOfRowsInSection:(NSInteger)section{
    return 10;
}
Set the text and configure swipe in the UITableView delegate method
We must implement this method to our .m file. This is what we configure the SwipeTableCell and each data detail on the list.
-(UITableViewCell*)tableView:(UITableView *)tableView cellForRowAtIndexPath:(NSIndexPath *)indexPath{
}
Then, create the identifier and initiate each cell inside the method. This identifier needs to identify each of our tableview cell. Don't forget to set the textLabel, detailTextLabel of the swipe table cell and its delegate
-(UITableViewCell*)tableView:(UITableView *)tableView cellForRowAtIndexPath:(NSIndexPath *)indexPath{
    static NSString * reuseIdentifier = @"programmaticCell";
    MGSwipeTableCell * cell = [tableView dequeueReusableCellWithIdentifier:reuseIdentifier];
    if (!cell) {
        cell = [[MGSwipeTableCell alloc] initWithStyle:UITableViewCellStyleSubtitle reuseIdentifier:reuseIdentifier];
    }

    cell.textLabel.text = @"Header";
    cell.detailTextLabel.text = @"This info is detail for the user";
    cell.delegate = self;
}
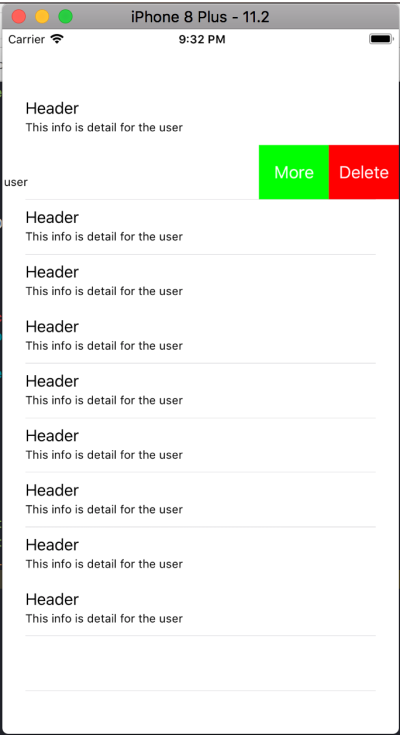
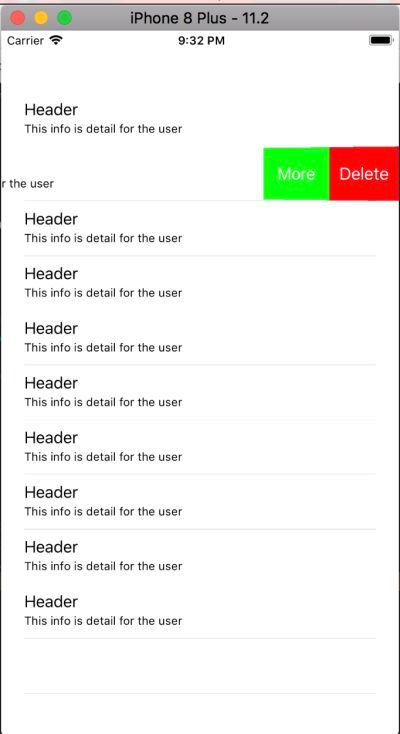
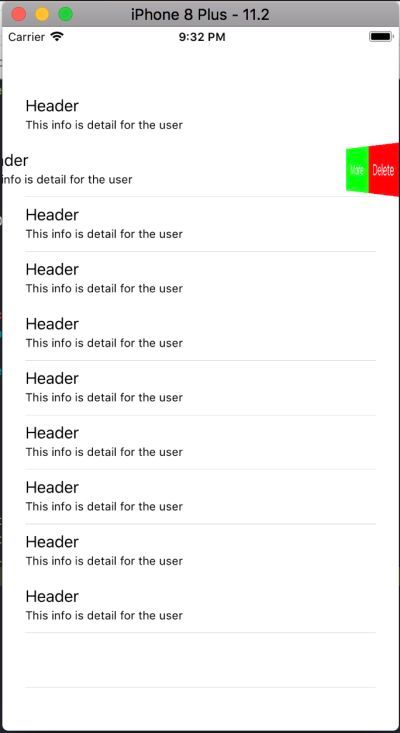
Then, configure to what will happen when using swipe right in a cell. In this case, we add 2 buttons. The Delete and More button using right swipe. You can set using left swipe if you want to. We also set the transition have 3D effect when the user is swiping the cell and return the created cell.
cell.rightButtons = @[[MGSwipeButton buttonWithTitle:@"Delete" backgroundColor:[UIColor redColor]]
                          [MGSwipeButton buttonWithTitle:@"More" backgroundColor:[UIColor greenColor]]];
cell.rightSwipeSettings.transition = MGSwipeTransition3D;
return cell;
This is the entire SwipeController.m file
//
//  SwipeViewController.m
//  SwipeDemoApp
//
//  Created by Andri on 1/15/18.
//  Copyright © 2018 Andri. All rights reserved.
//

#import "SwipeViewController.h"

@interface SwipeViewController ()

@end

@implementation SwipeViewController

- (void)viewDidLoad {
    [super viewDidLoad];
    [self setupUI];
}

- (void)setupUI {
    self.view.backgroundColor = [UIColor whiteColor];
    tableView = [UITableView new];
    tableView.backgroundColor = [UIColor whiteColor];
    tableView.delegate = self;
    tableView.dataSource = self;
    tableView.estimatedRowHeight = 100;
    tableView.rowHeight = UITableViewAutomaticDimension;
    tableView.separatorInset = UIEdgeInsetsMake(0, 24, 0, 24);
    [self.view addSubview:tableView];
    [tableView mas_makeConstraints:^(MASConstraintMaker *make) {
        make.left.top.bottom.right.equalTo(self.view).insets(UIEdgeInsetsMake(64, 0, 0, 0));
    }];
}


#pragma mark - uitable
-(NSInteger)tableView:(UITableView *)tableView numberOfRowsInSection:(NSInteger)section{
    return 10;
}

-(UITableViewCell*)tableView:(UITableView *)tableView cellForRowAtIndexPath:(NSIndexPath *)indexPath{
    static NSString * reuseIdentifier = @"programmaticCell";
    MGSwipeTableCell * cell = [tableView dequeueReusableCellWithIdentifier:reuseIdentifier];
    if (!cell) {
        cell = [[MGSwipeTableCell alloc] initWithStyle:UITableViewCellStyleSubtitle reuseIdentifier:reuseIdentifier];
    }

    cell.textLabel.text = @"Header";
    cell.detailTextLabel.text = @"This info is detail for the user";
    cell.delegate = self;

    cell.rightButtons = @[[MGSwipeButton buttonWithTitle:@"Delete" backgroundColor:[UIColor redColor]],
                          [MGSwipeButton buttonWithTitle:@"More" backgroundColor:[UIColor greenColor]]];
    cell.rightSwipeSettings.transition = MGSwipeTransition3D;


    return cell;
}


- (void)didReceiveMemoryWarning {
    [super didReceiveMemoryWarning];
    // Dispose of any resources that can be recreated.
}

@end
Okay that's all and we're done! You can now have better understanding how to use UITableView. Thank you for reading and following this guide.
Posted on Utopian.io - Rewarding Open Source Contributors
Thank you for the contribution. It has been approved.
You can contact us on Discord.
[utopian-moderator]
You're welcome
Hey @andrixyz I am @utopian-io. I have just upvoted you!
Achievements
Suggestions
Get Noticed!
Community-Driven Witness!
I am the first and only Steem Community-Driven Witness. Participate on Discord. Lets GROW TOGETHER!
Up-vote this comment to grow my power and help Open Source contributions like this one. Want to chat? Join me on Discord https://discord.gg/Pc8HG9x
Congratulations @andrixyz! You have completed some achievement on Steemit and have been rewarded with new badge(s) :
Click on any badge to view your own Board of Honor on SteemitBoard.
For more information about SteemitBoard, click here
If you no longer want to receive notifications, reply to this comment with the word
STOPCongratulations @andrixyz! You have completed some achievement on Steemit and have been rewarded with new badge(s) :
Click on any badge to view your own Board of Honor on SteemitBoard.
For more information about SteemitBoard, click here
If you no longer want to receive notifications, reply to this comment with the word
STOP