Tooltip is a very informative tool the user. For developers and designers, it can be useful to save the space if the views are too much. For example, when user clicked an "i" button in a specific page to show what is cvv. It can be very informative to users and attracts them though.
What Will I Learn?
- Adding tooltip library to an iOS project
- Implement tooltip preference
- Show the tooltip when a button is clicked
Requirements
- Mac OS, Macbook or other computer that can run MacOS (Macbook recommended)
- Xcode, IDE of the Apple development experience (Xcode 9 or latest recommended)
- Objective C Programming Language
Difficulty
- Basic
Tutorial Contents
Adding tooltip library
In this guide, we will use NMEasyTipView library. This library made tooltip customization easily and simple. Before install the library, we must first install Cocoapods to be able to install this library. CocoaPods is a dependency manager for Swift and Objective-C Cocoa projects. It has over 41 thousand libraries and is used in over 3 million apps. CocoaPods can help you scale your projects elegantly. You can see my previous post that explain how to install it in the curriculum section. Once installed, open up pod file and add this line.
pod 'NMEasyTipView'
Create tooltip preference
ToolTip preference is how we custom the tooltip behavior like show duration, transformation, color, etc. We need to create the preference because the preference is the setting for our tooltip. You must first create a view controller using CocoaTouchClass and named it according to your needs. Then, in the .h file import the library and create a UIButton variable.
#import <UIKit/UIKit.h>
#import <Masonry/Masonry.h>
#import "RCEasyTipView.h"

@interface ToolTipViewController : UIViewController{
    UIButton *button;
}

@end
Once you're finished, go to the .m file and create a method
- (void) buttonDidTap {
}
Inside the method, we will make the tooltip preferences first. Follow these
steps:
- Initialize with default preference
RCEasyTipPreferences *preferences = [[RCEasyTipPreferences alloc] initWithDefaultPreferences];
- Change the background color to color you need. In this context, i change to purpleColor
preferences.drawing.backgroundColor = [UIColor purpleColor];
- Set the arrow position of tooltip
preferences.drawing.arrowPosition = Bottom;
- Set the showDuration and dismissDuration of the tooltip
preferences.animating.showDuration = 1.5;
preferences.animating.dismissDuration = 1.5;
- Set the dismissTransform and showInitialTransform of the tooltip. This is where the translation x and translation y will be appeared of the tooltip.
preferences.animating.dismissTransform = CGAffineTransformMakeTranslation(0, -15);
preferences.animating.showInitialTransform = CGAffineTransformMakeTranslation(0, -15);
Create the Tooltip
After we have created the preference, we must create the our tooltip itself first. In this context, we will create the tooltip view. Remember create tooltip view is not equal to create our preferences before. Write the following code to do that and assign the preferences we created earlier.
RCEasyTipView *tipView = [[RCEasyTipView alloc] initWithPreferences:preferences];
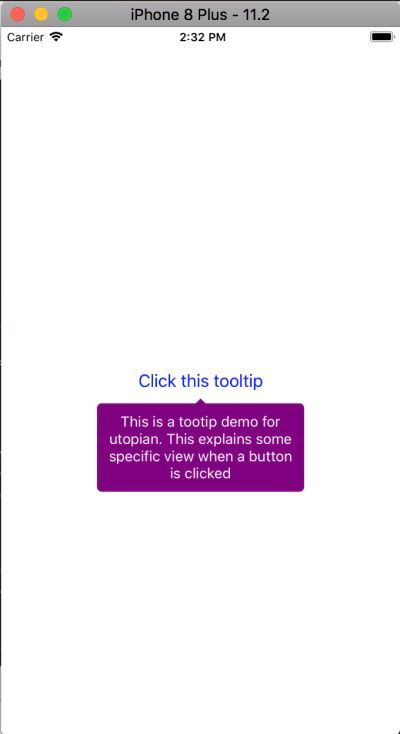
tipView.text = @"This is a tootip demo for utopian. This explains some specific view when a button is clicked";
Once we're done, of course we want to see the tooltip in action. We'll show it when specific button is clicked, in this context the view is the button. Button is the variable name for UIButton that we declared earlier in the .h file and assign the superview with the self.view
[tipView showAnimated:YES forView:button withinSuperView:self.view];
The forView:button code explains that forView: is a parameter while the button is the view we assigned to the tipView.
The [withinSuperView:self.view] code explains that we are using self.view as our superview and this is our ToolTipViewController.m class.
Initialize the button and show the tooltip
Because we have created the method that needs to show the tooltip. We now just need a button or other view to show it. Create the button code:
    button = [UIButton buttonWithType:UIButtonTypeCustom];
    [button setTitle:@"Click this tooltip" forState:UIControlStateNormal];
    [button setTitleColor:[UIColor blueColor] forState:UIControlStateNormal];
    [self.view addSubview:button];
    [button mas_makeConstraints:^(MASConstraintMaker *make) {
        make.centerX.equalTo(self.view);
        make.centerY.equalTo(self.view);
    }];
Then, we need to create listener to our button to listen an event when TouchUpInside. And we assign what method will be called during this event. In the following code, we add the selector to buttonDidTap method
[button addTarget:self action:@selector(buttonDidTap) forControlEvents:UIControlEventTouchUpInside];
And this is the entire code
//
//  ToolTipViewController.m
//  ToolTipDemoApp
//
//  Created by Andri on 1/13/18.
//  Copyright © 2018 Andri. All rights reserved.
//

#import "ToolTipViewController.h"

@interface ToolTipViewController ()

@end

@implementation ToolTipViewController

- (void)viewDidLoad {
    [super viewDidLoad];
    [self setupUI];
}

- (void)setupUI{
    self.view.backgroundColor = [UIColor whiteColor];

    button = [UIButton buttonWithType:UIButtonTypeCustom];
    [button setTitle:@"Click this tooltip" forState:UIControlStateNormal];
    [button setTitleColor:[UIColor blueColor] forState:UIControlStateNormal];
    [self.view addSubview:button];
    [button mas_makeConstraints:^(MASConstraintMaker *make) {
        make.centerX.equalTo(self.view);
        make.centerY.equalTo(self.view);
    }];

    [button addTarget:self action:@selector(buttonDidTap) forControlEvents:UIControlEventTouchUpInside];
}

- (void)buttonDidTap{
    RCEasyTipPreferences *preferences = [[RCEasyTipPreferences alloc] initWithDefaultPreferences];
    preferences.drawing.backgroundColor = [UIColor purpleColor];
    preferences.drawing.arrowPostion = Left;
    preferences.animating.showDuration = 1.5;
    preferences.animating.dismissDuration = 1.5;
    preferences.animating.dismissTransform = CGAffineTransformMakeTranslation(0, -15);
    preferences.animating.showInitialTransform = CGAffineTransformMakeTranslation(0, -15);

    RCEasyTipView *tipView = [[RCEasyTipView alloc] initWithPreferences:preferences];
    tipView.text = @"This is a tootip demo for utopian. This explains some specific view when a button is clicked";
    [tipView showAnimated:YES forView:button withinSuperView:self.view];
}

- (void)didReceiveMemoryWarning {
    [super didReceiveMemoryWarning];
    // Dispose of any resources that can be recreated.
}


@end
That's all about this tooltip tutorial. Thanks for following this tutorial.
Curriculum
Posts that have explained how to install cocoapods and creating view controller.
- https://utopian.io/utopian-io/@andrixyz/how-to-implementing-alert-in-ios-using-ehplainalert
- https://utopian.io/utopian-io/@andrixyz/how-to-build-ios-view-programmatically-by-code-and-auto-layout
Posted on Utopian.io - Rewarding Open Source Contributors
Your contribution cannot be approved because it is not as informative as other contributions. See the Utopian Rules. Contributions need to be informative and descriptive in order to help readers and developers understand them.
You can contact us on Discord.
[utopian-moderator]