
What Will I Learn?
Write here briefly the details of what the user is going to learn in a bullet list.
- Integrate Realm in an iOS project
- Create a simple to do list iOS using tableView and Realm
- Browse Realm Data using Realm Studio
Requirements
Write here a bullet list of the requirements for the user in order to follow this tutorial.
- Xcode
- Understanding of CocoaPods files
- Understanding of Objective-C programming language
- Basic understanding of Realm
- Protocol and delegate in iOS development
- UITableView iOS components
- AutoLayout constraining
Difficulty
- Intermediate
Tutorial Contents
What is Realm?
Realm is a mobile platform and a replacement for SQLite & Core Data. Build offline-first, reactive mobile experiences using simple data sync. We'll using Realm that use Objective Language. Realm is a very powerful platform that help you build offline app and can sync to the server though. When one data is update in a specific realm object, it will update in a real-time.
Integrate Realm in an iOS project
Make sure you have install Cocoapods to your project first. In order to integrate Realm in our project, we must first do the following steps:
- Run this command
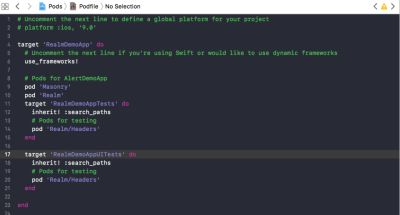
pod repo updateto make CocoaPods aware of the latest available Realm versions. - Open up the Podfile and add
pod 'Realm'to the app target andpod 'Realm/Headers'to the test target.
- Open up your terminal, change the directory to the project and install it using
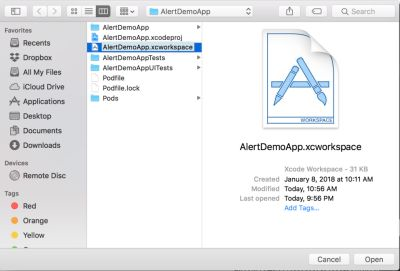
pod installcommand - Once finished, open the xcworkspace to get started with the Realm
Defining Task Model Class
Model is just like a table representative in a database. Before we go further, we need to make our model first. We'll make our class named Task to manipulate data with our tasks later. Follow these steps:
- For neat folder structure i recommend create a model group folder first by clicking AlertDemoApp folder first and Choose New group option.
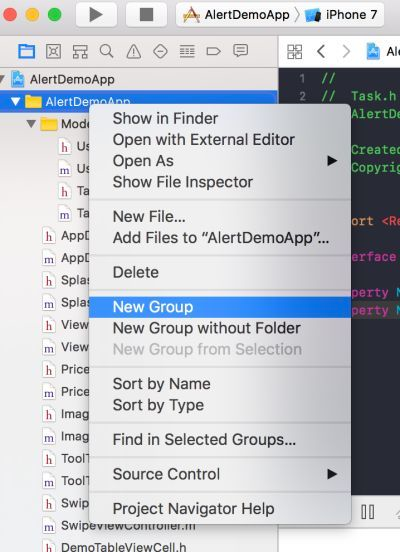
- Rename the folder to "Model"

- Point your cursor to the model folder and choose New File
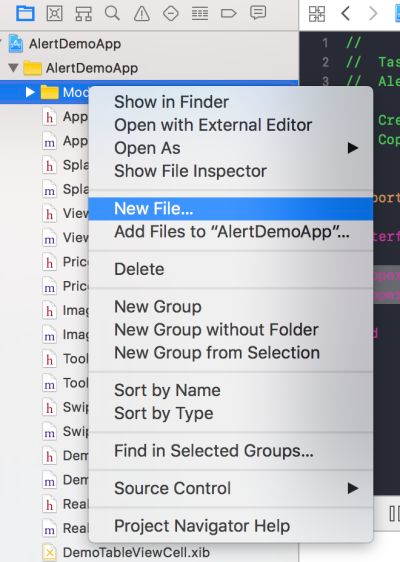
- Choose Cocoa Touch Class
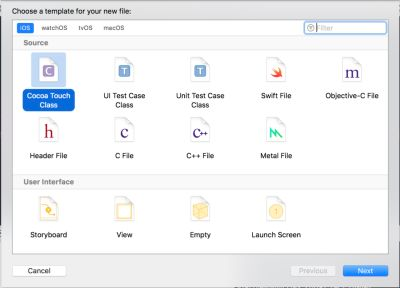
- Name it depending on your needs. In this case, we give the name the model class
Task
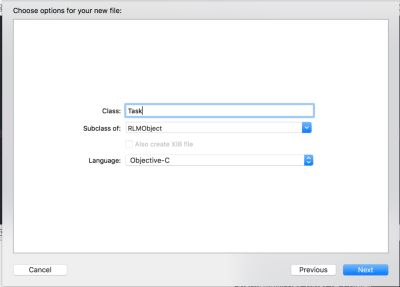
- Click Create and Finish
After the above steps done, create these 2 properties in the Task.h file by write the following code.
//
//  Task.h
//  AlertDemoApp
//
//  Created by Andri on 1/19/18.
//  Copyright © 2018 Andri. All rights reserved.
//

#import <Realm/Realm.h>

@interface Task : RLMObject

@property NSString *taskId;
@property NSString *name;

@end
The taskId property will represent id of each task.
The name property will represent name of each task.
Creating UITableView Cell
UITableViewCell is the cell representing each row in a tableview. Create by doing the following steps:
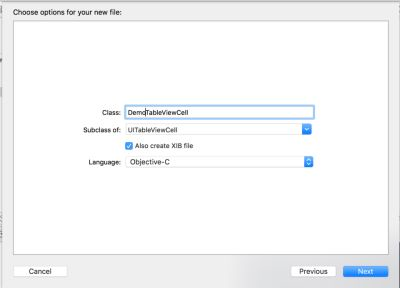
- File -> New -> CocoaTouchClass
- Give the name and don't forget to check the Also create XIB file. This will create 3 files consist of .h file, .m file and the XIB file
- Open the DemoTableViewCell.xib file and drag a UIButton to the xib file like below (We don't need to drag a UILabel because we'll use textLabel built-in from the UITableViewCell)
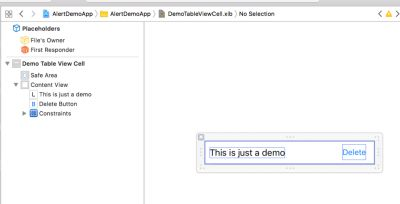
- Then Drag in a UIButton and named it "Delete"
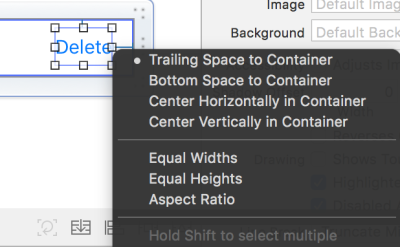
- Set the constraint of x axis of the UIButton by dragging the element to right of space and choose Trailing Space to container
- Set the constraint of y axis of the UIButton by dragging the element to top of space and click Top Space to the container
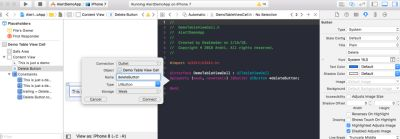
- Open Assistant Editor

- Drag the delete Button to the DemoTableViewCell.h as follow to be used later
Creating the .h file
In order to use our Realm and model class we defined, we must import them using these lines
#import <UIKit/UIKit.h>
#import "Task.h"
#import <Masonry/Masonry.h>
#import "DemoTableViewCell.h"
Once we imported them, we can use them later. Now declare the:
- UITextField for user to input task
- UITableView to display the list of task
- NSMutableArray to save and get data of the Realm
A protocol declares a programmatic interface that any class may choose to implement. Protocols make it possible for two classes distantly related by inheritance to communicate with each other to accomplish a certain goal. A delegate is an object that acts on behalf of, or in coordination with, another object when that object encounters an event in a program.
Don't forget to conform toUITableViewDelegateprotocol andUITableViewDataSourceprotocol because we will implement the delegate method in our .m file
Create them by writing this following entire .h file
//
//  RealmViewController.h
//  AlertDemoApp
//
//  Created by Andri on 1/16/18.
//  Copyright © 2018 Andri. All rights reserved.
//

#import <UIKit/UIKit.h>
#import "Task.h"
#import <Masonry/Masonry.h>
#import "DemoTableViewCell.h"

@interface RealmViewController : UIViewController<UITableViewDelegate, UITableViewDataSource>{
    UITextField *textField;
    UITableView *tableView;
    NSMutableArray<Task*> *taskArray;
}

@end
Setup the UI
Now, we will create a function named setupUI to create our views as well. We will create a label, a textField, a button and a tableview in this function. Write the following code.
- (void)setupUI{
    self.view.backgroundColor = [UIColor whiteColor];
    taskArray = [[NSMutableArray alloc] init];
    UILabel *taskLabel = [UILabel new];
    taskLabel.text = @"Task";
    [taskLabel setFont:[UIFont systemFontOfSize:24]];
    [self.view addSubview:taskLabel];
    [taskLabel mas_makeConstraints:^(MASConstraintMaker *make) {
        make.centerX.equalTo(self.view);
        make.top.equalTo(self.view).offset(16);
    }];

    textField = [UITextField new];
    textField.textColor = [UIColor colorWithRed:0/256.0 green:84/256.0 blue:129/256.0 alpha:1.0];
    textField.font = [UIFont fontWithName:@"Helvetica-Bold" size:14];
    textField.backgroundColor=[UIColor whiteColor];
    [textField setBorderStyle:UITextBorderStyleLine];
    [self.view addSubview:textField];
    [textField mas_makeConstraints:^(MASConstraintMaker *make) {
        make.left.equalTo(self.view).offset(16);
        make.right.equalTo(self.view).offset(-16);
        make.top.equalTo(taskLabel.mas_bottom).offset(16);
        make.height.mas_equalTo(44);
    }];

    UIButton *addTaskButton = [UIButton buttonWithType:UIButtonTypeCustom];
    [addTaskButton setTitle:@"Add" forState:UIControlStateNormal];
    [addTaskButton setTitleColor:[UIColor blueColor] forState:UIControlStateNormal];
    [addTaskButton addTarget:self action:@selector(addDidTap) forControlEvents:UIControlEventTouchUpInside];
    [self.view addSubview:addTaskButton];
    [addTaskButton mas_makeConstraints:^(MASConstraintMaker *make) {
        make.centerX.equalTo(taskLabel);
        make.top.equalTo(textField.mas_bottom).offset(16);
    }];

    tableView = [UITableView new];
    tableView.backgroundColor = [UIColor whiteColor];
    tableView.delegate = self;
    tableView.dataSource = self;
    tableView.estimatedRowHeight = 100;
    tableView.rowHeight = UITableViewAutomaticDimension;
    tableView.separatorInset = UIEdgeInsetsMake(0, 24, 0, 24);
    [self.view addSubview:tableView];
    [tableView registerNib:[UINib nibWithNibName:@"DemoTableViewCell"
                                               bundle:[NSBundle mainBundle]]
         forCellReuseIdentifier:@"DemoTableViewCell"];
    [tableView mas_makeConstraints:^(MASConstraintMaker *make) {
        make.left.bottom.right.equalTo(self.view);
        make.top.equalTo(addTaskButton).offset(48);
    }];
    [self fetchTask];
}
In the above codes, we also use this line to register our DemoTableViewCell to the tableview. We also assign taskArray using [[NSMutableArray alloc] init] because we'll use to save and delete each task to the array.
[tableView registerNib:[UINib nibWithNibName:@"DemoTableViewCell"
                                               bundle:[NSBundle mainBundle]]
         forCellReuseIdentifier:@"DemoTableViewCell"];
Create Fetching All Tasks Data Function
You may notice in the setupUI we call the fetchTask function. Now that we have setup the UI, we need to create a function that fetch data from the realm to display it later. Write the following code
- (void)fetchTask{
    RLMResults<Task *> *tasks = [Task allObjects];
    for (RLMObject *object in tasks) {
        Task *task = [[Task alloc] initWithValue:object];
        [taskArray addObject:task];
    }
}
Explanation:
RLMResults<Task *> *tasks = [Task allObjects]; means we get allObjects of the Task Realm and assign it to RLMResults which is tasks variable
We then create a single task and loop until the tasks end. Then, add the task object to taskArray in these lines
for (RLMObject *object in tasks) {
        Task *task = [[Task alloc] initWithValue:object];
        [taskArray addObject:task];
    }
Add task to the realm
We'll create addDidTap method that will be triggered when addTaskButton is tapped. We'll also save what the user input the Task Realm. First, create the task object and assign the taskId & name to the task object by writing the following code.
Task *task = [[Task alloc] init];
task.taskId = [NSUUID UUID].UUIDString;
task.name = textField.text;
We assign the textField.text to our task.name. Because Realm hasn't any auto incremental primary keys. You should set it for each record. You can use a unique primary key for each record. That's why we'll assign the taskId to [NSUUID UUID].UUIDString.
After that, we'll need to do transaction with our realm to save the task the user input. Do that by writing the following code.
RLMRealm *realm = [RLMRealm defaultRealm];
[realm transactionWithBlock:^{
      [realm addObject:task];
}];
Once finished, add the task to taskArray and reload the tableView to display in a real-time. We also clear the textfield when user has added the task
[taskArray addObject:task];
[tableView reloadData];
textField.text = @"";
We're done with the add to realm functionality. This is the method of addDidTap function
- (void)addDidTap{
    Task *task = [[Task alloc] init];
    task.taskId = [NSUUID UUID].UUIDString;
    task.name = textField.text;

    RLMRealm *realm = [RLMRealm defaultRealm];
    [realm transactionWithBlock:^{
        [realm addObject:task];
    }];
    [taskArray addObject:task];
    [tableView reloadData];
    textField.text = @"";
}
Implement delegate methods of tableView
Now that we have setup our tableview in setupUI method, we will implement the delegate methods of the tableview. First of all, this delegate method return count of our taskArray.
-(NSInteger)tableView:(UITableView *)tableView numberOfRowsInSection:(NSInteger)section{
    return taskArray.count;
}
After done with that, we will configure our each cell and the listeners in this delegate method
-(UITableViewCell*)tableView:(UITableView *)tableView cellForRowAtIndexPath:(NSIndexPath *)indexPath{
}
Inside the method, we first declare the cell using the dequeueReusableCellWithIdentifier method. Then, check if it is nil we use UITableViewStyleDefault and give identifier.
static NSString *identifier = @"DemoTableViewCell";
    DemoTableViewCell *cell = [tableView dequeueReusableCellWithIdentifier:identifier];
    if (nil == cell) {
        cell = [[DemoTableViewCell alloc] initWithStyle:UITableViewCellStyleDefault
                                      reuseIdentifier:identifier];
    }
After done with that, we'll set our taskArray that we get from the realm and display it using the indexPath.row index
cell.textLabel.text = taskArray[indexPath.row].name;
Then, we add listener delete button in the cell and assign the tag using indexPath.row so we can track which cell we are selecting.
[cell.deleteButton addTarget:self action:@selector(deleteDidTap:) forControlEvents:UIControlEventTouchUpInside];
    cell.deleteButton.tag = indexPath.row;
This is the full delegate methods code
#pragma mark - uitable
-(NSInteger)tableView:(UITableView *)tableView numberOfRowsInSection:(NSInteger)section{
    return taskArray.count;
}

-(UITableViewCell*)tableView:(UITableView *)tableView cellForRowAtIndexPath:(NSIndexPath *)indexPath{
    static NSString *identifier = @"DemoTableViewCell";
    DemoTableViewCell *cell = [tableView dequeueReusableCellWithIdentifier:identifier];
    if (nil == cell) {
        cell = [[DemoTableViewCell alloc] initWithStyle:UITableViewCellStyleDefault
                                      reuseIdentifier:identifier];
    }
    cell.textLabel.text = taskArray[indexPath.row].name;
    [cell.deleteButton addTarget:self action:@selector(deleteDidTap:) forControlEvents:UIControlEventTouchUpInside];
    cell.deleteButton.tag = indexPath.row;
    return cell;
}
Creating the delete functionality
Now that we have the add functionality, we will make for delete too. Remember to include the sender parameter because we need to get the tag of our selected that indicates the index of the cell.
- (void)deleteDidTap:(UIButton*)sender{
}
Inside the method, we'll get a single task by query where taskId is equalTo the selected task
Task *task = [[Task objectsWhere:@"taskId = %@", taskArray[sender.tag].taskId] firstObject];
Then, we'll make delete transaction to realm by these codes
RLMRealm *realm = [RLMRealm defaultRealm];
    [realm transactionWithBlock:^{
        [realm deleteObject:task];
    }];
After that, don't forget to remove from taskArray and reload the tableView
[taskArray removeObject:taskArray[sender.tag]];
[tableView reloadData];
This is the full deleteDidTap function
- (void)deleteDidTap:(UIButton*)sender{
    Task *task = [[Task objectsWhere:@"taskId = %@", taskArray[sender.tag].taskId] firstObject];
    RLMRealm *realm = [RLMRealm defaultRealm];
    [realm transactionWithBlock:^{
        [realm deleteObject:task];
    }];
    [taskArray removeObject:taskArray[sender.tag]];
    [tableView reloadData];
}
If you want to see the full code of the RealmViewController.m. This is it.
//
//  RealmViewController.m
//  AlertDemoApp
//
//  Created by Andri on 1/16/18.
//  Copyright © 2018 Andri. All rights reserved.
//

#import "RealmViewController.h"

@interface RealmViewController ()

@end

@implementation RealmViewController

- (void)viewDidLoad {
    [super viewDidLoad];
    [self setupUI];
}

- (void)setupUI{
    self.view.backgroundColor = [UIColor whiteColor];
    taskArray = [[NSMutableArray alloc] init];
    UILabel *taskLabel = [UILabel new];
    taskLabel.text = @"Task";
    [taskLabel setFont:[UIFont systemFontOfSize:24]];
    [self.view addSubview:taskLabel];
    [taskLabel mas_makeConstraints:^(MASConstraintMaker *make) {
        make.centerX.equalTo(self.view);
        make.top.equalTo(self.view).offset(16);
    }];

    textField = [UITextField new];
    textField.textColor = [UIColor colorWithRed:0/256.0 green:84/256.0 blue:129/256.0 alpha:1.0];
    textField.font = [UIFont fontWithName:@"Helvetica-Bold" size:14];
    textField.backgroundColor=[UIColor whiteColor];
    [textField setBorderStyle:UITextBorderStyleLine];
    [self.view addSubview:textField];
    [textField mas_makeConstraints:^(MASConstraintMaker *make) {
        make.left.equalTo(self.view).offset(16);
        make.right.equalTo(self.view).offset(-16);
        make.top.equalTo(taskLabel.mas_bottom).offset(16);
        make.height.mas_equalTo(44);
    }];

    UIButton *addTaskButton = [UIButton buttonWithType:UIButtonTypeCustom];
    [addTaskButton setTitle:@"Add" forState:UIControlStateNormal];
    [addTaskButton setTitleColor:[UIColor blueColor] forState:UIControlStateNormal];
    [addTaskButton addTarget:self action:@selector(addDidTap) forControlEvents:UIControlEventTouchUpInside];
    [self.view addSubview:addTaskButton];
    [addTaskButton mas_makeConstraints:^(MASConstraintMaker *make) {
        make.centerX.equalTo(taskLabel);
        make.top.equalTo(textField.mas_bottom).offset(16);
    }];

    tableView = [UITableView new];
    tableView.backgroundColor = [UIColor whiteColor];
    tableView.delegate = self;
    tableView.dataSource = self;
    tableView.estimatedRowHeight = 100;
    tableView.rowHeight = UITableViewAutomaticDimension;
    tableView.separatorInset = UIEdgeInsetsMake(0, 24, 0, 24);
    [self.view addSubview:tableView];
    [tableView registerNib:[UINib nibWithNibName:@"DemoTableViewCell"
                                               bundle:[NSBundle mainBundle]]
         forCellReuseIdentifier:@"DemoTableViewCell"];
    [tableView mas_makeConstraints:^(MASConstraintMaker *make) {
        make.left.bottom.right.equalTo(self.view);
        make.top.equalTo(addTaskButton).offset(48);
    }];
    [self fetchTask];
}

- (void)addDidTap{
    Task *task = [[Task alloc] init];
    task.taskId = [NSUUID UUID].UUIDString;
    task.name = textField.text;
    NSLog(@"Name of task: %@", task.name);

    RLMRealm *realm = [RLMRealm defaultRealm];
    [realm transactionWithBlock:^{
        [realm addObject:task];
    }];
    [taskArray addObject:task];
    [tableView reloadData];
    textField.text = @"";
}

#pragma mark - uitable
-(NSInteger)tableView:(UITableView *)tableView numberOfRowsInSection:(NSInteger)section{
    return taskArray.count;
}

-(UITableViewCell*)tableView:(UITableView *)tableView cellForRowAtIndexPath:(NSIndexPath *)indexPath{
    static NSString *identifier = @"DemoTableViewCell";
    DemoTableViewCell *cell = [tableView dequeueReusableCellWithIdentifier:identifier];
    if (nil == cell) {
        cell = [[DemoTableViewCell alloc] initWithStyle:UITableViewCellStyleDefault
                                      reuseIdentifier:identifier];
    }
    cell.textLabel.text = taskArray[indexPath.row].name;
    [cell.deleteButton addTarget:self action:@selector(deleteDidTap:) forControlEvents:UIControlEventTouchUpInside];
    cell.deleteButton.tag = indexPath.row;
    return cell;
}

- (void)fetchTask{
    RLMResults<Task *> *tasks = [Task allObjects];
    for (RLMObject *object in tasks) {
        Task *task = [[Task alloc] initWithValue:object];
        [taskArray addObject:task];
    }
}

- (void)deleteDidTap:(UIButton*)sender{
    Task *task = [[Task objectsWhere:@"taskId = %@", taskArray[sender.tag].taskId] firstObject];
    RLMRealm *realm = [RLMRealm defaultRealm];
    [realm transactionWithBlock:^{
        [realm deleteObject:task];
    }];
    [taskArray removeObject:taskArray[sender.tag]];
    [tableView reloadData];
}

- (void)didReceiveMemoryWarning {
    [super didReceiveMemoryWarning];
    // Dispose of any resources that can be recreated.
}

@end
And this is the result.
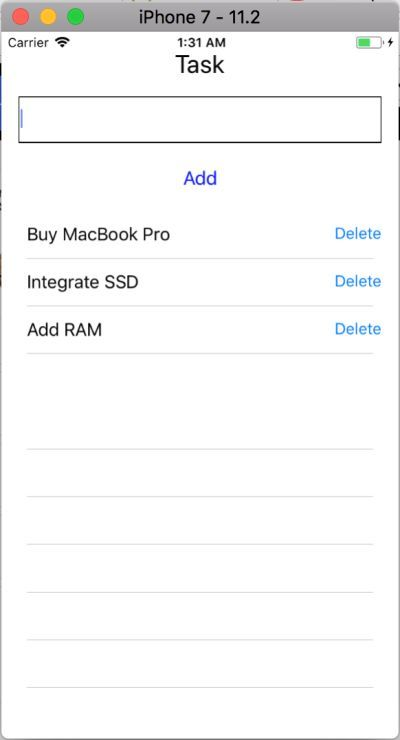
You can view the video here to see how it works
Now we're done with the simple to do list app. But, there is something really important to notice and that is our realm data. It is very time consuming if we want to log each realm and must run every time to see the data. And because of that we'll use Realm Studio.
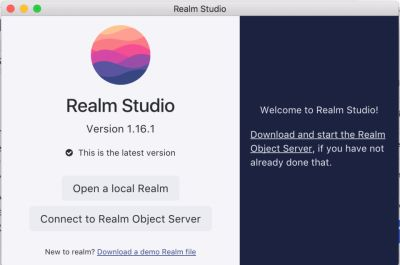
What is Realm Studio?
Realm Studio is premiere developer tool, built so you can easily manage the Realm Database and Realm Platform. You can download from the official page https://realm.io/products/realm-studio/. You can get your realm file by logging using `` NSLog(@"%@",[RLMRealmConfiguration defaultConfiguration].fileURL);```.
Then, open the Realm Studio and open a local realm
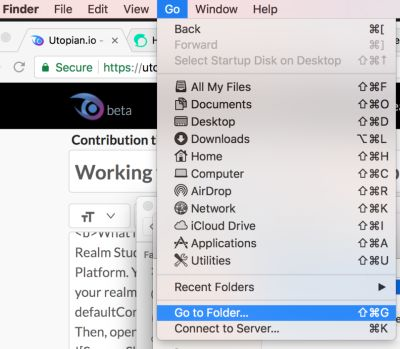
Then, copy the url you have got to the finder and click go to folder
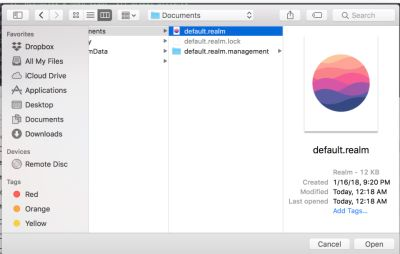
Once you go to the folder, drag the default.realm to the realm studio window and it will choose the realm file quickly from our path that we log before.
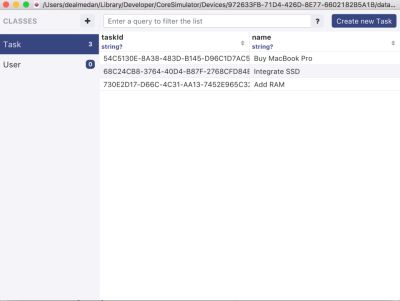
Click Open and you can browse your data in realm studio. Just notice the Task Realm in this case. The Task Realm consist of taskId and name column.
Okay, that's all for this tutorial. Thanks for reading this tutorial.
Posted on Utopian.io - Rewarding Open Source Contributors
Thank you for the contribution. It has been approved.
You can contact us on Discord.
[utopian-moderator]
Meski ga ngerti.. Tp smoga sukses :)
Hey @andrixyz I am @utopian-io. I have just upvoted you!
Achievements
Suggestions
Get Noticed!
Community-Driven Witness!
I am the first and only Steem Community-Driven Witness. Participate on Discord. Lets GROW TOGETHER!
Up-vote this comment to grow my power and help Open Source contributions like this one. Want to chat? Join me on Discord https://discord.gg/Pc8HG9x