What Will I Learn?
In this tutorial;
- You will learn what Layout Managers does.
- You will learn how to use Flow Layout Manager.
- You will learn how to use Border Layout Manager.
- You will learn how to use Grid Layout Manager.
- You will learn how to use Box Layout Manager.
- You will learn the use of a tabbed pane.
Requirements
-Java SE Development Kit (Not necessarily the last version) is required.
-Eclipse IDE or any similar Interated Development Enviroment (IDE) that is designed for Java programming language is required.
Difficulty
- Intermediate
Tutorial Contents
The purpose of this tutorial is showing the use of the layout managers and tabbed pane in Java. In this example, we have 5 different tabs which contain simple panels with 5 button. Each panel in these tabs is controlled by different layout manager so that you can see the difference between the layout managers better by examining the button configration difference between panels. For this example, we have 6 different Java file. One of them is for the frame of the program. Others are for the different panels. The following figures contain their images.
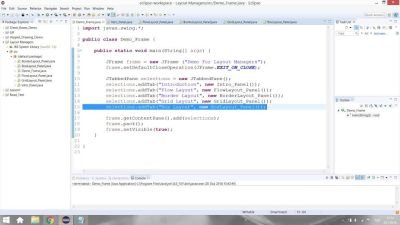
- To create and show the program frame (Demo_Frame.java);
- To set up a panel for the introduction tab of the tabbed pane (Intro_Panel.java);

- To set up a panel for the Flow Layout tab of the tabbed pane (FlowLayout_Panel.java);

- To set up a panel for the Border Layout tab of the tabbed pane (BorderLayout_Panel.java);

- To set up a panel for the Grid Layout tab of the tabbed pane (GridLayout_Panel.java);

- To set up a panel for the Box Layout tab of the tabbed pane (BoxLayout_Panel.java);

Tabbed Pane
A tabbed pane is defined by the JTabbedPane class in Java.
With the JTabbedPane class, you can have several components, such as panels, share the same space. The user chooses which component to view by selecting the tab corresponding to the desired component.Oracle
To define a tabbed pane object with selections name, we can use the following code;
JTabbedPane selections = new JTabbedPane();
In order to add a tab to the selections tabbed panel, use the following code;
selections.addTab(String, Component);
where the string represents the name of the tab and the component represent the panel that open when user clicks the tab. In this example program;
To add Introduction tab with introduction panel, the code is;
selections.addTab("Introduction", new Intro_Panel());To add Flow Layout tab with Flow Layout panel, the code is;
selections.addTab("Flow Layout", new FlowLayout_Panel());To add Border Layout tab with Border Layout panel, the code is;
selections.addTab("Border Layout", new BorderLayout_Panel());To add Grid Layout tab with Grid Layout panel, the code is;
selections.addTab("Grid Layout", new GridLayout_Panel());To add Box Layout tab with Box Layout panel, the code is;
selections.addTab("Box Layout", new BoxLayout_Panel());
Note that for the components, we use the name of methods that is defined by us for creating the panels .
Layout Manager
Layout managers are determines how components (buttons for our example) in a panel is visually presented.
Flow Layout
Flow layout manager is the default layout manager for the JPanel. It organizes the components from left to right. If the component stays the out of the window size, it changes the component position by putting the next line. To set the layout as flow layout, the following code needs to be used in the main method of the panel.
setLayout(new FlowLayout());
Then, the components (buttons) in the frames are controlled by the Flow Layout manager.
Border Layout
The border layout manager organizes the components into five areas (South, North, West, East and Center) in label. . To set the layout as Border layout, the following code needs to be used in the main method of the panel.
setLayout(new BorderLayout());
Then, you need to decleare the position of the component like the following code;
    JButton button1 = new JButton("Button 1"); //Our component
    add(button1,BorderLayout.CENTER);
For changing the position, you can change CENTER with SOUTH, NORTH, WEST or EAST. For this layout the size of the component is different for each area.
Grid Layout
The Grid Layout manager organizes the components into a grid of rows and collumns. To set the layout as grid layout with 3 rows and 2 columns, the following code needs to be used in the main method of the panel.
setLayout(new GridLayout(3,2));
This layout manager creates a grid layout with 3 rows and 2 columns. The components size are equal for this layout manager.
Box Layout
The box layout manager organizes the components into a single row or column. To set the layout as box layout with single column, the following code needs to be used in the main method of the panel.
setLayout(new BoxLayout(this, BoxLayout.Y_AXIS));
If you want to organize your components as single row, you need to change Y_AXIS with X_AXIS.
Results
When you run the program, the following window opens;


When you choose the Flow Layout tab, the flow layout panel is opened;


- When you change the size of the window like following the organization of the button changes like following;

- When you choose the Border Layout tab, the border layout panel is opened;


- When you choose the Grid Layout tab, the grid layout panel is opened;


- When you choose the Box Layout tab, the box layout panel is opened;


As you can see, each type of layout manager has different organization type for the components.
Github
You can get this program from Github.

Curriculum
You can find my other java related tutorials in below links.
-Adding JPEG or GIF image files into the GUI in Java using Eclipse IDE
-Reading Text Files and Parsing It Using Iterators and Delimiter in Java with Eclipse IDE
-Drawing Methods in Java Applet (JApplet) Using Eclipse IDE: Drawing a Snowman
-Check Boxes (JCheckBox) and Its Listeners in a Java GUI using Eclipse IDE
Code of the Program
//Demo_Frame.java
import javax.swing.*;

public class Demo_Frame {

    public static void main(String[] args) {

        JFrame frame = new JFrame ("Demo For Layout Managers");
        frame.setDefaultCloseOperation(JFrame.EXIT_ON_CLOSE);

        JTabbedPane selections = new JTabbedPane();
        selections.addTab("Introduction", new Intro_Panel());
        selections.addTab("Flow Layout", new FlowLayout_Panel());
        selections.addTab("Border Layout", new BorderLayout_Panel());
        selections.addTab("Grid Layout", new GridLayout_Panel());
        selections.addTab("Box Layout", new BoxLayout_Panel());

        frame.getContentPane().add(selections);
        frame.pack();
        frame.setVisible(true);
    }

}


//Intro_Panel.java
import java.awt.*;
import javax.swing.*;

public class Intro_Panel extends JPanel{

    public Intro_Panel() {
        setBackground(Color.ORANGE);

        JLabel label = new JLabel("Layout Managers Tutorials");

        add(label);
    }

}

//FlowLayout_Panel.java
import java.awt.*;
import javax.swing.*;

public class FlowLayout_Panel extends JPanel{

    public FlowLayout_Panel() {

        setLayout(new FlowLayout());

        setBackground(Color.GREEN);

        JButton button1 = new JButton("Button 1");
        JButton button2 = new JButton("Button 2");
        JButton button3 = new JButton("Button 3");
        JButton button4 = new JButton("Button 4");
        JButton button5 = new JButton("Button 5");

        add(button1);
        add(button2);
        add(button3);
        add(button4);
        add(button5);
    }
}


//BorderLayout_Panel.java
import java.awt.*;
import javax.swing.*;

public class BorderLayout_Panel extends JPanel{

    public BorderLayout_Panel() {

        setLayout(new BorderLayout());

        setBackground(Color.WHITE);

        JButton button1 = new JButton("Button 1");
        JButton button2 = new JButton("Button 2");
        JButton button3 = new JButton("Button 3");
        JButton button4 = new JButton("Button 4");
        JButton button5 = new JButton("Button 5");

        add(button1,BorderLayout.CENTER);
        add(button2,BorderLayout.SOUTH);
        add(button3,BorderLayout.NORTH);
        add(button4,BorderLayout.WEST);
        add(button5,BorderLayout.EAST);
    }

}


//GridLayout_Panel.java
import java.awt.*;
import javax.swing.*;

public class GridLayout_Panel extends JPanel{

    public GridLayout_Panel() {

        setLayout(new GridLayout(3,2));

        setBackground(Color.RED);

        JButton button1 = new JButton("Button 1");
        JButton button2 = new JButton("Button 2");
        JButton button3 = new JButton("Button 3");
        JButton button4 = new JButton("Button 4");
        JButton button5 = new JButton("Button 5");

        add(button1);
        add(button2);
        add(button3);
        add(button4);
        add(button5);
    }

}


//BoxLayout_Panel.java
import java.awt.*;
import javax.swing.*;

public class BoxLayout_Panel extends JPanel{

    public BoxLayout_Panel() {

        setLayout(new BoxLayout(this, BoxLayout.Y_AXIS));

        setBackground(Color.GREEN);

        JButton button1 = new JButton("Button 1");
        JButton button2 = new JButton("Button 2");
        JButton button3 = new JButton("Button 3");
        JButton button4 = new JButton("Button 4");
        JButton button5 = new JButton("Button 5");

        add(button1);
        add(button2);
        add(button3);
        add(button4);
        add(button5);
    }
}
Posted on Utopian.io - Rewarding Open Source Contributors
Thank you for the contribution. It has been approved.
You can contact us on Discord.
[utopian-moderator]
Hey @aromatheraphy I am @utopian-io. I have just upvoted you!
Achievements
Suggestions
Get Noticed!
Community-Driven Witness!
I am the first and only Steem Community-Driven Witness. Participate on Discord. Lets GROW TOGETHER!
Up-vote this comment to grow my power and help Open Source contributions like this one. Want to chat? Join me on Discord https://discord.gg/Pc8HG9x