
(http://yyolapermatasari.blogspot.com/2016/11/instalasi-dan-konfigurasi-dhcp-server.html)
DHCP (Dynamic Configuration Protocol) is a service that automatically provides IP numbers to computers that request it. A computer that delivers the IP number is referred to as DHCP servers, while the computer asks for the IP number is referred to as a DHCP Client. Thus Administrators no longer need to have to give the IP number manually at the time of the TCP/IP configuration, but it is enough to give reference to the DHCP Server. At a time when both the DHCP client is turned on, then the computer doing the request to The DHCP Server to get IP numbers. DHCP replied by giving the IP number that exists in the DHCP database. After the DHCP Server provides IP numbers, then server lend (lease) IP number to DHCP-Client and write off the IP number from the list of the pool. IP number is given along with the subnet mask and default gateway.
PRACTICAL RESULTS AND ANALYSIS
1.Ip Settings first before the configuration of the DHCP Server.
root @ debian: ~#nano/etc/network/interfaces
Analysis:
The above command is a command to set the ip address. Nano it is text editor default on debian, while /etc/network/interfaces was the location of the files to be configured. The command contains the IP configuration that will be used by the Network Interface that is installed on a computer. In addition to IP address, this file also stores information about routing.
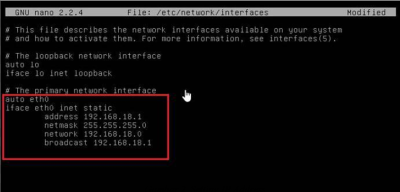
2.Add writing as below:
Analysis:
Auto word that precedes the name of an interface indicates that the interface will be turned on automatically at boot time.
Configuration for eth0 is using a static IP. Parameters should be mentioned for this kind of static interface are:
a. address : specify the IP address that was used a computer. Here is using ip address 192.168.18.1 which is the ip of the server.
b. netmask : Specifies the subnet mask of a computer network. Netmask here is 255.255.255.0
c. network : specify the Network Address of the computer. Network here is 192.168.18.0
d. broadcast address: specify the broadcast used computers to introduce themselves on the network. Broadcast here is 192.168.18.1
3.Save and restart the interfaces:
root @ debian: ~ # *service networking restart *
Analysis:
When you are finished making changes on the configuration at the networking then we can enable these settings by running the command: root @ debian: ~ # service networking restart . It is aimed to check whether this setting is correct.
4.Next up is the install package dhcp server. root @ debian: ~ # apt-get install dhcp3-server
Analysis:
The above command is a command to install the dhcp3-server software that exists in the package debian ISO. So when we want to configure the DHCP Server and enable it for the client, then the first must install package the dhcp.
5.After the package is already installed, the configuration is now dhcpnya. root @ debian: ~ # nano/etc/dhcp/dhcpd.conf
Analysis:
Is a command to configure dhcp servers with the way edit the file/etc/rc.conf dhcpd residing in/etc/dhcp/dhcp.conf. so later in
that's all the dhcp configuration file is done start domain-name and so on.
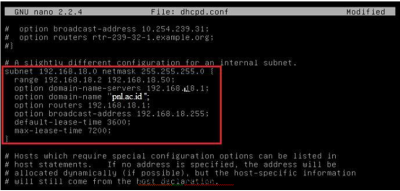
6.Edit as below and remove the fence was:
Analysis:
In the range 192.168.18.2 192.168.18.50 is the part that determines how much of the ip number will be assigned by the server to the client.
Here we also determine the domain-name-servers 192.168.18.1 which is the ip address of the server. The other parameters in the configuration of the DHCP server that would often used is the DNS parameters, so that when implementing a system where DNS then we do not need anymore to setting. In this case his DNS i.e. pnl.ac.id. After it was determined also routers 192.168.18.1 and broadcast-address 192.168.18.255.
On the default-lease-time 3600 and max-lease-time 7200 is the configuration of the DHCP server that specifies how long a client can use an IP that was leased by the DHCP Server where after time determined the IP then expired client will change. For this configuration we can menyetingnya by utilizing the default lease time and max lease time. In this configuration there is a value of 3600 and 7200 where those values.
calculated in seconds. Which means after 7200 seconds then the client will update the IP that was leased by the server.
7.After that we go to the folder "/etc/default/dhcp".
root @ debian: ~ # nano/etc/default/dhcp
Analysis:
Is a command to populate the file interface on the dhcp server by way of the dhcp edit files that are located in/etc/default/dhcp. so that's file later in interface eth0 entered.
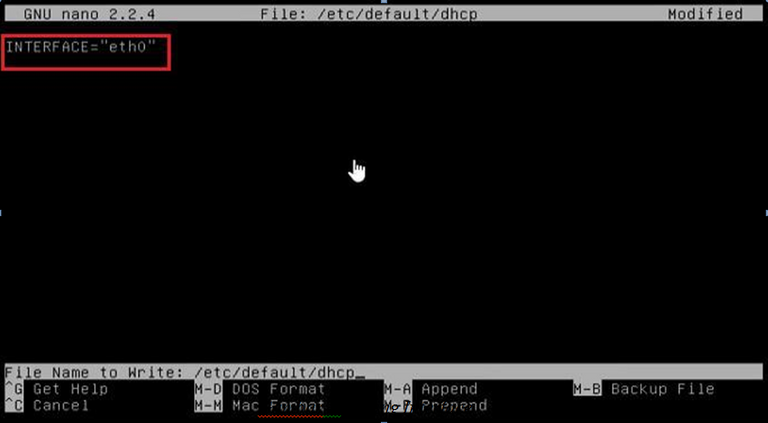
8.then we content with file like the image below.
Analysis:
On linux, the point we have to set the interface to be used as a DHCP Server. In the example this time interface is eth0.
9.Save the configuration and restart the dhcp of yesteryear.
root @ debian: ~ #/etc/init.d/isc-dhcp-server restart the
**Analysis: **
When you are finished making changes on the configuration at the isc-dhcp-server then we can enable these settings by running the
command: root @ debian: ~ # /etc/init.d/isc-dhcp-server restart. It is aimed to check whether this setting is correct.
- then we check the status of dhcp.

Analysis:
In this case, the dhcp has been configured and restarted will be checked if already running or not. It aims to find out beforehand on the server before the check by the client computer. If dhcp is already running it will pop up a message dhcpd is running.
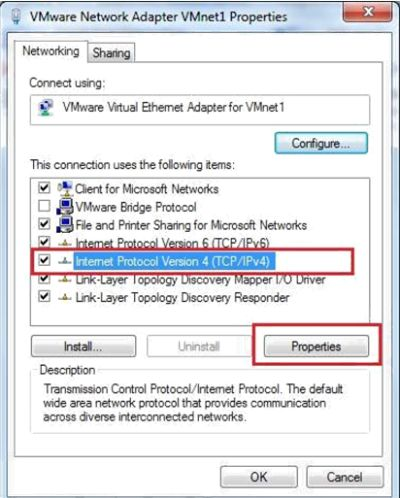
11.If its already running DHCP then we can check it out on the client computer. Before that, we have to set the ip residing in "VMware Network Adapter VMnet1."
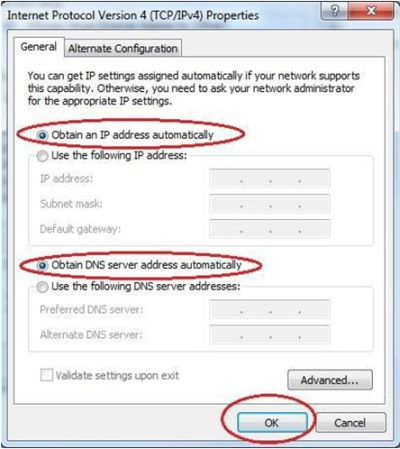
Analysis:
In this case we will check through the client computer, then first we have to change the settings on the client computer's ip be automated, so that later on the client computer will get ip address automatically from a DHCP that has configured on the server.
12.When a client computer has received an ip from the server, then we can check it out through the Command Prompt by typing the command
"ipconfig".
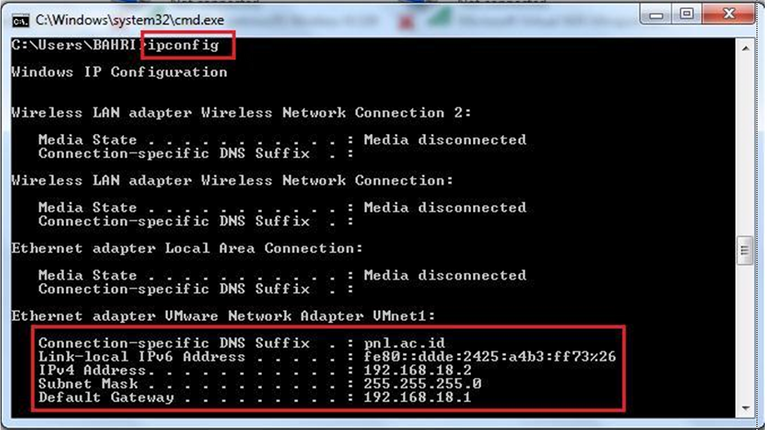
Analysis:
Ipconfig is one of the commands on the Windows operating system which serves to display the IP configuration of the computer. By using these commands so users can see what configurations have been set on his computer. In this case we can see that the computer client getting ip 192.168.18.2 is in the range configured DHCP and DNS also has compliance with the server i.e. pnl.ac.id.
13.If it is like the picture above, then the DHCP configuration succeeded
note :
if the output is not like in the tutorial please check back the configuration
Your contribution cannot be approved because it is not as informative as other contributions. See the Utopian Rules. Contributions need to be informative and descriptive in order to help readers and developers understand them.
You can contact us on Discord.
[utopian-moderator]
okay i will fix it
Hey @gerginho, I just gave you a tip for your hard work on moderation. Upvote this comment to support the utopian moderators and increase your future rewards!