What Will I Learn?
The aim of this tutorial is to learn the creation of buttons that is linked to a specific function in Applet. By learning and cıombinig it with our former tutorials we will be able to gerenate a method that is capable of analysing the input data, user friendly display and game - mini software preparation. So briefly in this tutorial you will learn,
- Adding buttons on Applet interface panel,
- Displaying the outcome on a text panel,
- Linking functions and buttons,
- The usage of ide to run and test your codes.
Requirements
- Eclipse IDE or any other IDE for java developers,
- Basic knowledge on Java.
- Basic knowledge about Applet.
Difficulty
This program is designed for indivuduals who have a basic knowledge in java and programming languages,
- Intermediate
Tutorial Contents
To begin we shall describe our example. In this tutorail making a basic calculator is picked since it combines several information and its easy to change to your needs. This calculator will get the user entered values sum them and display the result on a text box. After this example we will be able to find a way to get user input, arrange it according to our demands and finally display it.
Initially, as usual we should define the Applet library. This library contains elements that are required to make the pop-up applet output panel.
import java.applet.Applet;
Moreover to make Graphical user interface we need to add awt library that is capable of generation pop-up window-based applications in java.
import java.awt
Now we need a method to call the function. In java its good to use public class since in public class the subject can be reached from any class. Moreover we should also here declare that we are going to use Applet. To do that below code was written,
public class NewApplet extends Applet
Nıw since we defined our libraries and classes we can start by implementing the buttons and output text field on the figure. To add a text field on Applet similar to other GUI's like Octave you should add a new.Textfield,
TextField screen = new TextField();
This will put a text field on the Applet. Later we will arrange its position, width, height and color. But for now we can proceed on adding buttons. To add buttons similar to text field we should call new Button. In this calculator we will have numbers from 0 to 9 , summation symbol (plus symbol and equal sign. In your case you may add other operations or buttons according to your own demand.
    TextField screen = new TextField();
    Button one = new Button("1");
    Button two = new Button("2");
    Button three = new Button("3");
    Button four = new Button("4");
    Button five = new Button("5");
    Button six = new Button("6");
    Button seven = new Button("7");
    Button eight = new Button("8");
    Button nine = new Button("9");
    Button plus = new Button("+");
    Button euqal = new Button("=");
Then we shall call a function that is capable of arranging buttons vertically and horizontally.
GridBagLayout level = new GridBagLayout();
GridBagConstraints levelReagent = new GridBagConstraints();
These two above codes enable us to locate buttons easly. Now we can call another class to change the properties of buttons and enable the summation operation.
public void PlaceItem(int Xaxis, int Yaxis, int Height, int Width, Component element)
To arrange the position of the buttons on x axes call a function named levelReagent,
levelReagent.gridx = Xaxis;
Again to arrange the position of the buttons on y axes,
levelReagent.gridy = Yaxis;
To arrange the height of the buttons,
levelReagent.gridheight = Height;
Adjust the width,
levelReagent.gridwidth = Width;
and now we can put the elements on Applet or in other words locate them, Firstly lets generate the outher form of the Applet,
setLayout(level);
After setting the layout we can put our text box. Remember our function has 4 inputs, position on x axes, position on y axes, height and width of the button/field. Since we want the text field on the top like most of the calculators we should first define its location. It will be on x=0 and y=0, then it will have the same height with buttons but third time greater in width. You may change these values to have your own calculator.
PlaceItem(0, 0, 1, 3, screen);
add(screen);
This will put the text box on the top of the screen. Then we may proceed of adding more buttons. We want a regular look like calculator. So the numbers 1-4 and 7 must be in same x axes we will make their x value equal to one. Then the numbes 2-5 and 8 must be in the same x axes, their x value will be two. Then lastly 3-6 and 9 must have an x value of three to have a proper calculator look. For y value the numbers 1-2 and 3 will be on the same line and we picked their y value to be 1, 4-5 and 6 will have y value of two and 7-8 and 9 will have a y value of 3. So by doing this we arranged the numbers like in a dial pad /number pad scheme. Now we can arrange the width and height of the buttons. To look like a square we height and width to be one.
   PlaceItem(0, 1, 1, 1, one);
        add(one);

        PlaceItem(1, 1, 1, 1, two);
        add(two);

        PlaceItem(2, 1, 1, 1, three);
        add(three);

        PlaceItem(0, 2, 1, 1, four);
        add(four);

        PlaceItem(1, 2, 1, 1, five);
        add(five);

        PlaceItem(2, 2, 1, 1, six);
        add(six);

        PlaceItem(0, 3, 1, 1, seven);
        add(seven);

        PlaceItem(1, 3, 1, 1, eight);
        add(eight);

        PlaceItem(2, 3, 1, 1, nine);
        add(nine);
Now we can put our summation and equal sign buttons. We wanted to have a big equal button on the below left on the screen and a square plus button on the right side of the Applet. Thereby, the equal sign will have an 0 x value means it will be on the same column with 1-4 and 7. We want it to have same height with other buttons so we defined its y axes value as 4 and height to one. We just doubled its width to look wider. For summation button we picked x to be 2 , y to 4 and width/height value to 1 to look like a square.
In your design you can change the color, font or size of these buttons by checking my previous tutorial. You can also change the behaviour of the buttons simply defining a different class.
        PlaceItem(0, 4, 1, 2, euqal);
        add(euqal);

        PlaceItem(2, 4, 1, 1, plus);
        add(plus);
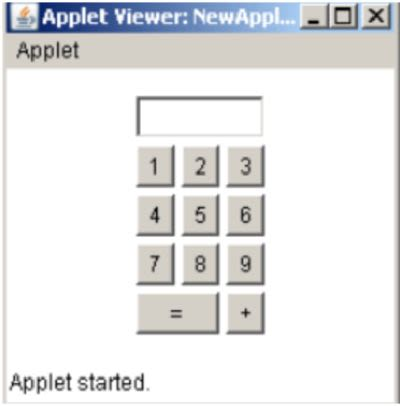
After adding buttons our code is now ready to test and verify. To do that we need a java supported ide. I picked Eclipse ide for java developers but you may pick any other.
The overall code of this example is ,
import java.awt.*;
import java.applet.Applet;

public class NewApplet extends Applet {

    TextField screen = new TextField();
    Button one = new Button("1");
    Button two = new Button("2");
    Button three = new Button("3");
    Button four = new Button("4");
    Button five = new Button("5");
    Button six = new Button("6");
    Button seven = new Button("7");
    Button eight = new Button("8");
    Button nine = new Button("9");
    Button plus = new Button("+");
    Button euqal = new Button("=");
    GridBagLayout level = new GridBagLayout();
    GridBagConstraints levelReagent = new GridBagConstraints();

    public void PlaceItem(int Xaxis, int Yaxis, int Height, int Width, Component element) {
        levelReagent.gridx = Xaxis;
        levelReagent.gridy = Yaxis;
        levelReagent.gridheight = Height;
        levelReagent.gridwidth = Width;
        level.setConstraints(element, levelReagent);
    }

    public void init() {
        setLayout(level);
        levelReagent.insets = new Insets(2, 2, 2, 2);
        levelReagent.fill = GridBagConstraints.BOTH;

        PlaceItem(0, 0, 1, 3, screen);
        add(screen);

        PlaceItem(0, 1, 1, 1, one);
        add(one);

        PlaceItem(1, 1, 1, 1, two);
        add(two);

        PlaceItem(2, 1, 1, 1, three);
        add(three);

        PlaceItem(0, 2, 1, 1, four);
        add(four);

        PlaceItem(1, 2, 1, 1, five);
        add(five);

        PlaceItem(2, 2, 1, 1, six);
        add(six);

        PlaceItem(0, 3, 1, 1, seven);
        add(seven);

        PlaceItem(1, 3, 1, 1, eight);
        add(eight);

        PlaceItem(2, 3, 1, 1, nine);
        add(nine);

        PlaceItem(0, 4, 1, 2, euqal);
        add(euqal);

        PlaceItem(2, 4, 1, 1, plus);
        add(plus);

    }
}
And the output once we tested it on our ide,
Curriculum
Posted on Utopian.io - Rewarding Open Source Contributors
Your contribution cannot be approved because it does not follow the Utopian Rules.
Copied from http://www.dijitalders.com/icerik/67/2264/soru_gonder.html
You can contact us on Discord.
[utopian-moderator]
Congratulations @disturbia! You received a personal award!
Click here to view your Board of Honor
Congratulations @disturbia! You received a personal award!
You can view your badges on your Steem Board and compare to others on the Steem Ranking
Vote for @Steemitboard as a witness to get one more award and increased upvotes!