What Will I Learn?
In this tutorail our goal is to change the image according to the user input. We may do it in several ways either putting a button or defining a link or changing the pictures location whenever mouse moves. Since it's the most prefered and easy to adjust one we will focus on creating an application that detects mouse movements and changes the icon on the screen correspondingly.
- You will learn the usage of Java Applet (graphic) generation,
- You will learn changing images according to the users input,
- You will learn the usage of ide to run and test your codes.
Requirements
- Eclipse IDE or any other IDE for java developers,
- Basic knowledge on Java.
- Basic knowledge about Applet.
Difficulty
This program is designed for indivuduals who have a basic knowledge in java and programming languages,
- Intermediate
Tutorial Contents
To begin with we need to define the librariese that we are gıing to use in this example. Since we will work on Applet the very first library we need is java.awt library.
import java.awt.Graphics2D;
The 2D graphics library extends the current Applet library to give more geometrical coordinate based transformations. With this library it becomes easier to control objects inside the library. You may also use this library to arrange the position of text, vector or drawing locations. Now to obtain the mouse movements and record them we need add a library that is capable of mouse actions. In Applet this library is called as MouseEvenet and Mouse listener to get the pressing , clicking, and click duration like events. This can also be used to make an click base, mouse controled games which we will in our further tutorials. Below libraries added to observe the user's mouse behaviour,
import java.awt.event.MouseListener;
import java.awt.event.MouseEvent;
Then to use icons arrange and locate them we need to add below libraries,
import javax.swing.ImageIcon;
import java.awt.FlowLayout;
Now we can start calling our class,
public class mouse_events extends JApplet implements MouseListener, MouseMotionListener
We should first locate the first image and define the width height properties of the Applet,
    int BirdX = 10;
    int BirdY = 10;

    ImageIcon Picture;

    int Width = 0;
    int Height = 0;
Then we can define the initail position of the image and we can even declare the image too,
Picture = new ImageIcon(getImage(getDocumentBase(), "bird1.gif"));
Above code will give default bird gif as ImageIcon. Now since we want this image to change according to mouse clicks we need to add inital value for mouse click change it after every click. You can change this behaviour like changing image with button pressing or mouse rotation.
   setLayout(null); // first set the layout null
        addMouseListener(this); // we'r adding the listener to mouse
        addMouseMotionListener(this); // also adding the motion listener to mouse
Now we can get the width height properties of the picture that we can later use it to adjust other images that will come whenever mouse clicks,
Width = Picture.getIconWidth(); // take the width and the height
Height = Picture.getIconHeight();
Now we can locate the picture according to the define x,y value. You may change this value if you want your initail picture to locate in a different place on Applet.
PictureHolder.setLocation(BirdX, BirdY); // x and y axis been set
Then we can set the size of image and add it on the screen. This will set the height and width of the image equal as it's original version,
        PictureHolder.setSize(Picture.getIconWidth(), Picture.getIconHeight()); // and sizes also
        add(PictureHolder); // finally adding the PictureHolder
Now after defining and adding the picture we need to make another object that is capable of changing pictures with mouse movements and clicks. In this turoail we pick an exmaple bird.gif you may change it according to your interest,
    // Mouse Listeners
     public void mouseExited(MouseEvent theMouseEvent){
        BirdName("bird5.gif");
    }
    public void mouseReleased(MouseEvent theMouseEvent){
        BirdName("bird3.gif");
    }
    public void mouseEntered(MouseEvent theMouseEvent){
        BirdName("bird1.gif");
    }
    public void mouseClicked(MouseEvent theMouseEvent){
        BirdName("bird1.gif");
    }
     public void mousePressed(MouseEvent theMouseEvent){
        BirdName("bird2.gif");
    }
Now we need a location definiton for each of these pictures. We wanted eah picture to locate 10 pixels right and below of the previous one so that we add 10 to theMouseevent action,
public void mouseMoved(MouseEvent theMouseEvent){

        PictureHolder.setLocation(theMouseEvent.getX() + 10, theMouseEvent.getY() + 10);
Now finally we can call the bird icon from the image file and locate it on the applet,
    public void BirdName(String _birdName){
        ImageIcon Picture = new ImageIcon(getImage(getDocumentBase(), _birdName));
        PictureHolder.setIcon(Picture);
    }
Now our code is ready to test. We can test it in any IDE that supports java. Since its quite popular this application is tested on Eclipse ide.
The overall code of the applicaton,
import java.awt.Graphics2D;
import java.awt.FlowLayout;
import java.awt.event.MouseListener;
import java.awt.event.MouseEvent;
import javax.swing.ImageIcon;
import java.awt.event.MouseMotionListener;
import javax.swing.JApplet;
import javax.swing.JLabel;

public class mouse_events extends JApplet implements MouseListener, MouseMotionListener {

    JLabel PictureHolder = new JLabel();
    JLabel MouseEvents = new JLabel();

    int BirdX = 10;
    int BirdY = 10;

    ImageIcon Picture;

    int Width = 0; int Height = 0;

    public void init() {

        setLayout(null); // first set the layout null
        addMouseListener(this); // we'r adding the listener to mouse
        addMouseMotionListener(this); // also adding the motion listener to mouse

        Picture = new ImageIcon(getImage(getDocumentBase(), "bird1.gif")); // and give default bird gif as ImageIcon

        Width = Picture.getIconWidth(); // take the width and the height
        Height = Picture.getIconHeight();


        PictureHolder.setIcon(Picture); // with this code seting the icon the default picture

        PictureHolder.setLocation(BirdX, BirdY); // x and y axis been set
        PictureHolder.setSize(Picture.getIconWidth(), Picture.getIconHeight()); // and sizes also
        add(PictureHolder); // finally adding the PictureHolder
    }

    // Mouse Listeners
     public void mouseExited(MouseEvent theMouseEvent){
        BirdName("bird5.gif");
    }
    public void mouseReleased(MouseEvent theMouseEvent){
        BirdName("bird3.gif");
    }
    public void mouseEntered(MouseEvent theMouseEvent){
        BirdName("bird1.gif");
    }
    public void mouseClicked(MouseEvent theMouseEvent){
        BirdName("bird1.gif");
    }
     public void mousePressed(MouseEvent theMouseEvent){
        BirdName("bird2.gif");
    }

    // Mouse Motion Listeners
    public void mouseMoved(MouseEvent theMouseEvent){

        PictureHolder.setLocation(theMouseEvent.getX() + 10, theMouseEvent.getY() + 10);

    }

    public void BirdName(String _birdName){
        ImageIcon Picture = new ImageIcon(getImage(getDocumentBase(), _birdName));
        PictureHolder.setIcon(Picture);
    }
}
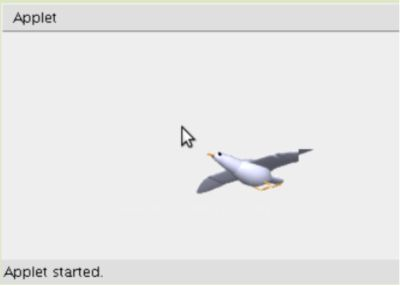
And the output after generation the code is shown below. Note by changing above methods, you can adjust the position of the image, the action required to go next image or even make mouse click based games.
Curriculum
Posted on Utopian.io - Rewarding Open Source Contributors
Your contribution cannot be approved because it does not follow the Utopian Rules.
Copied from http://www.dijitalders.com/icerik/67/3423/javada_fare_hareketleri.html
You can contact us on Discord.
[utopian-moderator]