Repository
What Will I Learn?
- Automation code
- AJAX pagination in feeds
Requirements
- Basic Python
- Install Python 3
- Install Flask
Resources
- Python - https://www.python.org/
- Flask - http://flask.pocoo.org/
- Peewee http://docs.peewee-orm.com/en/latest/
- Sqlitebrowser https://sqlitebrowser.org/
Difficulty
Basic
Tutorial Content
Still in the same tutorial that is making social media applications using Flask, so far the features in our application are quite a lot, you can see the previous tutorials in the curriculum section. this is a tutorial series that will discuss in full about and the final process of this tutorial. the feature that I will add relates to technology. I will use ajax jquery to make the lazy load on large data. for more details, I will start this tutorial.
Code automation
Optimization is very necessary for programming and has become part of the programming recommended to developers. for that functions exist in an application also need optimization. If we have seen from the previous tutorials. There are some things that can be automated in the project in this tutorial. If reviewed in terms of code, there are several blocks of code that are repeated. the following is how to automate the code block:
The repeater function can be seen in the picture below:
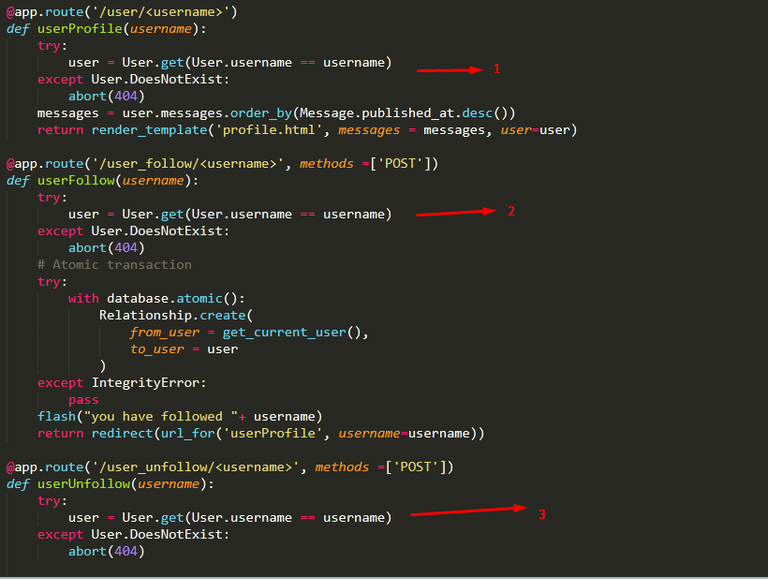
The picture above is an example of an inefficient function. When the development process is natural we do things like make repetitive functions, untidy code, and others. Well, usually in every development process there is a part called refactor.
For the above example it can be overcome by creating a function that can later be used repeatedly and more flexible like the following code:
app.py
def getUser(username):
    try:
        return User.get(User.username == username)
    except User.DoesNotExist:
        abort(404)
I will create a new function with the name getUser () the contents are exactly the same as the previous code block, the difference is I will return the results from the return User.get(User.username == username) function and now I use the function in other functions that are used to get the data of the user who is logged in. the following is the implementation.
app.py
@app.route('/user/<username>/followers')
def showFollowers(username):
    user = getUser(username)
    return render_template('userList.html', users = user.followers())

and if the code automation is successful, there will be no errors in the application and the application is running as it should.

- Automation of error handles
There are a few more things that can be automated, namely how to handle errors when the user is not logged in but wants to access the user's page. Of course, there is an error and the error can be seen in the illustration below:
.gif)
Can be seen in the picture above when the application accesses the route http://127.0.0.1ambat000/user/User2 there is an error that appears, now the task is to optimize the error from the frontend side like the following, This error appears on the profile.html page. because the is_following () function requires a temporary parameter in the backend not to pass parameters. here's the optimization method:
profile.html
{% if user.username != session.username %}
        {% if session.logged_in %}
            {% if active_user.is_following(user)%}
                <form method="post" action="{{url_for('userUnfollow', username = user.username)}}">
                    <p class="bold">{{user.username}} <button class="btn btn-danger">-Unfollow</button></p>
                </form>
            {% else %}
                <form method="post" action="{{url_for('userFollow', username = user.username)}}">
                    <p class="bold">{{user.username}} <button class="btn btn-primary">+Follow</button></p>
                </form>
            {% endif %}
        {% endif %}
    {% endif %}
I will add one more filter using {% if session.logged_in%} this way I will only run the is_following function when the user is logged in and here are the results:
.gif)
We can see in the picture above, we have done error handling on the error. The next section will discuss ajax for database queries that will make the user experience more attractive to users.
Ajax synchronization
Broadly speaking, this application should use HTTP Request to access data from the database. It would be great if using ajax (Asynchronous JavaScript and XMLHTTP). I will practice this method to make the system protect the data so that it can make the system load more so that the user experience can be better. For the AJAX part, I will ask Jquery for help to make AJAX easier, import Ajax first in the project like the following, I use CDN to make it easier for the development process:
CDN:
<script type="text/javascript" src="https://cdnjs.cloudflare.com/ajax/libs/jquery/3.3.1/jquery.min.js"></script>
- Use jquery to do AJAX (frontend)
Now I will start from the frontend to make an AJAX request. for that, I need to mark HTML elements so that I can use the DOM element. The following is index.html that we installed Jquery Ajax.
index.html
{%extends "layout.html" %}
{% block body %}
<div class="jumbotron">
  <h1 class="display-4">Welcome to homepage, I'm using base layout</h1>
  <p class="lead">Welcome to the social media application that uses flasks</p>
  <hr class="my-4">
  <p>For new users you are required to register to use this application. please click register</p>
  <a class="btn btn-primary btn-lg" href="{{url_for('registerPage')}}" role="button">Register</a>
</div>
<h2 style="text-align: center;">Your feed</h2>
    <div id="tweets">
      {%for message in messages%}
            <h4>{{message.content}} - by <a href="{{url_for('userProfile', username=message.user.username)}}">{{message.user.username}}</a></h4>
            <span style="font-size: 10px; font-style: italic;">{{message.published_at}}</span>
      {%endfor %}
    </div>
    <a href="#" id="btn_load" data-id=2>Load more..</a>
    <script type="text/javascript" src="https://cdnjs.cloudflare.com/ajax/libs/jquery/3.3.1/jquery.min.js"></script>
    <script type="text/javascript">
        $('#btn_load').on('click', function() {

            initPage = $(this).attr('data-id') // get attribute id

            $.get('/loadMore/'+initPage, function(res){
                console.log(res)
                if($.isEmptyObject(res))
                    console.log('Empty !!')
                else
                    $.each(res, function(key, item){

                    })
            })
        })
    </script>
{% endblock %}
The focus is the button that has the
$('#btn_load').on('click', function() { }function, then I will make a helper which is an additional attribute on the button<a href="#" id="btn_load" data-id=2>Load more..</a>. The data-id will be the page marker that will be accessed. later the data id will increase automatically. I will define the data-id to the initPage variableinitPage = $(this).attr('data-id'), I use$(this)to refer to the button element that is clicked.Then now is the AJAX section. I will do AJAX on the endpoint loadMore
$.get('/loadMore/'+initPage, function(res){ }. This time the AJAX request uses the get method and at that endpoint I pass the initPage parameter as a marker of pagination and before it gets too far I will doconsole.log(res)to see the data we have got from the endpoint.
Create a loadMore endpoint (backend)
The next step is to make an endpoint on the backend side. there is a new routing that will be created, namely routing '/ loadMore', for more details, see the code below:
app.py
@app.route('/loadMore/<int:pageNum>')
def loadMore(pageNum):
    user = get_current_user()
    messages = {}

    for message in (Message.select()
                .where((Message.user << user.following()) |
                    (Message.user == user.id)
                )
                .order_by(Message.published_at.desc())
                .paginate(pageNum, 3)):

        messages[message.id] = {
            'content' : message.content,
            'user' : message.user.username
        }
    return jsonify(messages)
Need to know because this endpoint is used for the API so the return is in the form of JSON, to return data in JSON form, I will import a function that is jsonify
from flask import jsonify.In this function, I will create parameters that will be defined in the form of integers
/loadMore/<int:pageNum>. So the parameter is pageNum.To make pagination I can use the
paginate()function, in this function there are two parameterspaginate(pageNum, 3), the first parameter is the range of pagination and the second parameter is the amount of data that will be taken.The results of the pagination query will first be looped and input into the new object ie messages.
messages[message.id] = {
            'content' : message.content,
            'user' : message.user.username
        }messages[message.id] = {
            'content' : message.content,
            'user' : message.user.username
        }
The data being looped is input into the key based on the post ID of the data messages[message.id], then the data is returned in JSON form by using jsonify return jsonify(messages).
to test whether the results are the way we want I will run the application because in the frontend section I have provided console.log (), there should be a response displayed like the demonstration below:
.gif)
Now it can be seen in the console part of the response from the Request AJAX that was done when clicking the load more button ... on the frontend, this means that the application that we created is running well and the load more function can be used in the FLask application, just this tutorial hopefully it will be useful for you. thank you
Curriculum
Make social media applications with Flask #2: System routing and Templating, Make user register
Make social media applications with Flask #3: Register user and Store data in SQLite, Base Layout
Make social media applications with Flask #4: Login system and Use session to manage user data
Make social media applications with Flask #6: View decorator and Post the first status
Make social media applications with Flask #7: The use of backref and Create profile features
Make social media applications with Flask #8: Handle error and Make the system follow a user
Make social media applications with Flask #10: Stream tweets and Feeds for each user
Thank you for your contribution @duski.harahap.
After analyzing your tutorial we suggest the following points below:
We suggest again putting comments in your code. Besides the explanation that makes during the tutorial if you have a brief description in the code the user understands better.
Your tutorial has been very well structured and in addition GIFs help a lot to see what you have developed. Great job!
Thanks for following some suggestions.
Thank you for your work in developing this tutorial.
Looking forward to your upcoming tutorials.
Your contribution has been evaluated according to Utopian policies and guidelines, as well as a predefined set of questions pertaining to the category.
To view those questions and the relevant answers related to your post, click here.
Need help? Chat with us on Discord.
[utopian-moderator]
Thank you for your review, @portugalcoin! Keep up the good work!
Hi @duski.harahap!
Your post was upvoted by @steem-ua, new Steem dApp, using UserAuthority for algorithmic post curation!
Your post is eligible for our upvote, thanks to our collaboration with @utopian-io!
Feel free to join our @steem-ua Discord server
Hey, @duski.harahap!
Thanks for contributing on Utopian.
We’re already looking forward to your next contribution!
Get higher incentives and support Utopian.io!
Simply set @utopian.pay as a 5% (or higher) payout beneficiary on your contribution post (via SteemPlus or Steeditor).
Want to chat? Join us on Discord https://discord.gg/h52nFrV.
Vote for Utopian Witness!
Congratulations @duski.harahap! You received a personal award!
Click here to view your Board
Do not miss the last post from @steemitboard:
Vote for @Steemitboard as a witness and get one more award and increased upvotes!