Repository
e.g. https://github.com/kivy/kivy
What Will I Learn?
In this second tutorial of the Crytocurrency Checker App we'll take forward the development of the App. In this chapter of the App we'll add design elements and other feature in the app.
- Develop a CryptoCurrency Table
- Show Data within Table
Requirements
- Fundamentals of Programming
- Essentials of Python
- Basics of Kivy
- Tutorials #1
Difficulty
- Intermediate
Tutorial Contents
- What we'll do
- Develop Crypto Table for the App
- Feed the Table with Data
What we'll do
Today, in this tutorial we'll take ahead of our app, and build a crypto currency table, in this table we'll show the top 100 coins price with their total market capital and change occur in price within 24 hours. You can see the table when ever you open the app.
Develop Crypto Table for the App
In order to move to develop the presentation layer for the app, its really important for you to understand the code and working of our first tutorial, you'll have to know it before you move with this tutorial. So, If you don't know about first tutorial then please visit.
If you know about the working of our first tutorial, then you can proceed with us.So, we move to develop the app further, open your text editor and start working with our first tutorial files. You know there are two files, main.py : our logical layer and CryptoCurrency.kv: presentation layer.
First we develop the presentation layer of the app, for this open the CryptoCurrency.kv file in text editor.All the stuff related to our presentation of the data will be done here.
Now here we start, first we make changes to our input field, here we replace the input field with BoxLayout: and within the BoxLayout we add the input field and also add two other Buttons. Set the size_hint_y: None to set the height of the BoxLayout. and then step by step write code for input field and buttons.
        BoxLayout:
            height: "50"
            size_hint_y: None
            TextInput:
                id: coinSearch
                text_hint: "Search Coin e.g. Bitcoin"
                size_hint_x: 60
            Button:
                text: "Search"
                size_hint_x: 20
            Button:
                text: "Show All"
                size_hint_x: 20
Output:
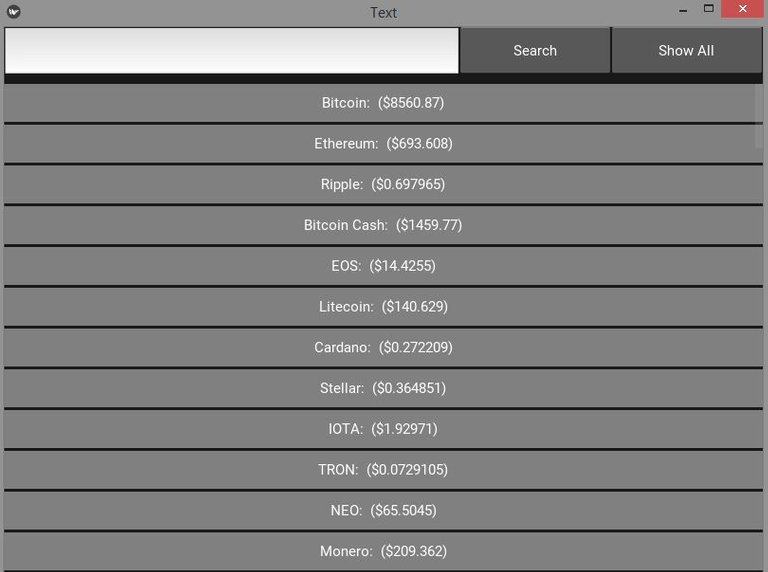
Here you can see we've set the two button, one for search and other to show all the coins. Because when you launch the app it only show the top 100 coins. Top see all the coins available in the market you've to click over this button. But we'll deal this in later tutorial.
Now, we'll set the table headings, for this first go to the main GridLayoutand set the row:3 before it was 2, beacuse we have only two rows one for search box and other for coin's list. We add this row for to show the table headings. Our table heading will be in center of search and list row. Therefor our table heading will be in 2nd row.
First write the code for a Boxlayout to, in order to set the layout for table headings. For this write this code.
BoxLayout:
            height: "50"
            size_hint_y: None
Now, within this Layout, write the code for table headings, First we write the code for GridLayout and set padding 10px to left and right and 0px to bottom and top then within this we'll give color to our background by drawing a canvas. Also set the rows:1 and cols:5.
Set the color of the canvas: black and draw a Rectangle: , set the its size by self.height .
BoxLayout:
            height: "50"
            size_hint_y: None
            GridLayout:
                padding: 10, 0, 10, 0
                canvas:
                    Color:
                        rgba: 1, 1, 1, .1
                    Rectangle:
                        size: self.size
                rows:1
                cols:5
Now write the Labels to show the text fro table heading.
        BoxLayout:
            height: "50"
            size_hint_y: None
            GridLayout:
                padding: 10, 0, 10, 0
                canvas:
                    Color:
                        rgba: 1, 1, 1, .1
                    Rectangle:
                        size: self.size
                rows:1
                cols:5
                Label:
                    text: "Name"
                Label:
                    text: "Price"
                Label:
                    text: "Market Capital"
                Label:
                    text: "Chnage (24h)%"
                Label:
                    text: "Details"
Output:
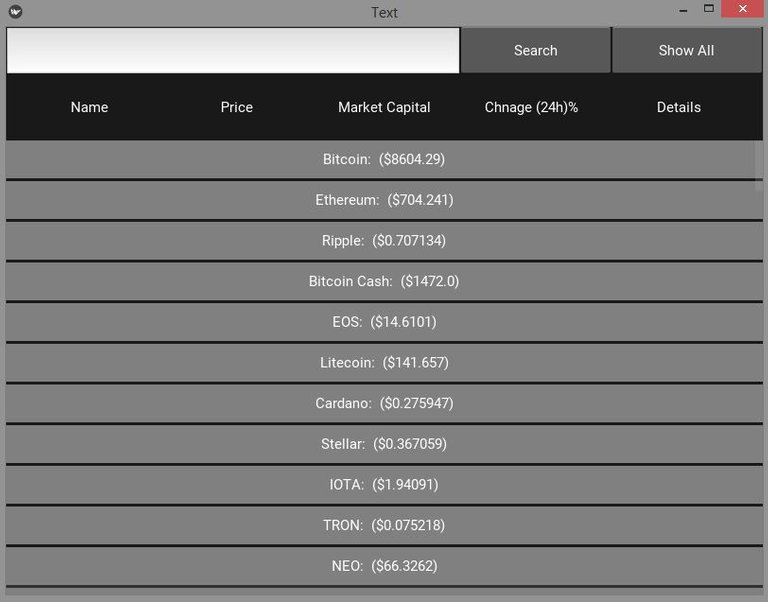
You can see we have set the table heading now we'll move toward table cells. For this move toward our custom BoxLayout that we set for RecyleView. In this boxlayout remove the label that we used to show coins.
Develop a GridLayout with 1 column and 5 rows, then withing this draw a Boxlayout.
<EachItem@BoxLayout>:
    canvas.before:
        Color:
            rgba: 0.5, 0.5, 0.5, 1
        Rectangle:
            size: self.size
            pos: self.pos
    value: []

    GridLayout:
        rows:1
        cols:5
        BoxLayout:
Then within this BoxLayout write Labels to show the text, for now populate the Label tex with some dummy text. In the four columns we set the label widget and in the last column we set a Button widget to show the details of the selected coin.
<EachItem@BoxLayout>:
    canvas.before:
        Color:
            rgba: 0.5, 0.5, 0.5, 1
        Rectangle:
            size: self.size
            pos: self.pos
    value: []

    GridLayout:
        rows:1
        cols:5
        BoxLayout:
            Label:
                id: cryptoList
                font_size:14
                text_size: None, None
                size_hint: 1,1
                text: "Field 1"
                mipmap: True
            Label:
                id: coinPrice
                markup: True
                font_size:14
                text_size: None, None
                size_hint: 1,1
                text: "Field 2"
                mipmap: True
            Label:
                id: marketCap
                markup: True
                font_size:14
                text_size: None, None
                size_hint:(1, 1)
                text: "Field 3"
                mipmap: True
            Label:
                id: change
                font_size:14
                text_size: None, None
                size_hint: 1,1
                text: "Field 4"
                mipmap: True
            Button:
                text: "Details"
Output:
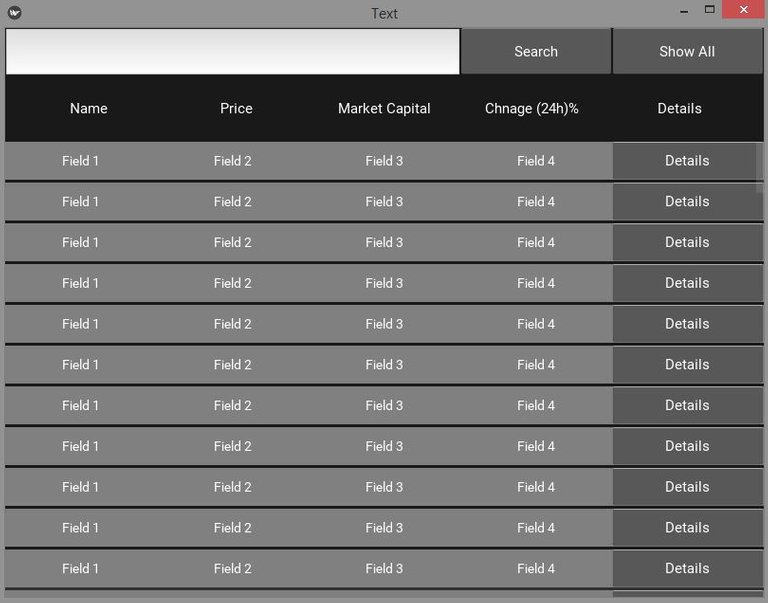
You can clearly see we've develop the table for our data, now we just have to populate our table with data.
Feed the Table with Data
Once we developed the presentation layer for the App, now we move to our logical layer that will help us to feed the data to our table. As you know our presentation layer in main.py file, open this file and directly move toward the allCoinsList() method and change its name to topCoinsList() because it shows the only top coins list. Then move toward where we are accessing the JSON data from API and define three List variable and assign them blank Lists as we previously done with allCoins variable.
        r = requests.get('https://api.coinmarketcap.com/v2/ticker/')

        json_data = r.json()
        keys = json_data['data'].keys()
        allCoins = []
        price = [] #new var
        marketCap = [] #new var
        changeHr = [] #new var
Now access the data from API and store in the above defined List variables.
        for i in keys:

            #print("{}:  ${}".format(json_data['data'][i]['name'], json_data['data'][i]['quotes']['USD']['price']))

            price.append("${}".format(json_data['data'][i]['quotes']['USD']['price']))
            marketCap.append("${}".format(json_data['data'][i]['quotes']['USD']['market_cap']))
            changeHr.append("{}%".format(json_data['data'][i]['quotes']['USD']['percent_change_24h']))
            allCoins.append("{}".format(json_data['data'][i]['name']))
Now pass this accessed data to the RecycleView data. Write this code under the above loop
self.ids.coinList.data = [{"value": [w,x,y,z]} for w,x,y,z in zip(allCoins, price, marketCap,changeHr)]
At the end use this data in the Label text fields, first remove the dummy data and set this in the place of dummy data. Every Label will have different code.
text: text: str(" ".join(root.value[0:1])) # put this in field 1
text: text: str(" ".join(root.value[1:2])) # put this in field 2
text: text: str(" ".join(root.value[2:3])) # put this in field 3
text: text: str(" ".join(root.value[3:4])) # put this in field 4
Output:
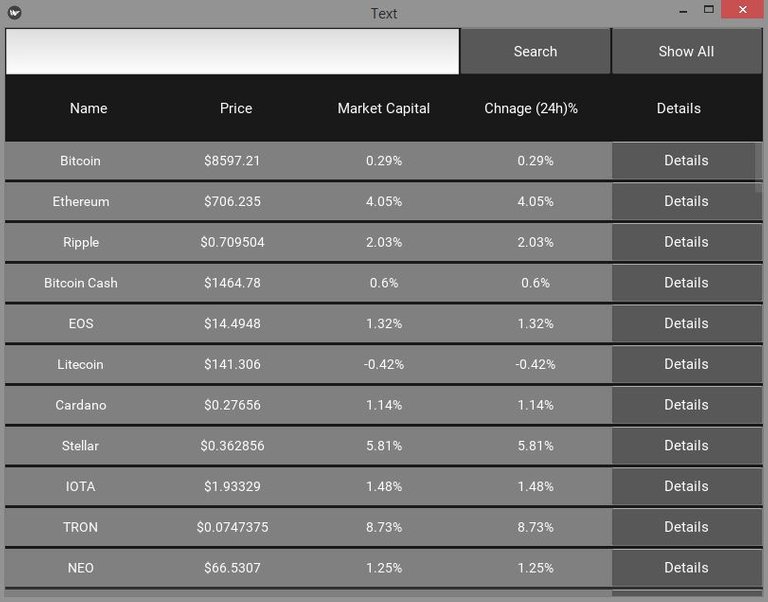
You can see we've developed the table for the Coins and feed the data to table, now in the next tutorials we'll do work on search and details of the coins in order to make it a full fledged Cryptocurrency Price Checker app.
Curriculum
Include a list of related tutorials you have already shared on Utopian that make up a Course Curriculum, if applicable.
Thank you for your contribution.
While I liked the content of your contribution, I would still like to extend few advices for your upcoming contributions:
Looking forward to your upcoming tutorials.
Link to the Answers of the Questionnaire -
Click here
Need help? Write a ticket on https://support.utopian.io/.
Chat with us on Discord.
[utopian-moderator]
Thanks brother,
Next time it will better :)
great tutorial, keep it up:)
Hey @faad
Thanks for contributing on Utopian.
We’re already looking forward to your next contribution!
Contributing on Utopian
Learn how to contribute on our website or by watching this tutorial on Youtube.
Want to chat? Join us on Discord https://discord.gg/h52nFrV.
Vote for Utopian Witness!