![]()
wxPython is a Python wrapper for wxWidgets (which is written in C++), a popular cross-platform GUI toolkit. Developed by Robin Dunn along with Harri Pasanen, wxPython is implemented as a Python extension module.
Just like wxWidgets, wxPython is also a free software. It can be downloaded from the official website http://wxpython.org. Binaries and source code for many operating system platforms are available for download on this site.. This introductory tutorial provides the basics of GUI programming and helps you create desktop GUI applications.
Repository
https://github.com/wxWidgets/wxPython
What Will I Learn?
In this tutorial you will how to do following things in Python using wxPython
REQUIREMENTS
To follow along with this tutorial you will need to know basics of Python.If you don't know them you can check @scipio blog as he have made plenty of awesome tutorials from which you can learn from. You will also need to be focused while reading as sometimes the things become hard for me to explain.
Difficulty
Tutorial
Setup
windows
If you haven't installed wxpython and you want to do it then you can check out http://www.wxpython.org/download.php it has all the information regarding installing the wxpython
LINUX
wxPython binaries for many Linux distros can be found in their respective repositories. Corresponding package managers will have to be used to download and install. For instance on Debian Linux, following command should be able to install wxPython.
sudo apt-get install python-wxgtk3.0
MacOS
Prebuilt binaries for MacOS in the form of disk images are available on the download page of the official website.
GUI Builder Tools
Creating a good looking GUI by manual coding can be tedious. A visual GUI designer tool is always handy. Many GUI development IDEs targeted at wxPython are available
wxFormBuilder
s an open source, cross-platform WYSIWYG GUI builder that can translate the wxWidget GUI design into C++, Python, PHP or XML format.
First of all the latest version of wxFormBuilder needs to be downloaded and installed from http://sourceforge.net/projects/wxformbuilder/
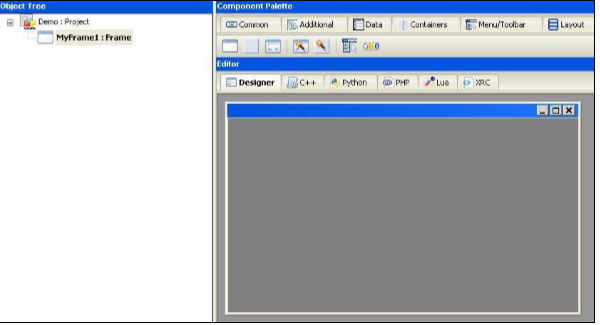
On opening the application, a new project with blank grey area at the center appears.
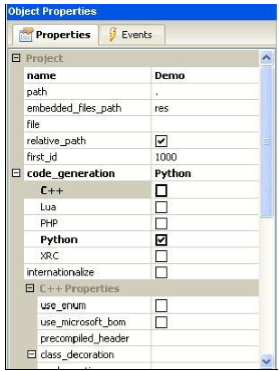
Give a suitable name to the project and choose Python as code generation language. This is done in the Object properties window as shown in the following image −
Then from ‘Forms’ tab of components palette, choose Frame.
( )
)
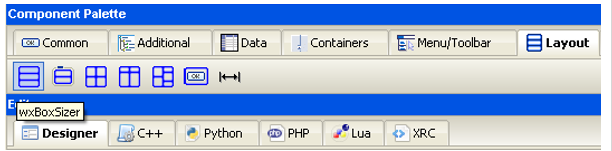
Add a vertical wxBoxSizer from ‘Layouts’ tab.
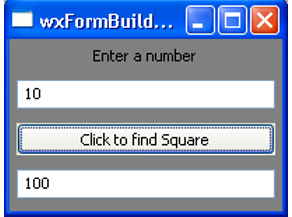
Add necessary controls in the Box with suitable captions. Here, a StaticText (label), two TextCtrl objects (text boxes) and a wxButton object are added. The frame looks like the following image
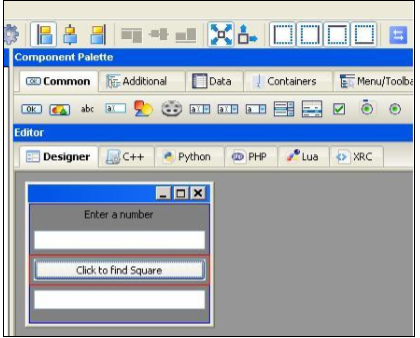
Enable Expand and Stretch on these three controls. In the object properties for wxButton object, assign a function findsquare() to OnButtonClick event.


Save the project and press F8 to generate Python code for developed GUI. Let the generated file be named as Demo.py
In the executable Python script, import demo.py and define FindSquare() function. Declare Application object and start a main event loop. Following is the executable code
          import wx

           #import the newly created GUI file
           import demo
            class CalcFrame(demo.MyFrame1):
                  def __init__(self,parent):
                 demo.MyFrame1.__init__(self,parent)

                 def FindSquare(self,event):
                 num = int(self.m_textCtrl1.GetValue())
                     self.m_textCtrl2.SetValue (str(num*num))

                   app = wx.App(False)
                              frame = CalcFrame(None)
                           frame.Show(True)
                     #start the applications
                       app.MainLoop()
The above code produces the following output −
Event Handling
Unlike a console mode application, which is executed in a sequential manner, a GUI based application is event driven. Functions or methods are executed in response to user’s actions like clicking a button, selecting an item from collection or mouse click, etc., called events.
For example, to call OnClick() method of the program on a button’s click event, the following statement is required
self.b1.Bind(EVT_BUTTON, OnClick)
Example
In the following example, the MoveEvent, caused by dragging the top level window – a wx.Frame object in this case – is connected to OnMove() method
     import wx

      class Example(wx.Frame):

       def __init__(self, *args, **kw):
          super(Example, self).__init__(*args, **kw)
            self.InitUI()

          def InitUI(self):
                 self.Bind(wx.EVT_MOVE, self.OnMove)
                self.SetSize((250, 180))
     self.SetTitle('Move event')
      self.Centre()
      self.Show(True)

                  def OnMove(self, e):
               x, y = e.GetPosition()
           print "current window position x = ",x," y= ",y

         ex = wx.App()
             Example(None)
            ex.MainLoop()
The above code produces the following output-
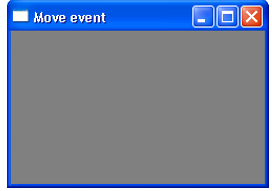
current window position x = 562 y = 309
current window position x = 562 y = 309
current window position x = 326 y = 304
current window position x = 384 y = 240
current window position x = 173 y = 408
current window position x = 226 y = 30
current window position x = 481 y = 80
The complete code is −
 import wx

          class MyPanel(wx.Panel):

                     def __init__(self, parent):
                super(MyPanel, self).__init__(parent)

              b = wx.Button(self, label = 'Btn', pos = (100,100))
                      b.Bind(wx.EVT_BUTTON, self.btnclk)
                         self.Bind(wx.EVT_BUTTON, self.OnButtonClicked)

                     def OnButtonClicked(self, e):

                print 'Panel received click event. propagated to Frame class'
           e.Skip()

               def btnclk(self,e):
               print "Button received click event. propagated to Panel class"
                  e.Skip()

               class Example(wx.Frame):

                          def __init__(self,parent):
                       super(Example, self).__init__(parent)

               self.InitUI()

                             def InitUI(self):

                          mpnl = MyPanel(self)
             self.Bind(wx.EVT_BUTTON, self.OnButtonClicked)

          self.SetTitle('Event propagation demo')
              self.Centre()
            self.Show(True)

                    def OnButtonClicked(self, e):

                      print 'click event received by frame class'
                        e.Skip()

   ex = wx.App()
                 Example(None)
         ex.MainLoop()
In the above code, there are two classes. MyPanel, a wx.Panel subclass and Example, a wx.Frame subclass which is the top level window for the program. A button is placed in the panel.
This Button object is bound to an event handler btnclk() which propagates it to parent class (MyPanel in this case). Button click generates a CommandEvent which can be propagated to its parent by Skip() method.
MyPanel class object also binds the received event to another handler OnButtonClicked(). This function in turn transmits to its parent, the Example class. The above code produces the following output −
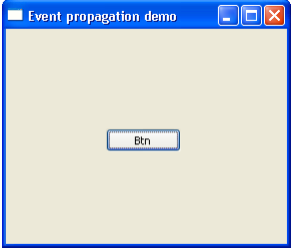
                         Button received click event. Propagated to Panel class.
                        Panel received click event. Propagated to Frame class.
                         Click event received by frame class.
It is working as intended. In the upcoming tutorials I will show you how you can do more cool stuff with wxPython so stay tuned for that!
✅ @faizaraja, I gave you an upvote on your first post! Please give me a follow and I will give you a follow in return!
Please also take a moment to read this post regarding bad behavior on Steemit.
Source
Plagiarism is the copying & pasting of others work without giving credit to the original author or artist. Plagiarized posts are considered spam.
Spam is discouraged by the community, and may result in action from the cheetah bot.
More information and tips on sharing content.
If you believe this comment is in error, please contact us in #disputes on Discord
Flagged for Plagiarism
@steemflagrewards
Steem Flag Rewards mention comment has been approved! Thank you for reporting this abuse,@flugschwein categorized as plagiarism. This post was submitted via our Discord Community channel. Check us out on the following link!
SFR Discord
Hi! I am a robot. I just upvoted you! I found similar content that readers might be interested in:
https://www.tutorialspoint.com/wxpython/wxpython_tutorial.pdf
In utopian plagiarism isn't allowed.
Don't do that again.
Your contribution has been evaluated according to Utopian rules and guidelines, as well as a predefined set of questions pertaining to the category.
To view those questions and the relevant answers related to your post,Click here
Need help? Write a ticket on https://support.utopian.io/.
Chat with us on Discord.
[utopian-moderator]