Repository
Node.js
https://github.com/nodejs/node
Express
What Will I Learn?
We will learn to do the views and forms in a project in Nodejs using the express framework with the mongodb database and in this way upload images.
We will also learn to manage those images, store them and manipulate them using the Nodejs modules, and improve our screens and stylize our forms and views of our application.
Requirements
Node.js
Expressjs
Mongodb
Resources
Node.js - https://github.com/nodejs/node
Express- https://github.com/expressjs/express
Bootstrap 4-https://getbootstrap.com/docs/4.0/getting-started/introduction/
Mongodb - https://github.com/mongodb/mongo
Difficulty
Basic
Tutorial Content
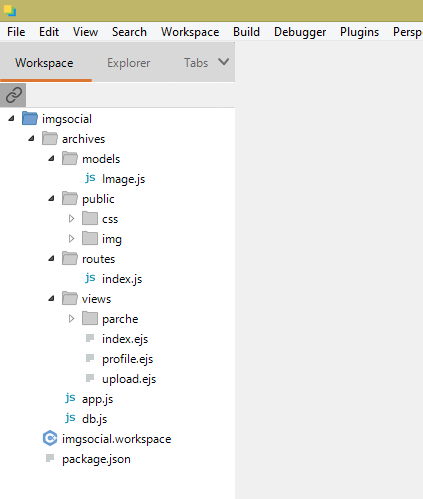
Greetings dear friends, in this tutorial we will be explaining how our views or screens are made as you prefer to call them for our social network portal to upload images, previously we created our file structure and in that process we created a file to make the connection with our base of data, this we have called DB.js.
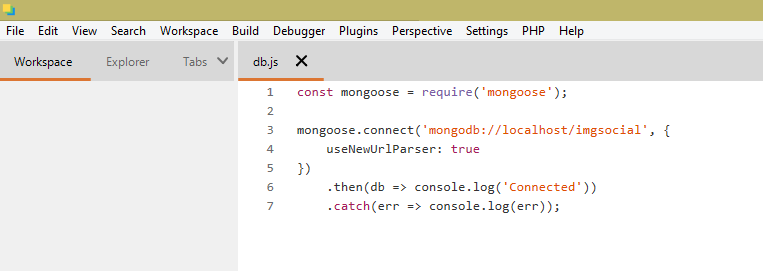
This file shows us how we require the mongoose module and the response is stored in a variable with the same name:
const mongoose = require('mongoose');
Later we use a function of the module called mongoose.connet where we indicate the address or path where our project is located and use the instruction
useNewUrlParser: true to verify that the address we have provided is correct and verify this.
If the following line is active: then (db => console.log ('Connected'))
If this line is not found active: .catch (err => console.log (err));showing us a connection error. So far our connection to our databases that can be used as many times as necessary by calling it from the file that needs it.
Now we will see our first view, for which we have created a file called: index.ejs, we assign this name to this extension since we are using our template engine for node.js called EJS .
Before explaining this file I will show you two additional files that I have created with content directly from bootstrap where part of this code is extracted from the libraries and is used in several of our files to stylize our forms a little, this way of using them creating independent files It is for the purposes of this tutorial making it clear that it is code directly from an external library and not having to re-copy it as many times as needed.
These files with the following: patch head and patch browse, from here we will use a bit of html code to make our screens and our forms in the application.
The following code helps us to stylize our forms in the upper part using the code to be applied in the forms where this file is required and in them we have used the bootstrap cdn , once this is done we can import it into our views with the instruction <% - include (" patch / head ") -%>
Parche head
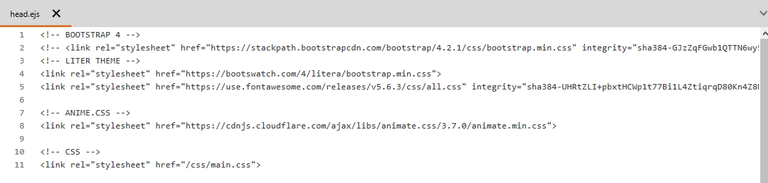
And finally in this Head Patch file we call a small file called main.css that we have created with some CSS instructions for our screens. <link rel =" stylesheet "href =" / css / main.css ">
Now the following code is quite similar to the previous one but in this case it does not take care of the headers, this is done for what corresponds to the navigation as its name indicates, simply we when we studied what we called menus, it is only to show the option of menu that will say Upload and a Logo image that we have designed.
In the first block of code the call is expressed to the bootstrap cdn , WE CAN APPRECIATE THUS:
Parche navega
 <nav class="navbar navbar-expand-lg navbar-light bg-light">
    <a class="navbar-brand" href="/">
        <ing src="/img/logos.png" style="height: 30px" class="d-inline-block align-top"> Intensely
    </a>
    <button class="navbar-toggler" type="button" data-toggle="collapse" data-target="#navbarNav" aria-controls="navbarNav"
        aria-expanded="false" aria-label="Toggle navigation">
        <span class="navbar-toggler-icon"></span>
    </button>
    <div class="collapse navbar-collapse" id="navbarNav">
        <ul class="navbar-nav ml-auto">
            <li class="nav-item">
                <a class="nav-link" href="/upload"><i class="fas fa-upload"></i> Upload</a>
            </li>
        </ul>
    </div>
</nav>
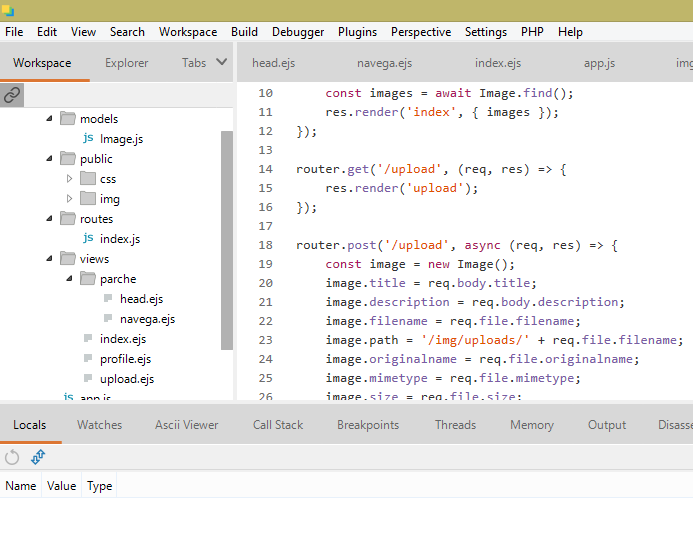
Finally we will explain our main view where the images will be shown once we upload them.
Index.ejs
<html lang="en">

<head>
    <meta charset="UTF-8">
    <meta name="viewport" content="width=device-width, initial-scale=1.0">
    <meta http-equiv="X-UA-Compatible" content="ie=edge">
    <title>Tutorials images with node.js</title>
<%- include("parche/head") -%>```
</head>

<body>

    <%- include("parche/navega") %>

    <div class="container p-4">
        <div class="row">
            <div class="card-columns">

                <% images.forEach(function (image) { %>

                <div class="card animated fadeInDown">
                    <ing src="<%= image.path %>" class="card-img-top" alt="<%= image.filename %>">
                    <div class="card-body">
                        <h5 class="card-title"><%= image.title %></h5>
                        <p class="card-text"><%= image.description %></p>
                        <p><%= format(image.created_at) %></p>
                        <a href="/image/<%= image._id %>" class="btn btn-primary">
                           View
                        </a>
                    </div>
                </div>
                <% }) %>
            </div>
        </div>
    </div>

</body>

    </html>
When we are going to show the images, we must remember that these will be in a database, we will call them with a query to that database and this query returns an arrangement showing us the images that are stored, to recover that arrangement we must make a loop with an EJS instruction that works as a function when receiving an image, this would be: <% images.forEach (function (image) {%>, and to make this look better on our screens we place it inside a container class as follows:
        <div class="row">            <div class="card-columns">

                <% images.forEach(function (image) { %>```

Later we create letters where we will place the images, this we will do it in the following way:

`` ` <div class =" card animated fadeInDown ">
                    <ing src = "<% = image.path%>" // I get the address where the image is
class = "card-img-top" alt = "<% = image.filename%>">
                    <div class = "card-body">
                        <h5 class = "card-title"> <% = image.title%> </ h5> // placing the title to the image by taking it from the public folder
                        <p class = "card-text"> <% = image.description%> </ p> // placing the description to the image taking it from the public folder  `` `

With these lines of code what we do is create a button that redirects us to the profile of each image using the ID of each image, for now we will not see it very well but when we finish our routes and upload the images we will see its usefulness.

``` <p><%= format(image.created_at) %></p>
                        <a href="/image/<%= image._id %>" class="btn btn-primary">
And finally we close all our divisions that we have made in our code with the respective / div.
In our next installment we will continue developing the necessary views for our social network application with images made with Node.js and Express and we will begin to relate them to our routes and our route file that is already under construction as you can see in this image.
Similarly when we finish with some explanations we will address our main app.js file because to explain it better we will do it by relating the instructions with the files, modules and functions that execute them, there is still much to learn as you see in the following image.
I hope this tutorial is useful, thank you for reading it.
Curriculum
My Github Address
https://github.com/IntenselyMichell
Thank you for your contribution @intensely.
After reviewing your contribution, we suggest you following points:
Using the first person in the tutorials makes it difficult to understand the tutorials. We suggest using the third person in your text.
Nice work on the explanations of your code, although adding a bit more comments to the code can be helpful as well.
Code sections are better displayed using the code markup, instead of placing them as screenshots.
In the next tutorial ident your code. It is important to have the code idented so that the reader has a better perception of what you are developing.
Looking forward to your upcoming tutorials.
Your contribution has been evaluated according to Utopian policies and guidelines, as well as a predefined set of questions pertaining to the category.
To view those questions and the relevant answers related to your post, click here.
Need help? Chat with us on Discord.
[utopian-moderator]
Thanks for your advice, I hope to improve
Thank you for your review, @portugalcoin! Keep up the good work!
Hi @intensely!
Your post was upvoted by @steem-ua, new Steem dApp, using UserAuthority for algorithmic post curation!
Your post is eligible for our upvote, thanks to our collaboration with @utopian-io!
Feel free to join our @steem-ua Discord server
thanks for your support
Hey, @intensely!
Thanks for contributing on Utopian.
We’re already looking forward to your next contribution!
Get higher incentives and support Utopian.io!
Simply set @utopian.pay as a 5% (or higher) payout beneficiary on your contribution post (via SteemPlus or Steeditor).
Want to chat? Join us on Discord https://discord.gg/h52nFrV.
Vote for Utopian Witness!
Congratulations @intensely!
Your post was mentioned in the Steem Hit Parade for newcomers in the following category:
I also upvoted your post to increase its reward
If you like my work to promote newcomers and give them more visibility on the Steem blockchain, consider to vote for my witness!