What Will I Learn?
- here you will learn how to create a map with php
- here you will create a database of map data
- here you will learn how to input data through map image
Requirements
- You have basic about html
- You have basic about javascript
- You have basic about php
Difficulty
- Basic
Tutorial Contents
-map is a description of the view of the earth viewed from above, in this paper will be explained about the stages in making the form input data into the map.
- buatlah sebuah database dengan mengikuti sytax dibawah ini :
create database datapeta;
use datapeta;
create table tempat(
    id_tempat int not null auto_increment primary key,
    latlng varchar(100) not null,
    nama_tempat varchar(50) not null,
    keterangan_tempat text
    )
setelah membuatnya, silakan diperiksa di phpmyadmin, pasti akan tampil data seperti gambar dibawah ini :

- selanjutnya buat sebuah file php dengan nama peta.php, codingnya dapat dilihat dibawah ini :
<html>
  <head>
   <title></title>
  </head>
  <body>
  <div id="map_canvas" style="width:70%; height:70%;">
   </div>
  </body>
  <script type="text/javascript" src="http://maps.google.com/maps/api/js?sensor=false"></script>
  <script type="text/javascript">
  var infowindow = null;
  (function() {
   initialize();

  })();
    function initialize() {
       var sites = [

    ];
        var centerMap = new google.maps.LatLng(5.041453040397738,97.32267737388611);
        var myOptions = {

          zoom: 14,
          center: centerMap,
          mapTypeId: google.maps.MapTypeId.ROADMAP
        }

       var map = new google.maps.Map(document.getElementById("map_canvas"), myOptions);

        setMarkers(map, sites);
        setAction(map);
        infowindow = new google.maps.InfoWindow({
            content: "loading..."
          });

      var bikeLayer = new google.maps.BicyclingLayer();
        bikeLayer.setMap(map);

     }

        function setMarkers(map, markers) {
        for (var i = 0; i < markers.length; i++) {
          var sites = markers[i];
          var siteLatLng = new google.maps.LatLng(sites[1], sites[2]);
          var marker = new google.maps.Marker({
            position: siteLatLng,
            map: map,
            title: sites[0],
            zIndex: sites[3],
            html: sites[4]

          });

          var contentString = "Some content";
          google.maps.event.addListener(marker, "mouseover", function () {

            infowindow.setContent(this.html);
            infowindow.open(map, this);
          });
        }
      }

        function setAction(map){

          google.maps.event.addListener(map, "rightclick", function(event) {

          if(confirm("Tandai Titik Ini? (klik pada tanda yang muncul untuk melihat pilihan)")){
            var lat = event.latLng.lat();
            var lng = event.latLng.lng();
            var form = '<h4>Tambah Data</h4><form id="formtambahdata" method="post" action="save.php"><br><input type="text" id="nama" placeholder="nama tempat" name="nama"><br><textarea id="keterangan" name="keterangan" placeholder="Isi Keterangan tempat"></textarea><br><input type="text" id="latlng" name="latlng" value="'+lat+','+lng+'"><br><input type="submit" value="save"></form>';

            var siteLatLng = new google.maps.LatLng(lat, lng);
            var marker = new google.maps.Marker({
                position: siteLatLng,
                map: map,
                title: "add data",
                zIndex: 100,
                html: form

              });
             google.maps.event.addListener(marker, "mouseover", function () {

                infowindow.setContent(this.html);
                infowindow.open(map, this);
              });
          }
        });
        }
  </script>
  </html>
- berdasarkan coding diatas akan didapat hasil seperti ini :

- buat sebuah file php dengan nama save.php dan ikuti coding berikut ini :
<?php
 mysql_connect('localhost','root','');
 mysql_select_db('datapeta');
 $nama_tempat = $_POST['nama'];
 $keterangan = $_POST['keterangan'];
 $latlng = $_POST['latlng'];
 $query = "insert into tempat (nama_tempat,keterangan_tempat,latlng) values('$nama_tempat','$keterangan','$latlng')";
 if(mysql_query($query)){
      header('location:peta.php');
      }
 ?>
pada baris yang ditandai dibawah ini :

masukan coding php berikut :
    <?php
           mysql_connect('localhost','root','');
           mysql_select_db('datapeta');
           $query="select * from tempat";
           $datas = mysql_query($query);
           while ($data=mysql_fetch_array($datas)) {
             ?>
             ["<?php echo $data['nama_tempat'];?>", <?php echo $data['latlng']; ?> ,1, "<h4><?php echo $data['nama_tempat'];?></h4><p><?php echo $data['keterangan_tempat'];?></p>"],
             <?php
           }
         ?>
- klik kanan pada gambar, kemudian akan muncul notifikasi seperti dibawah ini :
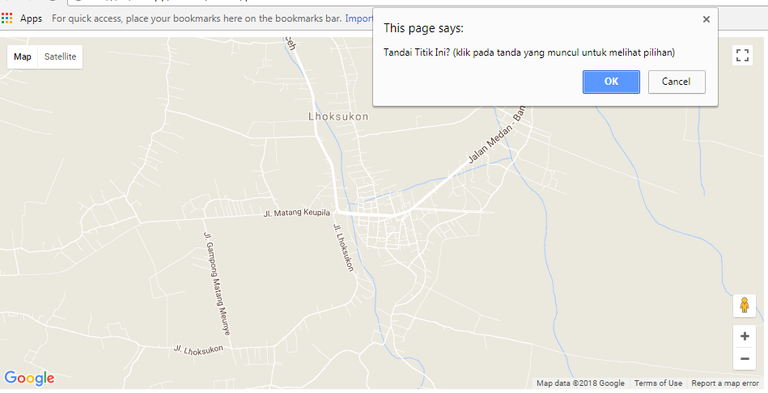
- klik ok

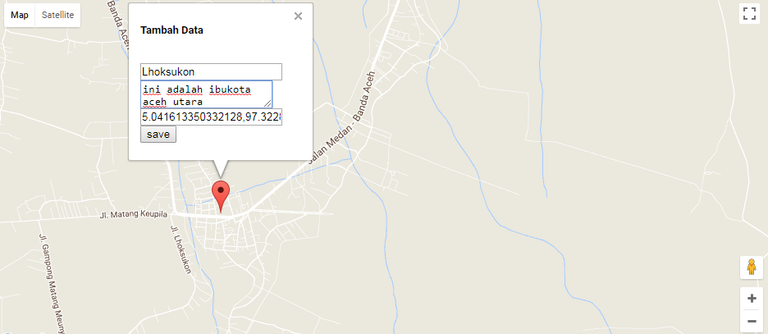
- masukan data lokasi dan save seperti gambar dibawah ini :
- data akan disimpan kedalam database seperti gambar dibawah ini.

- hasil akhir dari peta akan terlihat seperti ini :

Posted on Utopian.io - Rewarding Open Source Contributors
Your contribution cannot be approved because it does not follow the Utopian Rules.
You can contact us on Discord.
[utopian-moderator]