What Will I Learn?
- You will learn how to configure a water sensor module with NodeMCU devkit v1.o
board to make a circuit that sensed water overflow. - You will learn how to make a web server that automatically gives on-screen alert
when water overflows on a setup. - You will learn some possible application of this tutorial in electronic projects, studies or in the industry.
Requirements
Materials Needed
- NodeMCU devkit v1.0
- Water Level Sensor
- A bowl of water
- 220 ohms Resistor (1/4 W)
- USB Cable (Type A to Mini B)
- Junction Wires
- Power Supply Unit (+5V)
- Computer
Software Applications
- Open-Source Arduino Software (IDE) / Arduino IDE
Difficulty
- Intermediate
Description:
 Image References: 1, 2, 3
 Water level measurements or monitoring systems have many known uses in manufacturing, science experiments, navigations and even in public safety. There are known automation for water level indicators that mostly uses light emitting diodes or piezoelectric buzzers as an indicator once certain levels of water is already reached. But there are areas for development in these systems with the use of IoT technology.
Hence, I made this tutorial about making a Water Overflow System with Online Updates using NodeMCU devkit v1.0. With this system, the water overflow alert will be automatically updated with the use of a web server that displays an alarm when a certain level of water level is already reached.
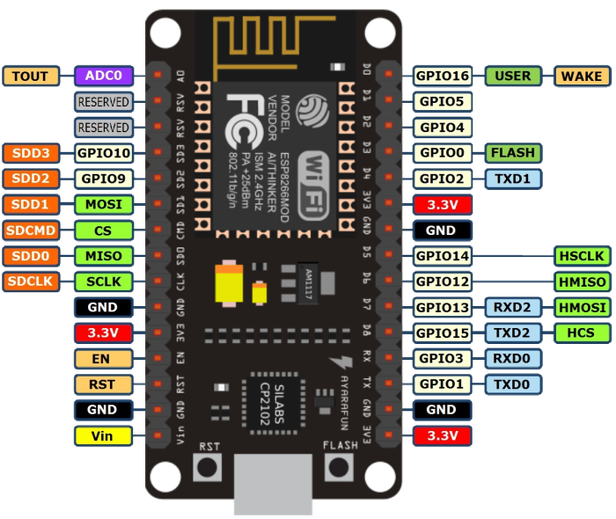
The Water Level Sensor is an electronic module that is generally used for sensing rainfall, liquid leakage and water level. This sensor can easily communicate to a dedicated and compatible microcontroller like the NodeMCU devkit v1.0 board. It has three terminals: VCC (Source), GND and the Vout. The Vout is connected to an input digital pin on the board.
For more information about the Water Sensor Brick, here is its user manual.
Tutorial Contents
Step 1:
and its Necessary Files"
Open Arduino IDE. And create a new sketch.
Note: Make sure that you have already downloaded and installed the boards and the necessary files to make the NodeMCU devkit v1.0. If you haven't install or download them, kindly click here. And follow the first step of my tutorial there.
After the installation of ESP8266, go to the Tools tab and change the board to NodeMCU 1.0 (ESP-12E Module)

We have to start with programming our board, first. Thus, after we finished assembling the circuit on our next step, we can position the system on a remote place within our local area network, so we can remotely check the response of the web server to the water overflow.
On your new sketch in Arduino IDE, input this program:
#include <Arduino.h>
#endif
#include <ESP8266WiFi.h>
#define watersensor D2
const char* ssid = "my WiFi SSID";
const char* password = "my WiFi Password";
WiFiServer server(301);
IPAddress ip(192, 168, 43, 67);
IPAddress gateway(192, 168, 43, 1);
IPAddress subnet(255, 255, 255, 0);
IPAddress dns(192, 168, 43, 1);
void setup() {
Serial.begin(115200);
delay(10);
// Connect to WiFi network
Serial.println();
Serial.println();
Serial.print("Connecting to ");
Serial.println(ssid);
//Static IP Setup Info Here...
WiFi.config(ip,dns,gateway,subnet);
WiFi.begin(ssid, password);
while (WiFi.status() != WL_CONNECTED) {
delay(500);
Serial.print(".");
}
Serial.println("");
 Serial.println("WiFi connected");
// Start the server
server.begin();
Serial.println("Server started");
// Print the IP address
Serial.print("Use this URL to connect: ");
Serial.print("http://");
Serial.print(WiFi.localIP());
Serial.println("/");
}
void loop()
{
// Check if a client has connected
 <WiFiClient client = server.available();
 if (!client) {
return;
}
// Wait until the client sends some data
Serial.println("new client");
while(!client.available()){
//    delay(1);
client.setNoDelay(1);
 }
// Read the first line of the request
String request = client.readStringUntil('\r');
Serial.println(request);
client.flush();
// Set ledPin according to the request
// Return the response
client.println("HTTP/1.1 200 OK");
client.println("Content-Type: text/html");
client.println(""); //  do not forget this one
client.println("");
client.println("<html>");
client.println("<meta http-equiv='refresh' content='20'>");
client.println("<title>WATER OVERFLOW ALARM WITH ONLINE UPDATES</title>");
client.println("<center>");
client.println("<style>");
client.println("H1 {");
client.println("background-color: blue;");
client.println("}");
client.println("</style>");
client.println("<H1 style='color:white'><table>");
client.println("<tr>");
client.println("<td><div class='inner'><font size= '+3' color='white'><b>");
client.println("WATER OVERFLOW ALARM WITH ONLINE UPDATES<br>");
client.println("USING NODEMCU 1.0 BOARD</font></b>");
client.println("</div></td>");
 client.println("<td><div class='relative'>");
if (digitalRead(watersensor)==LOW)
 {
client.println("<button style='background-color:red;width:200px;height:100px'><font size= '+2' color='white'><b>FULL LEVEL ALERT</b></font></button><br>");
}
else
{
client.println("<button style='background-color:gray;width:200px;height:100px'<font size= '+2' color='white'><b>NOT FULL</b></font></button><br>");
}
client.println("</div></td>");
client.println("</tr>");
client.println("</table><hr></center>");
client.println("<body style = 'background-color:lightgray;'>");
client.println("<br>");
client.println("<style>");
client.println("div.relative {");
client.println("position: relative;");
client.println("left:100px;");
client.println("}");
client.println("div.inner {");
client.println("position: relative;");
client.println("left:10px;");
client.println("}");
client.println("div.sample1 {");
client.println("position: relative;");
client.println("left:85px;");
client.println("}");
client.println("</style><hr><br>");
client.println("<b>LEGENDS: </b> <button style='background-color:gray;width:100px;height:50px'><font color='white'<b>NOT FULL</b></font></button>");
client.println("<font color='black'><b>WATER LEVEL IS BELOW SENSOR.</b></font><p>");
client.println("<div class='sample1'><button style='background-color:red;width:100px;height:50px'><font color='white'><b>FULL LEVEL ALERT</b></font></button><font color='black'><b> WATER LEVEL IS ALREADY FULL.</b></font>");
client.println("</div><br><hr>");
client.println("</body>");
client.println("</html>");
delay(1);
Serial.println("Client disconnected");
Serial.println("");
delay(500);
}
The program of this system uses a digital pin D2 as an input pin based on the codepinMode(D2, INPUT). We have defined the pin D2 as equivalent to the variable watersensor by the code#define watersensor D2. The if condition,if (digitalRead(watersensor)==LOW), implies that when water contacts with the water sensor, the sensor reading will be low. Thus, changing the online update to big red button with a text FULL LEVEL ALERT. But if the sensor does not sense water, the reading will be HIGH and thus, the display on the web page is a big gray button with a text NOT FULL.
The program simply let your NodeMCU devkit v1.0 board to connect to your local access point or your Wi-Fi hotspotconst char* ssid = "my wifi SSID"and use the passwordconst char* password = "my wifi password"to authenticate.
I have set the port, ip, default gateway, subnet mask and the dns addresses of the web server as static in the program. But we may have different configurations of IP addresses. It will depend on the network address of your local area network. This is to make sure that when your server shuts down, it will still have the same ip address when it is establish again.
Now, connect your NodeMCU devkit v1.0 to your computer using the USB cable (Type A to Mini B).

Actual Photo
Go to the device manager then, identify its port number if it is your first time to use this board. Now, go the Arduino IDE and click Tools > Port and look for the port of your NodeMCU devkit v1.0.
Input the program above properly. And click Verify/Compile when you are done to check for errors.I have already compiled this program and it has no errors based on my screenshot.

Actual Photo
If your program has no errors after you compiled, click on Upload.
After you are done uploading your program to your board, you can test your web server by using your web browser. But make sure that your computer or device is connected on the same local access point or Wi-Fi hotspot.
To access your simple web server, just type the ip address you set like in my case, it is 192.168.43.67:301. Your web page must look like this.

Actual Photo
Step 3:
Get your breadboard and other components and carefully assemble the circuit below.
IMPORTANT SAFETY REMINDER: Make your wires from your water level sensor lengthy. It must be at least a feet away from your board and other electronic components because we will be partially soaking the water level sensor into the bowl of water to test our circuit after.

Made with Fritzing
Take note of the pin configurations of the NodeMCU devkit v1.0 and the Water Level Sensor

Get the bowl of water you had prepared. Hold the water level sensor by its edge and carefully soak, just a half of it, into the bowl of water. Make sure that you are not touching the copper strips, just the plastic. The big gray button with a text NOT FULL on the upper right corner of our web page must be replaced by a big red button with a text FULL LEVEL ALERT now. If your web page is unresponsive, try to examine if you had missed something on my steps or check the connections of your circuit and troubleshoot.

Made with GIPHY
Now, you have successfully made a Water Overflow Alarm System with Online Updates using NodeMCU devkit v1.0 Board.
Curriculum
• Auxiliary Wireless TV Power Remote Control using NodeMCU devkit v1.0
• Make Your Own Web Server using NodeMCU devkit v1.0
• External GPIO Pin State Monitoring using HTTP Client Request for NodeMCU Devkit v1.0 Boards
• Web-controlled Servomotor using NodeMCU devkit v1.0 board
• Intruder Alarm System with Automatic Online Updates using NodeMCU devkit v1.0
• Online Temperature Monitor using NodeMCU devkit v1.0 This tutorial has a potential application in automated flood detection alert systems and automated controls with water measurements.
I hope you enjoy this tutorial. Till next time!
Your contributor, @japh
Posted on Utopian.io - Rewarding Open Source Contributors
Thank you for the contribution. It has been approved.
You can contact us on Discord.
[utopian-moderator]
Thank you, sir @redart.
Hey @japh I am @utopian-io. I have just upvoted you!
Achievements
Suggestions
Get Noticed!
Community-Driven Witness!
I am the first and only Steem Community-Driven Witness. Participate on Discord. Lets GROW TOGETHER!
Up-vote this comment to grow my power and help Open Source contributions like this one. Want to chat? Join me on Discord https://discord.gg/Pc8HG9x