
What Will I Learn?
I'm planning on doing a series of tutorials showing some of angularjs directives and plugins. Today we will be learning how to import, declare and make a simple angular application using some of angular's basic directives.
- Setup angular in an html application.
- Familiarize and use some of angularjs's directives (ng-model, ng-required, ng-submit, ng-class and ng-show)
Requirements
- Any text editor. (I recommend sublime as this is what i'm using and will make it easier for you to follow along)
- Basic knowledge in HTML, CSS and Javascript.
Difficulty
Basic
Tutorial Contents
By the end of this tutorial our expected output would be a simple form that enables the user to toggle if the fields are required or not, see if the form is in a valid state, submit the form (valid or invalid) and be prompted a successful or unsuccessful submission, and reset the fields in the original state.
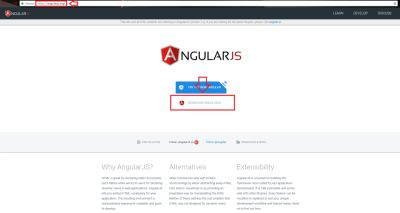
The first thing we need to do is download the latest version of angularjs, this can be done by going to their official website and downloading it there. I recommend downloading the minified version of the file (the file with ".min").
| Code | Output |
|---|---|
 |  |
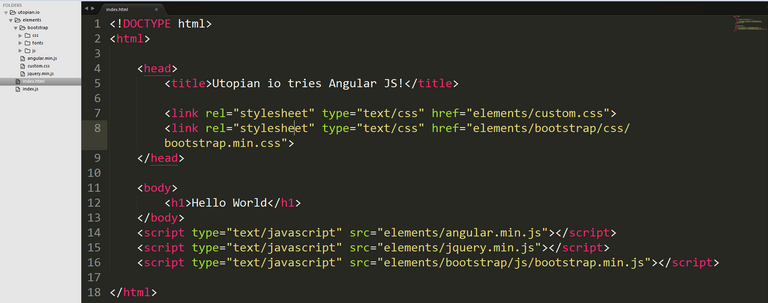
<!DOCTYPE html>
<html>

    <head>
        <title>Utopian io tries Angular JS!</title>
    </head>

    <body>
        <h1>Hello World</h1>
    </body>
</html>
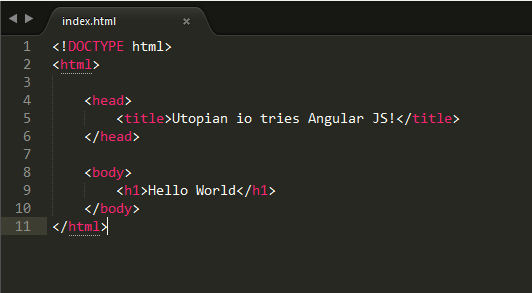
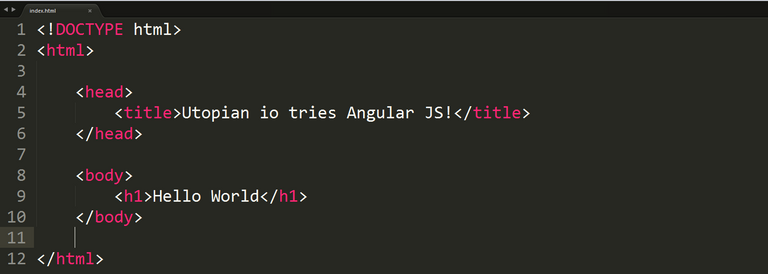
Here we have created a simple html file named index.html and it outputs a simple "Hello World". After downloading the latest version of angularjs we will import it into the html file.
| Before | After |
|---|---|
 |  |
<!DOCTYPE html>
<html>

    <head>
        <title>Utopian io tries Angular JS!</title>
    </head>

    <body>
        <h1>Hello World</h1>
    </body>
    <script type="text/javascript" src="elements/angular.min.js"></script>
</html>
I will also be importing jQuery, bootstrap and a custom css class for aesthetic purposes this is NOT required and is purely for aesthetic purposes only, the app will still function without these imports.
<!DOCTYPE html>
<html>

    <head>
        <title>Utopian io tries Angular JS!</title>

        <link rel="stylesheet" type="text/css" href="elements/custom.css">
        <link rel="stylesheet" type="text/css" href="elements/bootstrap/css/bootstrap.min.css">
    </head>

    <body>
        <h1>Hello World</h1>
    </body>
    <script type="text/javascript" src="elements/angular.min.js"></script>
    <script type="text/javascript" src="elements/jquery.min.js"></script>
    <script type="text/javascript" src="elements/bootstrap/js/bootstrap.min.js"></script>
</html>
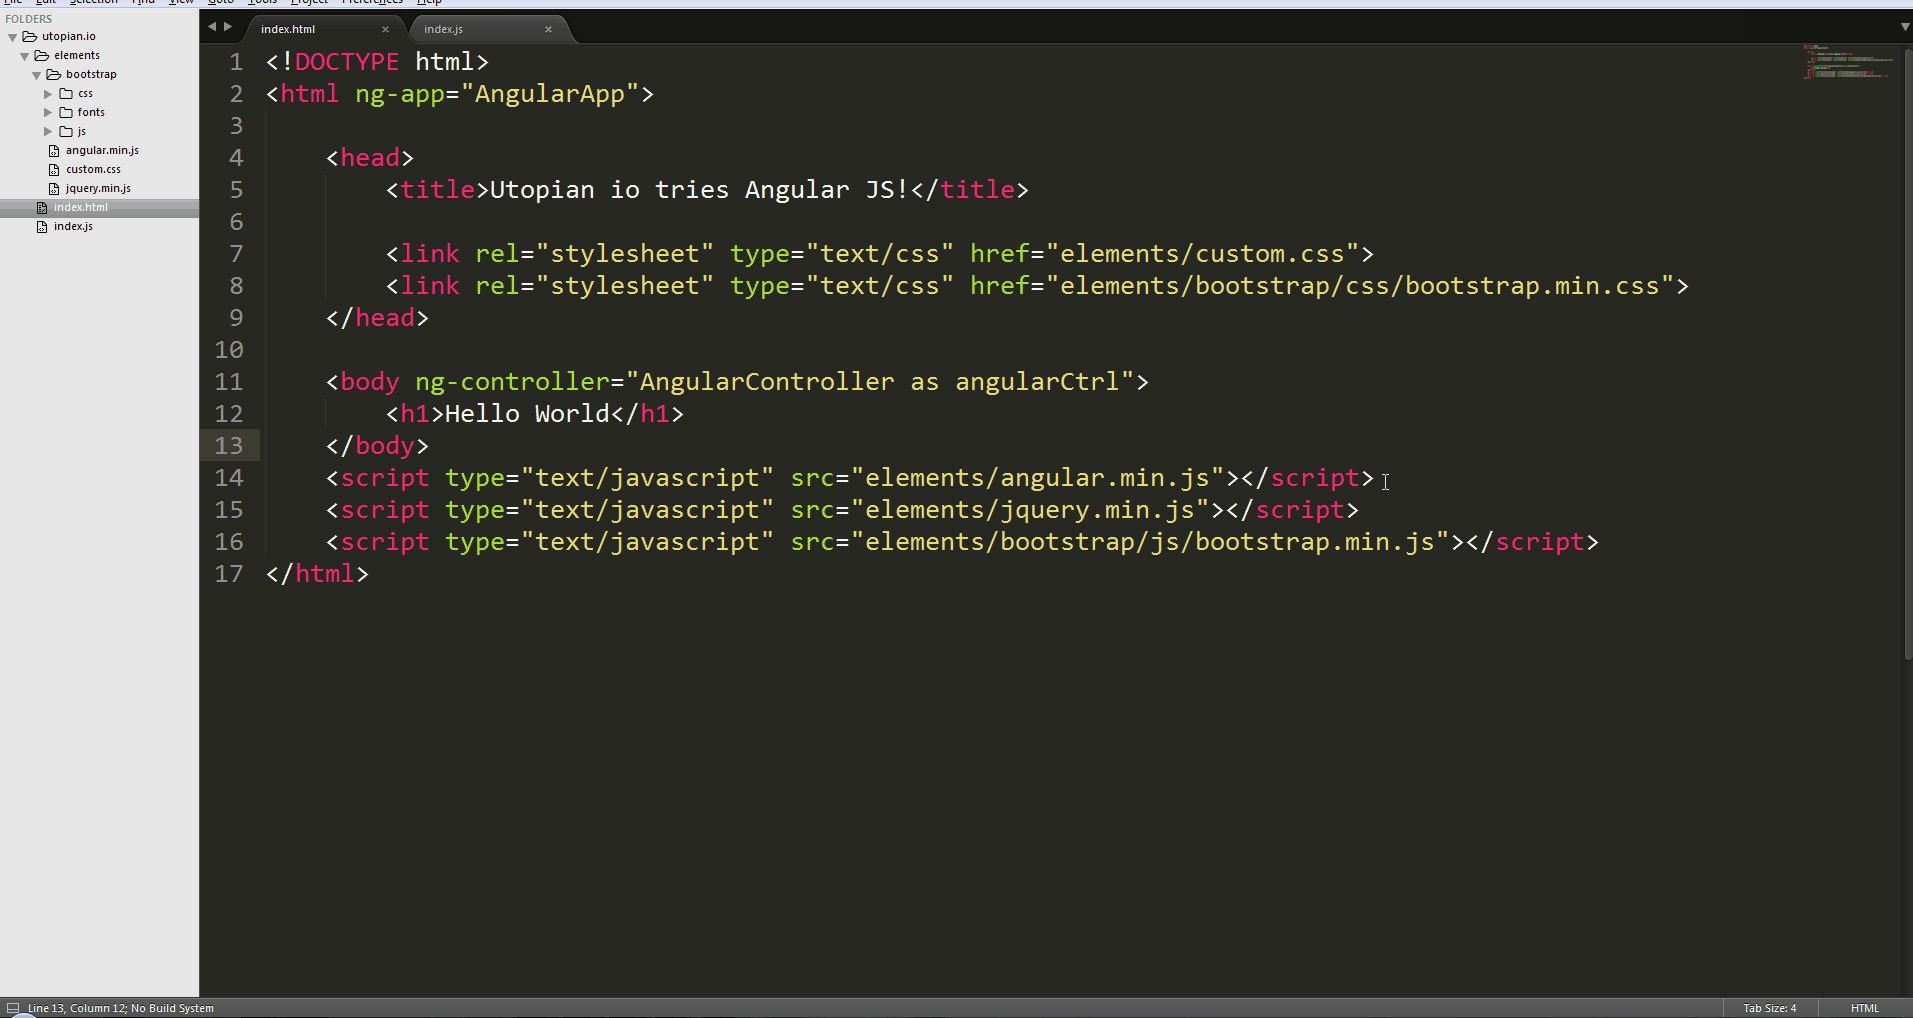
The image shown above will serve as our "base code" for this tutorial. I have placed all my imports in the elements folder.
The next thing we'll do is declare our module and its controller this is done by making a new .js file, we will name this file as index.js and declare our module and controller like so,
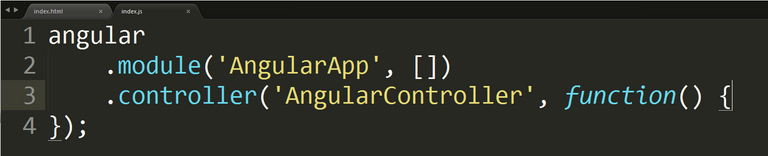
angular
    .module('AngularApp', [])
    .controller('AngularController', function() {
});
An angular module is basically our way of declaring our application, it's the most important thing in an angular application. The module also serves as a container for not only controllers but also, directives, services, factories and etc. In its most basic sense the angular module accepts two parameters angular.module(parameter1,parameter2) wherein parameter1 accepts string and is where we put the name of the application and parameter2 is an array wherein we insert other modules since it is possible to use modules within other modules.
The controller on the other hand serves as the handler for all the logic in an html file or "view". Every view has one controller. It also accepts two parameters angular.controller(parameter1,parameter2)wherein parameter1 accepts string and is where we put the name of the controller and parameter2 is a function, this is where we put the logic of the controller.
Now that we have created our controller let's update our base code.
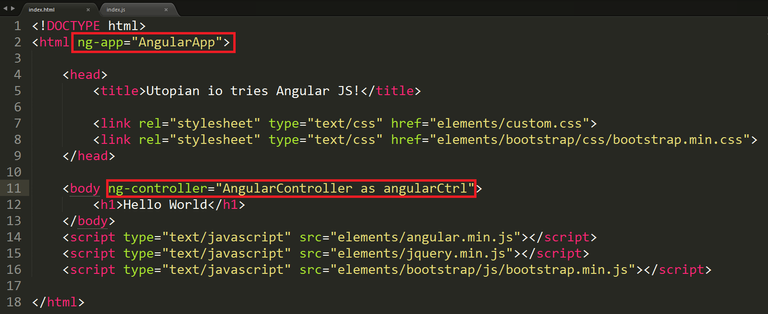
<!DOCTYPE html>
<html ng-app="AngularApp">

    <head>
        <title>Utopian io tries Angular JS!</title>

        <link rel="stylesheet" type="text/css" href="elements/custom.css">
        <link rel="stylesheet" type="text/css" href="elements/bootstrap/css/bootstrap.min.css">
    </head>

    <body ng-controller="AngularController as angularCtrl">
        <h1>Hello World</h1>
    </body>
    <script type="text/javascript" src="elements/angular.min.js"></script>
    <script type="text/javascript" src="elements/jquery.min.js"></script>
    <script type="text/javascript" src="elements/bootstrap/js/bootstrap.min.js"></script>
</html>
As we can see from the updated base code we have added two directive the ng-app and ng-controller. The ng-app tells the application that this is the root element of the application, only one ng-app should be declared and is usually placed where it is most accessible by all the other elements hence we placed it on the html tag.
The ng-controller assigns the view to a controller, unlike the ng-app there could be multiple ng-controller but only one per view. For the ng-controller it is not uncommon to have long names that is why some developers use aliasing basically what is does is you assign a long controller name to a shorter name by using as like we have.
Now that we have successfully setup module and controller let us now import our controller in our view file, try to declare a variable on out controller and show it on our view.
In the GIF we've shown three changes
Importing the
index.jsfile in our html.

So that our view would be able to see our module and controller.Declare a variable in our controller.

For ease of code, we've assignedthisto a variablevm, because since we are using controllers we have to use the keywordthiswhen assigning variables.Show it on the view.

Now that we've assigned the variable we then need to show it on the view. To do this we use the controller alias followed by the variable name enclosed in double brackets, in this case{{ angularCtrl.helloWorld }}. Double brackets ({{}}) are what are used to evaluate angular variables on html.
The next thing we need to do is make the markup for our simple form.
markup
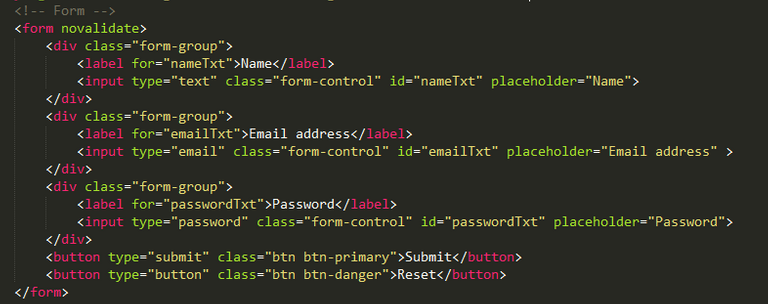
<form novalidate>
    <div class="form-group">
        <label for="nameTxt">Name</label>
        <input type="text" class="form-control" id="nameTxt" placeholder="Name">
    </div>
    <div class="form-group">
        <label for="emailTxt">Email address</label>
        <input type="email" class="form-control" id="emailTxt" placeholder="Email address">
    </div>
    <div class="form-group">
        <label for="passwordTxt">Password</label>
        <input type="password" class="form-control" id="passwordTxt" placeholder="Password">
    </div>
    <button type="submit" class="btn btn-primary">Submit</button>
    <button type="button" class="btn btn-danger">Reset</button>
</form>
result
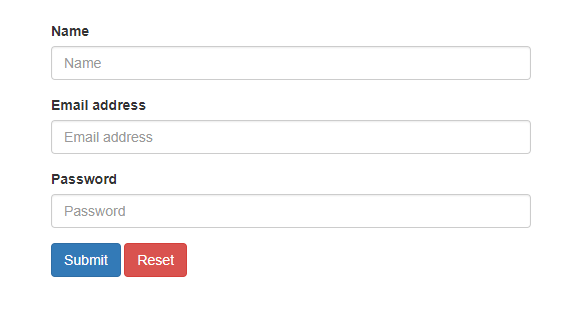
In our markup we've just done a simple form with three(3) textfields namely name, email and password and two(2) buttons a submit and reset button. Now we will be introducing the ng-model, ng-submit and ng-click directive.
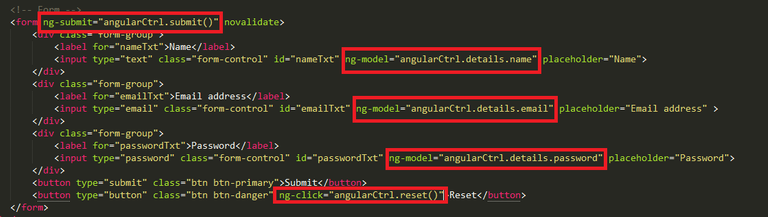
<form ng-submit="angularCtrl.submit()" novalidate>
    <div class="form-group">
        <label for="nameTxt">Name</label>
        <input type="text" class="form-control" id="nameTxt" ng-model="angularCtrl.details.name" placeholder="Name">
    </div>
    <div class="form-group">
        <label for="emailTxt">Email address</label>
        <input type="email" class="form-control" id="emailTxt" ng-model="angularCtrl.details.email" placeholder="Email address">
    </div>
    <div class="form-group">
        <label for="passwordTxt">Password</label>
        <input type="password" class="form-control" id="passwordTxt" ng-model="angularCtrl.details.password" placeholder="Password">
    </div>
    <button type="submit" class="btn btn-primary">Submit</button>
    <button type="button" class="btn btn-danger" ng-click="angularCtrl.reset()">Reset</button>
</form>
| Directive | Function |
|---|---|
| ng-model | What the ng-model does is bind the data from the html to the controller and vice versa. |
| ng-submit | ng-submit is triggered when the form is submitted. |
| ng-click | ng-click is triggered when an html element is clicked. Note: this is not limited to buttons alone. |
Let us now try out the newly added directives, in our controller let us add a submit and reset function.
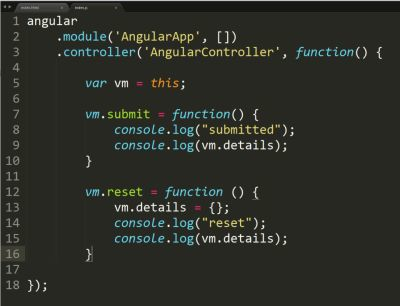
angular
    .module('AngularApp', [])
    .controller('AngularController', function() {

        var vm = this;

        vm.submit = function() {
            console.log("submitted")
            console.log(vm.details)
        }

        vm.reset = function () {
            vm.details = {};
            console.log("reset")
            console.log(vm.details)
        }

});
What submit does is basically when it's called (when form is submitted) it'll write in the console the contents of the textfield, the reset on the other hand will be triggered when the reset button is clicked and will clear the details object and write it in the console.

As we see from the GiF it does what we expected it to do. Now, we will introduce the last two directives which are
ng-required and ng-show as well as introducing $valid.
<!DOCTYPE html>
<html ng-app="AngularApp">

    <head>
        <title>Utopian io tries Angular JS!</title>

        <link rel="stylesheet" type="text/css" href="elements/custom.css">
        <link rel="stylesheet" type="text/css" href="elements/bootstrap/css/bootstrap.min.css">
    </head>

    <body ng-controller="AngularController as angularCtrl" class="center">
        (html comment removed:  Checkbox to toggle if fields are marked required or not )
        Require Fields: <input type="checkbox" ng-model="angularCtrl.requireFields">
        <h3>Fields are required? {{angularCtrl.requireFields}}</h3>

        (html comment removed:  Check if form is valid for submission )
        <h3>Is a valid form? {{angularCtrl.angularForm.$valid}}</h3>

        (html comment removed:  Form )
        <form name="angularCtrl.angularForm" ng-submit="angularCtrl.submit()" novalidate>
            <div class="form-group">
                <label for="nameTxt">Name</label>
                <input type="text" class="form-control" id="nameTxt" ng-model="angularCtrl.details.name" placeholder="Name" ng-required="angularCtrl.requireFields">
            </div>
            <div class="form-group">
                <label for="emailTxt">Email address</label>
                <input type="email" class="form-control" id="emailTxt" ng-model="angularCtrl.details.email" placeholder="Email address" ng-required="angularCtrl.requireFields">
            </div>
            <div class="form-group">
                <label for="passwordTxt">Password</label>
                <input type="password" class="form-control" id="passwordTxt" ng-model="angularCtrl.details.password" placeholder="Password" ng-required="angularCtrl.requireFields">
            </div>
            <button type="submit" class="btn btn-primary">Submit</button>
            <button type="button" class="btn btn-danger" ng-click="angularCtrl.reset()">Reset</button>
        </form>
        <h1 ng-class="angularCtrl.msgClass" ng-show="angularCtrl.msg.length > 0">{{ angularCtrl.msg }}</h1>

        (html comment removed:  User Details )
        <div>
            <fieldset ng-show="angularCtrl.showDetails">
                <legend>User Details</legend>
                <h2>Hi {{ angularCtrl.details.name }}!</h2>
                <h3>Email: {{ angularCtrl.details.email }}</h3>
                <h3>Password: {{ angularCtrl.details.password }}</h3>
            </fieldset>
        </div>

    </body>
    <script type="text/javascript" src="elements/angular.min.js"></script>
    <script type="text/javascript" src="elements/jquery.min.js"></script>
    <script type="text/javascript" src="elements/bootstrap/js/bootstrap.min.js"></script>
    <script type="text/javascript" src="index.js"></script>
</html>
| Directive | Function |
|---|---|
| ng-required | ng-required is like the required in textfields but is more dynamic because it gives the user the ability to toggle the value |
| ng-show | ng-show shows the element when the value is true and hides when value is false |
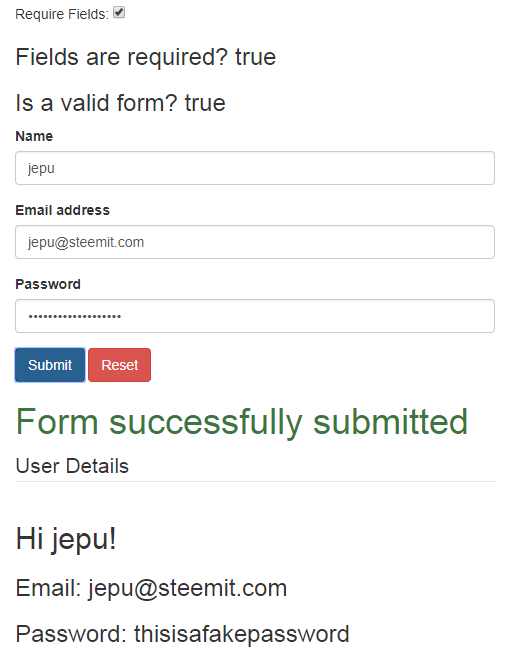
$valid checks the form if all form elements meet the valid criteria. i.e., email is a valid email, numbers are number, and etc.,
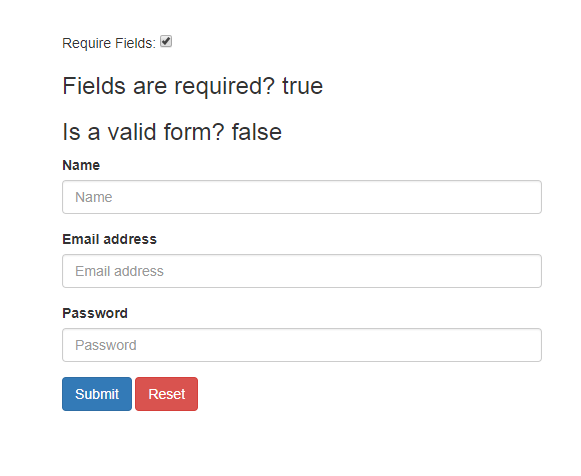
We have also added a User Details wherein it will only show when the form is successfully submitted, also we've added a toggle for the required field, as well as a message for when the form is submitted and lastly, a live checker if the form is valid.

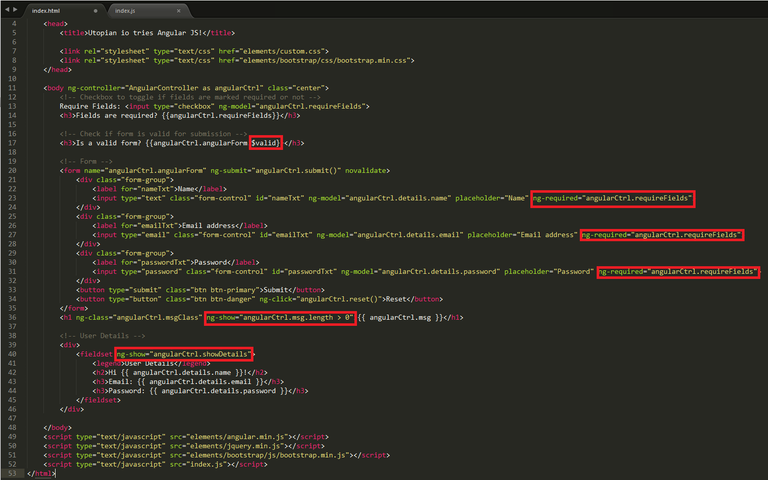
<!DOCTYPE html>
<html ng-app="AngularApp">

    <head>
        <title>Utopian io tries Angular JS!</title>

        <link rel="stylesheet" type="text/css" href="elements/custom.css">
        <link rel="stylesheet" type="text/css" href="elements/bootstrap/css/bootstrap.min.css">
    </head>

    <body ng-controller="AngularController as angularCtrl" class="center">
        (html comment removed:  Checkbox to toggle if fields are marked required or not )
        Require Fields: <input type="checkbox" ng-model="angularCtrl.requireFields">
        <h3>Fields are required? {{angularCtrl.requireFields}}</h3>

        (html comment removed:  Check if form is valid for submission )
        <h3>Is a valid form? {{angularCtrl.angularForm.$valid}}</h3>

        (html comment removed:  Form )
        <form name="angularCtrl.angularForm" ng-submit="angularCtrl.submit()" novalidate>
            <div class="form-group">
                <label for="nameTxt">Name</label>
                <input type="text" class="form-control" id="nameTxt" ng-model="angularCtrl.details.name" placeholder="Name" ng-required="angularCtrl.requireFields">
            </div>
            <div class="form-group">
                <label for="emailTxt">Email address</label>
                <input type="email" class="form-control" id="emailTxt" ng-model="angularCtrl.details.email" placeholder="Email address" ng-required="angularCtrl.requireFields">
            </div>
            <div class="form-group">
                <label for="passwordTxt">Password</label>
                <input type="password" class="form-control" id="passwordTxt" ng-model="angularCtrl.details.password" placeholder="Password" ng-required="angularCtrl.requireFields">
            </div>
            <button type="submit" class="btn btn-primary">Submit</button>
            <button type="button" class="btn btn-danger" ng-click="angularCtrl.reset()">Reset</button>
        </form>
        <h1 ng-class="angularCtrl.msgClass" ng-show="angularCtrl.msg.length > 0">{{ angularCtrl.msg }}</h1>

        (html comment removed:  User Details )
        <div>
            <fieldset ng-show="angularCtrl.showDetails">
                <legend>User Details</legend>
                <h2>Hi {{ angularCtrl.details.name }}!</h2>
                <h3>Email: {{ angularCtrl.details.email }}</h3>
                <h3>Password: {{ angularCtrl.details.password }}</h3>
            </fieldset>
        </div>

    </body>
    <script type="text/javascript" src="elements/angular.min.js"></script>
    <script type="text/javascript" src="elements/jquery.min.js"></script>
    <script type="text/javascript" src="elements/bootstrap/js/bootstrap.min.js"></script>
    <script type="text/javascript" src="index.js"></script>
</html>
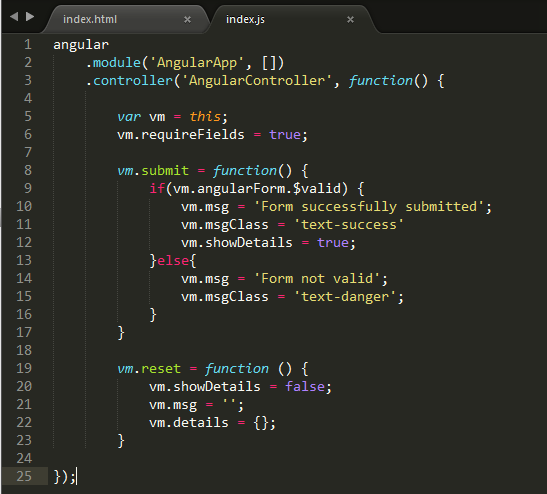
angular
    .module('AngularApp', [])
    .controller('AngularController', function() {

        var vm = this;
        vm.requireFields = true;

        vm.submit = function() {
            if(vm.angularForm.$valid) {
                vm.msg = 'Form successfully submitted';
                vm.msgClass = 'text-success'
                vm.showDetails = true;
            }else{
                vm.msg = 'Form not valid';
                vm.msgClass = 'text-danger';
            }
        }

        vm.reset = function () {
            vm.showDetails = false;
            vm.msg = '';
            vm.details = {};
        }

});
The form in action

Like what I've stated above this is the first of a series of tutorials exploring Angular JS and it's plugins!
Curriculum
This is is the first contribution for this curriculum.
Posted on Utopian.io - Rewarding Open Source Contributors
Amazing..Thanks ton for this help.
Do well to add your codes in blocks on your contribution...
Your contribution cannot be approved because it does not follow the Utopian Rules.
You can contact us on Discord.
[utopian-moderator]
Contacted you on discord, thanks
Thank you for the contribution. It has been approved.
After reviewing your case again, due to high quality of your contribution the decision has been changed.
You can contact us on Discord.
[utopian-moderator]
Thank you @jestemkioskiem for taking time to review the post
Hey @jepu I am @utopian-io. I have just upvoted you!
Achievements
Suggestions
Get Noticed!
Community-Driven Witness!
I am the first and only Steem Community-Driven Witness. Participate on Discord. Lets GROW TOGETHER!
Up-vote this comment to grow my power and help Open Source contributions like this one. Want to chat? Join me on Discord https://discord.gg/Pc8HG9x