Data Binding is one the most important concepts in Xamarin.Forms mobile development. It allows properties of two different objects to be linked together, so that a change in one results in a proportional change in the other.

What Will I Learn?
- How to perform data binding between two visual elements
- How to perform data binding between a visual element and a data model
Requirements
- Visual Studio IDE (2015 or 2017 preferably)
- Visual Studio for Mac (If you intend testing your iOS application)
- Android Emulator or Physical Android device
Difficulty
- Intermediate
Tutorial Contents
Data Binding can take different forms. There are different elements which you would naturally want to bind together. You could bind a Visual Element to a Data Model e.g Binding a ListView to a Table on your database. You could also choose to bind a Visual Element to another Visual Element e.g Binding an Entry to a Label.
We will cover both these examples in this tutorial.
Visual Element - Visual Element Binding
Create your Xamarin.Forms portable project.
Refer to this tutorial if you do not already know how to.
Here, we are going to bind a slider to a label, and have the label rotate in response to the slider movement.
To make a view bound to another, we have to set the BindingContext of the target element to a reference of the source.
In this case, we link the rotation property of the label to the value of the slider. Here is the code below
  <Label Text="@JOHNESAN"
               BindingContext="{x:Reference Name=slider}"
               Rotation="{Binding Path=Value}"
               FontAttributes="Italic"
               FontSize="24px"
               HorizontalOptions="Center"
               VerticalOptions="CenterAndExpand" />

    <Slider x:Name="slider"
                Maximum="360"
                VerticalOptions="CenterAndExpand" />
You find that the "Label" has its BindingContext set to the slider and the rotation property of the Label text is bound to the value of the slider( which of course, we set to a maximum of 360). Consequently, any change in the Slider value causes a proportional change in the "Rotation" property of the Label.

Visual Element to Data Model Binding
In like manner, you could bind a visual element to an underlying data source. The most popular use case which we are going to demonstrate is the "ListView",of which is usually populated by a structured data list.
In your MainPage.xaml, add the following code to insert a listview in our page.
    <StackLayout>
        <Grid VerticalOptions="FillAndExpand">
            <Grid.RowDefinitions>
                <RowDefinition Height="*" />
            </Grid.RowDefinitions>
            <ListView x:Name="BlogPostsListView"
                          HasUnevenRows="True"
                          VerticalOptions="FillAndExpand">
                <ListView.ItemTemplate>
                    <DataTemplate>
                        <ViewCell>
                            <ViewCell.View>
                                <StackLayout>
                                    <Label Text="{Binding Title}" FontSize="Large" TextColor="Black"/>
                                    <Label Text="{Binding Details}" FontSize="Small" TextColor="Green"/>
                                </StackLayout>
                            </ViewCell.View>
                        </ViewCell>
                    </DataTemplate>
                </ListView.ItemTemplate>
            </ListView>
        </Grid>
    </StackLayout>
Notice how the Text properties of the Labels in the ListView's Viewcell are carrying a Binding definition.
"Title" and "Details" are properties of each task in the list which we will bind to shortly.
Now Lets define the Task List itself.
But first we have to create a data Model for Task that contains definition for name and details properties
Create a new class and put in the following code
   public class Task
   {
       public string Title { get; set; }
       public string Details { get; set; }
   }
Navigate to the code behind of the MainPage and update it to the following
public partial class MainPage : ContentPage
{
public partial class MainPage : ContentPage
{
public List<Task> Tasks { get; set; }
public MainPage()
{
InitializeComponent();
Tasks = new List<Task>
{
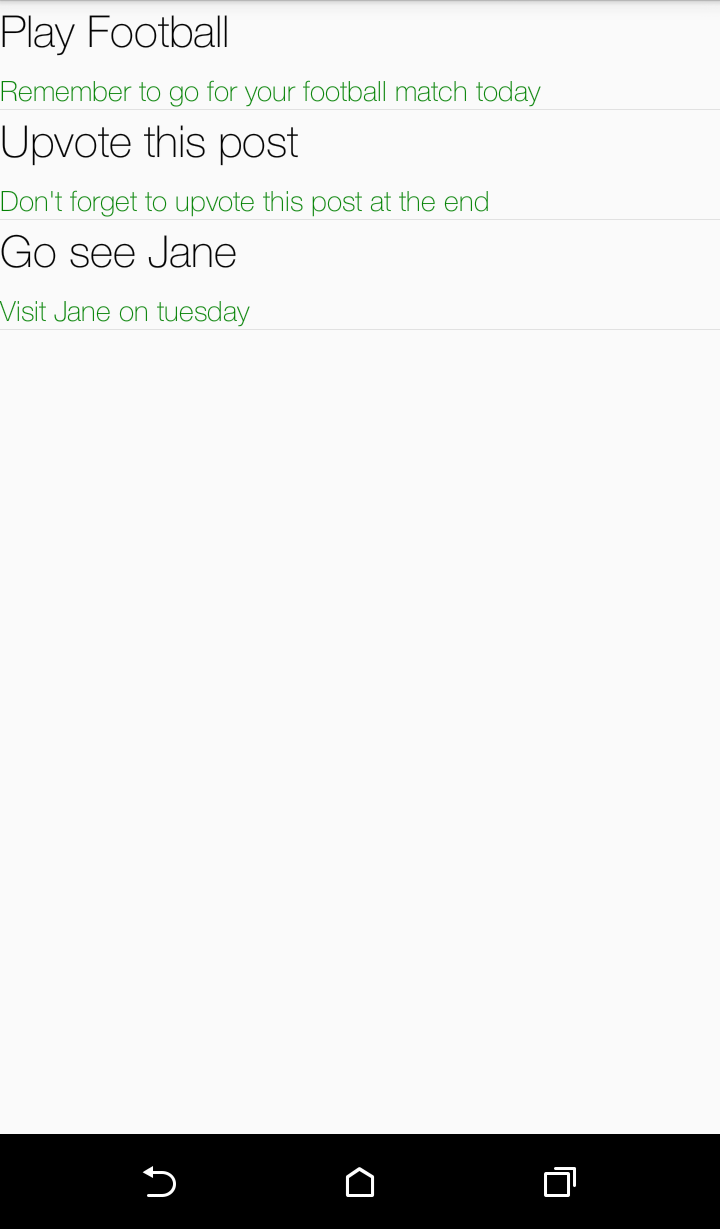
new Task{Title="Play Football", Details="Remember to go for your football match today" },
new Task{Title="Upvote this post", Details="Don't forget to upvote this post at the end" },
new Task{Title="Go see Jane", Details="Visit Jane on tuesday" }
};
listview.ItemsSource = Tasks;
}
}
What we did here was make a static list of tasks of model Task and thereafter set the ItemSource property of the listview(in our page) to the Tasks List
Run the application and we will see the bound data
With this basic concept, you can bind any form of elements and source together, as long as the target element has a definition for a Bindable Property- meaning it must derive from "BindableObject" class.
Curriculum
Older tutorials on Xamarin.Forms include
- Introduction to Xamarin.Forms-Creating your first Cross-Platform Application
- Xamarin.Forms Tutorial - Accessing Platform Native Features using DependencyService
Posted on Utopian.io - Rewarding Open Source Contributors
@johnesan, I always try to support who contribute to open source project, upvote you.
Thank you for the contribution. It has been approved.
You can contact us on Discord.
[utopian-moderator]
Hey @johnesan I am @utopian-io. I have just upvoted you!
Achievements
Suggestions
Get Noticed!
Community-Driven Witness!
I am the first and only Steem Community-Driven Witness. Participate on Discord. Lets GROW TOGETHER!
Up-vote this comment to grow my power and help Open Source contributions like this one. Want to chat? Join me on Discord https://discord.gg/Pc8HG9x