
Repository
https://github.com/pibara-utopian/asyncsteem
What Will I Learn?
- You will learn how to build an asynchronous STEEM web-service that provides and structures live feed from the STEEM blockchain using Twisted-Web and asyncsteem.
- You will learn how to bind the resulting structured feed info in a simple VisJS based visualization.
Requirements
- Experience with Python
- A base understanding of the STEEM blockchain
- Experience with HTML and Javascript
Difficulty
- Intermediate
Tutorial Contents
Where in a previous tutorial we covered the use of the asyncsteem Python STEEM library for extracting stats from historical blockchain data only, a task that should be doable with approximately an equal amount of trouble in other Python STEEM libraries such as steem-python and Beem, in this tutorial we are going to dive into specifically the type of use case that asyncsteem was designed for: Doing asynchronous networking. Specifically we are going to look into combining asyncsteem with a Twisted-Web web-service implementation and providing a simple life-updated visualization for that web service using the JavaScript VisJS visualization library
On asynchronous frameworks
If you have some experience with both the JavaScript Node framework and one of the synchronous Python STEEM libraries, you probably realize that there are tasks, especially networking tasks, that are much more convenient and easy to implement within the confines of an asynchronous framework such as Node. No need to mess with different threads just to keep up with a few hands full of clients. No need for many of the locks and mutexes that can sometimes make your life a hell if you need to debug your code to fix a deadlock or find a strange race condition. Asynchonous frameworks really can be your best friend when your application needs to talk to multiple networking parties, using multiple API's or even protocols from within the same program, being a server for some and a client for others.
Well, there also are such frameworks for Python and the most extensive one available is the Twisted framework. In fact, if you have worked with Node and start to dive into what Twisted can provide for you, it will soon become apparent why some Twisted enthusiasts refer to Twisted as Node on steroids. The asyncsteem Python STEEM library is a library for interacting with the STEEM JSON-RPC API in a way that is 100% compatible with the design of the Twisted asynchronous framework.
What asyncsteem isn't
The asyncsteem library isn't a general-purpose Python API for STEEM. If it will ever become a general-purpose library, but today it isn't. The most important reason for that is the fact that the library doesn't implement any kind of transaction signing and hopefully, it won't need to. Ideally, an application using asyncsteem for asynchronous RPC would be able to use a library such as Beem for creating signed transactions, but there currently are some rather technical reasons why this isn't possible yet. The important take away point today is that asyncsteem is great for stats and linking a blockchain feed to other asynchronous STEEM JSON-RPC API calls and different asynchronously handled networking services, not for things like a voting bot or a comment bot or other applications that require signed transactions to work.
A Twisted logger
import io
from os.path import join, dirname, realpath
from twisted.logger import Logger, textFileLogObserver

...
#Find the directory our script lives in
mypath = dirname(realpath(__file__))
#Instantiate a log observer for logging to a text file in our script directory.
observer = textFileLogObserver(io.open(join(mypath,"flag_stream.log"), "a"))
#Instantiate the actual logger.
logger = Logger(observer=observer,namespace="asyncsteem")
The first asynchronous component to our program we will need to set up is a logger. You may not think of logging to a file as something that benefits from an asynchronous approach, but even writing to local files when not done asynchronously constitutes blocking operations that could block the responsiveness of networking modules in your code. In the above code, we instantiate a simple logger that will log to a text file. It is always a good idea to run some type of tail command on your log file while running your code, but for now, we have a logger so if anywhere in our code we need to log something asynchronously, now we can.
Instantiating our business logic
This tutorial is a tutorial about writing asynchronous code, not a tutorial about the specifics of our business model for a specific application. Sowe will be brief about the actual business model. What are we trying to build? You can post content on steemit. You can comment, and upvote, but you can also flag or downvote content. In this tutorial, we are going to look at a rudimentary live-updated visualization of flag or downvote events as they happen on the blockchain. The business logic is implemented to process flag events in such a way that it will keep track of:
- A list of up to N account nodes and all flags that occurred between them.
- Incremental information needed by the front-end to live-update its visualization
#Bussiness logic for keeping track of the latest set of flags
# and the involved accounts
class FlagHub:
    #Constructor
    def __init__(self,max_node_count = 32):
        ...
    def flag(self,voter,author):
        ...
    get_graph(self):
        ...
    def get_updates(self,oldseq):
        ....

...

hub = FlagHub(20)
Our business logic class has a constructor taking the amount of nodes it is supposed to keep track of, a flag methos that we shall be binding to our asyncsteem code and tho methods get_graph and get_updates that our Twisted Web classes will be using. We instantiate our FlagHub, setting it to support 20 nodes. We forget about the specific implementation for our business logic for this tutorial and move on to binding it to asyncsteem and Twisted Web
Binding to Twisted Web
from twisted.web import server, resource
from twisted.web.static import File
The first thing we do before we can start using Twisted Web is adding another set of imports to the imports section of our program. Once we have those, we can add a few classes for turning two of our business logic methods into so-called resource classed
import json

...

class SnapShot(resource.Resource):
    isLeaf = True
    def __init__(self,hub):
        self.hub = hub
    def render_GET(self, request):
        return json.dumps(self.hub.get_graph())

class DesignatedUpdates(resource.Resource):
    isLeaf = True
    def __init__(self,hub,oldseq):
        self.hub = hub
        self.oldseq = oldseq
    def render_GET(self, request):
        return json.dumps(self.hub.get_updates(self.oldseq))
It is important to note that both resource classes define themselves as leaf nodes. And both return a JSON representation of the data structures returned by the business logic. The first resource is meant to be the initial state our web frontend requests. There will be a sequence number in this response, as will there be in the response of the updates query. This should allow the frontend to periodically request updates since the last known sequence number.
class Updates(resource.Resource):
    isLeaf = False
    def __init__(self,hub):
        self.hub = hub
        self.children = []
    def getChild(self, name, request):
        try:
            return DesignatedUpdates(self.hub,int(name))
        except:
            return resource.NoResource()
    def render_GET(self, request):
        return "<HTML><HEAD><TITLE>updates</TITLE></HEAD><BODY><H1>UPDATES</H1></BODY></HTML>"


class FlagWebServer(resource.Resource):
    def __init__(self,hub):
        self.hub = hub
        self.children = ["/","/snapshot"]
    def getChild(self, name, request):
        if request.uri == '/snapshot':
            return SnapShot(self.hub)
        else:
            if request.uri == '/vis.js':
                return File("visjs/dist/vis.js")
            else:
                if request.uri == '/':
                    return File("index.html")
                else:
                    if request.uri[:8] == '/updates':
                        return Updates(self.hub)
                    else:
                        return resource.NoResource()
The next thing we do is adding two more resource classes. These classes though are non-leaf resource nodes that allow our simple web server to serve up all the content needed to complete our simple web frontend. The Updates class will handle any request for updates since a given sequence number as coded in the URL. The FlagWebServer is there as top level resource for our web application, looking at the URL requested and serving out the proper content:
- The main HTML + JavaScript frontend page
- The relevant JavaScript from the VisJS visualization library
- A snapshot of the current graph as JSON
- A list of updates from a previous sequence number upto now
Also note the use of static files using the File class here.
from twisted.internet import reactor, endpoints

...
#Define the FlagWebserver as root resource
root = FlagWebServer(hub)
#Instantiate a Twisted Web server
factory = server.Site(root)
#Instantiate a listening server on TCP port 4080
endpoint = endpoints.TCP4ServerEndpoint(reactor, 4080)
#Bind our web server to the listening port
endpoint.listen(factory)
So now we are going to get these resources into a simple HTTP server running on port 4080 on localhost.
We first incluse an other essential Twisted component that we shall be needing once more later on with asyncsteem. The reactor is the beating heart of any Twisted based application. Look at it as the central event loop of your application that any asynchonous component needs to plug into. We also import ourselves an endpoints so we can start running our Twisted Web server. The reast of the code above should be obvious. We bind our resource to a HTTP server, and bind our HTTP server to a listening socket on our local host.
The Front-end code
<html>
<head>
<title>Flag Stream Monitor</title>
<script type="text/javascript" src="vis.js"></script>
</head>
<body>
<center>
<div id="mynetwork"></div>
<script type="text/javascript">
  fetch("/snapshot").then(function(response){
    response.json().then(function (data) {
      let container = document.getElementById('mynetwork');
      let edges = new vis.DataSet(data["edges"]);
      let nodes = new vis.DataSet(data["nodes"]);
      let ndata = {
        nodes: nodes,
        edges: edges
      };
      let network = new vis.Network(container, ndata, {});
      let seq = data["seq"]
      window.setInterval(function(){
        let path = "/updates/" + seq.toString()
        fetch(path).then(function(update_response){
          update_response.json().then(function (update_data) {
            seq = update_data["seq"]
            let updates = update_data["updates"]
            for (let index = 0; index < updates.length; index += 1) {
              let update = updates[index]
              if (update["type"] === "add_node") {
                nodes.add(update["node"])
              }
              if (update["type"] === "add_edge") {
                edges.add(update["edge"])
              }
              if (update["type"] === "drop_node") {
                nodes.remove({id : update["node"]["id"]});
              }
              if (update["type"] === "drop_edge") {
                edges.remove({id : update["edge"]["id"]});
              }
            }
          });
        });
      }, 3000);
    });
  });
</script>
</center>
</body>
</html>
As you can see, the JavaScript of the front-end is quite trivial. VisJs does most of the heavy lifting. On loading, the snapshot will get requested and the initial graph gets drawn. Then at intervals of three seconds (3000 msec) the updates since the last processed sequence number get requested and nodes and/or edges get added or removed dynamically.
But at this point, nothing will get drawn yet, as we haven't come to the heart of the application yet, the asyncsteem part.
Encorporating an asyncsteem bot.
from asyncsteem import ActiveBlockChain

...

#Trivial asyncsteem bot
class FlagStream:
    def __init__(self,hub):
        self.hub = hub
    #Handler for vote operations
    def vote(self,tm,vote_event,client):
        if vote_event["weight"] < 0:
            self.hub.flag(vote_event["voter"],vote_event["author"])

#Instantiate an asyncsteem ActiveBlokChain
blockchain = ActiveBlockChain(reactor,log=logger,nodelist="stage")
#Instantiate our bot
steembot = FlagStream(hub)
#Register our bot with the active blockchain.
blockchain.register_bot(steembot,"flag_stream")

...

reactor.run()
It is almost an anti-climax, right? We import some asyncsteem stuff, define a simple bot class that defines a method those operations we wish to process , we bind the bot to a newly instantiated ActiveBlockChain and reactor.run() brings it all home.
But let us zoom in a bit at what is happening here. This bot only implements a vote method, but you might want to write a different bot that would implement one of the following methods that maps to an operation as can be observed on the blockchain:
- account_create
- account_create_with_delegation
- account_update
- account_witness_proxy
- account_witness_vote
- cancel_transfer_from_savings
- change_recovery_account
- claim_reward_balance
- comment
- comment_options
- convert
- custom_json
- delegate_vesting_shares
- delete_comment
- escrow_approve
- escrow_dispute
- escrow_release
- escrow_transfer
- feed_publish
- limit_order_cancel
- limit_order_create
- recover_account
- request_account_recovery
- set_withdraw_vesting_route
- transfer
- transfer_from_savings
- transfer_to_savings
- transfer_to_vesting
- vote
- withdraw_vesting
- witness_update
Much to choose from. And then there are a few special events for what you may also write a method in your bot:
- block
- transaction
- week : blockchain timestamps have traversed to a new week
- day : new day
- hour : new hour
Now let's look again at our method and it's aguments
def vote(self,tm,vote_event,client):
        if vote_event["weight"] < 0:
            self.hub.flag(vote_event["voter"],vote_event["author"])
Each of the above methods (from the 0.6 version of asyncsteem) has the same set of attributes.
- The blockchain timestamp as Python datetime object
- An event-type specific object
- A handle to an RPC client for doing more asynchronous RPC calls with.
As we covered the use of additional layers of asynchronous calls in the previous tutorial we shall not go into that any further now.
Before looking at what we ended up building, we zoom into the call we made to instantiate our ActiveBlockChain.
blockchain = ActiveBlockChain(reactor,log=logger,nodelist="stage")
When we instantiate our blockchain, we need a reactor and a logger, but there are some more (optional) arguments that we need to discuss. First of all the nodelist. The nodelist is a tricky thing as nodes may change versions of the software they run, there are nodes disappearing occasionally and others pop up to take their place. The asyncsteem library depends on nodes that properly implement the JSON-RPC API. There are workarounds for nodes that don't properly support JSON-RPC batches, etc, but the library needs to keep this info coupled. Currently asyncsteem defines the following nodelists:
- stage
- default
- appbase
- bench_stage
- bench1
- bench2
- bench3
- bench4
- bench5
- bench6
- bench7
- bench8
At this point in time stage (api.steemitstage.com) is recomended for the sole reason that it is known to have proper support for JSON-RPC batches, but this should be true for other nodes in the forseeable future as well. Feel free to play around with the nodesets.py py file and please send a pull request if you have good knowledge waranting updates to any of the node sets in this file.
Apart from the constructor arguments used, here are some more usefull constructor arguments for the ActiveBlockChain:
- rewind_days : Start n days in the past or None for now.
- day_limit : Stop processing new blocks after n days. Meant to be used in conjunction with rewind_days.
- max_batch_size : The max batch size to use for JSON-RPC batched calls. Only use with nodes that support batched RPC calls!
- parallel : Maximum number of paralel outstanding HTTPS JSON-RPC at any point in time.
- rpc_timeout : Timeout (in seconds) for a single HTTPS JSON-RPC query.
- initial_batch_size : The initial number of 'get_block' commands to start the command queue off with.
- stop_when_empty : Boolean indicating if reactor should be stopped when the command queue is empty and no active HTTPS sessions remain.
- nodes : List of API nodes, you normally should NOT use this, if you use this variable, also use max_batch_size!
Some results
It is hard to show the results in a static web page of a graphical representation of flags that gets live updated, but here is a set of screenshots:
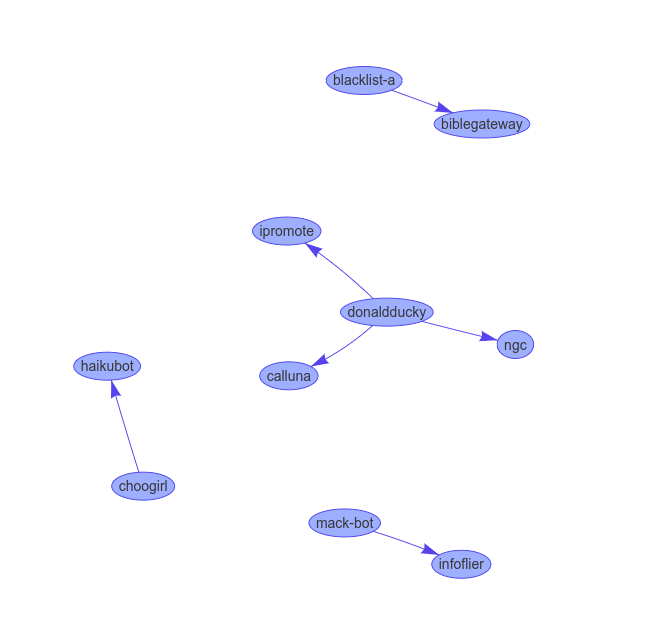
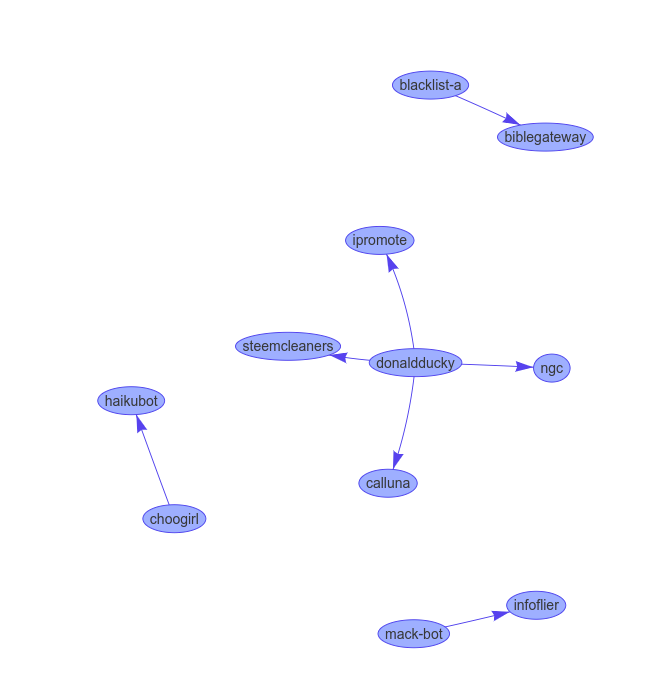
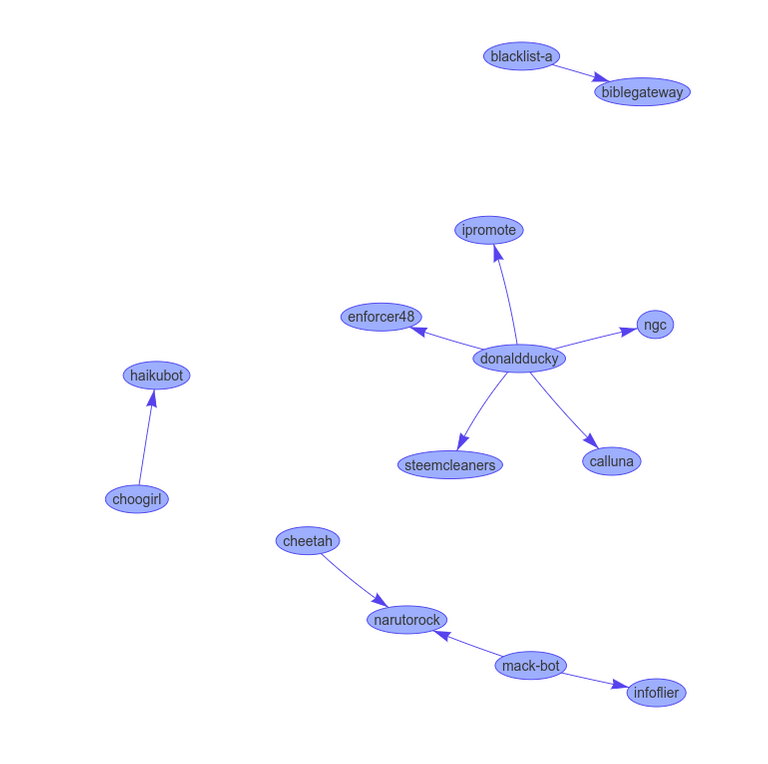
No guarantee it will still be up at the time you read this, but at time of writing here was a demo server demonstrating the live-updated VisJS visualization we made in this tutorial. While of little true practical use, it does showcase the power of the asynchronous approach. If the image is static, give it a few minutes till someone makes a new flag.
I hope this tutorial has shown you the strengths and limitations of the asyncsteem asynchronous JSON-RPC library for STEEM, and has taught you how to build NodeJs-like asynchronous applications in Python using asyncsteem and Twisted. Realize that we only touched a small fragment of what you can do with the Twisted framework in Python, so please take what you've learned here and experiment. The asyncsteem library remains a work in progress, and is currently in beta. If you run into any bugs or have any feature requests, or any updates for the node lists, please open an issue on github or send me a pull request.
Curriculum
Proof of Work Done
The flagstream example script , that is part of the sample scripts in the asyncsteem repo, was written for this tutorial.
Nice one Rob! (Leuk om alweer een mede-Pythonista uit Nederland te treffen!)
Tnx. Just noticed your Python lectures. Looking good. Maybe you could consider doing a generic one like that on using the Twisted framework, one day.
Hey @mattockfs
Thanks for contributing on Utopian.
We’re already looking forward to your next contribution!
Want to chat? Join us on Discord https://discord.gg/h52nFrV.
Vote for Utopian Witness!
Thank you for your contribution.
While I liked the content of your contribution, I would still like to extend one advice for your upcoming contributions:
Looking forward to your upcoming tutorials.
Your contribution has been evaluated according to Utopian policies and guidelines, as well as a predefined set of questions pertaining to the category.
To view those questions and the relevant answers related to your post, click here.
Need help? Write a ticket on https://support.utopian.io/.
Chat with us on Discord.
[utopian-moderator]
Want to see the script created above in action?
Keep looking at the nodes for a while until a new flag occurs . This may sometimes take a couple of minutes. Alternatively or go and find a comment spammer and deal out a flag yourself, your flag should show up in seconds.