Repository
React
https://github.com/facebook/react
My Github Address
This Project Github Address
https://github.com/pckurdu/Develop-Applications-Using-React-Context-And-Hooks-Part-1
What Will I Learn?
- You will learn createContext() function in react context.
- You will learn create Provider in react context.
- You will learn useState() function in react hooks.
- You will learn useContext() function in react hooks.
- You will learn uuid() function in uuid packeges.
- You will learn props.children in react context.
Requirements
- text editor (I used visual studio code editor)
- Basic javascript information
- Basic react information
Difficulty
- Basic
Tutorial Contents
Hello to everyone,
In this tutorial we will develop an application using react context and hooks, and use almost all of the concepts of context and hooks when developing applications.
We'll show the list of books in the application and add and delete books. We will create context and process the data using this context when developing the application. We will use the react hooks structure for state creation and context access. We will create functions to perform certain operations in context and make them more useful by using the reducer structure.
Finally we will store the books on the browser with localStorage because we do not want the data to be lost.
Topics are divided into the following sections:
- Create BookContext
- Create Context Data And Functions
- Create Navbar Component
- Design Application
Let’s start
1- Create BookContext
In this section, we will create a react application and create the context we will use for the application.
We can globally access the data to be used on the application Using the react context structure. By creating context, we can create data and functions that will interact with it, and we can easily access them with other components.
Then let's start creating the react app. We will create the application using the create-react-app packages and remove any unnecessary files.
npx create-react-app context-hooks-app
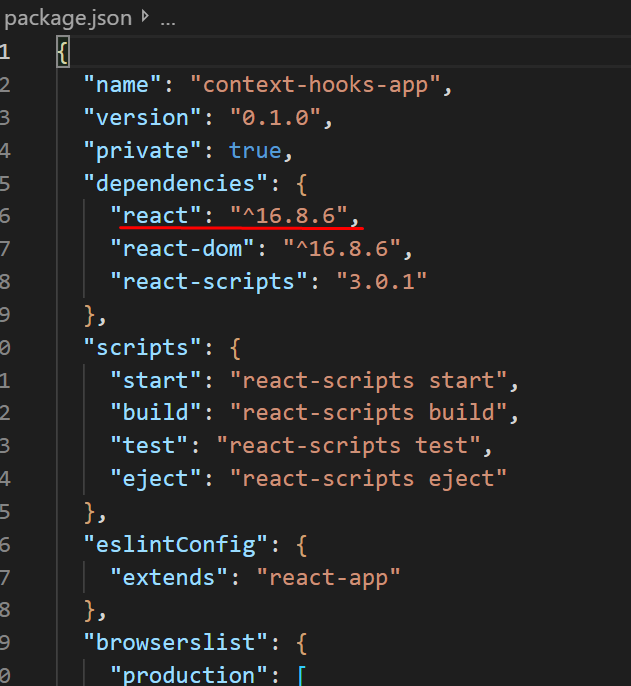
We can create our application with the above command so we created the react application. In order to use the react hooks and context structure, the react version must be at least 16. We can learn the version of react from package.json file.
Let's create a folder called contexts in the src folder and create the BookContext.js file inside that folder so we can provide the necessary context structure for the book in this file.
BookContext.js
//Import the createContext function to create context
import React,{createContext} from 'react';
//Generate context using the createContext function
export const BookContext=createContext();
To generate context, we must use the createContext () function in the react packages.
In order for the context to be accessed by other files, we must open the context using the Provider structure. Let's create a functional component and create the Provider structure within the function.
//create functional componet
const BookContextProvider=(props)=>{

    return(
        <BookContext.Provider>
            {/* To access context objects */}
            {props.children}
        </BookContext.Provider>
    )
}

//export component
export default BookContextProvider;
We created the props structure as a parameter when creating the functional component and used it with props.children to create the provider. Thus, the other components that are included in this component are ready to use the data of BookContext.
We can now create the data for this context.
2- Create Context Data And Functions
In this section, we will create the book data in context using useState and learn how to update it using functions.
//Import the useState function to create state
import React,{createContext,useState} from 'react';
The useState () function is used to create state with hooks in the component so we need to import them from react packages.
//create state using useState
const [books,setBooks]=useState([
    {title:'Metamorphosis',author:'Franz Kafka',id:1},
    {title:'Animal Farm',author:'George Orwell',id:2}
]);
We can create the books object using useState. The object we define with setBooks is actually a function and allows us to update the books object.
We can pass the value of the books object to the useState () function with a parameter. Above we created two book objects and assigned the value of the books object because we send the useState () function as a parameter.
To add a new book to this books object, create the addBook () function.
//add new book
const addBook=(title,author)=>{
    setBooks([...books,{title,author,id:3}]);
}
Since setBooks () makes the value of the books object the new value, we must add the new value as the continuation of the books object. If we use the new value as in setBooks (), the books object will only contain the newly added value.
An important feature here is the id value.
Since the id value is set to 3 each time a new book is added, the application will give an error when we add the second book. We must produce a new and unique value every time a new book is added. We will use uuid packages to do this.
When uuid () works with uuid packages, guid will generate a value, and id will have a unique value each time a new book is added. In order to use the uuid () function, we must download the uuid packages to the project.
yarn add uuid
Let's import these package into the file we want to use and let us use them easily.
//import uuid
import uuid from 'uuid/v1';
…
//add new book and use uuid
const addBook=(title,author)=>{
   setBooks([...books,{title,author,id:uuid()}]);
}
We can now generate the function for deletion.
//remove book
const removeBook=(id)=>{
  setBooks(books.filter(book=>book.id!==id));
}
Since we are updating books data with setBooks, we need to export other data, excluding the known id. We can use the filter () function to perform this operation.
With the filter function we can filter the data we want to reach.
We need to use the value attribute of the provider tag in order to access the books object and functions that we create externally.
//with books addBook removeBook
<BookContext.Provider value={{books,addBook,removeBook}}>
     {/* To access context objects */}
     {props.children}
</BookContext.Provider>
So we created context and provider. In App.js, we can use this BookContextProvider to allow other components to use this context.
In App.js
//import context provider
import BookContextProvider from './contexts/BookContext';
…
function App() {
  return (
    <div className="App">
      <BookContextProvider>
      {/* compnents that will use the data will come */}
      </BookContextProvider>
    </div>
  );
}
3-Create Navbar Component
In this section we will create a component that accesses context.
To create the component, create the components folder in the src folder and add the Navbar.js file to this folder.
We will create a functional component using react hooks.
In Navbar.js
import React,{useContext} from 'react';
import {BookContext} from '../contexts/BookContext';
const Navbar=()=>{
//access book context
const {books}=useContext(BookContext);
return(
<div className="navbar">
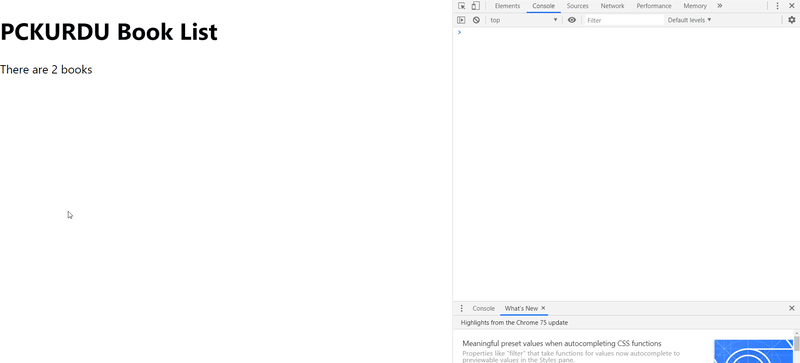
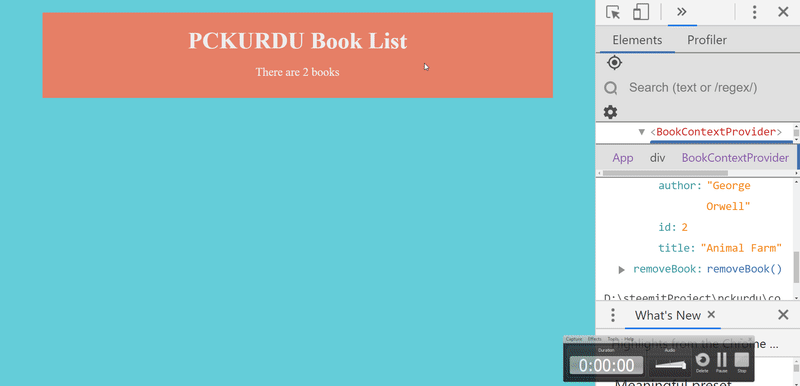
<h1>PCKURDU Book List</h1>
{/* show book length use context */}
<p> There are {books.length} books</p>
</div>
)
};
export default Navbar;
We use the useContext () function to access context. After accessing the books data we move out with context provider, we use it in the appropriate place on the page.
After creating the Navbar component, we should use it in the App.js.
<BookContextProvider>
   <Navbar/>
</BookContextProvider>
To access context in data, we must define it in the BookContextProvider.
Using the react developer tool, we can examine the structure of the application.
4- Design Application
We can use the index.css file to design the application. We should give style to navbar class and App class.
In index.css
body {
  background: #63cdda;
}

.App{
  background: #22a6b3;
  margin:20px auto;
  width:90%;
  max-width:700px;
  color:#eee;
}

.navbar{
  padding:10px 20px;
  text-align:center;
  background: #e77f67;
}

.navbar h1{
  margin: 10px 0;
}
Proof of Work Done
https://github.com/pckurdu/Develop-Applications-Using-React-Context-And-Hooks-Part-1
Thank you for your contribution @pckurdu.
After reviewing your tutorial we suggest the following points listed below:
Your tutorial is very well structured and explained all the concepts in a very simple way.
The CSS styling code is very simple. You should focus on the more complicated concepts in what you will develop.
I really like your GIFs to show the browser inspector so that the reader has a good idea of what is done.
Thank you for your work in developing this tutorial.
Looking forward to your upcoming tutorials.
Your contribution has been evaluated according to Utopian policies and guidelines, as well as a predefined set of questions pertaining to the category.
To view those questions and the relevant answers related to your post, click here.
Need help? Chat with us on Discord.
[utopian-moderator]
Thank you for your review, @portugalcoin! Keep up the good work!
Hi @pckurdu!
Your post was upvoted by @steem-ua, new Steem dApp, using UserAuthority for algorithmic post curation!
Your post is eligible for our upvote, thanks to our collaboration with @utopian-io!
Feel free to join our @steem-ua Discord server
Hey, @pckurdu!
Thanks for contributing on Utopian.
We’re already looking forward to your next contribution!
Get higher incentives and support Utopian.io!
Simply set @utopian.pay as a 5% (or higher) payout beneficiary on your contribution post (via SteemPlus or Steeditor).
Want to chat? Join us on Discord https://discord.gg/h52nFrV.
Vote for Utopian Witness!