How do I use template inheritance in QUIQQER?

In version 1.3 QUIQQER appears with the possibility of template inheritance. Through template inheritance you are now able to inherit your created template from another template.
You are now able to overwrite individual parts / blocks of the parent template in your own template package. If the child template does not have certain HTML / CSS files, these are obtained from the parent template. So you don't have to start templates from scratch.
Repository
What Will I Learn?
In this tutorial we will show you how to quickly create a template using the new inheritance in QUIQQER 1.3. As described in the last post we have implemented a template inheritance which allows you to specify a kind of parent template for your template.
Requirements
- You need a QUIQQER System
- You need a new QUIQQER Package
- You need to know from which Template you want to inherit
- The parent template should include Asset URL's with
{$Template->getTemplateUrl('URL')}and should uses{fetch}to include HTML files. - You need to know whats a
composer.jsonfile is
Difficulty
- Intermediate
Tutorial Contents
I assume that your package is available and that you have created the first files for your package. This means you have a composer.json file and a package.xml.
If not then please create this, if yes, then we will start now.
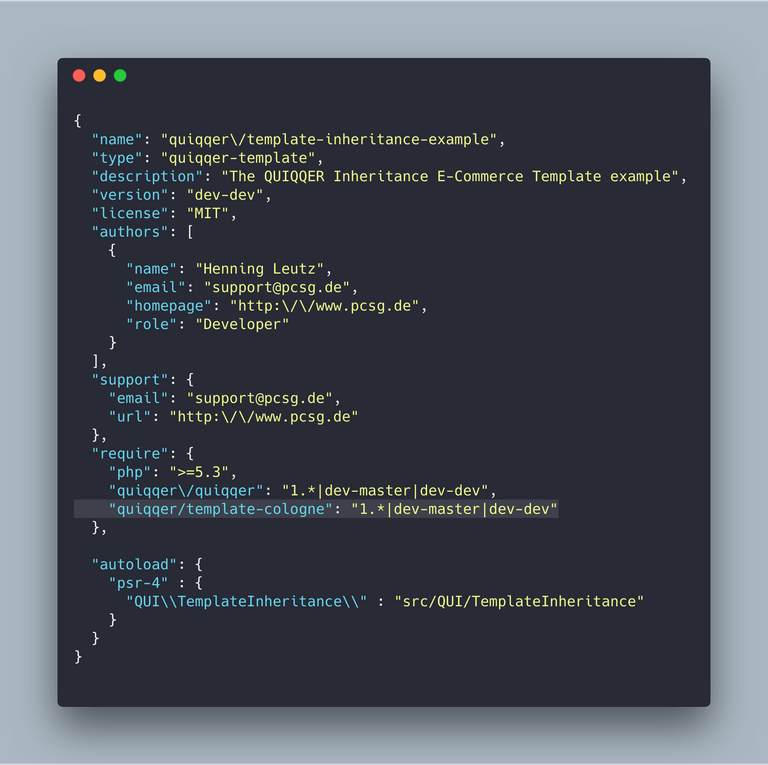
First of all you have to define your dependency in your composer.json so that the parent template is available in the system. If you want to inherit from quiqqer/template-cologne, you have to add this template to the require part of the package composer.json file.
In this tutorial I assume that we want quiqqer/template-cologne as a dependency. This is a quite complicated template and shows super that small parts can be overwritten even in complicated templates quickly and easily.
"require": {
    "quiqqer/template-cologne": "1.*|dev-master|dev-dev"
}
A complete composer.json could look something like this:
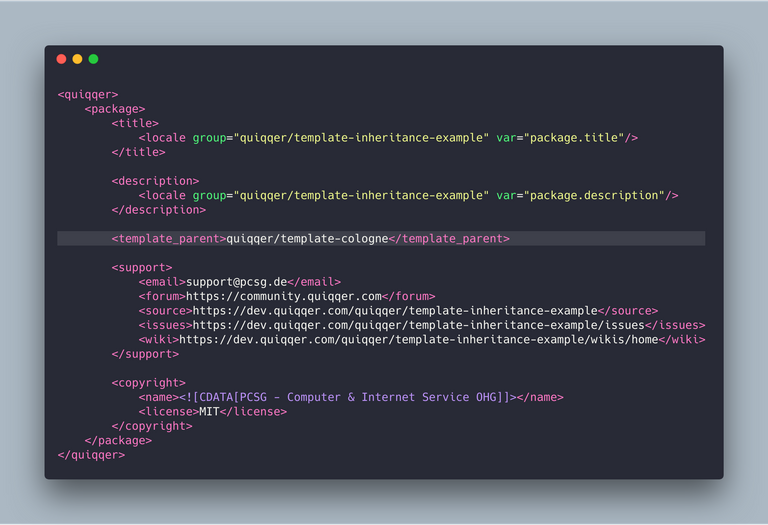
After that you have to tell your template package that it has a parent template. You do this in the package.xml of your package by adding a <template_parent> entry.
A complete package.xml could look something like this:
Once these two things are done, you can start overwriting the templates. So that you can overwrite individual files of the parent template, you only have to create the same folder structure as in your source template.
So that you know which things you can overwrite in the template there are two ways. The developer has documented this or you can see for yourself which areas can be overwritten.
Most of the time the documentation is a bit incomplete, so you should have a look at the Parent Template.
For example, what you need to pay attention are all {fetch} functions in HTML. The Smarty {fetch} function inserts another HTML template exactly at this point.
In the Cologne Template, for example, there are the following code lines:

If we now want to customize the template footerCopyright.html for us, we just have to create a template folder and a new HTML file called footerCopyright.html. Now we can write everything we want into it.
Of course, we prepared the whole thing to show you what it looks like. Examples always clarify the whole thing a lot better. (https://github.com/QUIQQER/template-inheritance-example/tree/master/template)
From now on you can overwrite templates and quickly offer completely new templates. Look forward to more tutorials in the near future. We will explain to you how to build your e-commerce shop or your SaaS quickly and easily.
Curriculum
- More coming soon ;-)
Proof of Work Done
We wish you a lot of fun with QUIQQER
Thanks for reading,
Hen, for PCSG Developers
Thank you for your contribution @pcsg-dev.
After reviewing your tutorial we suggest the following points listed below:
Your tutorial is quite short for a good tutorial. We recommend you aim for capturing at least 2-3 concepts.
Code sections are better displayed using the code markup, instead of placing them as screenshots.
We suggest that in your next tutorial details more what you have developed, so that the reader less experienced in programming understands well your contribution.
We suggest that you put the result into an image of what was developed in this tutorial.
Thank you for your work in developing this tutorial.
Looking forward to your upcoming tutorials.
Your contribution has been evaluated according to Utopian policies and guidelines, as well as a predefined set of questions pertaining to the category.
To view those questions and the relevant answers related to your post, click here.
Need help? Chat with us on Discord.
[utopian-moderator]
Thank you for your review, @portugalcoin! Keep up the good work!
Hi @pcsg-dev!
Your post was upvoted by @steem-ua, new Steem dApp, using UserAuthority for algorithmic post curation!
Your post is eligible for our upvote, thanks to our collaboration with @utopian-io!
Feel free to join our @steem-ua Discord server
Hey, @pcsg-dev!
Thanks for contributing on Utopian.
We’re already looking forward to your next contribution!
Get higher incentives and support Utopian.io!
Simply set @utopian.pay as a 5% (or higher) payout beneficiary on your contribution post (via SteemPlus or Steeditor).
Want to chat? Join us on Discord https://discord.gg/h52nFrV.
Vote for Utopian Witness!