What will I learn?
- Why react native?
- Adding native components in your react native application
- Building your first react native application
Requirements
- A laptop/PC with Mac OS/ Linux/ Windows
- Preinstalled node.js
- Preinstalled Code editor
Difficulty
Intermediate, you must have good knowledge of JavaScript to catch up this tutorial.
Tutorial Content
I have been developing android application for more than one year. I always wanted to learn ios application development too but as I couldn’t afford MAC and give much time as needed I never could learn IOS application development. So instead I decided to give a try to hybrid application development as I could see it everywhere. I researched a lot about it and finally decide to start learning to react native. There were many other options like ionic, Xamarian, Flutter etc and so on. But I choose to react native
Why react native?
- Well there were many other options like recently released flutter by google but react native is very properly documented and has a good developer support. There are plenty of third-party libraries, packages available already
- React native is cross-platform which means we can share much code between android and ios
- As react native uses native components so it is much faster than then other options like ionic
- The hot reloading feature of react native allows us to view real-time changes instantly. We don’t have to run the application again and again to view the changes
React native is based on the concept of ‘learn once write everywhere’. We build a real-world application by using JavaScript and react(native). Many people misunderstand react-native application as a web application running in the browser but it is not so. In fact, react native is a real native application. It gives us the component which compiles to native components so that user can experience native felling while using the application. There are many benefits of using react native.
This was much about react native. Starting, react native was a bit hectic task initially but now I am enjoying it.
We can learn react native from various sources. One of the much efficient ways to learn react native is from its official documentation:
https://facebook.github.io/react-native/docs/getting-started.html
Building native application can make our application fast but react native really reduces the time the development and cost of development and there are many more advantages of using it too. Hence I decided to go with it.
Before creating our first react native application you should have a basic fundamental understanding of JavaScipt. It is also good if you have the basic understanding of react and css.
Creating first react native application:
Install node JS downloading from https://nodejs.org/en/download/
and then we can use npm to install create-react-native-app to install command line utility. Here if we wanted to develop a web app using react then we would use npm install -g create-react-app. Here -g means that the utility is being installed globally and we can access this command anywhere from the command line.

After that, we can create our first react native project by the following command line. Here SteemitTutorial is the name of our application that we are going to create.

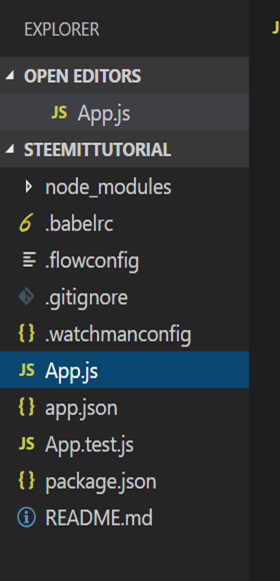
This step will take a bit of time. So relax for a while. After the completion, we will open our project in Visual Studio Code in order to work on the project. The project will seem something like this if you open it the visual studio code.
Now, Navigate to the directory of the project like this:

And add the command

This will print the QR code on the command line. We can scan this QR code by downloading Expo Client on our Android devices and see the real-time changes in that application. In order to run our application on our devices/emulator, we have to add android and ios platform in our application. We can achieve it in two ways first one is while creating our project we should create it by command line

As we have already set up our project we can also run the eject command in order to add this platform

You should then select I’d like a regular React Native project after you run the eject command.

After that in both the steps, you will be asked to name the user’s home screen and the name of the project. You can name it in the way you fill feasible. For now, I have named it SteemitTutorial.

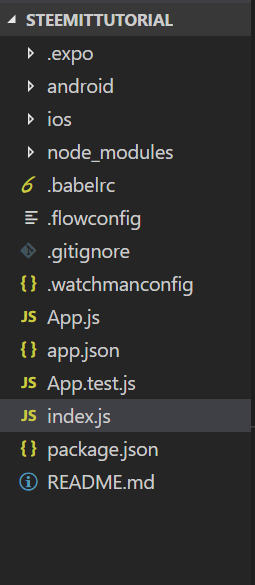
The project now will look like this. It contains the folders named ios and android and we it also added the file named index.js. We can open these particular folder named android in our Android Studio project and we can also open ios project in XCode. After we have successfully ejected then npm-start will not print the QR code at the command prompt. Instead, we should compulsorily run this on our native android or ios devices/emulator. We can also enable hot reloading feature in our application in the emulator. I have used Genymotion emulator to run this project. You can setup whichever emulator you want.
Press Command+M in the emulator once the app has been installed. After that click on enable live loading and that’s it. You can view your changes in real-time without having to rerun the application again and again which is another advantage of react native.
Here node_modules is the giant collection of all the java script packages which allow us to run our application. If you expand node_modules you can see tons of different packages. All the dependency that our application needs to run is inside this package.
Now let us open package.json.
{
  "name": "SteemitTutorial",
  "version": "0.1.0",
  "private": true,
  "devDependencies": {
    "babel-preset-react-native-stage-0": "^1.0.1",
    "jest": "^22.4.3",
    "jest-react-native": "^18.0.0",
    "react-test-renderer": "16.3.0-alpha.1"
  },
  "scripts": {
    "start": "react-native start",
    "android": "react-native run-android",
    "ios": "react-native run-ios",
    "test": "jest"
  },
  "jest": {
    "preset": "react-native"
  },
  "dependencies": {
    "react": "16.3.0-alpha.1",
    "react-native": "0.54.0"
  }
}
This file is like the meta data of our application. It describes our application. It contains the information about our application like name, version etc and so on. It also contains the dependencies on which the project depends on. Currently, we have two dependencies that is react and react-native. React for web and react-native for the application. Both of these communicate with each other. So all the dependencies that we will be needing for our project are kept in the dependencies section.
We only have two dependencies in our package.json but node_modules contains tons of package. That’s because one dependency depends on another and hence there are many dependencies for react and react-native.
The package android and ios are for writing native code for our application. See, this is the beauty of react native. We can even write our code in the native language for the specific platform.
Here index.js file is the entry point our application and looks like this
import { AppRegistry } from 'react-native';
import App from './App';
AppRegistry.registerComponent('SteemitTutorial', () => App);
Application’s root component should register with AppRegistery.registerComponent so that the native system can load the application. Here we have imported AppRegistry form ‘react-native’ package and we have also imported App from ‘./App’. Here ./App is referring to App.js.
App.js will be our root component so here in index.js, we are registering our Application root Component that is App in AppRegistery.
Now let us Open App.js
import React from 'react';
import { StyleSheet, Text, View } from 'react-native';

export default class App extends React.Component {
  render() {
    return (
      <View style={styles.container}>
        <Text>Open up App.js to start working on your app!</Text>
        <Text>Changes you make will automatically reload.</Text>
        <Text>Shake your phone to open the developer menu.</Text>
      </View>
    );
  }
}

const styles = StyleSheet.create({
  container: {
    flex: 1,
    backgroundColor: '#fff',
    alignItems: 'center',
    justifyContent: 'center',
  },
});
Let us understand this code. Here import statement is used to get the features and functionalities which are that is written in a separate file or class. Here we are importing ‘React’ from ‘react’ If you took a glance at node_modules by expanding it then there you can find ‘react’ package. Here React is imported so that we can use React Components.
Now if you edit the lines inside the component and write whatever you want. Let us write
<Text>This is our first application hahahaha </Text>
And congratulation you have successfully created the first application and the output seems like this:

The first line of code that is
export default class App extends React.Component {
}
Here we have written ‘export’ so that we can use this component in another file by importing it as we want it. Like in index.js we had imported App by
import App from './App';
This wouldn’t be possible if we hadn’t exported the component. Here default is written so that we don’t have to import the component by using { }.
If we hadn’t written default keyword here then we would have to import App by syntax. Each component can only have one default export.
import {App} from './App';
A class is simply the blueprint of our object like JAVA, C++ etc and we have extended React.Component so that we can get all the features of React.Component.
The render() method is used to return the view which is supposed to be displayed. StyleSheets.create() is used to style our view as per our requirement.
Now let us add some TextInput and Button in our application so that we can take input from our user. For that, we have to use the predefined component given to us by reacting native that is TextInput and Button. For that, we have to first import those components from react-native which can be done by:
import { StyleSheet, Text, View,TextInput,Button } from 'react-native';
Now that we have imported it we can use it in our view simply by calling it:
<View style={styles.container}>
        <TextInput placeholder="Add Some text"/>
        <Button title="submit"/>
      </View>
Here placeholder is the attribute of TextInput.
This gives the output like:

The final code of App.js looks like this:
import React from 'react';
import { StyleSheet, Text, View,TextInput,Button } from 'react-native';

export default class App extends React.Component {
  render() {
    return (
      <View style={styles.container}>
        <TextInput placeholder="Add Some text"/>
        <Button title="submit"/>
      </View>
    );
  }
}

const styles = StyleSheet.create({
  container: {
    flex: 1,
    backgroundColor: '#fff',
    alignItems: 'center',
    justifyContent: 'center',
  },
});
There were many difficulties when starting react native as I knew nothing about javascript, react and so on. So I would like to suggest you to go through the basic of java script at first. Also, there were many errors like the app wasn’t installed on the emulator and so in that was because I didn’t patiently wait for the successful download of the dependencies required. So I suggest you wait patiently for all the downloads that are required. Also, you can drop your comment if you get any error in the middle. I will try m best to solve it.
We successfully added out first TextInput and Button in our project. In our next session, we will be discussing component, state, props in more detail and we will be taking users input too.
All above codes are availbale in my Github. Click here to download.
Posted on Utopian.io - Rewarding Open Source Contributors
Thank you for the contribution. It has been approved.
You can contact us on Discord.
[utopian-moderator]
Hey @programminghub I am @utopian-io. I have just upvoted you!
Achievements
Community-Driven Witness!
I am the first and only Steem Community-Driven Witness. Participate on Discord. Lets GROW TOGETHER!
Up-vote this comment to grow my power and help Open Source contributions like this one. Want to chat? Join me on Discord https://discord.gg/Pc8HG9x