SweetAlert2 is a library replacement for Javascript default alert and prompt. SweetAlert2 is easy-to-use and customizing it. In this tutorial, I'll go through how to use and customize of the sweetalert2 library.
Installing
First we need a project folder where kept all of files, in this case I make a folder called SweetAlert and I put it on drive D:\Tutorial\SweetAlert. But you can put it wherever you prefer.
In project folder we need a file to use the sweetalert2, in this case I make a file called index.html
It looks like

We can install SweetAlert2 using bower
$ bower install sweetalert2$ npm install sweetalert2Let's start install and usage sweetalert2, in project file index.html we need initialize the html tags. Then we need import Jquery and SweetAlert2 library from CDN. Here's the code of index.html
<!DOCTYPE html>
<html>
<head>
    <title>How to use and customize SweetAlert2</title>
    <!-- jQuery -->
    <script src="https://cdnjs.cloudflare.com/ajax/libs/jquery/3.2.1/jquery.min.js"></script>
    <!-- SweetAlert2 -->
    <link rel="stylesheet" href="https://cdnjs.cloudflare.com/ajax/libs/limonte-sweetalert2/7.2.0/sweetalert2.min.css">
    <script src="https://cdnjs.cloudflare.com/ajax/libs/limonte-sweetalert2/7.2.0/sweetalert2.all.min.js"></script>
    <!-- styles -->
</head>
<body>
</body>
</html>
Okay, sweetalert2 has been installed. But it's still blank page. now, we need some html and css code to make a design and button to call sweetalert2. Here's the code:
<!DOCTYPE html>
<html>
<head>
    <title>How to use and customize SweetAlert2</title>
    <!-- jQuery -->
    <script src="https://cdnjs.cloudflare.com/ajax/libs/jquery/3.2.1/jquery.min.js"></script>
    <!-- SweetAlert2 -->
    <link rel="stylesheet" href="https://cdnjs.cloudflare.com/ajax/libs/limonte-sweetalert2/7.2.0/sweetalert2.min.css">
    <script src="https://cdnjs.cloudflare.com/ajax/libs/limonte-sweetalert2/7.2.0/sweetalert2.all.min.js"></script>
    <!-- styles -->
    <style type="text/css">
        body{background-color: aliceblue;font-family: sans-serif;text-align: center;}
        button{background-color: cadetblue;color: whitesmoke;-webkit-box-shadow: none;box-shadow: none; font-size: 18px;font-weight: 500;border-radius: 7px;padding: 15px 35px;cursor: pointer;white-space: nowrap;margin: 10px;}
        img {width: 200px;}
        input[type="text"] {padding: 12px 20px;display: inline-block;border: 1px solid #ccc;border-radius: 10px; box-sizing: border-box;}
        h1{border-bottom: solid 2px grey;}
        #success {background: green;}
        #error {background: red;}
        #warning {background: coral;}
        #info {background: cornflowerblue;}
        #question {background: grey;}
    </style>
</head>
<body>
<div>
        <h1>How to use and customize <img src="https://limonte.github.io/sweetalert2/assets/swal2-logo.png"></h1>
        <div>
            <h4>Modal Type</h4>
            <p>Sweet alert with modal type and customize message alert with html and css</p>
            <button id="success" >Success</button>
            <button id="error" >Error</button>
            <button id="warning">Warning</button>
            <button id="info" >Info</button>
            <button id="question">Question</button>
        </div>
        <br>
        <div>
            <h4>Custom image and alert size</h4>
            <p>Alert with custom icon and background icon</p>
            <button id="icon">Custom Icon</button>
            <button id="image">Custom Background Image</button>
        </div>
        <br>
        <div>
            <h4>Alert with input type</h4>
            <p>Sweet Alert with Input and loading button</p>
            <button id="subscribe">Subscribe</button>
        </div>
        <br>
        <div>
            <h4>Redirect to visit another site</h4>
            <p>Alert to visit a link to another site</p>
            <button id="link">Redirect to Utopian</button>
        </div>
    </div>
</body>
</html>
Usage
Now we can use SweetAlert2 with trigger button using jquery. first we trigger each button from modal type category. In this category just display generic messages to the user. in this case the code for calling sweetalert2 is placed inside the script tag at the bottom before closing the body tag.
The different of this alert messages just the alert type and alert type define in third quote inside of swal() and consists 5 types of values: success, error, warning, info and question eg:
swal(
'This is title',
'This is the text for detail and can insert some html tag',
'type'
)
<!DOCTYPE html>
<html>
<head>
    <title>How to use and customize SweetAlert2</title>
    <!-- jQuery -->
    <script src="https://cdnjs.cloudflare.com/ajax/libs/jquery/3.2.1/jquery.min.js"></script>
    <!-- SweetAlert2 -->
    <link rel="stylesheet" href="https://cdnjs.cloudflare.com/ajax/libs/limonte-sweetalert2/7.2.0/sweetalert2.min.css">
    <script src="https://cdnjs.cloudflare.com/ajax/libs/limonte-sweetalert2/7.2.0/sweetalert2.all.min.js"></script>
    <!-- styles -->
    <style type="text/css">
        body{background-color: aliceblue;font-family: sans-serif;text-align: center;}
        button{background-color: cadetblue;color: whitesmoke;-webkit-box-shadow: none;box-shadow: none; font-size: 18px;font-weight: 500;border-radius: 7px;padding: 15px 35px;cursor: pointer;white-space: nowrap;margin: 10px;}
        img {width: 200px;}
        input[type="text"] {padding: 12px 20px;display: inline-block;border: 1px solid #ccc;border-radius: 10px; box-sizing: border-box;}
        h1{border-bottom: solid 2px grey;}
        #success {background: green;}
        #error {background: red;}
        #warning {background: coral;}
        #info {background: cornflowerblue;}
        #question {background: grey;}
    </style>
</head>
<body>
<div>
        <h1>How to use and customize <img src="https://limonte.github.io/sweetalert2/assets/swal2-logo.png"></h1>
        <div>
            <h4>Modal Type</h4>
            <p>Sweet alert with modal type and customize message alert with html and css</p>
            <button id="success" >Success</button>
            <button id="error" >Error</button>
            <button id="warning">Warning</button>
            <button id="info" >Info</button>
            <button id="question">Question</button>
        </div>
        <br>
        <div>
            <h4>Custom image and alert size</h4>
            <p>Alert with custom icon and background icon</p>
            <button id="icon">Custom Icon</button>
            <button id="image">Custom Background Image</button>
        </div>
        <br>
        <div>
            <h4>Alert with input type</h4>
            <p>Sweet Alert with Input and loading button</p>
            <button id="subscribe">Subscribe</button>
        </div>
        <br>
        <div>
            <h4>Redirect to visit another site</h4>
            <p>Alert to visit a link to another site</p>
            <button id="link">Redirect to Utopian</button>
        </div>
    </div>

<!-- SweetAlert2 Codes -->
    <script type:"text/javascipt">
        $(document).on('click', '#success', function(e) {
            swal(
                'Success',
                'You clicked the Success button!',
                'success'
            )
        });

        $(document).on('click', '#error', function(e) {
            swal(
                'Error!',
                'You clicked the error button!',
                'error'
            )
        });

        $(document).on('click', '#warning', function(e) {
            swal(
                'Warning!',
                'You clicked the warning button!',
                'warning'
            )
        });

        $(document).on('click', '#info', function(e) {
            swal(
                'Info!',
                'You clicked the info button!',
                'info'
            )
        });

        $(document).on('click', '#question', function(e) {
            swal(
                'Question!',
                'You clicked the question button!',
                'question'
            )
        });
    </script>
</body>
</html>


Next, we add some code for customize image, width and padding alert after modal type code.

        $(document).on('click', '#icon', function(event) {
            swal({
                title: 'Custom icon!',
                text: 'Alert with a custom image.',
                imageUrl: 'https://image.shutterstock.com/z/stock-vector--exclamation-mark-exclamation-mark-hazard-warning-symbol-flat-design-style-vector-eps-444778462.jpg',
                imageWidth: 200,
                imageHeight: 200,
                imageAlt: 'Custom image',
                animation: false
            })
        });

        $(document).on('click', '#image', function(event) {
            swal({
                title: 'Custom background image, width and padding.',
                width: 700,
                padding: 150,
                background: '#fff url(https://image.shutterstock.com/z/stock-vector--exclamation-mark-exclamation-mark-hazard-warning-symbol-flat-design-style-vector-eps-444778462.jpg)'
            })
        });
And then we make alert with input type. in this case I make alert message with input type. so check this out:
        $(document).on('click', '#subscribe', function(e) {
            swal({
              title: 'Submit email to subscribe',
              input: 'email',
              showCancelButton: true,
              confirmButtonText: 'Submit',
              showLoaderOnConfirm: true,
              preConfirm: (email) => {
                return new Promise((resolve) => {
                  setTimeout(() => {
                    if (email === '[email protected]') {
                      swal.showValidationError(
                        'This email is already taken.'
                      )
                    }
                    resolve()
                  }, 2000)
                })
              },
              allowOutsideClick: false
            }).then((result) => {
              if (result.value) {
                swal({
                  type: 'success',
                  title: 'Thank you for subscribe!',
                  html: 'Submitted email: ' + result.value
                })
              }
            })
        });


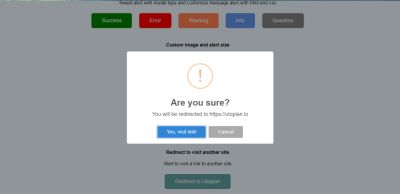
The last of custom sweetalert is redirect to another link when click submit button on sweetalert2. and show the result messages when click cancel button.
Here's the code
        $(document).on('click', '#link', function(e) {
            swal({
                title: "Are you sure?",
                text: "You will be redirected to https://utopian.io",
                type: "warning",
                confirmButtonText: "Yes, visit link!",
                showCancelButton: true
            })
                .then((result) => {
                    if (result.value) {
                        window.location = 'https://utopian.io';
                    } else if (result.dismiss === 'cancel') {
                        swal(
                          'Cancelled',
                          'Your stay here :)',
                          'error'
                        )
                    }
                })
        });

Conclusion
It's simple right. SweetAlert2 is very flexible to customizing. so, there is of course lots more you can do with SweetAlert2. for more configuration of SweetAlert2 you can check the official website here.
I hope this tutorial can help you to using the sweetalert2 and can be implemented in your project.
To demo this tutorial you can check Here
Thank you
Posted on Utopian.io - Rewarding Open Source Contributors
Thank you for the contribution. It has been approved.
You can contact us on Discord.
[utopian-moderator]
Hey @riyo.s94 I am @utopian-io. I have just upvoted you!
Achievements
Suggestions
Get Noticed!
Community-Driven Witness!
I am the first and only Steem Community-Driven Witness. Participate on Discord. Lets GROW TOGETHER!
Up-vote this comment to grow my power and help Open Source contributions like this one. Want to chat? Join me on Discord https://discord.gg/Pc8HG9x
I'm the author of SweetAlert2.
The plugin's homepage has been changed to https://sweetalert2.github.io/ please update it in your article.
Hi @limonte.
sorry I can't edit my article
I can't find a way to edit the article.