In this tutorial I'll guide you to use flatpickr for replacement default datetime picker UI on your website. Flatpickr is javascript datetime picker with minimal UI but have many themes and make it suitable for any environment. Flatpickr easy-to-use and less library size to keep your projects lean.
Installing
Flatpickr can be install using NPM or from CDN.
Using NPM install
npm i flatpickr --save
Using CDN
- CDNJS
- JSDELIVR
In this tutorial installing Flatpickr using CDN. In project file we just import Flatpickr library from CDN and put them toheadtag andscripttag before end of thebodytag. It's look like:
<head>
  <title>Using Flatpickr</title>
(html comment removed:   Flatpicker Styles  )
  <link rel="stylesheet" href="https://cdnjs.cloudflare.com/ajax/libs/flatpickr/4.2.3/flatpickr.css">
  <link rel="stylesheet" href="https://cdnjs.cloudflare.com/ajax/libs/flatpickr/4.2.3/themes/dark.css">
</head>
<body>
    (html comment removed:  jQuery )
  <script src="https://cdnjs.cloudflare.com/ajax/libs/jquery/3.2.1/jquery.min.js"></script>
  (html comment removed:   Flatpickr  )
  <script src="https://cdnjs.cloudflare.com/ajax/libs/flatpickr/4.2.3/flatpickr.js"></script>
</body>
In head tag we import Flatpickr styles and import dark theme styles. but, you can import another theme support in flatpickr library. In the script tag we import jquery and flatpickr javascript library.
Now, flatpickr ready to use.
Usage
To use flatpickr library we need tag element to trigger the flatpickr. In this tutorial I'll make some element tags with simple design to trigger flatpickr. Here's the code:
<head>
  <title>Using Flatpickr</title>
(html comment removed:   Flatpicker Styles  )
  <link rel="stylesheet" href="https://cdnjs.cloudflare.com/ajax/libs/flatpickr/4.2.3/flatpickr.css">
  <link rel="stylesheet" href="https://cdnjs.cloudflare.com/ajax/libs/flatpickr/4.2.3/themes/dark.css">
<style>
body { text-align: center;background: cornflowerblue;}
img { width: 50px;border-radius: 50px;}
input { border: 2px solid whitesmoke;border-radius: 20px; padding: 12px 10px; text-align: center; width: 250px;}
button { border: none; border-radius: 10px; padding: 12px 10px; text-align: center; cursor: pointer;  background: coral; color: whitesmoke;}
</style>
</head>
<body>
<img src="https://chmln.github.io/flatpickr/images/logo.png" alt="flatpickr">
  <h1>Flatpickr</h1>
  <hr>
  <div>
    <h2>Basic DateTime</h2>
    <input type="text" id="basicDate" placeholder="Please select Date Time" data-input>
    <h2>Range Datetime</h2>
    <input type="text" id="rangeDate" placeholder="Please select Date Range" data-input>
    <h2>Time Picker</h2>
    <input type="text" id="timePicker" placeholder="Please select Time">
  </div>
  <h2>Week Number with Reset Date</h2>
  <div class=resetDate>
    <input type="text" placeholder="Select Date.." data-input>
    <button class="input-button" title="clear" data-clear>RESET</button>
</div>
    (html comment removed:  jQuery )
  <script src="https://cdnjs.cloudflare.com/ajax/libs/jquery/3.2.1/jquery.min.js"></script>
  (html comment removed:   Flatpickr  )
  <script src="https://cdnjs.cloudflare.com/ajax/libs/flatpickr/4.2.3/flatpickr.js"></script>
</body>
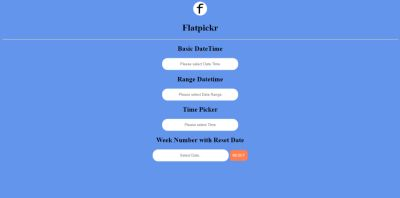
In this code we declare 4 input date to trigger flatpickr and one reset button as example to use flatpickr. Each input date as example how to use basic datetime, range datetime, timepicker and how to use datetime with reset button in flatpickr library. The design of this code:
First, we start from basic datetime, we need one script tag to use flatpickr and put the script tag before the end of body tag. here is the code:
<head>
  <title>Using Flatpickr</title>
(html comment removed:   Flatpicker Styles  )
  <link rel="stylesheet" href="https://cdnjs.cloudflare.com/ajax/libs/flatpickr/4.2.3/flatpickr.css">
  <link rel="stylesheet" href="https://cdnjs.cloudflare.com/ajax/libs/flatpickr/4.2.3/themes/dark.css">
<style>
body { text-align: center;background: cornflowerblue;}
img { width: 50px;border-radius: 50px;}
input { border: 2px solid whitesmoke;border-radius: 20px; padding: 12px 10px; text-align: center; width: 250px;}
button { border: none; border-radius: 10px; padding: 12px 10px; text-align: center; cursor: pointer;  background: coral; color: whitesmoke;}
</style>
</head>
<body>
<img src="https://chmln.github.io/flatpickr/images/logo.png" alt="flatpickr">
  <h1>Flatpickr</h1>
  <hr>
  <div>
    <h2>Basic DateTime</h2>
    <input type="text" id="basicDate" placeholder="Please select Date Time" data-input>
    <h2>Range Datetime</h2>
    <input type="text" id="rangeDate" placeholder="Please select Date Range" data-input>
    <h2>Time Picker</h2>
    <input type="text" id="timePicker" placeholder="Please select Time">
  </div>
  <h2>Week Number with Reset Date</h2>
  <div class=resetDate>
    <input type="text" placeholder="Select Date.." data-input>
    <button class="input-button" title="clear" data-clear>RESET</button>
</div>
    (html comment removed:  jQuery )
  <script src="https://cdnjs.cloudflare.com/ajax/libs/jquery/3.2.1/jquery.min.js"></script>
  (html comment removed:   Flatpickr  )
  <script src="https://cdnjs.cloudflare.com/ajax/libs/flatpickr/4.2.3/flatpickr.js"></script>
  <script>
$("#basicDate").flatpickr({
    enableTime: true,
    dateFormat: "F, d Y H:i"
});
  </script>
</body>
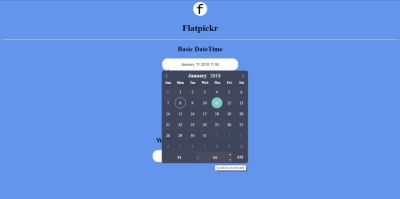
Short, in selector tag we initialize basic flatpickr date time, in this code we enable time to show date with time in selector tag. and the second configuration we format date time to "monthName, date, year Hour:minutes" but, you can set dateFormat as you prefer. That's code look like:
In the second selector we use flatpickr with range date and we put code after basicDate configuration. Here is the code:
<head>
  <title>Using Flatpickr</title>
(html comment removed:   Flatpicker Styles  )
  <link rel="stylesheet" href="https://cdnjs.cloudflare.com/ajax/libs/flatpickr/4.2.3/flatpickr.css">
  <link rel="stylesheet" href="https://cdnjs.cloudflare.com/ajax/libs/flatpickr/4.2.3/themes/dark.css">
<style>
body { text-align: center;background: cornflowerblue;}
img { width: 50px;border-radius: 50px;}
input { border: 2px solid whitesmoke;border-radius: 20px; padding: 12px 10px; text-align: center; width: 250px;}
button { border: none; border-radius: 10px; padding: 12px 10px; text-align: center; cursor: pointer;  background: coral; color: whitesmoke;}
</style>
</head>
<body>
<img src="https://chmln.github.io/flatpickr/images/logo.png" alt="flatpickr">
  <h1>Flatpickr</h1>
  <hr>
  <div>
    <h2>Basic DateTime</h2>
    <input type="text" id="basicDate" placeholder="Please select Date Time" data-input>
    <h2>Range Datetime</h2>
    <input type="text" id="rangeDate" placeholder="Please select Date Range" data-input>
    <h2>Time Picker</h2>
    <input type="text" id="timePicker" placeholder="Please select Time">
  </div>
  <h2>Week Number with Reset Date</h2>
  <div class=resetDate>
    <input type="text" placeholder="Select Date.." data-input>
    <button class="input-button" title="clear" data-clear>RESET</button>
</div>
    (html comment removed:  jQuery )
  <script src="https://cdnjs.cloudflare.com/ajax/libs/jquery/3.2.1/jquery.min.js"></script>
  (html comment removed:   Flatpickr  )
  <script src="https://cdnjs.cloudflare.com/ajax/libs/flatpickr/4.2.3/flatpickr.js"></script>
  <script>
$("#basicDate").flatpickr({
    enableTime: true,
    dateFormat: "F, d Y H:i"
});
$("#rangeDate").flatpickr({
    mode: 'range',
    dateFormat: "Y-m-d"
});
  </script>
</body>
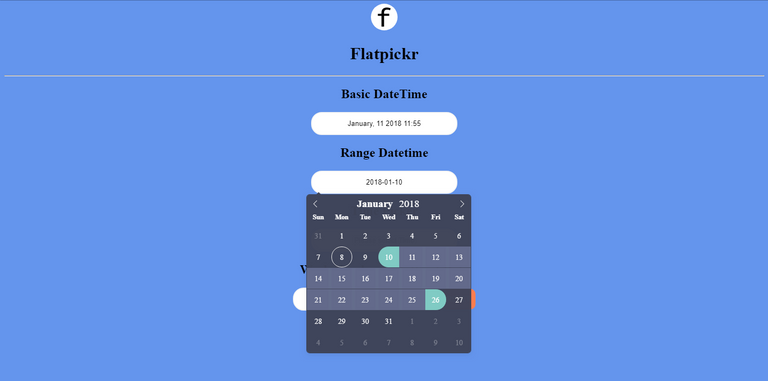
In this code to use flatpickr date with range date we just config and change mode to 'range'. So, flatpickr automatically render the datetime with range date after that we config the default dateFormat. here is the range date view:
Next, In to use timepicker and reset button on flatpickr we can configure like this:
<head>
  <title>Using Flatpickr</title>
(html comment removed:   Flatpicker Styles  )
  <link rel="stylesheet" href="https://cdnjs.cloudflare.com/ajax/libs/flatpickr/4.2.3/flatpickr.css">
  <link rel="stylesheet" href="https://cdnjs.cloudflare.com/ajax/libs/flatpickr/4.2.3/themes/dark.css">
<style>
body { text-align: center;background: cornflowerblue;}
img { width: 50px;border-radius: 50px;}
input { border: 2px solid whitesmoke;border-radius: 20px; padding: 12px 10px; text-align: center; width: 250px;}
button { border: none; border-radius: 10px; padding: 12px 10px; text-align: center; cursor: pointer;  background: coral; color: whitesmoke;}
</style>
</head>
<body>
<img src="https://chmln.github.io/flatpickr/images/logo.png" alt="flatpickr">
  <h1>Flatpickr</h1>
  <hr>
  <div>
    <h2>Basic DateTime</h2>
    <input type="text" id="basicDate" placeholder="Please select Date Time" data-input>
    <h2>Range Datetime</h2>
    <input type="text" id="rangeDate" placeholder="Please select Date Range" data-input>
    <h2>Time Picker</h2>
    <input type="text" id="timePicker" placeholder="Please select Time">
  </div>
  <h2>Week Number with Reset Date</h2>
  <div class=resetDate>
    <input type="text" placeholder="Select Date.." data-input>
    <button class="input-button" title="clear" data-clear>RESET</button>
</div>
    (html comment removed:  jQuery )
  <script src="https://cdnjs.cloudflare.com/ajax/libs/jquery/3.2.1/jquery.min.js"></script>
  (html comment removed:   Flatpickr  )
  <script src="https://cdnjs.cloudflare.com/ajax/libs/flatpickr/4.2.3/flatpickr.js"></script>
  <script>
$("#basicDate").flatpickr({
    enableTime: true,
    dateFormat: "F, d Y H:i"
});
$("#rangeDate").flatpickr({
    mode: 'range',
    dateFormat: "Y-m-d"
});
$("#timePicker").flatpickr({
    enableTime: true,
    noCalendar: true,
    time_24hr: true,
    dateFormat: "H:i",
});
$(".resetDate").flatpickr({
    wrap: true,
    weekNumbers: true,
});
  </script>
</body>
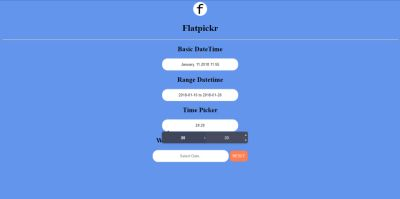
In timePicker selector we config flatpickr enableTime and noCalender with true value. So this config will render to show time picker without date. and then I set the time format to 24hour. For the last selector we set wrap and weekNumbers with true value to render the flatpickr date and display week numbers. Thats' fully code looks like:
Time Picker
Week Numbesr with Reset Date button

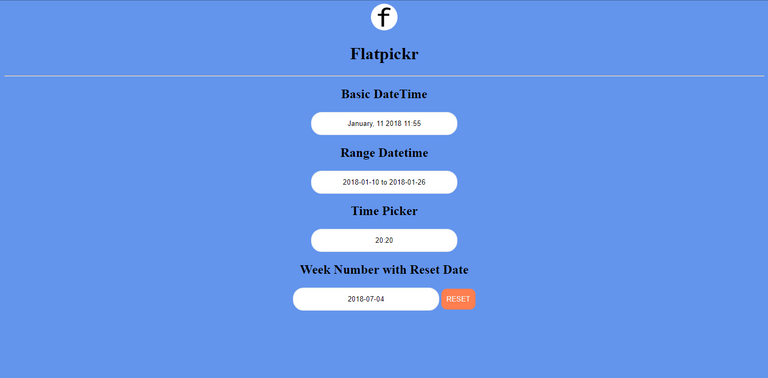
Result for the flatpickr
Conclusion
This tutorial just showed you a base practise. You can create and modify flatpickr as you prefer, just play around the flatpickr library. If you want see more configuration and documentation of flatpickr library. You can find in official site Flatpickr
If you want see fully code of this tutorial you can check here:
See the Pen Flatpickr by Rio Dwi Prabowo (@riyos94) on CodePen.
Thank you
Posted on Utopian.io - Rewarding Open Source Contributors
Hey @riyo.s94 I am @alfarisi94. I have just upvoted you!
Thank you @alfarisi94
Thank you for the contribution. It has been approved.
You can contact us on Discord.
[utopian-moderator]
Hey @riyo.s94 I am @utopian-io. I have just upvoted you!
Achievements
Suggestions
Get Noticed!
Community-Driven Witness!
I am the first and only Steem Community-Driven Witness. Participate on Discord. Lets GROW TOGETHER!
Up-vote this comment to grow my power and help Open Source contributions like this one. Want to chat? Join me on Discord https://discord.gg/Pc8HG9x