
This tutorial is a continuation on Part 0: How to install steem-python, the official STEEM library for Python. We will be setting up the CLI wallet for with our steem account for future use. After that we will upvote an article with a python script.
What Will I Learn?
- How to set up your Steempy wallet
- Change the default node
- Import your Steem account
- Set wallet defaults
- Upvote directly via the blockchain
Requirements
- steem-python
- python 3.6
Difficulty
- Basic
Tutorial
Update default node
By default the node which steempy is connected to is http://steemd.steemit.com, this node has now been depreciated and we will have to update it to make the wallet work again. We will be using the Steemviz node, but this can be replaced with any node to your liking. Adding multiple nodes for redundancy is also possible by separating the urls with a comma ,
steempy set nodes https://rpc.steemviz.com
import steem account
Now you can add your account, replace steempytutorials with your account name
steempy importaccount steempytutorials
Account Passphrase:
Importing active key!
Please provide a password for the new wallet
Passphrase:
Confirm Passphrase:
Importing posting key!
Importing memo key!
You will be asked for your master password. After this you will have to set up a password to encrypt your wallet. This password is needed for any transaction made with the wallet.
You can verify all the imported keys
steempy listaccounts

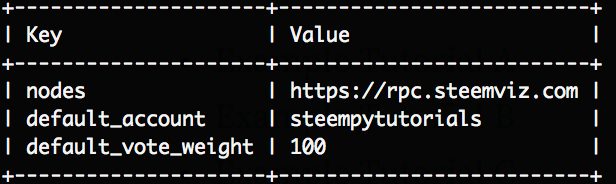
configure wallet defaults
You can then set up a the default account and upvote weight for any future transactions or upvotes.
steempy set default_account steempytutorials
steempy set default_vote_weight 100
Now verify all the settings with
steempy config
Your wallet is now ready to be used.
Upvoting an article with python
We will upvote 2 excellent articles made by @amosbastian with the python script below. The permlink is how steem identifies articles and you can get it from the url of an article. Removing the beginning of the urls until @. While we will be using 2 preset permlinks you can also use your own. The 100 in steem.vote(permlink,100) indicates the weight of the upvote we will be giving out. You can also alter this to your liking.
from steem import Steem

steem = Steem()
permlink = '@amosbastian/how-to-create-a-simple-reddit-bot-using-praw-1-streaming-and-replying'

try:
   steem.vote(permlink,100)
   print ("Succesfully upvoted!")
except Exception as e:
   print (repr(e))
Save the code as main.py and run it. You will be asked for you wallet passphrase and after that it should upvote the article.
python main.py
Passphrase:
Succesfully upvoted!
While this works, it is annoying to have to enter the passphrase every time. To prevent this you can set your passphrase as an environment variable with:
export UNLOCK='<passphrase>'
Now we will alter the code a bit to accommodate for this.
from steem import Steem
import os

steemPostingKey = os.environ.get('steemPostingKey')
steem = Steem(wif=steemPostingKey)

permlink = '@amosbastian/python-wrapper-for-the-fantasy-premier-league-api'

try:
    steem.vote(permlink,100)
    print ("Succesfully upvoted!")
except Exception as e:
    print (repr(e))
Try it again and it should upvote without asking for your passphrase, succes! You can verify this by going to the article or going over to steemd.com.

Curriculum
Credits
This tutorial was written by @juliank in conjunction with @amosbastian
Posted on Utopian.io - Rewarding Open Source Contributors
Thanks for a such good idea. I didn
t use python for last several months, but now I think, Ill come back to python!Awesome, make sure to subscribe. A lot more content is coming ;)
Thanks @juliank! I'll obligatorily subscribe! And waiting new content!
Giving us home work? .... XD
Thank you so much for the tutorial , a new item to the list of to-do stuff
Cheers
There will indeed be homework in the future, we will be doing weekly challenges. Where a puzzle will be introduced and also prize money ;)
Hey @steempytutorials I am @utopian-io. I have just upvoted you!
Achievements
Suggestions
Get Noticed!
Community-Driven Witness!
I am the first and only Steem Community-Driven Witness. Participate on Discord. Lets GROW TOGETHER!
Up-vote this comment to grow my power and help Open Source contributions like this one. Want to chat? Join me on Discord https://discord.gg/Pc8HG9x
I have started to learn python currently and it will be my first programme but can you explain what this post about because content is little bit detail for me :)
Is it possible to configure how many posts per day or per week to vote for a user account etc?
I will probably write a tutorial on how to do this in the future!
Finally
I come from aceh, can you see my introduction post briefly, if I am mistaken to post introductions I beg your comments. https://steemit.com/introduceyourself/@itajasrii/hi-steemit-i-m-itajasrii-and-i-m-from-aceh
Thank you for the contribution. It has been approved.
You can contact us on Discord.
[utopian-moderator]
@dimby it’s here
How would pure python solution look?
I mean without any
steempyCLI'sIm interested with this. Ill look for part one for me to have a good start in this learning.
It asks for my passphrase when I try to post and says that in order to do so, I need to use my UNLOCK environmental variable. Anyone know how to do that?
.
this is exactly what i was looking for thanks!