Ideal the users that uses the Blinkit standalone device should not need to do any coding related things. best would be when the device is turned on for the first time, it could be setup over WiFi with just the use of a mobile phone.
WiFi Connectivity improvements
With this latest version, when the user turns the device on for the first time, the device will create a WiFi accesspoint "Blinkit Setup", connect a mobile phone or pc to the "Blinkit Setup" accesspoint, open a browser and enter the, WiFi credentials of it and a Steem Username on the presented web-interface. Press save, and the device will switch to WiFi client mode and will now connect to the saved WiFi network with the saved Steem username on each boot. Connected to the internet and ready to Blink and beep on newly received Steem upvotes.
Once the device is setup, it can be reset from within the the Blinkit web interface with a presented reset link.
When the device is brought to a other location (and / or out of the range of the previously saved WiFi network) it wont be able to connect, and therefor will enter back into WiFi hotspot mode, ready to receive new settings.
How is it implemented?
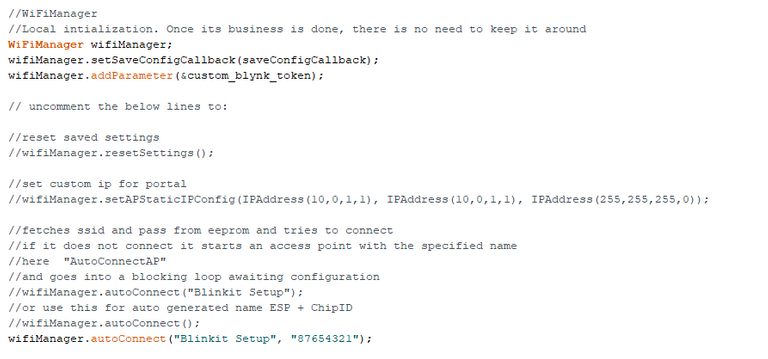
To make it possible for the device to switch between WiFi Accesspoint mode and Client mode, "WiFiManager" library is used, after researching, this was the most complete solution for the task, it did need a lot of trial and error, and each error on a Arduino takes around a minute to recompile and upload to the device, which can be a very annoying bottleneck for testing and troubleshotting things. (i think i spotted a few new grey hairs in my beard)
To add Wifimanager's functionality into the Blinkit stand alone device, the following is added to it's code:
- WiFiManager hotspot mode is set to start with password protection, password: 87654321 (documented in the readme as well)
- edited WiFiManager.h changed the text and button colours to be in line with Blinkit
- WiFiManagers presented options are limited to only the once that are required for Blinkit. "Configure Wifi"
WiFiManager implementation:
WiFiManager is a very awesome library for Arduino and the esp8266 , ...once all is up, and running and you get the "hang of it". But then the moment comes where it would be nice to also save additional parameters for later use, and this is not handled by WiFimanger, presenting the additional settings with WiFiManager is a feature, but saving is not, and the quest continued to find and test how to do this, after a lot of searching and testing multiple approaches and days later, i finally found a Arduino project that makes use of WiFiManager and also adds and saves additional parameters.
After merging the parts that make it possible to save and reload the saved additional parameter, it still didn't work, and it tuned out that the latest version of the AruinoJSON library (that by default is highlighted, is not supporting the required things) So be sure to NOT install the latest beta version and use the stable version.
It finally all worked, some minor thing is that i would wanted to make the code more pretty, by renaming the variables to Blinkit related variabel names. (instead of blynk and blynk_token, which is related to the Blynk project, (and is where the code comes from) at this moment multiple attempts to do this have failed, and the decision for now is to keep the names like this, and i will try again to make this more pretty. In the last 2 weeks of development for this project i learned a lot and i'm sure this "issue" can also be fixed, by me or when the team members receive there boards, with the help of the team. But for now it is working as required.
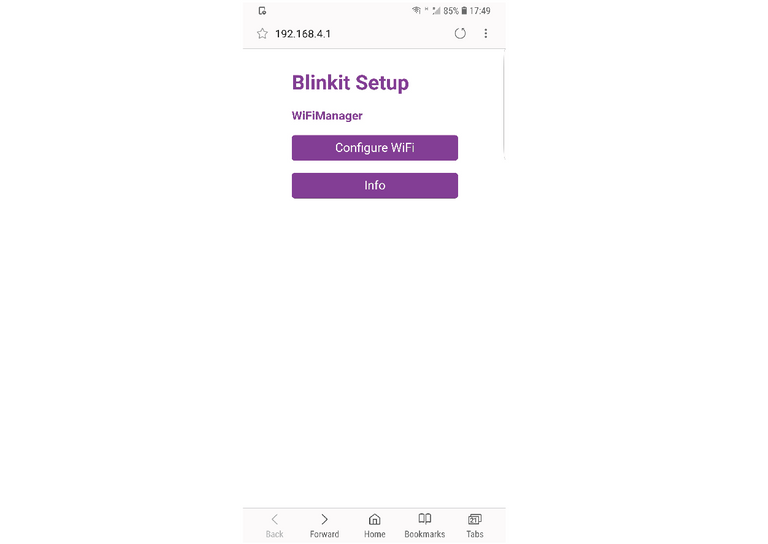
When the device is turned on for the first time it creates a WiFi accesspoint "Blinkit Setup", connect to the WiFi network and browse to the setup page, and press the "Configure WiFi button"

Select a available WiFi network you want to connect to, enter it's username and password, and enter in your, or someones Steem username you want to get upvote notifications for, and press save. The device will reboot and try to connect to the saved WiFi network, if it fails it will start the Wifi accesspoint mode again.
Splashscreen, Main screen icons, and other improvements
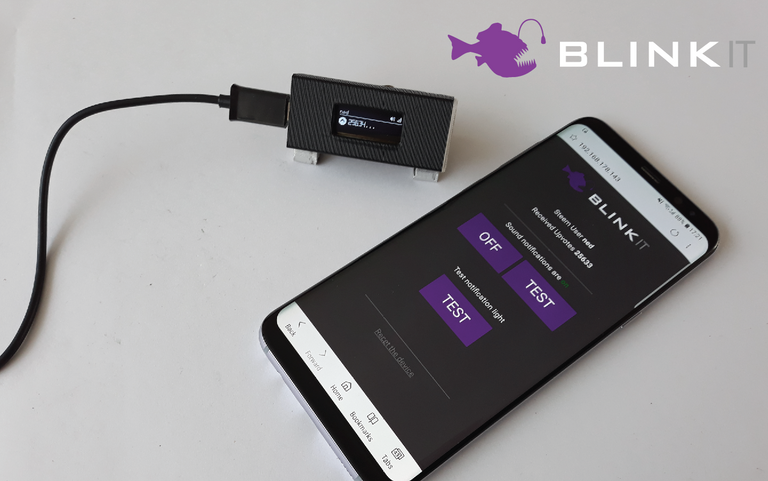
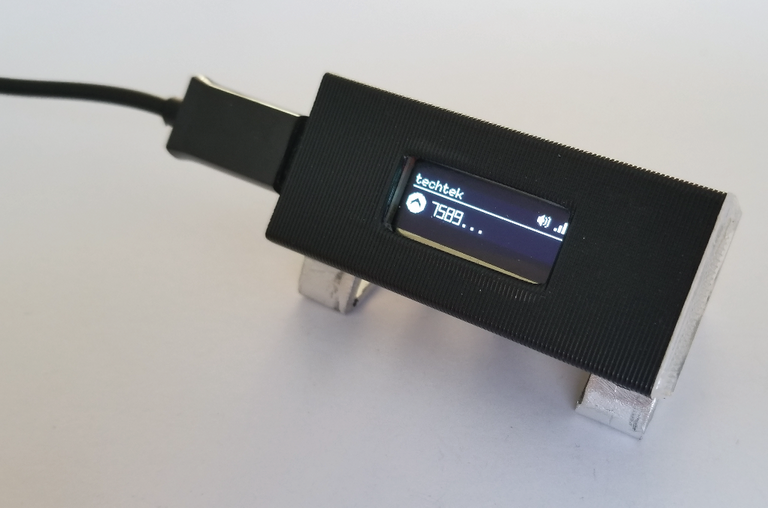
The previous version did not have any graphics displayed on the screen and had only text, but this new version have images: A Blinkit logo for the splashscreen, sound on/off icon, WiFi signal strength icon, and in front of the total received upvotes is a Upvote icon.
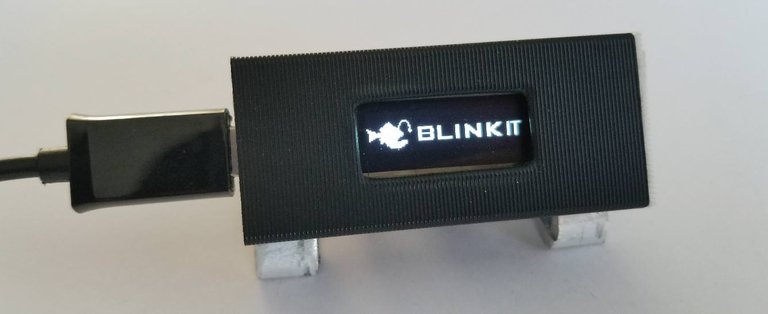
When the device starts a new splashscreen with Blinkit logo is shown.
When the device is booted and is connected it shows the new mainscreen with the total recieved upvotes and the new animated icons for WiFi and Sound.
How is it implemented ?
Made images need to be black and white and and a full screen image displayed on the oled screen would be 128x32 pixels (the resolution of the display.) the saved images needs to be converted to a XBM format (use a online converter) once converted open the image file with a text editor and the presented code can be used inside the Arduino sketch, to show the image on the oled display.
- To show in the mainscreen the Sound icon and the WiFi signal icon if statements are used to determine what icon to show.
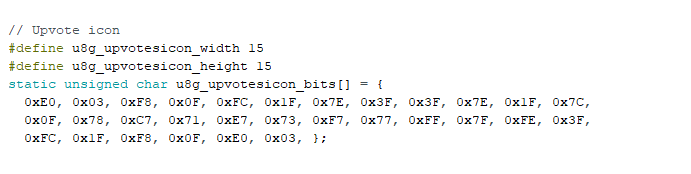
Storing the Upvote icon that is presented on the oled display

Showing the mute and unmuted sound icons when there state is changed
Other improvements
Readme is updated with the steps on how to install this new version.
A reset link is added to the Blinkit web interface that send to the web server the command to make the device reset the saved values. And to let the user know the device is resetting, the displays shows a text, to let the user now the reset is done.

Code that makes the device do a "factory" reset.
- The Blinkit .SVG logo in the web interface was generating some unexpected errors and it turned out that browsers don't like it being vector that much and instead of using a SVG vector image file with additional code to make it work, it is now changed to a more general .PNG image file.
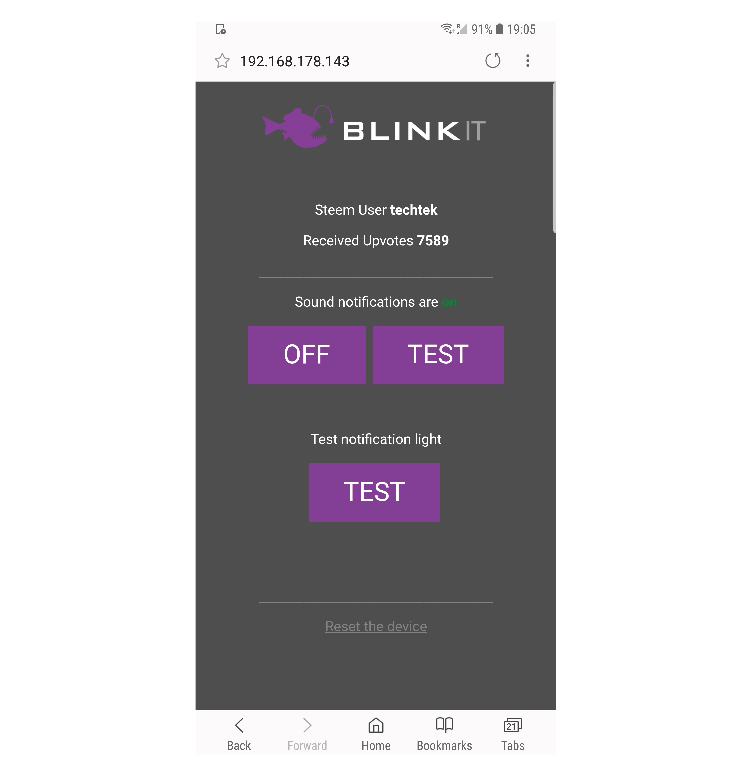
Blinkit webinterface opened on a Mobile phone
The previous posted version got suggestions from Utopian mod on things to improve on, the following point where fixed in this version as well: Changed to the suggested html breaks, removed dead code, removed white spaces.
The INO file is renamed to not include the version number, this is done so it can be overwritten on each commit and the progress of the work can be highlighted by Github.
The Blinkit repository is updated
https://github.com/techtek/Blinkit
latest commit: Blinkit v1.2
The following files are updated / added
- Blinkitstandalone.ino
- Readme
- WiFiManager library
Thanks for reading and supporting the Blinkit project, if you want to get in contact, or want to help to contribute to the Blinkit project, please feel free to join the Blinkit Discord server More details about blinkit can be found on the Blinkit website
Your contribution has been evaluated according to Utopian policies and guidelines, as well as a predefined set of questions pertaining to the category.
To view those questions and the relevant answers related to your post, click here.
Need help? Write a ticket on https://support.utopian.io/.
Chat with us on Discord.
[utopian-moderator]
Thank you for moderating and reviewing the post
Hey @techtek
Thanks for contributing on Utopian.
We’re already looking forward to your next contribution!
Want to chat? Join us on Discord https://discord.gg/h52nFrV.
Vote for Utopian Witness!
Thank you
This project is being supported by @Fundition
Fundition is a next-generation, decentralized, peer-to-peer crowdfunding and collaboration platform, built on the Steem blockchain.
#upfundition and #fundition tags on Steem represent the projects that are started on https://fundition.io.
Are You Prepared to Make the World a Better Place too?
Read the full details of Fundition Fund program
Learn more about Fundition by reading our purplepaper
Join a community with heart based giving at its core
Thanks for the support, much appreciated
Join our Discord Channel to connect with us and nominate your own or somebody else's posts in our review channel.
Help us to reward you for making it ! Join our voting trail or delegate steem power to the community account.
Your post is also presented on the community website www.steemmakers.com where you can find other selected content.
If you like our work, please consider upvoting this comment to support the growth of our community. Thank you.
Thanks for the support, much appreciated
Testing standalone module - upvotes
test
test
test
test
test