This is the 3rd post in a series of 3.
Part 1 -- Part 2

Warsaken Standard Setup Guide Part 3 [ Game Flow cont.]
In Part 2 we left off at the end of Zoff's turn. Zoff had attacked Lockwood, and the damage had been resolved. Part 3 will begin with Lockwood's next turn.
Playing The Game [cont.]
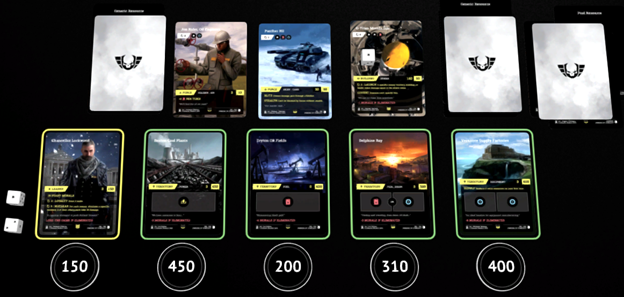
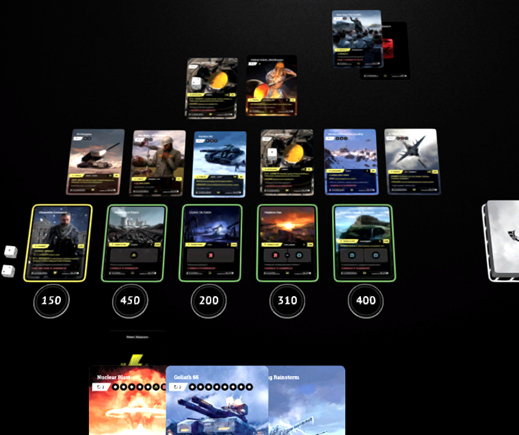
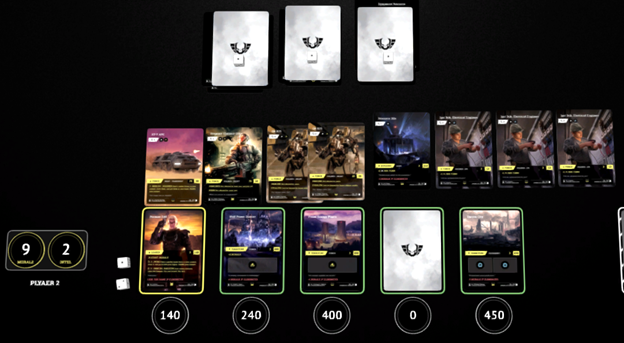
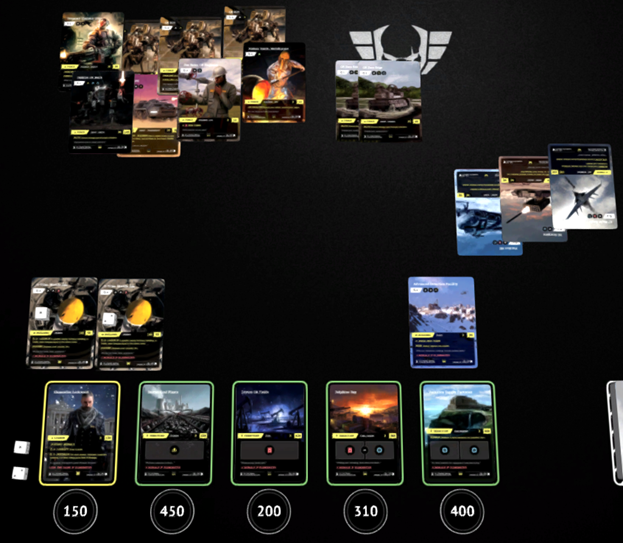
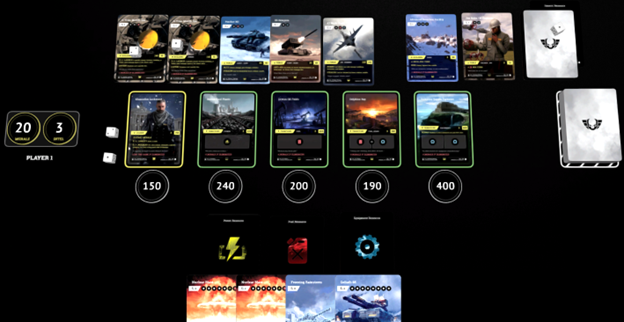
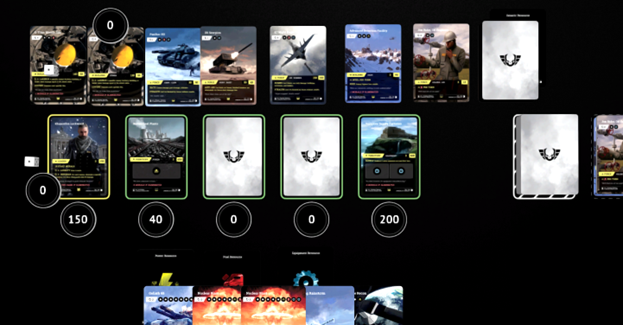
Lockwood will Return his Forces. No weather in play to remove, so Lockwood Draws a card.
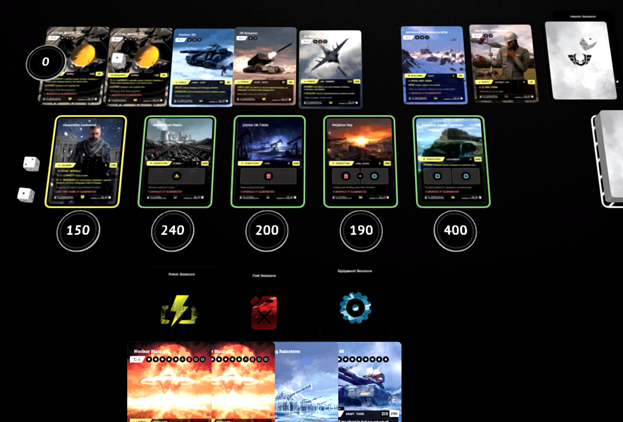
Lockwood draws a Freezing Rainstorm card and his hand now looks like this.

Let’s move into the Reduction phase.
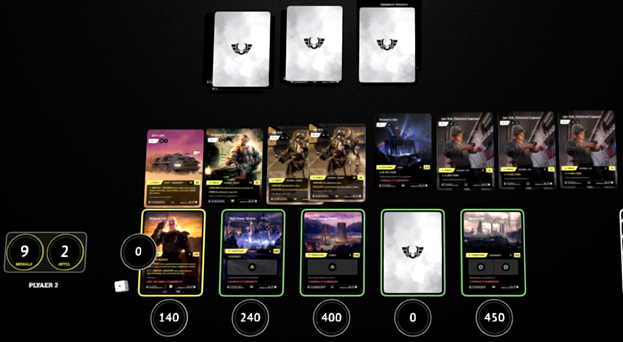
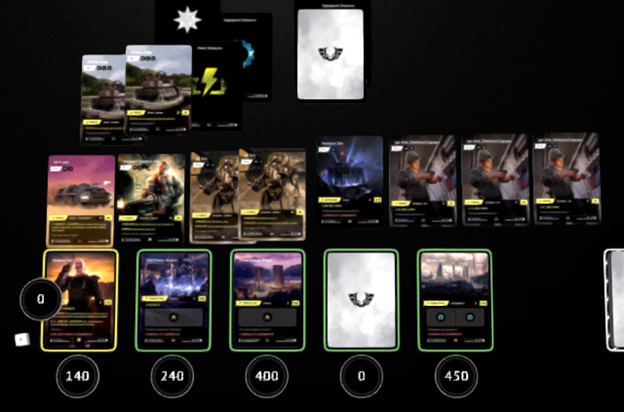
Before reduction.

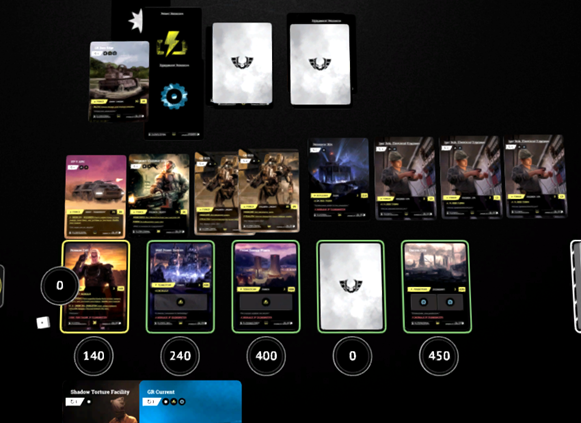
After reduction.
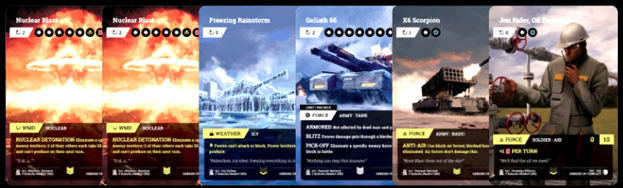
The first card to get flipped over is an X6 Scorpion.

The X6 Scorpion does not have any immediate mechanics upon initially becoming Ready. X6 Scorpion does however have the ANTI-AIR ability.
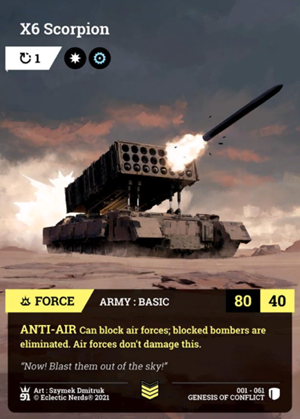
ANTI-AIR: Can block air forces; blocked bombers are eliminated. Air forces don’t damage this.
The X6 Scorpion is a really strong card when it comes to a blocking force. This card actually doubles as an Air/Ground Block or Ground attack.
When used to block air forces, X6 Scorpion becomes even a bit more desirable with the “Air forces don’t damage this.” clause. Paired together with “Blocked bombers are eliminated.”, the X6 Scorpion is a powerful air defense addition.
The next card to flip is another Advanced Detection Facility.
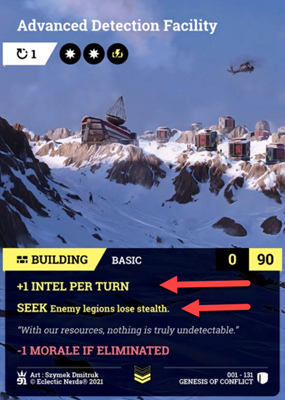
Once again Zoff loses the STEALTH ability, because once again Lockwood has the SEEK ability in play. Lockwood will also take the +1 Intel.


The next card to be flipped is the E7 Night Eagle.
The E7 Night Eagle has no immediate game altering mechanics, there is however the ability BOMBS and STEALTH.
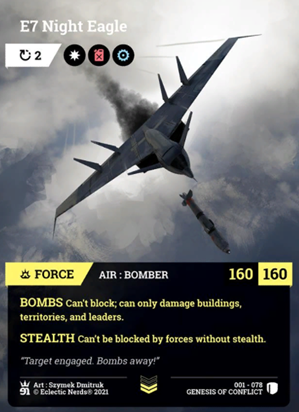
BOMBS: Can’t block; can only damage buildings, territories, and leaders.
STEALTH: Can’t be blocked by forces without STEALTH.
When a card has the BOMBS ability, the card effectively cannot be used as a blocker. This truly limits the play ability of the E7 Night Eagle, however the 160 attack damage is hard to pass up. This card packs a punch, and has STEALTH to ensure it hits when played in conjunction with the Advanced Detection Facility.
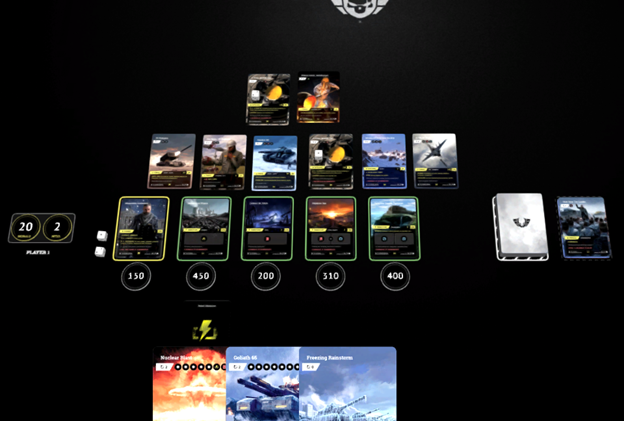
Now the Reduction phase is done. Time for Lockwood to produce his resources.
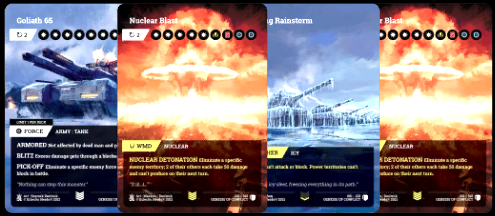
After Production Lockwood moves once again into the Play phase. Lockwood doesn’t quite have enough production this match to get out the Nuclear Blast, or the Goliath 65. So his next heavy hitter is the G-Titan Missile Silo we drew in a previous hand. I will play the G-Titan first.
Lockwood traded in 2 Equipment for the 2 Generics required for the G-Titan Missile Silo. Next I will play Nathan Smith, Metallurgist. Nathan Smith, Metallurgist require 1 Food resource. Lockwood will trade off 1 Fuel and 1 Equipment for the Food resource. Nathan Smith, Metallurgist has a Turn Cost of 0, and is immediately Ready.
Nathan Smith, Metallurgist is a Soldier : Aid. Unlike some of the other Soldier : Aid cards used for resource production, Nathan Smith, Metallurgist directly affects Force cards in your legion. By adding +20 Health to all non-soldier forces.

Immediately when Nathan Smith, Metallurgist becomes Ready, his Health bonus goes into effect.
+20 HEALTH To each non-soldier force in your legion.
This card plays pretty straight forward. +20 Health to each Force card that is not of the subtype Soldier. This card is handy when you need that extra little bit of health to make the effective block without losing the blocking Force. Nathan Smith, Metallurgist can also be stacked, if 4 are played it is +80 Health to each non-soldier force in your legion.
The next card Lockwood is going to lay down in the War Zone is Visit From Our Leader. Visit From Our Leader is a Morale card. A Morale card gives the player the opportunity to manipulate their Morale value.

When Visit From Our Leader is played, the player receives +2 Morale.
Once the Morale has been taken, Visit From Our Leader can be moved into the discard pile.

There are no more resource costing plays that Lockwood can make. However Lockwood could play the Freezing Rainstorm Weather card. I am going to opt out of playing this card at this point in the game.
Weather cards affect each player in the game equally. So when the card prevents a force attack, it also prevents the force attack for the player who played the weather card. In this game, Lockwood needs to keep his forces attacking so I will not play Freezing Rainstorm. Instead Lockwood will move into the Battle phase.
Lockwood will send the X6 Scorpion, E7 Night Eagle, and Panther RII. The E7 Night Eagle with 160 damage will hit Pons Research Centers. The Panther RII and the X6 Scorpion, with a cumulative damage value of 160, will both hit Wolf Power District.
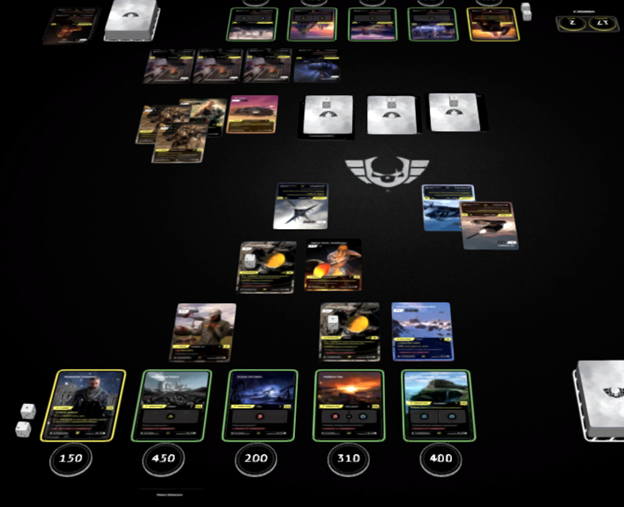
The only block Zoff could even make here is sending an Igor Bok, Electrical Engineer to block the X6 Scorpion. Once again, the attack would be blocked, however in this stage of the game, Zoff still needs his resource production and cannot afford to use Igor Bok, Electrical Engineer to block. So all damage is effective.
This will subtract 160 from Wolf Power District and 160 from Pons Research Centers.

After damage is taken.

You can see that after the damage has been resolved, Pons Research Centers is at 0. This indicates that Pons Research Centers has effectively been eliminated. Any resources that are still attached to Pons Research Centers must be returned to the Resource Bank. We must also look at the Morale loss for Pons research Centers being eliminated.
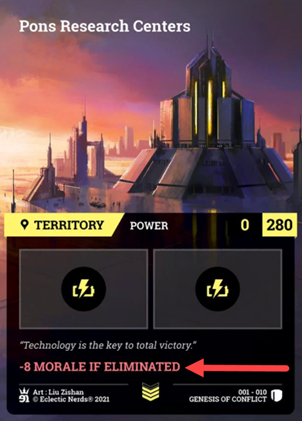
You can see that Pons Research Centers has an elimination cost of -8 Morale. Zoff must now subtract the -8 Morale for losing Pons Research Centers. He then flips the territory face down.


With the damage resolution, it is now Zoff’s turn.
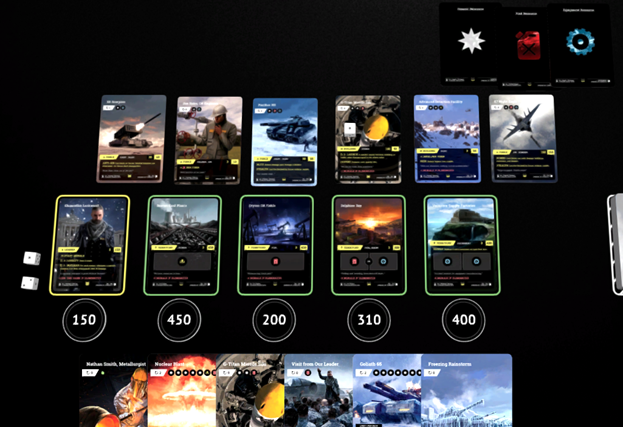
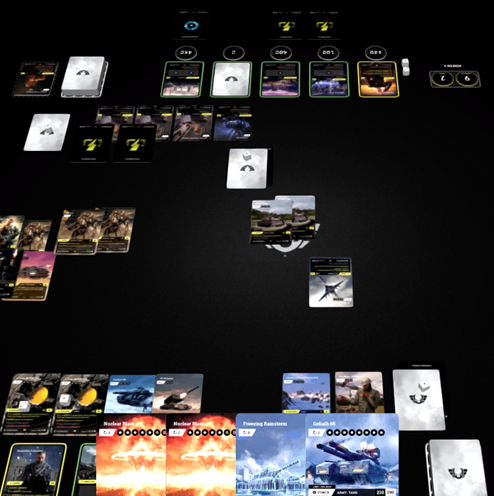
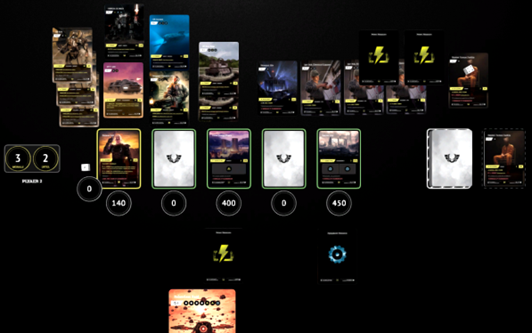
Zoff returns his last turns attacking forces to his legion. With no weather card to discard, Zoff draws a card. Zoff draws a GR Current.

Now the Reduction phase.
Before Reduction:
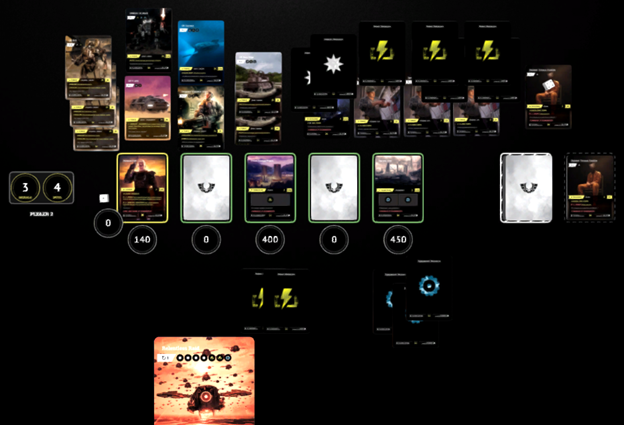
After Reduction:
Zoff’s 2 timer ability has expired again. This will allow for Zoff to pull a Drone from his arsenal during his play phase. There are also 3 cards Ready that Zoff needs to negotiate. The first card to flip is a GR Zero Edge.
There are no immediate mechanics to negotiate when GR Zero Edge becomes Ready. However, GR Zero Edge does have the BLITZ ability.
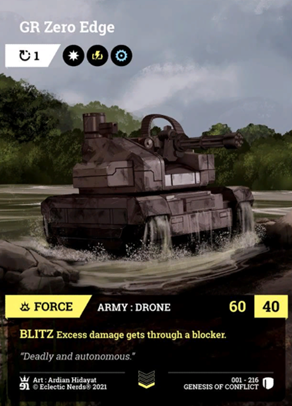
BLITZ: Excess damage gets through a blocker.
The next card to flip is another GR Zero Edge.
The final card to flip this Reduction phase is the Omega-32 Mech.
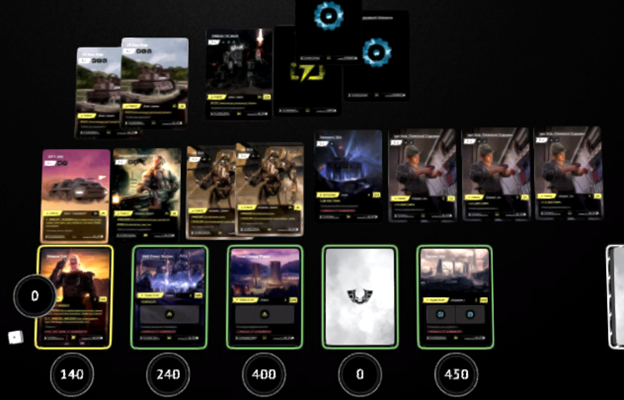
The Omega-32 Mech does not have any immediate mechanics to resolve once Ready. The Omega-32 Mech also encompasses the BLITZ ability.
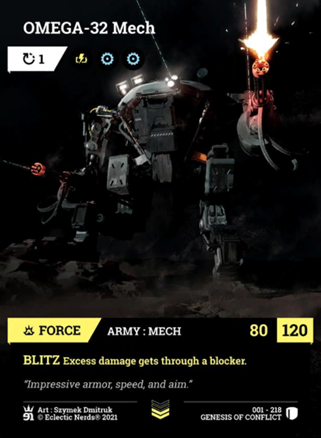
BLITZ: Excess damage gets through a blocker.
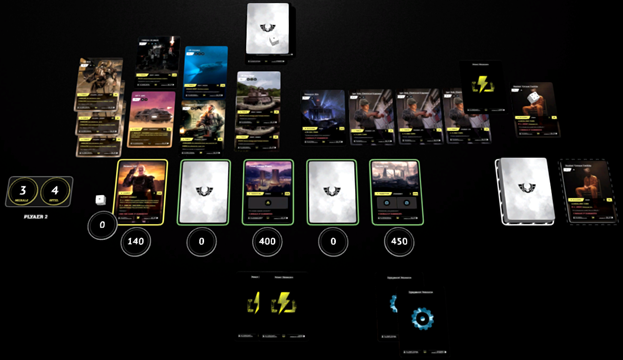
Zoff now can move into the Production phase.

Now that Zoff is done producing, he will move into the Play phase. The first thing I will do is use Zoff’s 2 timer ability PUSH. I will look through my arsenal for a Drone Force. Laying my hand face down on the game board, I can pick up my arsenal and locate any Drone force.
In this case, I need to get as much power put as possible and quickly. I will choose to pull out another G6-R75 drone, as its turn cost timer of 0 allows me to immediately play the card. I will immediately place the card with my legion and then reset, and put back into place the leader’s 2 timer.

Since Zoff only has 2 cards in his hand and plenty of resources, I will play both the cards. Even after playing both cards, Zoff will still have 4 Power and 1 Equipment to carry into the next turn.

Having played all his cards, Zoff now must move into the Battle phase.
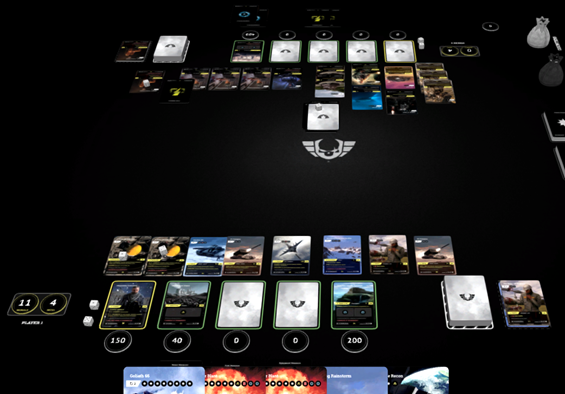
Keeping in mind, Zoff just needs to get each one of Lockwood’s territories down to 200 health, it is now time to disburse the damage.
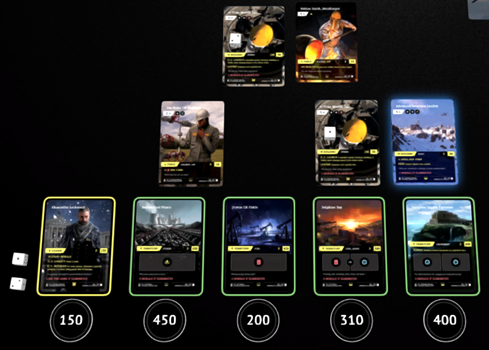
It looks like Dryton Oil Fields is already taken down to where we need it to be health wise. Looking at Delphine Bay, Zoff needs to send at least 110 damage. Looking at Vernance Supply Factories, Zoff needs to send 200. Looking at Boxton Coal Plants, Zoff will need 250 damage.

After calculations, it is decided to send Sergeant Vladimir Orlov, G6-R75(x3), Omega-32 Mech, and XT-T APC to attack Boxton Coal Plants with a total damage of 290. Zoff will also send the GR Zero Edge(x2) to attack Dephine Bay with a total damage of 120. Now it is time for Lockwood to specify any blocking he may do.
At this late stage in the game, I am pretty sure Lockwood has all the necessary components in his legion to win this match and will not need much more production. For this reason Lockwood will decide to block with his Soldier : Aid forces.
Although neither Jon Rider, Oil Engineer, nor Nathan Smith, Metallurgist have the STEALTH ability, they ARE able to block ground forces that do have the STEALTH ability due to the fact Lockwood has Advanced Detection Facility in play. So Lockwood will send Jon Rider, Oil Engineer and Nathan Smith, Metallurgist to block a G6-R75 each.
This block will effectively cancel out 80 damage from the 2 G6-R75s. Although both Soldier : Aid card only have 10 health each, by blocking, all the damage is stopped. The only time damage will ever get through a blocker, is if the attacking force has the BLITZ ability.
However, the G6-R5 has an attack of 80 and both Soldier : Aid cards have 10 Health, both Soldier : Aid cards will be eliminated and must be discarded.
All this results in 120 damage hitting Delphine Bay, and 210 damage hitting Boxton Coal Plants.
Before damage.

After damage.

With the damage resolved, it is now Lockwood’s turn once more.
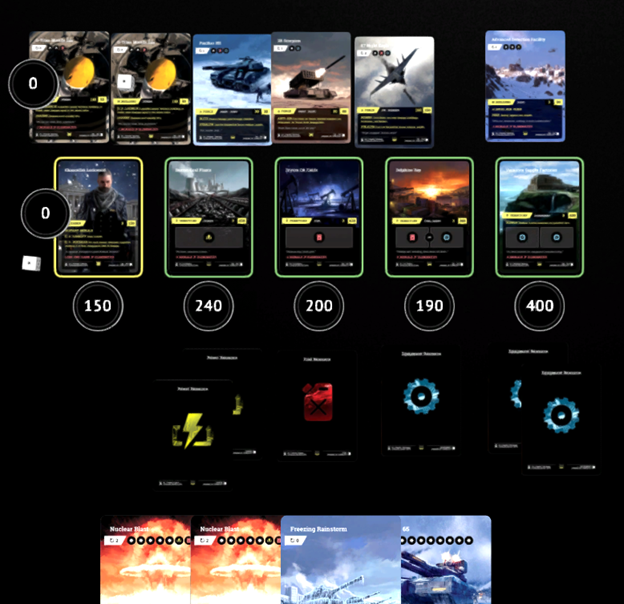
Lockwood returns his forces from last turns attack. He then draws a card. This turn Lockwood drew another Nuclear Blast.
It is now time to reduce.
Before Reduction.

After Reduction.

With the timer reductions being complete, Lockwood can now add the +1 to his Intel for having Advanced Detection Facility in play. Per Turn Intel gains happen at the end of the Reduction phase.

This takes Lockwood into the Production phase.
After production is completed, you can see Lockwood does not have enough resources to play any of his resource requiring cards. He does have the option of playing Freezing Rainstorm; however at this point in the game, Lockwood wants to be able to attack. If Freezing Rainstorm is played, Lockwood will be iced out of attacking as well because in Warsaken, Weather affects every player equally.
I can already see Lockwood has the advantage here. So Freezing Rainstorm will stay in his hand.
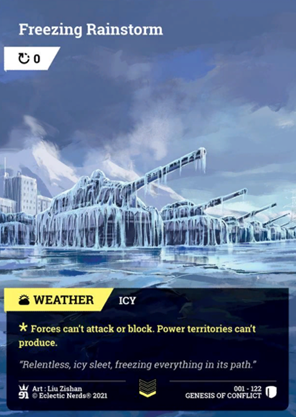
*Forces can’t attack or block. Power territories can’t produce.
When Freezing Rainstorm is played, no Force cards can attack or block, with the exception of cards having the WEATHERPROOF ability.
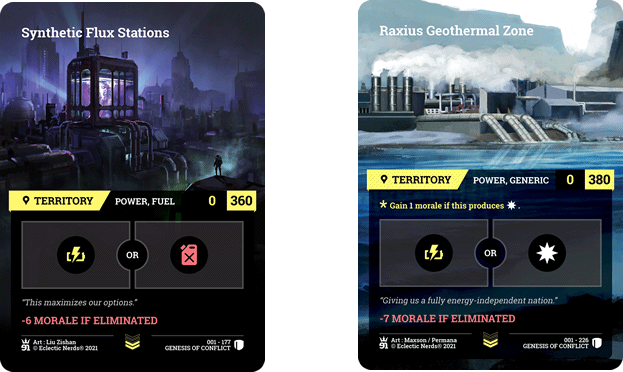
Freezing Rainstorm also prohibits any territory with the subtype Power from producing. This includes multi-resource territories such as Synthetic Flux Stations and Raxius Geothermal Zone. Neither resource can produce.
Since there are no cards to play as the hand sits now, Lockwood will execute his LOYALTY ability that activated on the last Reduction phase and he will Draw 2 cards. The timer is then reset to 2 and placed back next to the leader card.
Lockwood drew an X6 Scorpion and a Jon Rider, Oil Engineer. Now we have a couple cards to play. I will bring Jon Rider, Oil Engineer out first. The 0 cost timer will allow him to be Ready immediately, and also produce his 1 Fuel resource. The X6 Scorpion will have to wait until next turn to become Ready. I will use the Fuel resource produced by Jon Rider, Oil Engineer for my Generic resource exchange.
Lockwood still has one play to make before heading to the battle phase. One of the G-Titan Missile Silo cards LAUNCH ability is active. I would like to inflict this damage prior to the battle phase.
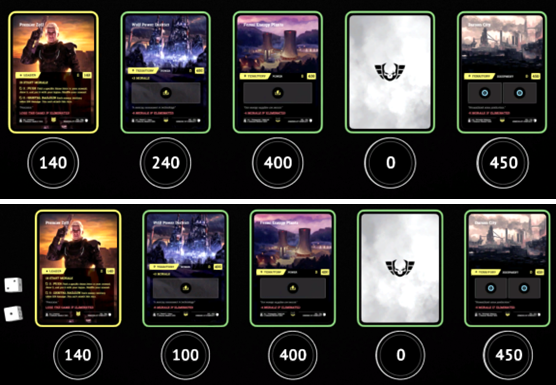
Here is how Zoff is sitting now:

If Lockwood can eliminate Wolf Power District, Zoff will lose -6 Morale bringing him down to 3 Morale total. Next turn Lockwood’s ultimate ability timer will expire costing Zoff another territory and thus bringing his morale down to 0. This will compromise Zoff, and Lockwood should have a G-Titan ready to launch. It just so happens Zoff has a health of 140, G-Titan has a damage of 140. This attack will win the match for Lockwood as you will see.
With that being said, this turn Lockwood will launch the G-Titan Missile Silo at Wolf Power District. Wolf Power District will receive an unblockable 140 damage.
Now that the LAUNCH ability has been executed, the countdown timer is once again set to 2 and placed back onto the card.
Now that Lockwood is done with his Play phase it is time to move into his Battle phase. Lockwood only needs to take out 1 territory. With Wolf Power District being down to 100 health, and the fact Zoff is without STEALTH due to Advanced Detection Facility, Lockwood can send his E7 Night Eagle with an attack value of 160. This bomber will be unblockable as it is equipped with STEALTH. Lockwood will rotate his E7 Night Eagle to be upright to the opponent, and he will specify Wolf Power District for attack.
This will eliminate Wolf Power District, and Zoff will lose -6 Morale.


As you can see, Wolf Power District had 1 Power resource still attached to the territory when it was eliminated. This resource is also eliminated and returned to the Resource Bank.
With the damage being resolved, it is now once again Zoff’s turn. Zoff will return his forces, and with no Weather to remove, he will then Draw his card. Zoff draws Relentless Raid. A bit to little to late. Relentless Raid is a Weapon Of Mass Destruction.
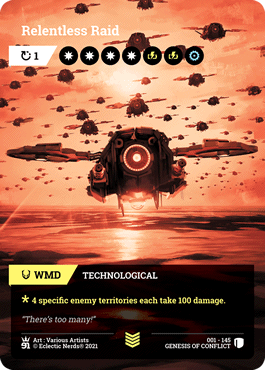
When Relentless Raid becomes Ready, the effects are immediate. With a turn cost of 1, this WMD hits quickly.
*4 specific enemy territories each take 100 damage.
Though the damage is not stackable on 1 territory, -100 damage to any territory is a big hit. If there are not 4 unique territories in play to inflict damage to, the unused damage is lost.
Zoff can now reduce.
Before Reduction.
After Reduction.

The first Ready card Zoff flips this turn is a GR Current.

When the GR Current becomes Ready, there are no immediate mechanics to be negotiated.
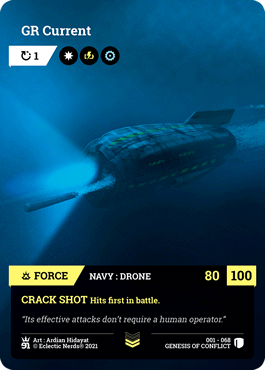
GR Current does however encompass the CRACK SHOT battle ability.
CRACK SHOT: Hits first in battle.
When a card with CRACK SHOT attacks or blocks another card without the CRACK SHOT ability, the damage from the card enabled with CRACK SHOT is inflicted prior to any damage being inflicted to the CRACK SHOT enabled card. If the non-CRACK SHOT card were to be eliminated, NO damage is inflicted to the CRACK SHOT enabled card.
FINEST can counter CRACK SHOT.

FINEST : Hits first and before crack shot in battle.
The next card to become Ready for Zoff is another Shadow Torture Facility. Once again Zoff will gain +2 Intel at the end of the Reduction phase. We will need to get the Required timer set to 4 and placed onto of the Shadow Torture Facility card.

After the reductions are completed, Zoff will take +2 Intel for the Shadow Torture Facility in play.


Now Zoff can produce.
This will move Zoff into the Play phase.
Zoff does have enough resources to play Relentless Raid, but this being his only card, this will be his only card play.
Now the only play Zoff has left is his ultimate ability timer.

ORBITAL RAILGUN: Each enemy territory takes 200 damage. You can’t attack this turn.
This will inflict 200 damage to each territory an enemy controls. Although the clause “You can’t attack this turn.”, really ties Zoff’s hands.
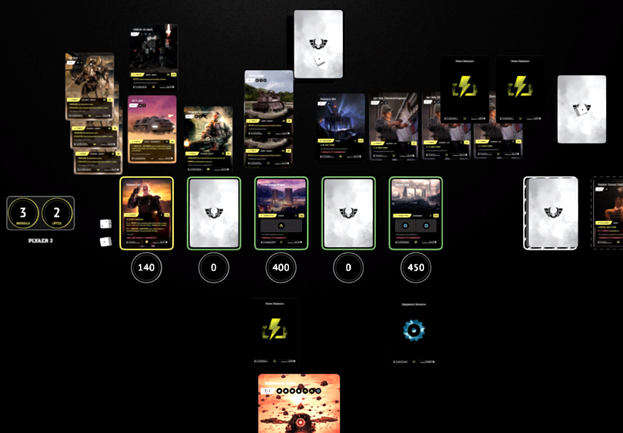
Lockwood will subtract -200 health from each one of his territories.

This will cause Dryton Oil Fields and Delphine Bay to be eliminated. Dryton Oil Fields has a Morale loss of -4 and Delphine Bay has a Morale loss of -5 for a total of -9 Morale loss.

With Zoff no longer having any cards to play, and the fact his ultimate ability is preventing him from launching an attack, it now becomes Lockwood’s turn.
Lockwood will return his E7 Night Eagle from last turns attack. With no Weather to remove, he will Draw a card. Lockwood draws Satellite Recon.

Lockwood can now reduce.
Before reduction.

After reduction.
Lockwood has another X6 Scorpion Ready to flip. He is also sitting on 1 G-Titan Missile Silo LAUNCH activated and his ultimate ability timer activated.
At the end of the reduction phase, Lockwood is able to take +1 Intel due to the Advanced Detection Facility he has in play.
This game has drawn to a head. Lockwood has enough to win right now. I will skip the final production phase and move directly into the Play phase. A player is able to strategically enable abilities that are Ready and exist on separate cards. Knowing this, Lockwood will execute his ultimate leader ability.

NUCLEAR: For each enemy, eliminate a specific territory; 2 of their others each take 50 damage.
The execution of Lockwood’s ultimate ability will compromise Zoff. Lockwood could pick any territory at this point, each one that is left has a Morale loss greater than 3. Lockwood picks Fermi Energy Plants which has a Morale loss of -4. Also the only territory Zoff will have remaining, Darson City, will see an additional -50 damage.


With Zoff now compromised, Lockwood will launch his G-Titan Missile Silo which has a attack value of 140, just enough to eliminate Zoff. Game Over. Lockwood Wins. A look at the final War Zone.
Although this match ended in Lockwood having the G-Titan ready to fire, not all games end in this way. For the most part you will find a Force attack on the Leader at the end of a match. If this were the case in this match, Lockwood could have attacked Zoff with his E7 Night Eagle. The 160 AP of the E7 Night Eagle would have also eliminated Zoff. Not to mention the bomber would be unblockable having STEALTH, and Lockwood also having the Advanced Detection Facility in play.
This will conclude this guide for Warsaken Standard. If you made it this far I hope you learned at least 1 tidbit along the way.
Special thanks to WarNeverChanges- The Sensei, xXSparkyXx, Cubos the Weatherman, stolengoods and BrandonWarsaken. Thanks for all the rule clarifications.
See you in the War Zone…
@relaylogix – Victorias Ballistic