In this post we will see how to install Nvidia tools to overclock our card, and use EWBF CUDA.
For this tutorial you need Ubuntu 16.04 on a fresh server where your GPU is linked.
First we login using SSH on our server, we will perform update of it, just tip :
sudo apt-get update -y && sudo apt-get upgrade -y
After that we need to install kernel header :
sudo apt-get install -y linux-headers-$(uname -r)
Just to be sure, reboot your server :
sudo reboot -h now
Ok now we will install the drivers for nvidia:
sudo apt-add-repository ppa:graphics-drivers/ppa
sudo apt update
sudo apt install -y nvidia-370 nvidia-cuda-toolkit
sudo nvidia-xconfig -a --cool-bits=31 --allow-empty-initial-configuration
After successful install reboot:
sudo reboot
Now we will download the nvidia driver version 370.28, we will use this version otherwise we are not able to overclock or control our card.
You can check the link here (http://www.nvidia.com/content/DriverDownload-March2009/confirmation.php?url=/XFree86/Linux-x86_64/370.28/NVIDIA-Linux-x86_64-370.28.run&lang=us&type=GeForce ) , but we will see all the step to download it directly to the server.
Become root :
sudo su root
Next we download the drivers and give executable permissions :
wget http://us.download.nvidia.com/XFree86/Linux-x86_64/370.28/NVIDIA-Linux-x86_64-370.28.run
chmod 777 NVIDIA-Linux-x86_64-370.28.run
Before running the installer we need to kill X and gui if running :
service lightdm stop
killall nvidia-persistenced
Ok now we are ready to run the installer, run it like the next command and follow instructions :
./NVIDIA-Linux-x86_64-370.28.run
When finished reboot your server.
Ok now we will check if we can detect our cards :
nvidia-smi
the output will look like this:
+-----------------------------------------------------------------------------+
| NVIDIA-SMI 370.28                 Driver Version: 370.28                    |
|-------------------------------+----------------------+----------------------+
| GPU  Name        Persistence-M| Bus-Id        Disp.A | Volatile Uncorr. ECC |
| Fan  Temp  Perf  Pwr:Usage/Cap|         Memory-Usage | GPU-Util  Compute M. |
|===============================+======================+======================|
|   0  GeForce GTX 1070    Off  | 0000:03:00.0     Off |                  N/A |
|5%   66C    P2   5W / 190W |    607MiB /  8112MiB |    0%      Default |
+-------------------------------+----------------------+----------------------+
You have two tools direct from NVIDIA - nvidia-smi and nvidia-settings. With nvidia-smi you can primary query data from the gpus.
Ok perfect we have our card, we will perform some basic task, set the fan speed to 100% to decrease temp of the GPU, but before you run command you need to start Xorg :
X :1 &
export DISPLAY=:1
Now we can perform our tasks using nvidia-settings :
- Fan speed :
nvidia-settings -a [gpu:0]/GPUFanControlState=1 -a [fan:0]/GPUTargetFanSpeed=100
- Higher the Memory Clock rate ( becarefull to not go to high as you will brake your card ):
nvidia-settings -a '[gpu:0]/GPUMemoryTransferRateOffset[3]=1430'
- Increase the GPU clock rate, do it step by step as you will freeze the system:
nvidia-settings -a '[GPU:0]/GPUGraphicsClockOffset[3]=+110'
Repeat this step for each card replacing the value [GPU:0] with the number of your GPU.
Ok so for now we have our hardware ready, we will download the miner and connect to hebusio.com zen pool ( https://zenpool-eu.hebusio.com ).
cd
mkdir zen_miner
ce zen_mine
wget https://github.com/nanopool/ewbf-miner/releases/download/v0.3.4b/Zec.miner.0.3.4b.Linux.Bin.tar.gz
tar xvzf Zec.miner.0.3.4b.Linux.Bin.tar.gz
We will check if all is ok before demonize our miner, note that the password can be anything you want :
./miner --server zenpool-eu.hebusio.com --user YOUR_ZEN_ADRESS.CUSTOM_NAME_FOR_YOUR_WORKER --pass YOUR_PASSWORD --port 3032
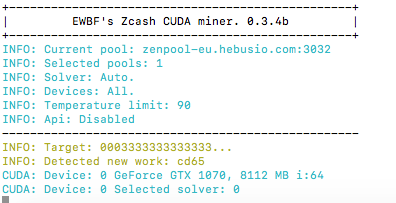
If all is ok you will see something like this:

You will get approximately 400 sols/s .
No just run :
nohup ./miner --server zenpool-eu.hebusio.com --user YOUR_ZEN_ADRESS.CUSTOM_NAME_FOR_YOUR_WORKER --pass YOUR_PASSWORD --port 3032 &
It will create a nohup.out file where you can check your miner stats with the command:
tail -f nohup.out
Wonderful your miner is mining on https://zenpool-eu.hebusio.com, just go to this address using your webbrowser and check your worker stats.
Happy ZenCash mining
Hi. Is the sol rate the same as the hash rate you should achieve?
the sol rate is the same as hash, for eth you will be around 30 and with a little overclock I have 460 sol ( 460 h )
Congratulations @masterdubs! You have completed some achievement on Steemit and have been rewarded with new badge(s) :
Click on any badge to view your own Board of Honor on SteemitBoard.
For more information about SteemitBoard, click here
If you no longer want to receive notifications, reply to this comment with the word
STOPdoes this also apply to ubuntu 16.04 desktop?
yes
Thanks for putting this together. Going to start mining ZEN asap!!
Thanks. Great guide. I was having trouble with 17.
So this command no longer works: sudo apt install -y nvidia-370 nvidia-cuda-toolkit
It must not be on the server anymore. If I figure anything out I will be sure to post it here. The 384 version, current version, does work, but you say that isn't ideal.
Did you manage to figure anything out?
Did you manage to figure anything out?
No. I switched to EthOS. ethosdistro.com. Here is a good guide by @blockops https://steemit.com/cryptocurrency/@blockops/how-to-build-and-run-a-6-gpu-mining-rig-for-zcash-or-ethereum-with-nvidia-gtx-1070
bummer
what happens when I won't install those drivers? I'm on 750 gtx
Thank you SOOO much. I added a 3rd card (1070ti)to my 2 card rig (1070s) and I could not get the card working for the life of me. redid your instructions and now I can control everything again! thanks so much.
I am curious if it is possible to mine cryptocoins using this setup on a headless machine without running Xorg. After you complete your configuration can you exit Xorg and run the miner from console ? From your article I've understood you only need Xorg to configure the video card right?
Congratulations @masterdubs! You received a personal award!
You can view your badges on your Steem Board and compare to others on the Steem Ranking
Vote for @Steemitboard as a witness to get one more award and increased upvotes!