With ARK Core v2.6 we’re focusing on making the multi-signature implementation as useful as possible for end-users. So, we’ve developed a Multisignature Server which can be run as a standalone server — enabling users to successfully create and use their own multisignature wallets.
In the previous blog post, we covered the basics of **Schnorr’s multisignatures** (multisig), just one of the new features implemented in the Core v2.6 release. We covered how it works, the use-cases and why it’s important. But that’s not the end of the story… from a user’s perspective, there needs to be a way to collect signatures from other participants in order to register and use a multisig address. This is where a Multisig Server comes into play.
Multisig Server repository available at: https://github.com/arkecosystem/multisig-server
How does it work?
The Multisig Server acts as a hub to verify & collect ARK multisig signatures. The clients (eg. Desktop Wallet) can connect to the server in order to obtain information on whether any addresses stored in the client has any pending transactions they need to co-sign in order to broadcast them to the network from the client to a Core relay.
To put this into perspective, let’s go over the process with a simple multisig example. Here, one of the participants wants to send funds from the multisig address that is registered as a 2 out of 3 multisig. This means there are a total of 3 registered accounts that can sign on behalf of the entire multisig account, but the minimum number of signatures required for successful signing and inclusion of the transaction on the network is 2 signees.
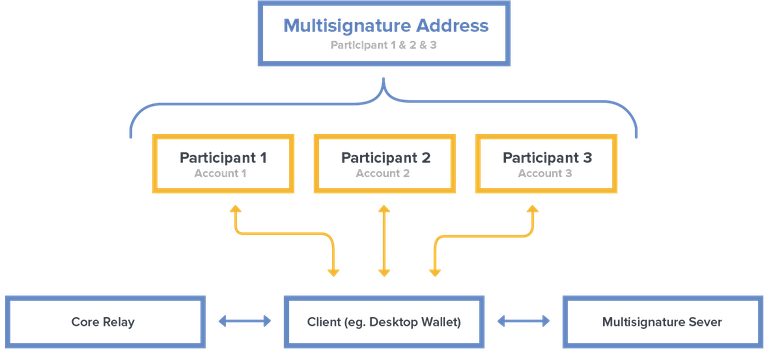
On the image above we have:
Multisig Address— the multisig address whose owners are the participants 1, 2 and 3 (the ones that registered it).
Participants— ****3 different user account/keys that are part of a multisig address that was registered as a 2-out-of-3 multisig address in our example.
**Client **— in our case the client is the Desktop Wallet where users view, send and interact with the ARK blockchain.
Multisig Server — the ****server responsible for the collection and verification of signatures that are required for a multisig transaction.
**Core Relay **— ****ARK Core where a transaction must be broadcast to in order to be verified and included in a block. This is the backbone of the blockchain.
One of the participants (be it 1, 2 or 3) wants to send funds from the multisig address which they are all a part of. They open the client (in our case, the Desktop Wallet) and initiate a transfer transaction from the multisig address and sign the transaction with their own key. The Desktop Wallet will then broadcast the new multisig transaction to the Multisig Server that it is currently connected to. The Multisig Server verifies the transaction and if the provided signatures are valid, it is stored.
Now we need one of the other two participants to open their client and sign the same transaction in order for the client to successfully broadcast the transaction to the network (to one of the Core relays). The second participant opens their Desktop Wallet, which connects to the same Multisig Server. It determines if their current wallet has any pending transactions that need to be signed. If there are any (in our case the one from the first participant)this is highlighted to the user and is shown as a transaction pending a signature. The second participant opens and verifies the transaction, and if everything is correct (amount, recipient, …. as pre-agreed with participant one) the user simply needs to sign it and that signature will be sent to the Multisig Server.
Since we now have the minimum required signature count for the multisig address (2 out of 3), the transaction can now be broadcast to the Core relay after it has been signed by the second participant. If everything is correct, the transaction will get included in the blockchain and the funds will be successfully transferred.
Some things to consider:
It is possible that the Multisig Server could be flooded with transactions. So, if you’ll be running your own servers then only share IPs with those who you trust.
Multisig Server pools aren’t shared across different multisig servers. Owners of a multisig wallet must be connected to the same multisig server if they want to obtain data / see the multisig transactions that need to be signed from that wallet. If all participants of a multisig wallet aren’t connected to the same multisignature server then they cannot successfully sign the transaction.
The signatures can stay in the Multisig Servers transaction pool for up to 24 hours, which should be more than enough to gather all the signatures needed. Once this lifetime is reached they will be removed from the multisig server and the transaction will need to be generated and signed again.
How is the Multisig Server structured?
The Multisig Server is constructed of two packages:
**CLI Package:** Which is a CLI (Command Line Interface) similar to Core, where you operate the multisig server application (start it, stop, restart, update, etc…). This package makes use of the server package underneath.
**Server Package:** This is the server responsible for the collection and verification of signatures. In order to use it, you have to integrate it into your application or install it as part of the bundle we offer.
How can I run a Multisig Server?
To set up your own instance or look over the codebase visit https://github.com/arkecosystem/multisig-server
While we officially provide a supported multisig server that can be used on Devnet, we recommend (as the nature of decentralization and to not depend on any central point of failure) to run your own multisig servers or use the ones that are provided and supported by other entities.
Devnet multisig server is located at:
No SSL: http://167.114.43.60:9999
The Multisig Server can be installed with one simple command:
yarn global add @arkecosystem/multisig-server-cli.
You can start the server by running a CLI command, eg. if you want to start it for Devnet and API port 8100 (where the server will be accessible on): multisig-server start --network=devnet --host=0.0.0.0 --port=8100.
Do note that for any command you run (if it's not testnet) you will need to add a flag for the said network as seen in the commands below.
If you want to see the status of the Devnet multisig server you can run:
multisig-server status --network=devnet.
If you want to see the log of the Devnet multisig server you can run:
multisig-server log --network=devnet.
To learn more about which commands you can run and how to install it visit https://github.com/arkecosystem/multisig-server#installation
The multisig server is just one of the options for easier end-user multisig interactions. Alternatively, you can generate signatures manually and send it to other participants via other mediums of exchange (email, SMS, chatting applications, … ), but that requires some additional steps and is not as intuitive as using a multisig server.
We cannot wait to see what others have in store for multisig implementations and hope to see even more innovative solutions from our community and developers.
Read our new whitepaper! Follow us on social media ( Twitter|Facebook|Reddit ), join our community ( Slack | Discord ) and stay tuned to our blog on Medium and on Steemit.