Photo by MUILLU on Unsplash - Art-ified By Me

The thumbnail in this post is a prime example of going that extra mile to add value and visual impact to a written post. It doesn't have to be a Van Gogh. You don't have to own a thousand dollar camera and become a professional photographer. All that is needed to elevate your post to the next level is a few tools, a little photo editing knowledge and the will to make your post the best it can be.
You can source high quality creative commons licence images from pixabay.com and unsplash.com as the canvas for your experimental art. Using websites such as deepdreamgenerator and artbreeder.com photos can be altered to a high degree. Finally, GIMP photo editing software is a great (free) alternative to Photoshop to make final changes and add text.
So, how did I arrive at the edited version of my thumbnail?

Step 1: Think about the subject of your post.
When I chose this image I wanted something that expressed the feeling of an artist making art. The visual idea in this photo fitted with the theme of my post, and the photo I chose was simple with plenty of scope for modifications. Notice the black area in the bottom right hand side of the picture; a perfect space for text.

Step 2: Experiment with deep dream generator.
This is my website of choice when trying to modify images in an arty or psychedelic way. It produces really unique and strange results without having to spend crazy amounts of time editing in GIMP. That comes later 😉

To use deep dream generator you have to sign up with an email and then log in. After using this website for a while you develop an instinct for which styles are going to work. There are three sections to choose from; deep style (preset deep dream style), thin style (paper arty style) and deep dream (full customization for psychedelic art).

First upload your image using the button at the top of the page and then chose a style. I went for deep style, popular styles and then went with a choice that looked arty. Once you've chosen, click the generate button at the bottom of the page.

It can take up to 5 minutes to generate the image sometimes. I usually spend this time doing some ab crunches or push ups.

Bingo! I got lucky and the modifications were perfect for my purposes. But in all seriousness, after using this website for a while you get a feel for what will work from the preset styles. For true experimentation try the deep dream option.
Step 3: Adding text using GIMP photo editing software.
Open GIMP and create a new background area.

When prompted change the dimensions to 1820/1023 width/height. This is the perfect dimensions for a thumbnail that will display well on most steem front ends and dtube.

Next drag and drop your image into the window and click yes if prompted to convert it.
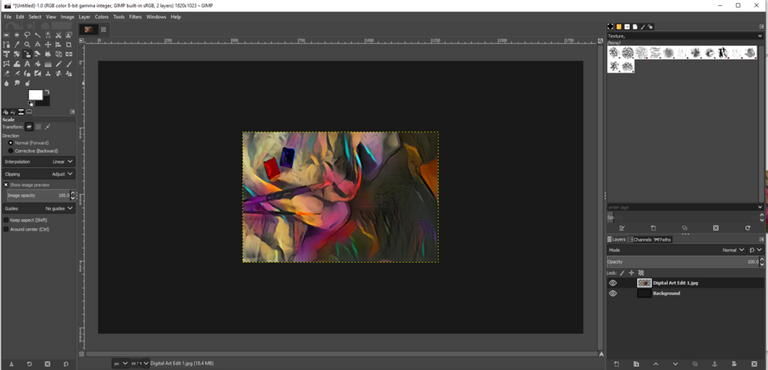
Next we need to resize the image to fit in the 1820/1023 area and move it so that it is showing the most appropriate part of the image. Click the scale tool (as highlighted in the below screen) in the tool box at the top left, hold shift to click the corners and drag the image larger while retaining the aspect ratio.

Click scale once the image is scaled to line up with the left and right hand side of the background area. Then hold Ctrl key while using the mouse wheel to change the viewing area so you can see the whole image.

Click the move tool (as highlighted in the screen above) in the tool box at the top left, and left click hold to move the scaled image within the 1820/1023 background area to provide the best part of the image.

Next, click the text tool (as highlighted in the screen above) in the tool box at the top left, and click where you want the text on your screen. Then paste, or type, the title text.

To change font and size highlight the text, left click and hold drag across the text, then you can change the font on the left hand side of the GIMP window just below the tool box. As long as the text is highlighted, you can change all aspects such as size, font and color.

Once you have got the right size and style of font, move the text to where you want it using the move tool in the tool box at the top left.
Now we're going to use a pipette function to make the lettering the same color as one of the pigments in the photograph and add a border to make the lettering stand out.

First you have to click on the writing with the text tool initiated and then highlight the text (as explained above). Click the little white (color) box at the bottom right corner of the text pop up editor above your writing.

And then click on the little pipette-on-screen icon on the right hand side of the pop up window. Click an area of the screen where you would like to copy the color, and then click OK.

The text should change to that color and then you can move on to the border. Right click the top layer (text layer) in the layers box at the bottom right of the screen in GIMP. Then choose 'alpha to selection' in the menu. This will create a flashing line around your text.

Next you want to click 'create a new layer' which is located at the bottom left of the 'layers box'. Name it border and click OK. The new layer will pop up at the top of the layers section and you need to drag and drop it below the text layer (one down from the top).


Now click 'select' menu at the top, then the 'grow' option from the drop down menu.

This basically defines the thickness of the border for your lettering. I changed the grow parameter to 2 as the lettering I was using was thin but for thicker lettering 5 or even 10 is better.
The next step is to change the foreground color to a complimentary color from the image. It is best to go for a color that stands out against the color of the lettering while still fitting the theme of the art. Or you can just use white border on black background and visa versa. To change foreground click on the top of the two color boxes in the far left middle of the GIMP screen and then follow the pipette procedure described above.

Once you have the desired color for your letting's outline set to foreground, click the edit menu at the top and click 'fill with FG color' option from the drop down menu.

To remove the flashing outline and see how the finished image looks, click the 'select' menu and then 'none' from the drop down menu.

To save your final image click 'file' menu and then 'export'. I recommend exporting as a PNG file but there are also options for JPG if the finished work is too large for upload in PNG format.
That's it! You're done and can sit back and enjoy your digital art.

A Note to Shit Posters
I see some people on steem who get very angry about the #newsteem downvote ethos and honestly it makes me wonder what world they're living in! I see so many people pissed about their single picture, two paragraph post being downvoted to the tune of ten dollars because they used bidbots.
So let me spell it out to you guys... some of us spend many hours, making sure that our posts are original and unique. Hours of work and we still don't buy votes for profit.
If you think that you deserve even $3 or $4 worth of profit for bought votes when you've put four to five minutes into creating a post you're delusional and deserve every one of those downvotes. There are people on here who have been writing interesting articles/stories for years and receiving little or moderate support.
The question you need to ask yourself is; am I bringing value to the ecosystem with my content?
I honestly want to see everyone do well on steem. The only way this will happen is by growing both the value of the token and the community. But it is very important not to grow community at the expense of content, or at the very least foster an understanding that rewards are proportional to effort. Whether that be from the quality of your content, networking skills or both. The important thing is that you add value to steem.
Does a one pic, two paragraph post add value? Maybe, someone somewhere will find it appealing. Many people have short attention spans, but when people outside of steem see these types of posts with large payouts, whether through organic (auto) votes or bidbotted votes, it creates false expectations.
I would put my money on these false expectations being the reason why a vast majority of people leave steem within the first few weeks. It's the false expectation of easy money that has caused many of the problems that are now being addressed with #newsteem and the EIP.
I hope that my content has provided someone with value and also maybe helped any newer members of the community to see past false expectations. If even one person takes this tutorial and learns how to add value to steem by pimping their post with some digital art, I will know I have done my job as a content creator.
Thanks for reading.


The result is amazing. Thanks @raj808 for this authentic treasure chest of tips! Also I couldn't agree more with you on the shitpost note 😉
Thanks for the encouragement @bananafish :)
This doesn't surprise me as I've never seen a shtpost emerge from any in the bananafish realms. It's one of the communities that produces only high quality creative writing that adds value to steem 100% :)
Really nice tips and super-detailed guide. Got to step up my thumbnail game too.
There you go bro ✌
!SKATE20
Posted using Partiko Android
Hi @knowhow92 and thanks for the skate tokens.
Glad you enjoyed the guide and found some value in it :)
P.s. I've seen many of your skate vids bro and I don't think you have to worry too much about your content lol I know how long it takes to edit a decent video... not too mention how long it takes to become even half decent at skating ;-)
I'm a retired skateboarder myself so it's always fun watching all the skaters on steem ripping :) Keep doing what you do mate. I'm really lame when it comes to commenting, mainly cause I'm tired all the time but rest assured that if you've seen a vote on one of your vids m8, I've watched it all the way through.
Thanks for your words of confidence Raj. I am so glad my videos entertain you, that's the goal.
Well, I wanted to step up my thumbnail game anyways and seeing your guide makes and how detailed everything is is just perfect.
Just saved your post on my Chrome browser.
Thank you again man ✌✌
Have a great day
Posted using Partiko Android
That's great to hear that this tutorial will help m8 👍🙂
I'll keep my eyes peeled for some crazy arty thumbnails on your posts.
Posted using Partiko Android
@knowhow92 tipped 20 SKATE TOKENS for this post!
NO!!!! NO!!! YOU ARE GIVING AWAY THE SECRETS OF THE INNER CIRCLE!!
You must be punished
Ha ha... shit I didn't know there was a secret society for GIMP users!!! I must have been given the higher dose of Rohypnol after the initiation ceremony ;)
I shall advise the elders, perhaps they will go easy on you!
Damn... does this mean I've got to find the GIMP mask 🤣
Posted using Partiko Android
And wear it to the Gimp temple!
Put on your Sunday best and get ready for temple! I bet the minister would give up the hand shake battle pretty sharpish ;)
Hehe, I bet he would. That's a flipping magic pic!
After going through all this I'm glad to say I'm beautifully confused, truth is I've been wondering the secret to your colourful posts until I saw this man
Ha ha, yeah it is the culmination of 2 years of messing with GIMP photo editing. I taught myself but I took my time learning ;-)
The school of YouTube and all that :)
2 years? Damn how do I cope with that? 😄I'm probably the laziest person you know around 😄 so I'll just think mine might take 15 years
I might try and make a video of some gimp photo editing methods one day. Just need to download a screen capture software.
I'm just more comfortable writing at the moment. Been out of the mood for video editing recently.
Ha ha, 15 years and you'll be as old as me Jose 🤣
Posted using Partiko Android
If I'm old as you then I'm inheriting all your wisdom and understanding and that's totally fine by me 😅.
Yeah I guess when you find that time, that video will come in handy
Thank you so much for participating in the Partiko Delegation Plan Round 1! We really appreciate your support! As part of the delegation benefits, we just gave you a 3.00% upvote! Together, let’s change the world!
Oh my god maybe just maybe this tutorial will be the reason I start understanding gimp. I'm such an idiot when it comes to these kind of software things. I wish wish wish I could create something great myself, but I just don't know how to.. I really feel lost in the sea of options/buttons in these software packages. Let alone when I would try photoshop, total waste of money before I even maybe maybe understand it a bit :)
Let me see what I can do after going through this tutorial with a cup of coffee one of these days <3
I might try and make a video of some gimp photo editing methods one day. Just need to download a screen capture software and do a step by step!
I'm just more comfortable writing at the moment. Been out of the mood for video editing recently.
My genuine hope is that this tutorial might add value to peoples experience on steem, but at the end of the day I know it's complicated. But you can do a lot with deepdreamgenerator even without the gimp editing part :)
P.s. you've created many great things I've seen the last year I've been following you @anouk.nox
Never forget that you're amazing 👍
O how I wish I had some techno sense...... it is amazing what one can do on a computer. Very nice.
Cheers.
Yes, it took me a while to gain these skills to the point where they're ingrained in my memory. Like so many things it's just a case of repeating the process until it becomes second nature 🙂
Posted using Partiko Android