If you have ever done any programming this tutorial is not meant for you. It is prepared for complete beginners who have never seen and try any coding.
We will begin part 3 with an option that will speed up our process of getting familliar with the interface.
If you have missed part 1 and 2 it is available here:
App inventor supports importing of project .aia files. For tutorial part 3 you can download the project file here so we can make sure we will be working on the same foundation.
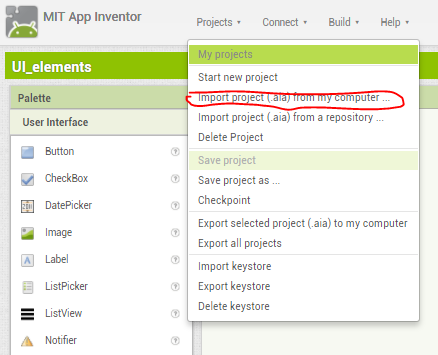
In this part we will get familliar with user interface components. Let's begin with opening the app inventor and downloading the project file. We can import it with selecting the projects button at the top and clicking on Import project (.aia) from my computer.
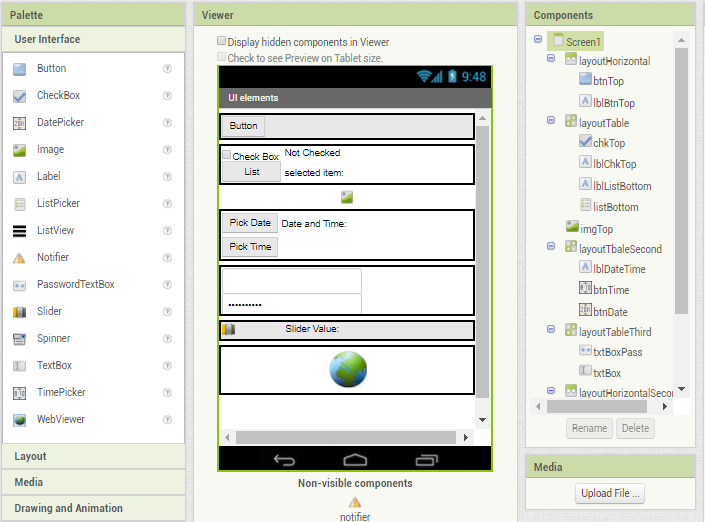
On the design screen of imported file, you can see all the available UI elements in App Inventor. I am sure that all of us already know what the functions of the button, label, checkbox and other elements are.
All the elements are laid out on the screen using the layout templates. We have 4 different options to arrange them in the designer.
- horizontal
- horizontal with scroll -> this means we are not limited with the screen width
- table arangement
- vertical and
- vertical with scroll -> we are not limited with screen height
We can name each arrangment so we will know on which one we are working, apply alignment of elements inside it and change height and width of it.
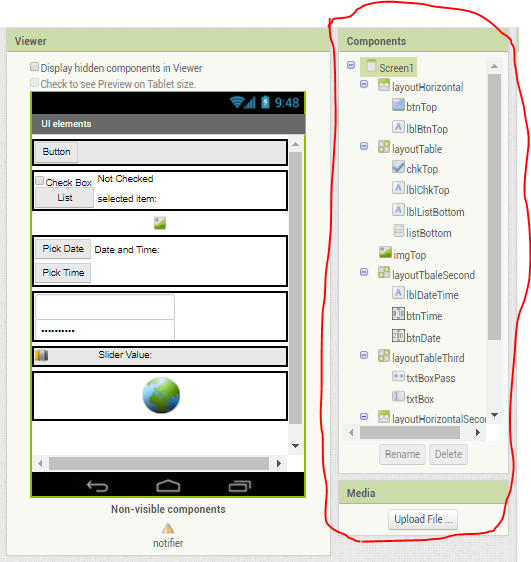
For now, take a look at viewer part of the screen and click each element to find out its name and type.
Lets move to Block section and start applying some functions to them:
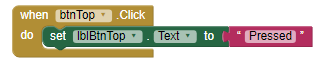
We will start with first horizontal layout. Click on btnTop and select event when btnTop.click. Then select lblBtnTop, which is the label that will display text, when button is clicked, and drag "set lblBtnTop.text to" and connect it to buttons event. We want to display text when button is clicked, so drag an emty string block from text blocks group and finish connection on "set lblTBtnTop.text".
We should have something like this:
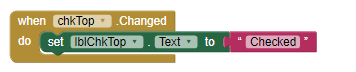
Let's proceed with layoutTable and select event from checkbox "when chkTop.changed". This action will listen to events that will change checkbox state (checked/unchecked). Connect it with label's property "set lblChkTop.text to" and apply another text block with text "checked".
Next element is an image element. We want to achive, that image will be loaded onto the screen, when the user opens our app. Because we are not using any button to display the picture, we will use event which is controlled by the screen itself. Move on top of the screen and select block group "Screen1". This is the first screen that loads when we open our app. "When Screen1.initialize" is the trigger, that will begin loading our picture. Click on "imgTop" element and select "set imgTop.picture to" and connect empty text block to it. Copy and paste
https://seeklogo.com/images/S/steemit-logo-C8ECB02BBF-seeklogo.com.pnginto text block. It will load the picture from url into our image element.

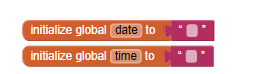
Other elements are date and time picker. Click and drag "when btnTime.afterTimeSet" and "when btnDate.afterDateSet" on the screen. We will join these two into one string and display it on the lblDateTime. To join 2 values into one, we need a variable. This is an empty value, that we can fill out or change later and always access it from different components. Click on block group variables and drag "initialize global name to". Change the name of the variable to "date" and connect it to an empty text block. Repeat the same and name it "time"
"When btnTime.AfterTimeSet" action will set out time part in variable. Select variable, drag block "set '' to" and connect both date and time events. You will find the dropdown menu on the variable to assign it to our date and time variables. Select coresponding variable for date and time pickers.
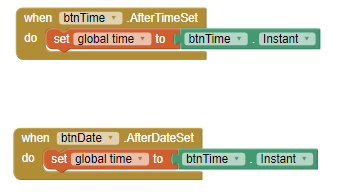
We need to finalize the variable block with value from date and time. Connect it with "btnTime.instant" and "btnDate.instant".
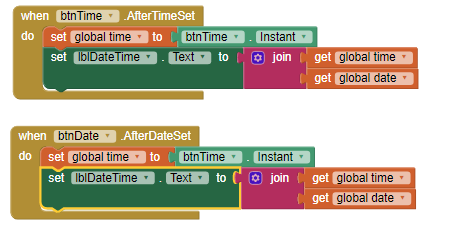
To display it on our label and refresh after any change, we will add one more block under date and time events. Drag "set lblDateTime.text to" on the screen and connect to both events. Make sure it is on the last position, because all blocks are being executed in order from first to last.
Becuse we are joining two strings into one, we will need block "join" that we can find in text group of blocks. Finish the connection with 2 blocks "get" from variable group.
We should have something like this
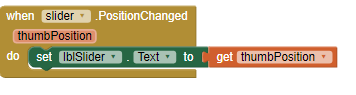
Last UI element that we will look into today is slider. This one is used to set the range value visually. Click on slider and drag event "when slider.PositionChanged". We will pair it with labels "set lblSlider.text" and sliders variable "get thumbPosition".
Now you can test it out in AI companion on your phone.
That is all for today's user interface elements, I hope it was smooth for you to follow. In the next part we will apply some logic into it and start getting to know basic loops and controllers.
I see that you active on Steemit! Now you have a new follower.
I'm waiting for your new posts.
Thank you. They will keep coming
I heard about app inventor it's based on Scratch programming language with an UI editor that, as you can say grandma can do an app, but I never test it. Have you publish an app made with it?
No, never published anything. I used it for fun when it came out. For production apps I am using cordova.
It is a great tool to learn programming logic or to quickly try out new app ideas because you can use sensors, nfc reader and so on.
Oh nice so, the algorithm is made by taking you places to choose from and select to continue. And at the end whole thing is ready.
That means codes are already written within individual selection and added together with your continue button.
Actually code is generated automatically with every block you drag to the screen. Each block has a "block of code" behind it. When you are done it gets compiled and apk file (android app installer) gets downloaded to your phone.
Thanks ,
we used to code every single thing, that is from scratch.
I did some programming in 1977 on FORTAN. Basic
Fortran? That is some time ago :)
Congratulations! This post has been upvoted from the communal account, @minnowsupport, by noperope from the Minnow Support Project. It's a witness project run by aggroed, ausbitbank, teamsteem, theprophet0, and someguy123. The goal is to help Steemit grow by supporting Minnows and creating a social network. Please find us in the Peace, Abundance, and Liberty Network (PALnet) Discord Channel. It's a completely public and open space to all members of the Steemit community who voluntarily choose to be there.
If you like what we're doing please upvote this comment so we can continue to build the community account that's supporting all members.