Bonjour à tous !
Hi everyone!
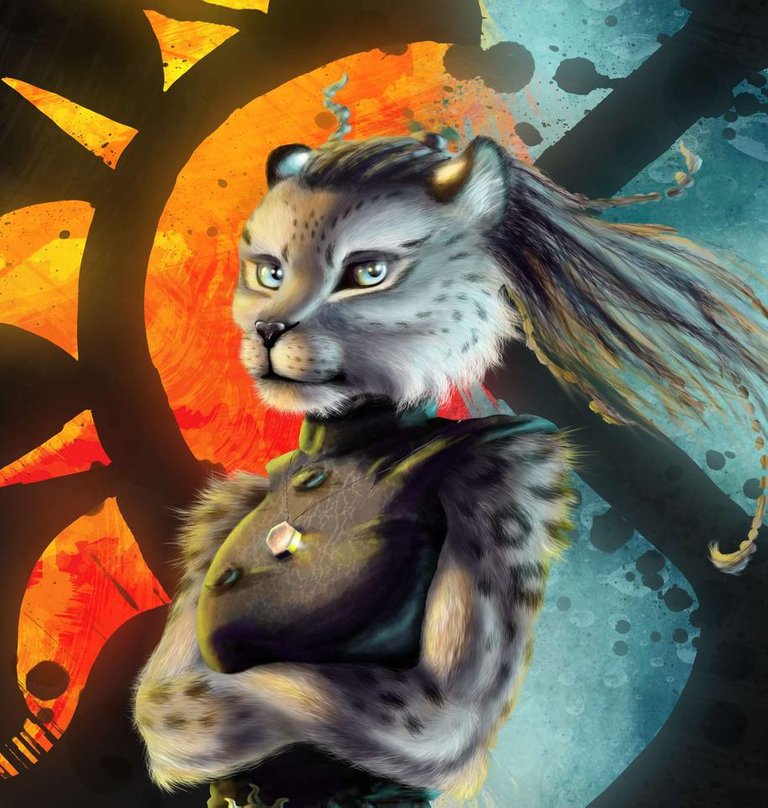
Pour démarrer cette nouvelle année sur un bon pied, Peluche s'est vu offrir un casse-noisettes géant. L'artefact, d'origine gobeline, a vite trouvé une toute autre utilité (comme la plupart des artefacts gobelins dans l'univers d'Ishural) : en effet, une fois positionné dans le bon sens, cela fait une super jambe artificielle ! Plus qu'une petite bénédiction de l'Impératrice, et voici notre jiitun renommée Peluche au Pied d'Or ^^.
Décortiquons maintenant le processus de colorisation de cette nouvelle illustration.
To get this New Year off to a good start, Plush has been offered a giant nutcracker. The artifact, of Gobeline origin, quickly found a completely different use (like most goblin artifacts in the Ishural universe): indeed, once positioned in the right direction, it makes a great artificial leg! One more little blessing from the Empress, and here is our jiitun renamed Peluche Golden Foot ^^.
Let's now take a look at the colorization process of this new illustration.

Process
Comme à l'ordinaire, je dessine à la main avant de passer sous l'ordinateur. Ici, je n'avais pas encore décidé si je faisais du remplissage de couleur ou de la peinture numérique, je suis donc allée jusqu'à la phase d'encrage à la main. Si j'avais pris la décision plus tôt de passer en peinture numérique, je me serai arrêtée à la phase crayonné, puisque ces tracés ne sont plus visibles en phase finale : ils me servent uniquement de guide.
As usual, I draw by hand before going under the computer. Here, I had not yet decided whether I was doing colour filling or digital painting, so I went to the hand inking phase. If I had made the decision earlier to switch to digital painting, I would have stopped at the pencil phase, since these traces are no longer visible in the final phase: they only serve as a guide.
Crayonné et encrage à la main / hand drawing and inking


Calques / Layers
Une fois l'encrage propre (un petit jeu de niveaux sous Photoshop si le scan n'est pas à mon goût), je prépare mes calques et mes groupes de calques.
On retrouve :
- des calques de zones
- des calques de couleurs, lumières et effets appliqués à ces calques zones
Once the inking is clean, I prepare my layers and layer groups.
We find:
- zone layers
- layers of colors, lights and effects applied to these zones layers
Voici leur organisation :
Here is their organization:

Ici les groupes "ouverts" pour voir l'intégralité de calques utilisés sur le dessin final :
Here the "open" groups to see all the layers used in the final drawing:


Brosses / Brushes
Avant tout chose, je me sens obligée de vous parler des brosses.
Découvrir les brosses sous Photoshop a été ma seconde grande révélation après avoir découvert les calques, pour vous dire à quel point cela peut transcender l'utilisation de Photoshop.
First of all, I have to tell you about the brushes.
Discovering brushes in Photoshop was my second big revelation after discovering the layers, to tell you how much it can transcend the use of Photoshop.
Ces brosses servent tant à dessiner qu'à créer de formidables textures. Mes préférées vont aux effets grunge (logo, fond) que j'utilise pour "salir" l'image. Pour cette illustration en particulier, j'ai enfin testé les brosses de pelage (Fur pack part 1, Part 2, part 3).
Dans d'autres illus, j'utilise énormément le pack nature environnement qui est extrêmement complet.
Je porte donc une reconnaissance incommensurable à ces créateurs talentueux et généreux qui nous permettent d'utiliser gratuitement ces fabuleux outils !
These brushes are used both to draw and to create great textures. My favorites are the grunge effects (logo, background) that I use to "dirty" the image. For this particular illustration, I finally tested the fur brushes (Fur pack part 1, part 2, part 3).
In other illustrations, I use the nature environment pack which is extremely complete.So I am deeply grateful to these talented and generous creators who allow us to use these fabulous tools for free!
Chaque brosse peut être bidouillée manuellement dans la fenêtre "formes" pour obtenir l'effet désiré :
Each brush can be tweaked manually in the "shapes" window to obtain the desired effect:

L'usage de la palette graphique est recommandé pour avoir tous les effet de pression et d'inclinaison. Pour ma part j'utilise une Intuos M, mais toute bamboo à 40€ fait l'affaire. Pour un confort optimum, je recommande une tablette de taille équivalente à votre écran, en fonction de ce que permet votre budget.
The use of the graphic tablet is recommended to have all the pressure and tilt effects. For my part, I use an Intuos M, but any 40€ bamboo will do. For optimal comfort, I recommend a tablet of the same size as your screen, depending on what your budget allows.
Zonage / Zoning
D'ordinaire, j'utilise pour mon zonage la couleur presque définitive de mon dessin. Ici, j'ai décidé d'utiliser des teintes de gris pour me concentrer sur les masses plutôt que sur les teintes.


Rendu sans le brouillon :
Rendering without the draft:

Couleurs et effets / Colors and effects
Logo

Les couleurs sont appliquées avec plusieurs brosses grunge d'opacité variable, appliquées un peu au hasard pour donner un aspect torturé, déconstruit, qui correspond bien avec l'état d'esprit du personnage à ce moment de son histoire.
Les "trous", renforçant le côté blessé, abimé, de Peluche, sont réalisés grâce à un masque de fusion appliqué sur mon calque de zonage.
The colours are applied with several grunge brushes of variable opacity, applied a little at random to give a tortured, deconstructed aspect, which corresponds well with the character's state of mind at this moment in his story.
The "holes", reinforcing the injured, damaged side of Plush, are made using a fusion mask applied to my zoning layer.
Pelage et visage / Fur and face
Utilisant à outrance mes brosses de fourrure, je trace sur un calque les dessins naturels (taches, rayures, zones plus grises ou plus jaunâtres). J'utiliserai dans un second temps d'autres calques pour tous les jeux d'ombre et de lumière.
Using my fur brushes to excess, I draw on a layer the natural patterns (spots, stripes, grey or yellowish areas). I will then use other layers for all the shadow and light games.

Rapidement, je définis les yeux sur plusieurs calques (couleur de fond / ombrages / pupille / reflets...)
Quickly, I define the eyes on several layers (background color / shadows / pupil / reflections...)


Vêtements / Outfit
La tenue étant plutôt terne, je place quelques ombres générales mais ne m'attarde pas sur cette étape : les plis et les volumes seront traité directement par les jeux d'ombres et lumières.
The outfit being rather dull, I place some general shadows but do not dwell on this step: the folds and volumes will be treated directly by the play of shadows and lights.

Lumières / Lights
Je travaillerai avec mes deux sources de lumière : orangée en provenance du demi-soleil, et bleutée en provenance du demi-trèfle de pluie.
I work with my two light sources: orange from the half sun, and bluish from the half rain clover.


J'ajoute les accessoires :
I add the accessories:


Je replace mon logo pour le centrer sur la tête de mon personnage.
Pour ce faire, je travaille avec une copie du groupe "Logo", car il m'est déjà arrivé d’avoir des bugs avec les masques de fusion et l'outil déplacement. Ici pas de bug, ouf !
I put my logo back on to center it on my character's head.
To do this, I work with a copy of the "Logo" group, because I have already had bugs with the merger masks and the moving tool. No bugs here, wow!

Et après quelques menus réglages et reprises, je crée un halo lumineux autour de mon logo.
Dupliquer le groupe > Fusionner le groupe > Appliquer le filtre flou gaussien au calque ainsi créé > Placer ce calque tout en bas du groupe.
And after a few minor adjustments and reworkings, I create a luminous halo around my logo.
Duplicate the group > Merge the group > Apply the Gaussian blur filter to the layer thus created > Place this layer at the very bottom of the group.

FINAL


Merci à tous d'être passés par là ! Peluche et moi-même vous souhaitons une excellente année 2019, pleine de découvertes, de joies, de surprises et de belles rencontres.
J'espère avoir le temps de faire un petit crobard illustrant la partie où Peluche a acquis cette patte en or, mais il s'agissait d'un scénario tellement bordélique (avec une gobeline, forcément...) qu'il sera impossible de la résumer (et je n'ai pas du tout le temps de me lancer dans un strip). Advienne que pourra !
D'autres illustrations sont à venir, avec la publication du nouveau livre de Patricia Fanget dont j'ai réalisé la couverture.
à bientôt !
Thank you all for going through this! Peluche and I wish you an excellent 2019, full of discoveries, joys, surprises and beautiful encounters.
I hope I'll have time to make a little sketch showing the part where Peluche acquired this golden paw, but it was such a messy scenario (with a gobeline, of course...) that it will be impossible to summarize it (and I don't have time to start a strip at all). Come what may!
Other illustrations are to come, with the publication of Patricia Fanget's new book, the cover of which I designed.See you soon!
Oreille Pointue
Superbe travail qui mérite amplement son upvote à 100% !
Merci beaucoup !
Rendez-vous sur notre serveur Discord pour plus d'informationsCe post a été supporté par notre initiative de curation francophone @fr-stars.
Merci !
Hi oreille-pointue,
Visit curiesteem.com or join the Curie Discord community to learn more.
Thank you !
Very beautiful 💚
Thank you :) !
Wow! Un travail vraiment magnifique! Ça c'est du talent!!!
Merci beaucoup ^^ !
Hi there @oreille-pointue!
What a very detailed photoshop painting it was! And it very beautiful too!!
I had never tried painting in photoshop, i still have to learn so much on it. Atleast now with your post, i have learn new things. Thank you for showing us that especially you had posted some screenshots! It was understood more.
Keep inspiring the community.
Cheers! ❤
Posted using Partiko Android
Thank you very much :) !
Photoshop is a software that allows many things, I have been using it for almost ten years and yet I continue to learn new techniques or tricks regularly.
Glad to hear that this post has made you discover something.
See you soon!
Definitely photoshop is one of the best tool ever created. I am still wanting to learn more ways of editing and creating aryworks using the app. I was happy I had fall in love with it. ❤
Posted using Partiko Android
The overall stand portrays a powerful creature. The crossed arms make her look like someone who does not seem to care. The artificial leg made her all the more look fierce. It looks like she can throw a flying kick. 😃
But her face is very mild with that smile on her lips. I wonder if you intended that, or if you noticed at all that is the outcome of your art.
Or maybe it's just me? 😊
Hi!
Plush is a complex character, it is a character that I play in a role-playing game. Raised in a country that is not his own and that has made her a religious fanatic, she returns today on the traces of her childhood, where the mysteries rise... but not necessarily for the best!
So yes, she is a character with an unwavering will but who is based on a dogma that has been challenged, which makes her a "tough guy with a fragile heart".
Losing her leg wasn't planned at first, but she'll deal with it!
That sounds like an interesting story behind your artwork. Will you also be posting the story here?
a very impressive art work you understand that there is a lot of efford and time dedicated but at the end the final drawing is excellent with high quality details, congrats very well done
thank you very much!
About 10h for this one (with 1 or 2 hours more for the draft). I'm going faster than before, but it's still a big job.
thank you very much!
About 10h for this one (with 1 or 2 hours more for the draft). I'm going faster than before, but it's still a big job.
One of the best works in photoshop that I've seen in a while. What I like most and captivated my attention was the prosthesis of the leg. it is seen that he is someone very rude. I can see the effort you gave her. I loved it. Congratulations.
Thank you very much !
A really lovely picture, @oreille-pointue :D I love how detailed your step by step presentation is ! Easy to follow for any reader <3
The result is wonderful and well detailed ! Very well done !
Congratulations for curie, as well :)
Thank you very much ^^ !
¡Hola! ¡Es una impresionante obra de arte! Un gran trabajo en photoshop, con muy buenos detalles, gracias por el paso a paso, la cola casi se siente lo peludo quedo bellísima, cariños y besos @oreille-pointue.
¡Muchísimas gracias!
Me gustó mucho trabajar en los pelos. Todavía tengo mucho que aprender, pero para un primer intento estoy bastante contento de mí ^^ (no se si se dice asi, mi español está oxidado).
¡hasta pronto!
Gracias a ti por responder, se entiende perfectamente, un abrazo.
SALUDOS DESDE VENEZUELA
SALUTATIONS DU VENEZUELA
Greetings from Venezuela
¡Saludos desde Chambéry!
Waouh! Excellent travail!! Les détails et l'original du design sont incroyables !!
Merci beaucoup :) !
The Creative Crypto is all about art on the blockchain and learning from creatives like you. Looking forward to crossing paths again soon. Steem on!Hello @oreille-pointue, thank you for sharing this creative work! We just stopped by to say that you've been upvoted by the @creativecrypto magazine.
Thank you !